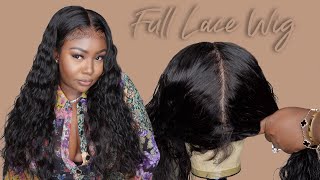
Full 13X6 Parting |More Lace Area?|Crimped Blunt Cut Afsisterwig
- Posted on 21 September, 2022
- Tape-In Hair Extensions
- By Anonymous
▼▼▼HAIR DETAILS & COUPON CODE▼▼▼
Wig in the video: https://bit.ly/3dgBnOI
Coupon Code: BEH to save money.
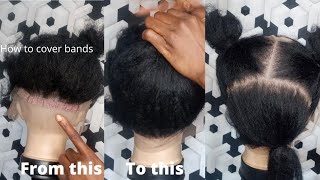
Melting Band ( no free gifts): https://bit.ly/39XeqyV
Swiss Lace Full Lace Wig Collection: https://bit.ly/3A7U00K
Delicate Hairline Skin Melt Wig Collection: https://bit.ly/2WQ7Hjy
Share looks on facebook, instagram , youtube and tag @ # afsisterwig, customers will get 15 dollar for next order.
The Skin Melt Wig is totally beginner-friendly, in the past three months, we have been making our best efforts to adding more density options, perfecting the plucking the hairline, adding the removable elastic band and optimizing the bleach technique to provide the perfect products.
INVISIBLE SWISS LACE: We upgrade our lace into Raschel net and bobbinet made of polyamide.The reason why we choose high-end swiss lace is that even with much higher price, it can be more invisible and undetectable especially when melting with glue. No matter what skin color you have, this skin melt lace will definitely match.
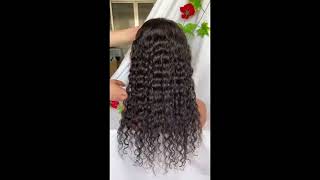
Hair length: 22"
Hair density: 150%
Cap size: Medium 22.5
Cap construction: 13x6 full frontal
Contact Us:
➞ website: https://afsisterwig.com/
➞Email: [email protected]
Follow US:
➞Instagram: afsisterwig
➞Youtube: https://goo.gl/fvBMPA
Welcome to My Channel
Be sure to SUBSCRIBE & TURN ON YOUR ALERTS
HAIR CHANNEL @iambeautifulhustlertv
——————————————————
MY PERSONAL YOUTUBE CHANNEL : @Life with ShaeTV
https://www.youtube.com/channel/UCB9xX...
——————————————————
Follow My Socials:
PERSONAL
@iambeautifulhustler
BUSINESS
Instagram:_Beautifulhustler
@thebhslay
@girlsniteoutapparel
Twitter:_Beautifulhustl
YouTube :IAmBeautifulHustlerTV
✨For Sponsorships ,Reviews,& Questions
Email:[email protected]
786-571-1313
To Purchase Hair & Products Www.ibhslays.com
Allow 3-14 Business Days For All Orders
#miamihairstylist,#miamihair,
#browardhair,#browardhairstylist, #Atlanta #atlantahair,#atlantahairstylist #reels, #explore #trending #tiktok #viral #miamimakeup #miamimua #miaminails
Foreign, hey Beauties and welcome back to. I am beautiful, Hustler TV. Today we are back with a new video and today's hair responsible by AF sister wigs now today I will be showing you guys a full parting space. 13X6 22 inch loose waist wig, but before we get into the wig here are the cute little goodies that come in your packaging, a melt band cap Combs Edge brush. You know the norm stocking caps out of that um, and here is the wig. Of course. Now most companies do tell you about their 13x6 wigs, but they're 13 by 6. Wigs are Never full parting space, and this is exactly what the AF sister loose wave wig will give you. It gives you that full parting space ear to ear, so you have free um a lot well, a lot of space to really style the wig. How you want to whether you want to do braids in the front deep side, part middle part, half up half down like literally whatever you want to do. You can have the full parting space range to create that look, but for today I will be doing a deep side. Part um, Bob crimped, Bob type of look so for starters, um. This wig already does come with the knots I already bleached in the hairline pre-plucked, but I did go in a little bit more and repluck the hairline, and now I'm just going ahead and taking my Foundation color and just applying it on the inside of my lace And on the top of the lace as well and just kind of pulling the wig down to see like you know, pretty much how it would kind of look onto my head and, of course going in with my lace, Med adhesive. I will be applying three layers of my glue to lay down my wig, but before we even get started, I'm just going to hot comb, the hairline back, just to make sure there are no hairs in the way when applying my glue to the hairline. And actually you know placing it down, but nevertheless, let's go ahead and begin with the layers and let's get this melt started. Do you know so now I'm done applying my layers, I'm going to go ahead and begin to place the wig down into place and then I'm just going to take the comb and just kind of Comb it in to secure it down. So I'm going to place the wig comb, it back place the wig comb, it back place the wig and comb it back, and this is Swiss laser by the way guys. But the Swiss lace is definitely giving me HD Vibes. I might even lie to you like it really does melt in with the skin perfectly fine from. As you can see. When I added that Foundation, you can tell that it was going to blend so nevertheless, I'm just combing that lace, one back and I'm going to hot comb that lace back as well and blow dry it on the heat setting as well and, of course, y'all know What comes after that, after putting the place the lace into place and securing it, of course we're going to go on with that melt belt, secure it down for about five to ten minutes and then come back and remove it foreign. So now it's time to go in with that melt, belt and begin to resolve the lace and I'm not gon na lie y'all I could have sworn I had picked up a brand new fresh razor, but this razor was definitely not giving fresh sprays at all like It was super hard to cut through which I was really confused about, so it didn't give me the cut that I needed it to give me. So I really had to like force the razor through the lace and it has nothing to do with delays. It'S everything to do with the razor. It was not as fresh as I thought it was so that really irritated me, because you know fresh razor and cutting off the extra lace. Um really gives you like that nice natural, Blended look, but I had to literally go in with scissors and like still cut off a lot of lace but um. Nevertheless, I still you know tried to make it work as best as possible, but um once I finish. Raising off I'm gon na go ahead and pull down the section for my baby hairs, cut and style them off camera, and then we would get into The Styling process. Foreign foreign ERS on each side, just like are near the temple area in The Sovereign area. As I normally do and I'm just going to plant those out the way and like I mentioned, I will go ahead and cut and style my baby hairs off camera and then I will go in and you know doing my deep side, part and, like I mentioned Guys with this full 13x6, you can literally make the part as deep as you want to make it. Some wigs only have six parting six inch potting space in the middle and then there's no potting space on the side, but not with the AF system, which you when I say you literally get your full 13 by six inner ear. Like you really get to make. You a deep side part and you can make your part go all the way around the back. If you really want a deep curved part as well like. This is why I love full parting space wigs and I always encourage you guys to get 13 by six weeks, because the more parting space, the better, the more creativity and versatility with your styling foreign foreign foreign, just taking my olive oil spray holding spray and I'm Just going to spray that on a hairline and just comb that back and then of course take the Melt belt and tie that down again and like I mentioned, I will do those baby hairs off camera so um once I do that, I will get into The Styling part, and what made me decide to do a crimp Bob today is just simply because I love the loose wave powder and it kind of reminded me of crimps, but I wanted my curls to be a little more. I, like organized, so that's why I decided to go with the um the side part crims. Now, as you can see, I do have me a deep side, part which I love Deep Side Parts literally all my favorite um, but right now, I'm just taking a little Foundation, applying it on the lace and I'm just going to tie that lace down as I Do my crimped Bob just to really melt that into the skin, so um, I'm tying that melt belt, and this will be the third time with this install like I mentioned y'all, I'm tying this down specifically for the baby hairs to be super melted, but as you Can see as I'm curving my part, how deep back my parting space goes, and this is one of the benefits of the 13x6, and I know I keep saying that. But I'm literally trying to program that in your brain, like more parting space, more like versatility to recruit, you know really create your Styles and even as I'm just going in with the wax thick and my hot comb to um. You know flatten this other side of my hair, while you can just see how deep it Parts back as I'm you know hot combing and smoothing down every section, and I'm just want to just simply so I can have a nice flat and you know Sleek, look On this side as well because um, if not, it would look very puffy and humpy - and you know sometimes a hump here and there is depending on the look it can work but um with my side Parts. I just really prefer them to be a little sleek and if I do want to add a little volume, I would simply do it to the front, but not the whole entire top of my head. So I'm just going in with that hot comb in that wax. Stick and just sleeking that down really good, then I would go in with my crimper and begin to grab pieces and begin to crimp, the hair foreign foreign. Thank you and I'm just going to continue to grab pieces and cram grab pieces and crimp and once I feel like I have enough enough pieces crumb, I will go ahead and proceed to the other side and honestly because this is loose wave hair. It kind of Blends, like even the price I did not crimp, is still Blended in really nicely so um. Once I'm finished, crimping up everything that I need to, then I will go ahead and you know take my scissors and make it more blunt. Foreign foreign, foreign, foreign foreign, just smoothing, smoothing, smoothing and blending everything I like my crimp to kind of float in the same pattern and I'm just going to go ahead and remove that melt belt that I had um, squeezing my brain and my lace together. So um, once I go ahead and remove that melt belt, then I would kind of like Smooth everything how I wanted to once again finger combing, because y'all know I like my crimps to just go with the flow. I don't really like them too um crispy um. I, like my crimps, nice and soft, so I don't really add any holding sprays to it. But if you do, you know whatever floats your boats, whatever gives you that look that you're going for, but I like to keep mine pretty soft and easy to just run. My fingers through and blow in all of that so now I'm gon na go in with the scissors and begin to blunt cut this hair up, and this is a 22 inch but and I don't really feel like I cut off much honestly, I don't know I Mean it nevertheless, I'm just gon na go in and make this a really nice blunt cut, um slightly Asian, asymmetrical and heavy on the slightly because it really does look pretty much even all around, but just slightly asymmetrical, where I make the other side like a little Longer and I'm just going and grabbing and cutting going and grabbing and cutting going and grabbing and cutting, and I'm just filling for the back. I always pull my back towards my side and then cut it like at an angle a little bit that way it can blend as far as the length with the rest of the hair. But this is what it's looking like still have to go, and you know conceal my part up a little bit and add a little found, whether that's the same that Foundation into the part, and just you know, kind of clean it up a little bit make it More vibrant and I'm gon na pull a little um put a little of more holding spray towards the top just to smooth any flyaways and freezy little hairs um. You know whatever and y'all was recording tutorial at two like almost three in the morning. So that's why I don't have to beat face today, but um. The finishing look will have a little slight little bead um and that's when I was getting ready to go to brunch the next day. So yes, why am I up recording content this time of night? I don't know because my energy don't even be fully up at this time of night, but you know I just be trying to you know: drop some videos or whatever, but you know. Nevertheless, let me know what you guys think down below. After I finish sleeping and staying up and adding a little concerning to my part, I would drop the finishing look but um overall, I hope you guys did enjoy this video once again. This hair is from AF sister, wigs, okay and um. Their wigs are always bomb. Always beginner friendly always come to bleach Notch, pre-plus hairline and that's what we love about their wigs and I also have another video coming with one another one of their wigs, which will be a full lace. Wig so make sure you guys tune into that video as well, once again, AF sister, wigs um description. Details will be down below on where you can purchase this full 13x6 parting space, wig, okay, but nevertheless, Beauty, stay tuned for the finished. Look and see you guys on the next video foreign

Comments
Sam Willis: I loveeee this look! It’s giving grown & sexii & this is what you call a lace FRONTAL full 13x6
Duranna Richards: Always a perfect installation ❤
1Glamrys1: Just and Beautiful as heck Ms Lady!!!!
Kimberly Smith: Yes y’all get ready for another slay
David golv: Sometimes when things is falling apart, they may actually be falling into place...so don't bother much...for nature knows better than you ❤️
Queen Leo: Very pretty per usual Queen! Nice bottle collection in the background as well! LOL
༼༗ Brian Lynn ༗༽: Beautiful hair
Pretty Kimmy: Really cute what brand crimps do you use ❤
Princess Toyia: Gorgeous Shae!!! ❤❤❤❤❤
Keisha J: Okay now, I see u that Tik Tok in the video was giving what it was supposed to give. Sooooo pretty ❤ (no homo lol) slaying like always
Sammy Da Goat: Bomb Hair
Nisha Trecale: Hey What Was The Name Of The Song You Was Playing In Your Video At The End With The Finished Look ???
Edna Williams:
Queenizzygetbusy: ❤
Nancy Dewitt: That's alot of hair , it's ok
Lucas Lima: Hello There