How To Round Brush Our Raw Indian Hair Extensions For The Perfect Look!
- Posted on 14 November, 2020
- Tape-In Hair Extensions
- By Anonymous
Want to pop the curls and make your hair turn heads? Check out our round brushing techniques with Dallas!
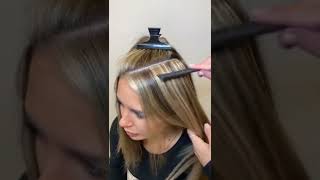
In this video we Vicky was wearing our Raw Indian Hair extensions with a leave out (no closure or frontal). Learn how to properly style your hair extensions from a professional.
----------------------
Website:
https://www.PrivateLabelExtensions.com...
Instagram:
https://www.instagram.com/privatelabel...
MB01BPMB2URUZ62
Hi guys i'm dallas, christopher and today i have a special guest here with me. She is the makeup artist of the stars, baby factory. It'S a makeup makeup, artistry brand um. I'Ve been doing makeup for over 10 years. Let'S just get into it and i'm going to do a couple of things here, i'm going to probably blow dry a little bit of it because you guys know i like to round brush my extensions as well, and then i'm going to do a little bit of Wanding and maybe a little bit of you know some smoothing out because she is a natural girl, okay, she's, very natural and this indian raw matches so good with her texture, so guys just sharing with you. This is a sew-in. She has a leave-out, that's here. So if you guys can see the sew-in comes up to a parietal ridge, that's almost white at the top of her head. That'S here, leaving out everything, that's in the mohawk, and so it looks really really good. She does have her area, which is in the front kind of left out as well, so her perimeter is left out just to give her a more natural look. And, of course, these are the bundles, and this is what three bundles that you did or how many bundles four, so i'm just gon na take and just hit with the round brush in this area here, but before i hit it, i'm gon na take a little Bit of this top invisible coat of kenra, just gon na tap, tap tap and i'm going to take my extra large round brush and i'm just going to pop in here and do a few pieces of round brushing just to give me my body that i'm looking For again, just really not going in to do a whole lot of straightening. I just want to give it a little bit more air volume and body into the hair. I'M also kind of sealing those cuticles on that hair as well. You should never do this with your brush; it is made to blow over and around the brush. That'S when you're going to get your best results, anything that lives in a nape, i'm not going to do a whole bunch of pulling and round brushing in that area. Why is because it's not really going to give me the movement that i'm looking for again just closing that cuticle down a little bit more addressing that frizz, i'm telling you once you get your customer extensions, it's a whole nother world. As you see, i'm almost done. I have about two more sections, my last section of the extension that i'm addressing so again. I just wanted to see that movement that was going in there. Now i've moved on to blow drying, vicky's hair and that round brush again still giving me that airiness that i'm looking for now, because i am proficient in this - i'm able to take a lot more hair and lift up in my round brush and control it. If you can't control it, take smaller sections so now i've given her that airy lift and now i can style her any way. I'D like to at this point so for the top area, which is in her mohawk, i'm just going to isolate this for a moment. I'M actually taking my fingers and allowing my fingers to pull and close the cuticle for me to help seal that cuticle for me down, and then i take my iron and go over it so guys. We have now pulled out the wand and i'm just literally taking strands of her hair and just winding them around this, to give that texture that i'm looking for right - and this looks so good when you finish it. But it also looks even better a couple of days later when they start to loosen up i'm going to turn her around just a little bit just so you can catch that side. Look that's there! So you don't look and see it in the dark. Here. Is that nape area that i told you i wasn't really concerned about as far as getting that movement? That'S there, because it's sitting right here in the nape and i'm gon na turn her around and let you see how i just addressed everything from here down. So i left that alone. I'M really focused there. The real purpose of you, curling, someone's hair, is you curl the top and you curl the bottom? Why all of this is going to fall under the top, and the bottom is going to stick out still taking some small sections, but addressing that mid chat to the ends? So as i climb up higher, i bring my curls from being here. That'S focused more on the end to going to mid to getting a little closer where i'm going to that root area that base. If you grab larger sections, it's going to be a bigger wave. If you grab smaller sections, it's going to be a smaller way. I like to pick up variations of sizes, because i want it to look a little bit more organic, like it's just natural, and this is probably that last section before i get to the surface section, i'm going to just pin this over to the side and as I focus on this i'm going to get a little closer, so i'm going to take a thicker position. That'S here it's going to give me a little bit more of a wave and then i'm going to take a smaller section right next to it, something that's a little smaller. This gives me a little tighter curl, so i have one more row before i'm finished. The back, the only thing that we'll have left now will be the side. I have a few more pieces just to add here and then we're going to do some finishing touches on her whenever you're doing a leave out. Some of the areas that you want to take in consideration are some of these areas up here. These are some of the weak areas. These are around the hairline so around the hairline, the weak areas. If it is not enough hair, that's there, you may not be able to do the wand, because here there's one piece here: i didn't have enough room to really do that. One! That'S right there, because i need it just about here. You want to just slightly bend that just a little bit here so that can fall there. This side is much longer. That'S the side. I was able to do it with, but this side i'm not able to do it with without taking anything out without running my fingers through it. This is just the finished product that you're going to look at all right. This is giving her that wonderful texture, wonderful wave, very organic instead of using a hairspray, i like to use a hot after press, it's going to help me get my look that i need without giving a harsh kind of more drying agent to it. I'Ve already added my heat protectant, that's in there, but if i'm going to do a finishing, i will reach for this when i'm dealing with hair, that's been colored or lifted or highlighted, or a high lift after a couple of days with this look, this look will Loosen up and just give her more of a beach wavy kind of look um, her first look. What she's going with today is giving her more of that that glam look it's going to give you multiple uses so enjoy this look first, and you are glam hollywood. You'Re getting ready to roll out on the red carpet and we are done guys. This is our finished look. She has not seeing the finished look on this, so i'm going to allow her to see the finished look, but as you guys looking at and i'm looking from the top of the head, i need to walk around and look at the front of here so hold On for a second, as i look at the front of her head, yeah, oh okay, okay, she cute she cute and i have not put any edge control on her whatsoever. She cute she cute, though, come on, come on and give me love. That'S what i'm talking about come on and give me love yes get in there and give me all natural, good, old, very, very elegant, glam, glam girl, look boom and bam. Thank you guys for joining us victoria. Thank you so much vicky for joining us check out her makeup work baby. She is a beast. Okay, i love working with her beating faces honey they be beat out, fulfilled all right, bye, guys. Thank you. Bye,
Comments
missgoFIGURES: Here for it‼️