How To Apply Your Own Tape In Hair Extensions | Beginner Friendly!
- Posted on 24 May, 2021
- Tape-In Hair Extensions
- By Anonymous
In this video I'll walk you through step by step how to apply your own tape in hair extension at home. I think tape in hair extensions are one of the easiest hair extension methods to do yourself so might as well save some money with a little DIY! I'll go over all my tips and tricks and everything you need to know from how much hair to buy to application placement. In this tutorial I'll also show you how I blend in the tape in hair extensions on my short hair.
PRODUCTS MENTIONED:
West Label Hair Extensions - https://bit.ly/2TiSdTv
Use code JANNA for 15% off
The hair I used in the video:
1 pack (100g) of #3 Espresso in 20"
1 pack (100g) of #4 Caviar in 20"
WATCH NEXT:
-What are Tape in Hair Extensions? https://youtu.be/LfR65tNFx4Q
-How to Buy Tape in Hair Extensions? https://youtu.be/d3R0qo9-l2M
-How to Wash your Hair with Tape in Hair Extensions https://youtu.be/GknOIsPbk3c
Follow me on Instagram:
(@janna_niki)
Don't forget to subscribe ;)
Business email: [email protected]
Timestamps
0:00 Intro
0:38 What hair am I using?
3:27 How much hair do you need?
6:49 Application and placement tips.
9:26 The application process!
This video is sponsored by West Label, all opinions are my own. Some links above are affiliate links which means I earn a small commission when you shop through my link, this is at no additional cost to you. Thank you so much for shopping through my links, it helps to support my channel.
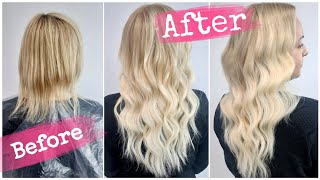
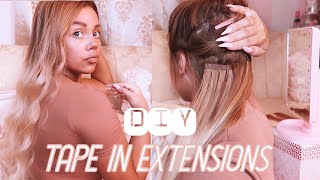
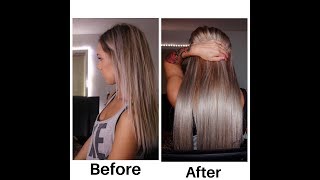
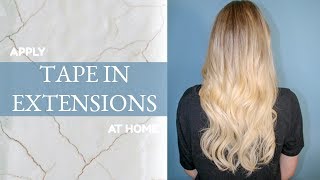
Hey what is up you guys welcome back to my channel or welcome if you're new here so today i have a very exciting video for us, i'm going to be showing you how to do your own tape and hair extensions at home. So if you've never done this before, don't worry tape, ins are probably one of the easiest hair extension methods to do on yourself. Besides, like clip-ins or something like that, tape-ins are super easy and this video is going to be very beginner friendly. So if you've never done this before i'm going to walk you through everything like step by step placement, all my tips and tricks, it's gon na, be it's gon na, be a good one. So if you wan na see how i do that, then keep on watching. Okay, so the hair i'm gon na be using today is this hair here look at this, so this is from west label hair, so big shout out to west label for partnering with me on today's video. So if you don't know about them, they're a new up-and-coming hair extension company, so the owner tessa, is canadian. So love that, like love, supporting canadian female entrepreneurs and the story behind the brand is she's been wearing hair extensions for years and years, and you and i know, like hair extensions - can be kind of hit or miss. So she really wanted to create a brand. That'S like focused on quality, so you can see how amazing these look just like right out the box super silky and thick from root to tip and they're all cuticle, aligned and ethically sourced. So all the donors are paid fairly and it's just like overall amazing hair and an amazing brand and look they come in this little tube. This like rose gold tube, which i thought is super cute, so the colors that i have i have two colors. So i have this one here: the darker one is espresso and then this one over here is caviar and i have one pack of each. So each pack comes with 100 grams of hair, so 50 grams 50 grams 100 grams. So this is the espresso and then i also have the caviar here as well, which i'll show you looks like that and i actually washed one like half of each pack, so you guys can kind of see the difference of what it looks like. So this is fresh out of the box this one here and then this one over here has been washed once so. The quality is still there, still super soft and beautiful, and i washed them just to like show you, because sometimes, if they're, not cuticle, aligned, hair and the cuticles, if you don't know like the cuticles on your hair, are kind of like the scales on a fish. So, if they're all aligned in the same direction, the hair is like super silky. It'S flowing everything's good, but if one some like or some of the strands of hair are upside down and the cuticles rub against each other, that's how you get crazy, matting and tangling and stuff like that. So you can always tell because i've like tried these other hair extensions. Before and after i washed them, they matted up like right away. I was like ugh yeah. This is why you like don't cheap out on hair extensions. I am super excited to be working with them. I think you guys are really gon na love their hair. I have a coupon code which i'll leave the information on the screen and everything in the description box as well. So if you want to check them out, look there all right. So how many packs do you need how many pieces? That'S always the question so just for reference. This is 50 grams of hair and the packs at west label come in packs of 100 grams. Like this, so that's what that looks like against my head, so 100 grams would be good if you already have like longer hair, and you just want to add a little bit of volume and a little bit of length. One pack of these would be perfect for you just to add like a little something something, but if you have short hair like me, then definitely get at least two packs. So that's what this looks like against my head. So this would be the perfect amount for me just because i do have short hair and a blunt cut. So you do need a little bit more hair just to like blend out that cut. So i'm going to be placing the hair extensions up pretty high. On my head just to again blend this out, but i'll show you how i do that later on so yeah i mean i'm pretty excited to get started, so i'm gon na release these bad boys and let's get into it all right. So now that you have your hair, it is time to prepare for the application process. So what you're going to do is you're going to wash your hair with clarifying shampoo, no conditioner, no leave-in conditioner, no other hair products, just wash your hair with shampoo. This is the one that i use, so i recommend this one, but you can use any clarifying shampoo that you like, and that just kind of strips your hair of all the oils or any other hair products or that might get in the way of the adhesive From sticking to your hair, so you really just want to have like clean hair ready to work with. I do recommend blow drying your hair and flat ironing your hair as well. So the texture kind of matches, the hair, extensions and it'll just make it easier to work with, and as far as your hair extensions go, you don't have to wash them before you use them. I actually recommend that you don't they're going to be easier to use. Just like straight from the pack and for the hair, i just have it laying on the table in front of me just like this and just a quick little tip. So once you get started and you want to pick up a piece of hair grab it from the end, that has the tape and then pull downwards like this, and that's just going to be a lot easier for you to pick up versus. If you pick it up like this and go up this way, the hair might start to like catch on each other and it'll just kind of create a mess so just to keep everything like neat and orderly pick up a piece move down like that and for Tools what you're going to need are a hair brush, of course, a comb for sectioning like this and then some hair clips as well. I recommend these kind of clips, like the crocodile clips, they're really good for sectioning and holding your hair, but i also have like a bunch of clips here. So whatever you have is good just to like section out your hair, and i also recommend, if you're going to be doing this, if you can have a mirror in front of you and then set up a mirror behind you. So you can see the back of your head. The way i'm gon na do it right now is i'm gon na, like use my camera monitor to see the back of my head, so whatever i'm filming, i'm gon na see that, but if you're doing this at home, what i used to do is just like Get a full length mirror and adjust it, so you guys know what i'm talking about all right. So now we are gon na get started with the application process. So the way i'm gon na show you today is again very beginner friendly, very easy. I'M just going to show you like a straight across rows, similar to how you would put in clip and hair extensions. You just like add one row put down some hair, add another row and keep going straight across. I'M not gon na do any like crazy placements. Today, once you get the hang of this, since you are with tape and hair extensions, you remove them every six to eight weeks to put them back in if you want to keep wearing them longer and once you kind of get the hang of it, you're going To be a pro, and you can try like different kinds of placements, so the way i'm going to show you today is like straight across rows like this, but once you get the hang of it, you can try like the u-shape application, where it's kind of like U-Shaped sections and it does kind of blend a little nicer, and if your hair extensions are at an angle like this, and you want to put up your hair in a ponytail, it becomes much easier because they kind of lay that way. But i'm just going to do the straight across rose today, because it's honestly it's easier when you're doing it on yourself and again, if you're doing this for the first time, it's way easier than like worrying about any other different shapes or placements, or anything like that. But again, once you get the hang of it, you can also try the bricklaying placement too, where, if you have two pieces side by side like this on a row, then the next row on top. You would put this piece so it covers, like the middle of these two pieces, just for like blending purposes again, i'm not worried about that. I'M i'm just gon na put them in girl, but one more tip if you do have more than one color since i have a lighter color and a darker color, you can actually use one of each color in the same sandwich. So if you want to have like the light one on top it'll, give you a little bit more of a highlighted, look and if you want to have the darker one on top it'll, give you a little bit more of a low-lighted look. So you can really play around with the colors and like make it your own. You can! Actually, if you don't have highlights, you can give yourself highlights with tape ends, and you can really play with your color. It'S actually pretty fun. You can give yourself an ombre effect if you don't have that so yeah extensions are really great, like that. I don't have any particular color placement in mind, i'm going to just kind of like wing it and like put them wherever i feel like looks good in the moment and yeah. That'S the great thing about tayden's too. You can always like just take them out and do it again if you really wanted to, if you like, don't like how you did it all right, so, let's get started, i'm gon na turn around and show you how i do it. Okay, so for my first section you want to leave enough hair so that if you did want to put your hair up into a ponytail, it would cover the tapes. So i recommend about like two fingers with that's about maybe an inch or so maybe do a little bit less something like that, and then you also want to make sure that you have hair left around the perimeter as well. So you don't want to bring the tape all the way to the edge, because then you know you might see it so make sure you have like, maybe about like a finger width of hair on the the perimeter as well. So i'll show you what that looks. Like all right, so this is what my first section looks like, so i'm going to go ahead and apply the tape so just grab a little tape, take off the backing and then i'm going to start in the middle. So what i do is, i take the tape and then you want to apply it not like right at your scalp but just kind of right under the parting, and i like to put the tape on top and i'll explain why, in a second but yeah, you Want to make sure you don't put it right at the root, because you want enough movement like this. So if you can move the tape up and down like this, then you did good. If you can't really move it, then you might have, you know, put it a little too high, so i'm just going to place that one in the middle and then place two on the sides as well, so i'm gon na apply one right next to it. You don't want them to touch like right next to each other. Like this, you do wan na have a little bit of space in between, so you don't want them like rubbing right next to each other. So that's my next one and then you can see. I have enough hair left on the side as well, so i'm gon na apply one more on this side, just like that, all right. So now this is the fun part, so i like to do it. This is like the method that i like to use where you put the tape on top of your section and then lift this up and then apply the bottom tape. I can show you the other way in the next row, where you put the bottom one. First and then the top one - but i think this way is a lot easier, so you just press this on and make sure that it grabs enough hair for your sandwich. So when you lift this up, you can see that it picked up like this much hair, which is perfect, but if it doesn't pick up enough hair, you just want to make sure that you really stick it so that you pick up enough hair. If you don't have enough hair in between your sandwiches, then that's where you can, you can get breakage. If you know, there's not enough hair to support the extension, then your hair might rip off. So, that's why this is really important to make sure that you have enough hair in between your sandwich, and you also don't want to have too much hair where the two pieces of adhesive don't meet. So i like this way because it kind of picks up just the right amount of hair, but you do obviously want to just have an eye out just to make sure that you have a good amount. But this way i feel like it does pick up enough. Hair and if you can still see or feel the adhesive through the hair, then you have a good amount that you can meet the next piece. So what i'm going to do now is i'm just going to clip these up all right, then you just want to grab the other half of your sandwich and apply it to the underside, and you do want to make sure that you kind of take your time With this, so you don't have like random hairs caught in your sandwich that aren't supposed to be there so really just like move out any hairs that are not supposed to be there and make sure that you make a clean application. So what i'm going to do is just kind of line it up like that and then boom stick the sandwich together. You can see i kind of missed right there. Honestly, that's fine, but really do try your best to line it up exactly and then you just want to push them together, like that all right so find the tape line up the edge like that and meet them together, so that one was a way better. So yeah you'll definitely get the hang of it like. Maybe your first one might be weird like mine was and then you'll get the hang of it right away and then just push them together and then line it up all right. So that is the first row there. So then, i'm just going to section out the hair for the next row. So what you want to do is you do want to have like a little bit of hair in between each row, so that the extensions aren't laying right on top of each other, and it will help with the blend. If you have some of your hair in between each row so or in between each section, so that's going to be kind of like the hair in between and then i'm going to section out a little bit more hair for the extensions and i'll just quickly show You, if you want to do the lower part of the sandwich first before the top part, what that looks like so what you would do is you would section out the hairs that you want to apply the tape to so you want it to be, like the Width of the extension, so something like that hold on it's too much hair. So something like that and then you would grab your extension and place it under. So the sticky side is up and then apply the hairs to it like that, and then you would stick the top piece on, so you would just line it up like this and then press them together. So it's kind of up to you. It'S really preference. This way is the way that i used to do it, and then i learned that you could stick the top piece on first and personally, i find that to be easier and quicker to do. But if you like this method, you can also do it. It'S this way is a bit easier if you want to control how much hair goes in between the sandwich, but i don't know, i feel like the other way is just like quicker and easier. So i like doing the top piece first, but that's what that looks. Like and see what i mean, if you want to do like the bricklaying method, where you, where you get the piece and then you stagger them so that you know you won't get these gaps. But honestly, don't even worry about it because, like once, i keep going it'll just like fill itself in, so i'm just gon na keep going with this section. So i'm gon na do i'm gon na continue on with the over method. Since i like that one better. So i'm just gon na stick the next piece right next to it, but leave like a tiny space just like that press on the hair. So it grabs the right amount of hair and then and then i'm gon na clip that up and then we can apply the bottom piece and you might run into something like this, where you almost have enough room to put a whole piece of tape. But not quite what you can actually do is you can cut these in half, so you just give it like a little snip snip and then you can apply a half piece there. So that's a really good hack, especially around the edges or like around your face. Just put like a little half piece in and that will help with the blend and another thing to keep in mind. If you wear glasses, just be careful about putting the tapes like right behind your ear because it might catch on when you put on your glasses. So i'm just gon na put a podcast on and get in the flow with this, and let you watch me because it's pretty repetitive, let's just do what you want to - please don't be polite cause. I like your attitude. Let'S forget about a curfew cause all that is stuck in my head. It'S me: let's just let our bodies be true: foreign, okay, hey hey, so i just took a break from doing the back of my head to focus on the front, because i really want to make sure that i have enough pieces to blend out this front part. So i'm and then with whatever i have left, i'm just going to move it up on the back as well. So this is what i have so far so she's looking cute. Look at that and look at that so yeah. I just need to blend out this front part here, so everything looks pretty seamless, so i'm just gon na kind of do the same thing section by section and start putting some face framing layers girl. I feel like it's been hours, but i'm finally done so. This is what it looks like. Oh my gosh look at this hair. I love. I love it. I love it. I love it so yeah when it comes to blending short hair. You really have to end up putting the extensions pretty high like i went up like pretty much all the way, almost up to my part, just because my hair is so blunt and short. But if you don't have super short hair, then you really don't have to go that high. You can probably end like around your temple level. It really depends on the length of your hair and how thick your hair is. Like i said before, you do have to wait. I think, like 24 to 48 hours before you can wash your hair honestly when i have tapens in i wash my hair like once a week, so i'm probably gon na wait like a whole week before i wash my hair, and i do have two other videos About how i wash my hair with tape and hair extension, so if you want to see that then i'll link those down below - and i am going to make some other videos on like how to take care of them, how to style them. So let me know if you guys have any questions about like what you want to see in the comments down below and i'll make some other videos for you. I hope you found this video informative and if you are going to do your own tape and hair extensions, send me a dm on instagram because, like i want to see them, because that would be really awesome but yeah. I hope you found this video helpful. I'M going to stop talking because i feel like it's been so long and i'll see you guys in my next video thanks for watching bye. You
Comments
Kelly van Diessen: Great video! I will use this when my hair grows back later ( now bald because of chemo). I am very curious about the video's how to take care of them :D It looks beautiful!
T S: This is Seriously the most informative video on tape-ins ever! It's the BEST!
Melissa Freeman: How’s the back look with it all behind you? That’s my biggest giveaway when it comes to extensions.
Alisa Pellegrino: I have watched tons of videos on tape ins and by far this was the best!! I am looking to fill my thinning hair , but still afraid to try it myself. I need more confidence in myself...keep sending videos because you are the best!!
Rosie Bell Peacock: Thank you, thank you, thank you Janna. I'm about to add my extensions for the very first time and I wasn't really very confident about getting it exactly right, you make it look so easy and with detailed instructions too. The only bit I'm not too sure of is how do you blend the last top part of your hair, obviously that will be my own hair, which is short so I'm hoping it blends well and dusn't look stupid. Maybe another video for this???
Elizabeth: This was so helpful!! You had the perfect amount of information that’s been a little hard to find. Do you have other vids on placements?
lulu V: I wore tape in hair extensions for 8 years. Lucky for me I have very thick strong hair. LADIES if you have thin hair AVOID AVOID AVOID. You will 100% get traction alopecia after prolonged wear, it means the extensions will pull on the hair, weaken your hair follicle until it dies. If you MUST wear them rotate one month the upper head and the other month the lower part of your head. Also do microneedling for your scalp to keep the follicle alive. Add in strong scalp massage /flipped head once a week for 10 min and take hair supplements. I just took my extensions off and I am grateful I still have a lot of hair but others with thin hair are struggling with very little hair left. Good luck to everyone.
sabrina lbr: soooooo helpful! i‘m so afraid of doing it by myself but when you just go everytime to a saloon i would be totally broken if i have enough confidence to try it again i hope i will do such a great job like you ♥️
Tracey Mello: Thank you so much for the video! I was wondering... Did the extension come with the tape? And also what kind of tape do you use or recommend?
NauticaLashelle: I can’t begin to explain how good of a video this is! Completely easy to understand and very detailed.
Salmon FloatingUpstream: Imagine growing your hair naturally that long and then having to sell it :( not trying to be a Debbie downer lol I literally bought zala tape ins last night, those people that donated their hair are amazing
TL Burris: How does this video not have a million hits?! One of the best I've ever seen. GREAT JOB (AGAIN) Janna!
Broken island Design: Super helpful and easy to follow video, trying this today with this as my reference, thank you!
Tifawylder Red: About to go in on these hair extensions thank you so much !
UMR UMR: Very nice step-by-step; after installing my tape-ins, I flatiron each sandwich approx. 2-3 seconds to ensure adhesion.
De La Rosa Janna: Very informative thx for the video… I’m considering doing it for some length I have a bunch of hair on my head lol. ( new subscriber as soon as I saw we have the same name… such a rare name lol )
Jenny Hillman Aunt Jenny: I just shaved my head! I’ll do these in a couple months. My hair grows fast and faster with vitamins!
brigitte cavanagh: I find, in all the ways to put hair extensions this is the fastest and nicest. I thought you needed an iron to melt the tape with the other tape so it cant be removed. Wrong. Your hair are beautiful. Thank you for the video its a great help.
lola brini: hello, I've never had hair extensions. So many options out there! 1- Why did u pick tape in over other methods? 2- if my hair is curly, should i get curly ones? even though i straighten my hair? 3- can men feel it if they touch your scalp? 4- is it ok to shampoo twice a week? It's summer now and too hot to shampoo only once a week
Veronika E: You did such a great job
alysha kelley: The best by far video for hair extensions and I'm knew to it and to your channel so definitely subscribing you ❤thank you so much not once did I get lost
Debbie Benton: Thank you I have never done this before so this video was very helpful.
T S: But Seriously, this is video is better than any certification training video!
Relaxing Music: Are these extensions you used ‘straight’ ones? Did they stay straight even after washing? I have stick straight hair and have been struggling to find extensions that are straight after watching. Thanks for the tutorial!
Pam Halpert: Omg thank you so much! I had no idea where to even start or where to get good tape in extensions! Thank you so much ahhhh! So excited to do it now
S john: My hair is thinning it’s so bad I been wearing clip on hair extensions but I feel like the weft are showing and I’m tired of everyday clipping them on and styling them. So was thinking of tape ins so thank you for this video very informative.
Robyn Wroot: when you leave your extensions to dry naturally, are they straight or have all of yours had a wave to them? The ones I purchased are from someone with curly hair and my hair is straight.
Irina Brilliant: Very helpful tutorial. Thank you.
Slendytubbies---Teletubbies--unknown--???--t.d.l.p: It turn out beautiful.
Me Jaz: I have tape ins for the first time and they are showing through my hair, even though I installed them very low! I have very very thin hair, one third of yours maybe, and the only extensions that worked for me were the small keratin ones. But I would really like to make tape ins work, as I can install them myself. Can tape ins be cut into small pieces so they would look more like bonded extensions?
Emily Williams: How would this look on someone with 2-4 inch hair? Does it still blend well?
Kendall Dyck: If you don’t want traction alopecia, I would absolutely avoid doing tape in extensions yourself. Informative but, this is why I see SO many bald spots on my client’s.
natalie julie: My clip ins are 160g, will i need the same amount of grams in tapes? Not sure if i'll get away with 40pc 100g or if i need to also purchase an additional 20pc or 40pc set. FYI my hair is about 2 inches below my shoulder + thin-average density.
Alaesya Zakharchuk: When you do a removal can you reuse them?
Ana Gabriela Vasquez: I check in the web page of the brand and each pack is just 50g. Anyhow is good video! Thanks!!
Jackie & Alexander: Will they come off in the shower? How long does it last? Can I shower my head every day?
Annissa Behm: What is the best shampoo conditioner for having tape in hair
Terri Coe: How long do these stay in?
Sissy Ntala: Ty for this video!
Irene Odrzywolski: Where can you get the glue for tape ins?
Vanessa Marroquin: Thanks!I just subscribed.
Emily McDonald: I looked up the extensions she was using. She said each pack comes with 100g but on their website each is only 50g. FYI for anybody considering buying tape-ins. You're going to need more than you think.
Bb: How long did it take the shipment to come in?
El Jana: How many tapes do you use ?
Eve Staley: I can’t even part my hair evenly.. why did I think I could do this♀️
Rachel G: It seems like they make each pack 50g now
Mrs Derwood: You're wearing a oura ring right?
Aracely Hammad: Gonna try these extensions
Nora Rios: I love it … very good job
Sky Syon: Your natural hair lookin thiccc girll yassss
maria lena: So how many pieces u had in total???...
Makeupafter50: Every time I put tape ins they hurt and my scalp is tender and sore, it’s not near on the root either. Sleeping is a pain too, I end up taking them out. His do you keep them comfortable?
SB HM: Yes more tape in videos
Leisa's Squad 9: How to take them OUTTT
Fluffy: If you have the money or are sponsoren yeah I get why you could buy extensive ones . But some of us are just happy there are cheaper ones. They may not be top notch but we can at least have different hairstyles at times too.
SwanLake: Can you explain How you knew where to Place it on the back? I Cannot See It and dont know How to do it with the mirror
Donna Hart: Hi hun if your tapes don't meet up use your flat irons on top of the tape and slide it down untill it meets OK and lamp them tight OK hope ur well I did my tape on Saturday the 12th June it took me hours to do but I think I mite have not done them right but u can't see them in my hair and that's good I had brown hair in my hair and I went for a root tint and the hairdresser washed my hair and oh my gosh wot a lot of matting so I came home and removed them they looked very bad but I'm learning to do them now and my hair is 24inches long now and I did the best I could OK take care babe love u Donna ❤️
Jenny Hillman Aunt Jenny: Oh my gosh I love ur top
Faye Umpleby: How much hair extensions do u use
lou jensen: Too much chatting. Get on with it.
Md Amir: Very good job
Riley: I'm getting tapein soon and they told me I couldnt have them to long cause it would look to choppy is that true I don't want to pay so much and have the look fake
iu Ai: Hello, I come from Xuchang, The wig capital of China. Do you need business cooperation
Randi Alade: Please make a intermediate and advanced video to talk about some of the more advanced techniques you mentioned with the different placement method and how to do ombre. This is great because you have short hair.
Visual Max: they really look good they thoes hair extensions, but ive realizes they use luxy hair pictures...
kay Dee: Too much talking in beginninh
layah cattouse: Girl i tried and im doing SO BAD plzzzz ur a god at this
Lea Seberg Fladstad: Has anyone else started wearing extensions also just because you have also had problems having short and thin hair for a long time and not been able to get long and thick hair again which you don't have patience or not even have time to wait for some special reasons as me? How long can tape extensions be on hair, can it be used again several times on hair, how long can it last before it gets worn out, how many tape exensions do I need for short and thin hair when I want long and thick hair, how can I keep it on my hair without it falling off, does it feels natural like our own hair when we wear it, will tape attachment be invisible on short and thin hair, can it make hair worn, how to blow-dry my hair and tape extensions without it being worn if tape extensions have to be blow-dryed every time I wash both my hair and tape extensions and do tape extensions need any other products than just extra tape, remover and another shampoo and conditioner?
Milady Castillo: Nice video you should don't have your that's hair cut leyers helping to don't need. The hair that high
lou jensen: People need to learn how to demonstrate in a more mature and concise manner. This gal must love the sound of her own voice.