How To: Apply Extensions And Re-Tape Used Hair
- Posted on 15 May, 2020
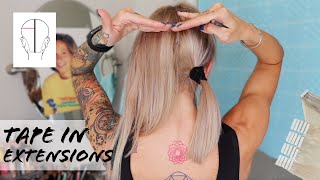
- Tape-In Hair Extensions
- By Anonymous
I always love adding hair extensions for added volume and length! What do you guys think of this result? Do you use tape-ins or a different type of extension? I personally love tape-ins the best, they lay super flat, you can't feel them in your head, and you can strategically place them individually!
In this video, I give step by step instructions on how to restore old hair by removing the old tape and reapplying new adhesive so that they're ready to go back in your client's hair! I also show you my PRO tips on applying the extensions including placement! I'm using Hot Heads Extensions.
Socials: @wholy.hair & @lauraa.ashleyy
What'S up you guys, I'm going to show you today and how to reuse your tape in extensions, we're going to be removing the old tape and then putting new tape on so they're ready to go back in your clients, hair. These have been taken out of my clients head and, as you can see, there is hair up top and there's old tape on it. So we want to restore these so that they can be reused. I have the hotheads tape, but first, what we're going to do is you want to always keep the same ones together, we're gon na unstick them. This is a pair and when you're, just gon na carefully undo that right there and then carefully pull them apart. They'Re kind of sticky, if so, when you pull them apart, you're gon na see that there is an extra piece of tape on there if you already retake them, so we're gon na pull that off. So you're gon na find an end piece to pull it off and you're just gon na carefully pull, and it's so sticky. So if you want to use gloves when you do this, you totally can but see how we're just pulling that piece of tape off okay and then there it is, and you have a clean canvas to put your new tape on some of the extensions are gon Na be more fragile than others, depending on where they wore them on their head. The ones that are worn toward the bottom are typically the ones that are more fragile to work with. So you just want to keep that in mind. So after you've removed the tape successfully and carefully, but we had a little boo-boo. So this disconnected so we're just going to line these back up and kind of stick them together. And then what you're going to do is take your new piece of tape and just apply it on the extension connecting that piece back together and that's how you're going to make a little repair. So this is very tedious to do, but that's why we charge our clients for this. So I have a different price for extension, installation versus removal, clean retake and then reinstall. I charge a little bit extra for them. So when you're applying the new tape onto the piece you're just going to make sure you line it up and try not to stick your finger on the sticky side too much and then so you're going to do this to all of the pieces of extensions. And then they'll be all ready to go and put back into your clients here. So you want to organize the hair before you put it in their head short medium long and then these are her accent, colored pieces. So the shorter pieces are going to go on the bottom rows and then you're going to switch to the medium and then on the top you're going to do the longer pieces. What you're going to need to put in your tape in extensions is the hair and foiling comb and some clips I'm going to start by sectioning her hair. So you want a section from the top of the head to the top of the ear clip that forward and do the same thing on the other side. So when you're, putting in extensions, you do not want to go too close to their hairline, you want to start about an inch and a half from the bottom of their hairline all right, so we're gon na stop start in the bottom section, and I'm going to Be a bricklayer and her extension, so I'm going to start with two and then go to three and then two again and then three so I'll show you how I do that and we're going to be starting with the shorter lengths, because it's at the bottom of Her hair and it's going to be the longest when it's in her head. So what I'm going to do is take a section with my rat tail coat. That is as wide as the extension hair and you can see the thickness of the section that I took and then I'm going to take my first piece, peel off the tape and then you're gon na put the bottom one on first you're going to go close To the hair line, but not touching the scalp and then you're gon na lay the hair on top and then what I like to do is take my rat tail comb and press the hair on top of it. And then what you want to do is pick up the extension from the bottom and just check and see if there's any pieces on the sides, you don't want little stragglers on the sides and then you're going to take your other piece and you're going to hold Up the extension a little bit and lay it on top and press it down and if there's any hairs that are like floating and not sticking to the tape you want to just section those off and on this one, I'm gon na do one in the middle And two other sides. So when I'm talking about brick layering, when you do three on the next row, you're going to do two in these empty spots here and that will help to seamlessly blend the extensions so that you do not have any holes in the ends. So I'm going to do this next section, I'm going to do these two pieces and then I'm going to show you how I connect the back with the front as we go up the head, so I'm taking about half an inch to 3/4 of an inch sections. Okay, so I'm going to come on to the side of her hair here and we want to make sure that we're not applying the extension too close to her ear, because when that grows out a little bit, it's going to get in the way of when she Puts on sunglasses and tries to put her hair behind her ears, so we're going to take a section horizontal about an inch and a half above the ear. So it's going to be a little bit behind the ear, but still on top of it and we're going to do the same thing on the other side. And that is going to blend the back to the front of the hair. And now, at the next section that we're going to do we're going to fill in this gap here this gap here and this gap here, you so now we're going to move on to doing the sides of her hair and we're still going to fill in a Few pieces in the back we're gon na. Do these fun colored pieces around her face? Ah, do you? Okay? I forgot there was another mirror over there that looks so good and we'll just let it Wow. So this is her hair after looks so beautiful, and this pretty purple color is just such a nice touch. I hope you guys enjoyed this video go ahead and hit the like and subscribe button. We'Ll see you next time.

Comments
Mel's World: Your work is always nice neat and organized! ♥️
Aubrey De Filippo: Love your videos! What brand extensions do you use? Do you prefer tape ins over different kinds?
Ivan J: Yasss good job!! it does look tedious but it's all for the beauty : ) This was nicely informative, didn't know to not put it too close to the ear or it will be a hindrance to wearing glasses later on! Im not a hair stylist but hair videos are so fun lol
Janira Reis: N entendo o que essa linda diz.kkkk mais estou aprendendo muito
samantha Addison: Curious to know if you wash clients hair for every move up and also pricing
Samantha Mellinger: If you rub it across foil it makes removing the tape so much fast!! Saves so much time.
lalis Torres: Love it
Rose Ahmed: Very nice love it
Sarah Ochoa: those extensions were so thin, you could see her blunt cut of natural hair peeking through. girl she needed double the amount of tape ins you have her for this to look balanced, not impressed at all, to say the least sorry