La Weave Application. Detailed Video With Tips And Tricks..
- Posted on 23 February, 2021
- Tape-In Hair Extensions
- By Anonymous
Hi guys,
Welcome to my channel. In this video i am sharing how to install an LA Weave. BELOW is a list of links of all the products i used.
Hair extensions: i used 2x20"
http://www.ledutches.com/product/europ...
Hair dye. i used 3
Hair extension kit
Hair Serum
hairspray
Babyliss curling wand
Please check out and follow my other social media handles
Instagram:
Personal page - LEDUTCHES ( FASHION AND LIFESTYLE)
Hair page - FABBYLEDUTCHES (HAIR)
The Show: thedutchesshow
Snapchat - fabbyledutches
Facebook - ledutches
Please subscribe guys. Thank you for the support.
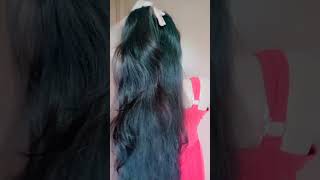
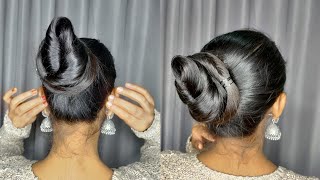
Hi guys it's your girl duchess and welcome to my channel. If you have clicked on this video, it's because you want to know how to install an lav. Don'T worry, i've got you covered, try the whole video. I will share tips and tricks on how to perform the perfect leve install so make sure you watch throughout the whole video and, of course, if you haven't subscribed yet what are you waiting for? Okay guys, so, let's get it started. First thing is: first, you want to make sure that you come out the hair, so it's nice and smooth and ready for application now we're doing the sectioning. So, as you can see, my client has beautiful hair of her own. So all we're going to do is basically add volume. So what i like to do is to make sure i leave some hair out at the front and at the sides and at the back, but i will show you how i do that. So now i'm going to start with the front section of which i leave the front out and then i just do a braid just to make sure that it doesn't interfere with the application. So now i'm sectioning the side of her head just to make sure same procedure that when she does want to put it into a ponytail or up in a bun, that the hair that i'm leaving out will cover the rings and that it won't show the weft And the rings, so you want to make sure you leave enough hair out guys. It'S really important to do this step right, and do you guys see my friend there in the back? Oh my god, she is so funny. Absolutely love her to bits like throughout the whole, install she was making me laugh. If only i could let you guys listen to what she was saying. Okay, now that that is done, i'm basically selecting the section that that i'm actually going to use for the installation. So you want to make sure that this section is not too big, but not too small either if it's too big, it won't fit into the ring, and if it's too small, the ring will actually slip out of the hair. So you just want to make sure that it's a medium sized section so for the application i purchased this and package on amazon. I will put a link down below and it's amazing, because it has everything that you need for this installation. You don't have to buy everything separately, everything that you need literally comes in this package, so this is a pair of pliers. This is the hook to select the hair. Then you also have the rings, which comes in different colors, black brown and white. So you probably want to use the color that would match your client's hair or as closest to your client's, hair, okay guys. So this is the section that i will be applying the macro ring on. So what i like to do first is place the hair inside the hook. Now the hook i placed inside the ring. So by the time i pull the hook out of the ring, then it pulls the hair inside the ring. If that makes sense and then now we're just going to clamp the ring as close to her scalp as possible, this will help the weaving method when once we get to that stage, so let's try this again, so we take a selection. So, as you can see, the sections are not too big and not too small and a good trick is to twist the hair. This will allow it to fit inside the hook more easily, as you can see, because just cleaner now, i'm grabbing the ring and pulling the hair out of the ring. I hope you guys saw that and i'm just clamping it again as close to the head as possible. Don'T worry later in the video, i will do it from a different angle, so probably be more easier to see what i'm doing so. I chose to use six rings, but that is optional and entirely up to you and your client i felt like six rings was more than enough. You don't want to put too many rings on her head um, so you kind of just have to judge it by your client's head space and also her hair type. So now that that is done, i'm selecting another section of hair and we're basically going to do the same thing again now. Here is the thing you could potentially do the micro rings by row and then attach the weave straight away, but i find it easier to just get all the rings applications out of the way going line by line once i've done that, then i just focus on The weaving, rather than doing a line of rings then do the weaving then do a line of rings again and then do the weaving. I don't know it works for some, but this is what works better for me. So just give it a try and see what works better for you also what i will say guys if this is your first attempt or you're quite new to this. Please take your time. It does take a while to get a hang of the um, the hook and the rings, and i love the rings in terms of fall on the floor, etc. We'Ve all been there but yeah once you get the hang of it. Trust me it's so easy and you'll be so fast and you can probably even do it with your eyes closed, um, so yeah it might seem a bit complicated, but it's really not, and another thing is to just make sure that your sectioning is really clean. It'S very handy to use section clips, as you can see that i'm using um this just all helps your the application to be much smoother and faster as well. Okay. So now i'm selecting my third section, but here is the catch with the third section. I won't be applying the rings, i'm using that as a section to cover the rings that i've already applied this way. If the client wants to wear the hair rub, they can actually do that. So now is the fourth section that i will be applying the rings to, and this will also include the sides, because we also want to make sure that we're adding volume on the sides as well. So this is how it should look like. So, even on this side, we're still continuing the same method, the same sections, the same medium-sized sections, don't go, bigger, don't go smaller and now i'm showing you guys a close-up. So this is what i was talking about. You see you saw that. Did you see that let's go back closer and then you clamp it as close to the head as possible guys? This is easy. This is easy. You just have to try and practice makes perfect, so we're going to do the same thing again and again, all the way around to the other side. Now the main difference between the la weave and the normal weave is that, with the la weave we're using the application with the rings now my clients say that this method lasts longer than the normal weave was when we use braiding method. I do have a video of this in my um, i thought it years ago, but i will link it down my description bar, so you can see the difference between l.a weave with the rings and a normal weave with the braid. Now my clients always say that this method lasts longer. I think that is the main difference. So this is how it looks like make sure when you're doing the application on the sides with the rings you put equal amount of rings on both sides. Now that that is done, we finally gon na get to the second part of the installation. Now before i do that, let me give you a little t on how i managed to match the hair extensions. Exactly to my clients, hair color. I used this die 7.11 by l'oreal. I will put it die in the description bar and i literally achieved the same hair color as my client look at that. It'S an absolute match. Yes, i've gone ahead and sewed the first track on there and i did that double left it and still look no traces of no rings and no extensions. It looks so natural, but don't worry, i'm going to show you guys how i did that so when you're weaving on the weft on the first two tracks, i like to use double weft now at the beginning, make sure you leave it a couple of times go Over it a couple of times time sorry, this will give it maximum security. Because that's what you want, you don't want the tracks to be hanging. You want to sew it as neatly as possible as tight as possible as close as possible when you're taking the steps and the gaps while sewing it to make sure it's really secure now, while you're sewing it, you also want to sew it like going inside of The rings, if that makes sense, um so in between the rings and the hair for maximum security. What you always want to do is to double knot. The ends of each fret make sure you always double secure. The ending and the beginning of each left is really crucial, so now we're moving forward to the next section. Now, usually when it comes to the temple or close to the temple of my client's head, i like to use single weft. This just allows a more flatter application, especially at the top and at the top people tend to usually have finer hair. So when it comes to the temple, i usually use single wefts. However, my clients got thicker and she wanted a lot of volume. So, in her case, i'm using double weft. So this is something you need to negotiate with your client, but also in take her hair texture into consideration. So now that that is done, i'm literally coming out the head blending it with her own hair and, as you can see, the color blend is absolutely amazing. I love it now, i'm using my favorite john frieda frizz free, fris e, sorry, serum um. I love to use on my extensions and now i'm just blow drying her hair guys blow drying. Extensions is a crucial part of extensions because it just allows the extensions to have a smooth finish, and it also gives the extensions a bit of a bounce. So before i style my client's hair, i always make sure i blow dry, especially when i'm using extensions extensions and blow drying literally goes hand in hand. I will put a round brush and the blow dry into the description bar is absolutely my favorite blow. Dryer of all times, if you do want a more in-depth blow drying tutorial, please comment down below and i will do a blow dry tutorial video for you guys guys. Can you see the difference in the hair? It just looks so bouncy. So now i'm just checking my application to see if if the rings were visible, but no like that looks so natural like the color blend is so amazing and the application is so amazing as well. She was happy, and i was happy now - i'm using my favorite bubbles, uh hair wand link will be down below, as usual, make sure you get yourself a pair, because these are my favorite tongs and the curls that it creates is magical again. If you want a more in-depth tutorial on how i use this one, please let me know now: i'm using my favorite element, l'oreal spray to you know, keep the curls keep the curls, but yeah guys. This is the end result. I absolutely love it. I hope you guys got a lot of information out of this video if i've missed out of anything. If there's any question you like to ask, you know the deal in the comments down below and i'll do my best to answer all of your questions but yeah. She was feeling herself, i was feeling the look and, as you can see, the hair is so nice and flowy it blended it with her own hair perfectly. She can wear her hair up. She can wear her hair down. She can wear her hair. However, she wants it guys, thank you for watching and, as you know, always if you haven't subscribed yet what are you waiting for?


Comments
Maisie Badham: Please anyone watching this DO NOT fit extensions this tight. There should be a 1cm Gap between the bead and the scalp, this tight could cause tension and possibly even bold spots. The beads should also lay flat to the head, not sticking out like in this video. It’s sticking out because it’s too tight and not clamped flat. Never fit as close to the scalp as possible
Fatou Sambou: That's beautiful i'm stylist in LA Weave and please the beads not to close to the scalp IS 1 cm to the scalp. This Can break her hair down.
Vikisha Knight: Her hair looks beautiful Love the technique and how versatile you can have it.
Alia K: Wow! Looks perfect!
Tenacious Dee: I just checked you’re in Essex woop woop I always do all my own extensions,weave,wig making but I’ve never treated myself to having it down professionally. I just followed you’re insta page .. will check out price lists if poss
Juz_ Isabella: This came out really beautiful......your hands Work magic girl❤️
Alesha's mehndi Art: Micro beads are too close to her scalp it will hurt her and will be painfull to put her hair up .overall she done nice job
ruth ogunro: Great video. ❤️But beads are too tight, use pinky to measure how much space to leave between scalp and bead.
Miss Cherise: The end result
Vivien Pap: That’s my girl amazing work
Aspacardin999 Aspacardin: Thank you so much!!!
joanlenore: How long it last?
Lorenza: You are the best of the best!
Chase Bennett: can u please do a slick straight low ponytail tutorial with hairspray only?
Chase Bennett: with the la weave in the hair?
E E: Why did you use black thread and she has blonde hair.