Hair Affair - Tape'Nlock Single Strand Tape-In Extensions
- Posted on 02 July, 2013
- Tape-In Hair Extensions
- By Anonymous
Our new Hair Affair - Tape'nLock Extensions are the smallest tape extension on the Canadian market. Made from superior Remy hair, this unique tape bond measures in at just 0.7cm x 1cm x .08 mm. Suitable for all hair types, the extension is designed with a M shaped tape edge to reduce tension on the wearers' hair and allow the hair to wash, wear and breathe better.
The Tape'nLock Single Strand M-tape style extension provides length, fullness and is suitable for both a full head of extensions or for side additions where the hair is finest. Install roughly takes 45 -- 60 minutes and the product is available is 19 shades! Can be seamlessly integrated with the Hair Affair Dual Tape system.
In Canada Call 1-800-268-2242 to find a distributor near you
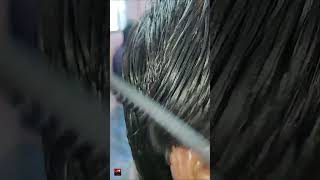
Hi and welcome to our educational video on hair extensions. My name is John and I'm here to demonstrate and educate for you, our tape and lock single strand tape and hair extensions by hair affair. Today we will be using our lovely model, Tasha hello, after viewing our video, you would feel confident up and moving forward with using extensions in your salon. Let me describe our hair for you. First of all, they come in 19 shades, which gives you lots of variety when matching up your clients, hair to the hair extensions. They also come ten in a pack. They are 18 inches in length and when pulled out, as you can see, they're straight, but when washed and left to dry, they will dry into the clients natural wave pattern. It is 100 % remy hair, which means the cuticle is intact and running in the same direction, which makes it less likely to tangle or matte and allows color and conditioning treatments to be accepted beautifully. As you can see, our attachment is M shape, made from a medical grade tape which adheres securely and strongly to the hair to resist any slippage. It is also hypoallergenic making it beautiful for your clients hair. All in all, the quality of our extensions are superb and second, to none, making it a natural choice for you and your salon before we begin our actual installation. I want to go over a few points with your client consultation, as this will be the most important step you take before you do. The extensions on your client, a proper client consultation should take you up to a half an hour and should be done a week. Prior to the services, this is where you have the opportunity to go through your clients, hair, to look for any scalp issues or any breakage in the hair scalp issues, including oily scalp or any severe dangers of dandruff. I might have. You also want to look for any severe breakage in the air that could be done to some over-processing in this time. This is where you may have to rethink your path that you're, taking with your client, meaning you may have to do some future treatments to get them ready for your extension installation once you've determined that her hair is healthy enough to move forward. This is where you want to address your client's needs. Does she want highlights? Does she want legs to Schule volume? Would you like just a splash of color here and there so you're going to go through and you're going to look at the thickness of her hair? The density of her scalp and to determine how many packages of hair you need to complete your installation. Now at this point, you want to go over the client questionnaire, which you will find in our men in our manual on our website. It has a list of questions that you want to go through very thoroughly, for instance, however, what hobby she has if she happens to be a very active person, may be into sports or she may swim every day. Tape and long hair extensions may not be the right path for her. However, hair affair does offer other varieties of hair extensions that may be better suitable to her lifestyle and, lastly, you're going to want to go over in great depth in detail with your client. Her at-home guide to taking care of all of her extensions this. You really want to make sure that she is ready to commit herself to the maintenance of the hair extensions before you put them in and she decides within a week or two that this maybe wasn't. The right thing for her just a little tip if you find that you need to custom color the extensions to the clients hair is probably easier to tweak the clients hair color to match the extensions. However, if you find that you need to color the extensions firstly you're going to color off scalp, always you're, going to make sure that you cover the attachment, the ante, with a piece of tinfoil and you're, going to use a semi or dummy, so meat or Demi Color of a 10 volume deposit, only you want to properly saturate that hair and color in the same direction as the hair falls. When the hair is ready to be rinsed again, you want to make sure that your attachment is properly covered, as so, it can stay dry and you're going to want to rinse the hair off in the same direction and lay flat to dry. Before you begin your installation, you want to be sure that your clients, chemical services, her hair color, for highlighting any straightening treatments that she needs to have done are done a week prior to your installation. You want to make sure if that cuticle has shrunk back down to its natural size. If you were to do it on the same day with the cuticle swollen, once the cuticle shrinks back down, it allows the extension to remove itself from the tape and slip down the hair on the day of your extension installation. The hair preparation is extremely important. You must follow these few simple rules. First, we're going to start with clarifying our clients, hair. You want to use a pure, clear, clarifying shampoo, so you're going to take your client to the sink you're going to clarify your hair two to three times on the last time. You want to leave the clarifying shampoo on for about two to three minutes, just to ensure any buildup or impurities are stripped off the hair to leave a nice squeaky clean and base you're then going to drain the client back to your chair, we're not going to Use any conditioners: no leave ins, no smooth and serums, nothing just with the stripped face you're going to blow dry, her hair to the clients natural part, or to how she feels comfortable with wearing her hair on a daily basis. You are, then, going to take each section and you're going to flat iron, it straight down to ensure any flyaways are smooth and that the hair extensions lay flat to the clients, hair so last step and preparing your clients hair would be the texturizing of her ends. So once the hair is blow-dried and flatter you're going to take your scissors and lightly texturize the bottom of the hair from front to back. This is to ensure you don't have a blunt line or any demarcation lines once extensions are installed, because once they're installed they're quite difficult to go back in and wisp through. So now we're going to talk about why we chose the colors of Sasha's, hair and Sasha's hair. We have do different shades of blonde and a brown, so I have chosen her base color a later blonde and then a brown to follow throughout her hair and an even texture tone. So, to begin, your extension installation we're going to section the clients hair so you're, going to start at the top of their hair and you're going to work your way down behind the ear. Now this is where, depending on the thickness or thinness of your clients, hair, you will choose two of our following three finger rule or two finger rule. It'S just to ensure that all your attachment sites are covered at all times throughout your extension process. So on Sasha's hair, because her hair is thicker, we're going to use the two finger rule from behind her here. So you're just going to very nicely and neatly clip this front section away and you're going to do the same Locker other side so section again from the top of the head and they get out her hair. Two fingers behind her ear and Singh follows for the bottom of the hair again to make sure your attachment sites are properly covered at all times again on Sascha's hair, her hair's thick, so we're going to use the two finger rule we're going to section straight across This is just to ensure that if she wears her hair up or any side, ponytails or side braids or anything again, you don't see your attachment sites or your extensions where they begin correct again, you want nice, clean, clear sections, just clip her hair and over the Way like so so to start our extensions today, we're going to start in the middle of the head out of first section, we're going to create a powder by working left to right and right to left. So we're going to take our first piece of hair. Always keep in mind when taking hair, that less is more, you don't want a lot of hair when you put it on the tape, you want to create any air bubbles. So again, just nice small piece like so and just take this clip and clip all this hair underneath it that way, you can lay this down and always find it when you're ready to use it so you're going to take your hair extension and be careful when You'Re, removing your M tape backing from this. You don't want to touch it with your own hands. You don't want to get your own natural oils on it, they're just going to remove it like so and you're going to lay the hair. You can start with laying on the right side of your empty, so lift that piece of hair up kind of fan it out a little bit. So it lays properly across the right side of the tape and remember less is more so if you have to remove a piece of to you, that's fine and you want to lay it a quarter of an inch from the scalp. So you want to be able to have natural movement with the hair at all the times to go in a quarter of an inch away. You can lay the hair on it and just before you close, it just make sure it's even and the crease. So it's not bunching up into the right side, crease of the hair and just one little tricky Kenji. You can just lightly slide your comb across and feel any unwanted hairs that will create that could create a bubble in the air and close it. So you just want to close it now, just give it a nice soft little squeezes, maybe sort of massage it in with your fingers a little bit just help both sides of the tape IQ together securely like that, and just when you're done, give it a little Tug and there you are so again, I've started with a light-colored of hair, I'm going to move to the second blond color. So for the first three rows, I'm just going to alternate between both blondes when we get up to here I'll start incorporating her little lights. So you're going to move over one extension space just so that when we get to the second row, brick lane that piece of hair will fill in those spaces for a natural look. So we're going to skip over again one space and again we're picking up the hair, always remember that less is more just clip all that hair away and again, when you're moving, they haven't a don't touch it with your own fingertips, pick up a piece of hair. Again, sort of fan it out make sure you don't have to bless or too much lay it a core of the inch away from the scalp into the right side. Again check that you have some natural movement to it. Go in remove any of the unwanted hairs that would be in the way and then just gently close and again massage in through any unwanted air, pockets or air bubbles in there. So now we have finished our first three rows where we have alternate our blondes back and forth. We are now going to incorporate our brown for our low-light, I'm just starting in our fourth row, so that when we drop the next row down, that starts with the brown it'll blend very nice on the bottom. It won't just be a solid fall. A brown okay, we're gon na go in remembering your brick lane in between every extension every time. So at the fourth row we are back to starting in the middle again go. Take your small section. Less is more take your extension again from quarter-inch off the scalp you're, going to fan the Harrow and lay it to the right side of the extension you're then going to remove any unwanted pieces and close the extension and massage with your fingers and lay down now We'Re going to do our two blondes alternating and that our Brown two blondes alternating working from left to left and right right. Okay! So now that we finished the back we're going to move on to the side, okay, so just gently clip at the back just out of your way. Alright, now working with the sides of the hair, things are done just a little bit differently than the back. So again, we going to use the two or three finger rule above the ear. Now this allows space for clients who maybe tuck their hair clients who maybe we're you know, reading glasses sunglasses always remember to cover your attachment sites just so. If the client is to wear her hair back or up, you don't see them at any given time. Okay, so once we have this section, we're not going to brick lay anymore we're going to lay the extensions side by side and we're going to go up to next show and lay them right on top of each other side by side. Just to ensure that all the hair is blended and you have the same thickness at the bottom, that you do, the top take your small section. Less is more now remember when these lay at a quarter then job to scope. You want to be sure that they lay completely flat. You don't want any what we call a waterfall technique that can cause breakage in the hair and will cause the hair to stick out in between the natural hair. So always make sure that you have that cordage. For the scalp to have that natural fall and to lay flat again just clip that hair out of the way and and out, lay it nice and smooth and flat on the right side again to check for any unwanted hair. As it did not stick and close. And massage it together now that we've completed our extension installation, we have gone back through and we have flat ironed the extensions into the hair to create a natural fall. Now, just so, you know on Sasha's hair, we used nine bundles of hair, which equals 90 pieces. So, starting from the back to the top, we have nine rows of hair and we have four rows going up each side. Now, let me go to complete our haircut. You want to just lightly comb the hair down into its natural fall. Okay. So when it's starting, you sort of want to start at the back in the middle again sort of working from left to right and you're just gon na lightly comb down, you don't want a tough grip. It just want a nice smooth grip on the hair. Nice light comb you just want to lightly point cut into the hair, always make sure that no matter what length you are doing, you always want to cut an inch below your length that you're achieving okay. You want to leave some room for some Corrections. In the end, you want to be able to go shorter later. If you need to, if you over cut in the beginning, you may create a hole and that's a little harder to correct afterwards, so again, again lightly movie lightly point cutting into the hair. You don't want any blunt cutting with this hair of whatsoever with everything to look nice and smooth and natural and again, as we come up closer to the front and the sides you're just lightly angling, your fingers upwards. If you are comfortable using a razor, you may use a razor too, but just make sure you follow the same rules you just want to lightly bring the hair in towards the face and you're gon na sort of work with her layers, starting you know, maybe from Her chin level, wherever she would like the length of her layers to go okay, you take it like this and, as you can see where her hair starts to really extension start, you want to give it that same sort of jagged. Look so you're, just gon na slide cut and again just lately. If you have to go over to a few times, that's fine! You want less hair. So less is more always remember that rule okay. So when removing your hair extensions you're going to take your little dabber here, which looks like a little tiny, bingo Dawber, this ensures that you have proper control when removing your hair extension, so you're not dripping liquid all over the hair and all over your client. So you just do very quickly, two little dabs on top two little dabs underneath and then with your comb. You just go right in between your little your little tape, just like that, and you just lightly peel it away and as it peels away, you'll just be able to gently, remove it right from the hair okay, so you are now removing the old tape off the Hair, like so you're then going to take peel the new tape off your M tape, package', so, okay, you're gon na remove the backing of it. You'Re then, going to lay the extension right over top of your new M tape, as so just like that, and then you have this side ready to reuse when you're ready to install it again. I would just like to thank Sasha for being our model today. I would like to thank you for watching our educational video on our tape and long hair extensions by Hera Pheri, I'm confident you have great success in the future when offering this in your salon. If you have any further questions or concerns, please refer to our manual on our website. Thank you.


Comments
Lee Bice-Huba: Who distributes the Tape & Lock hair extensions in the United States, Florida namely?
Mindy Diaz: my hair guy told me the same thing my tape ins will dry and be the same as my hair. he created his brand is also my bff although he has the absolute best hair. THEY DO NOT!!! I have curly hair when air dryed. they have a beach wave at best. so that is nooot true.
Sheri Robinson: How can I order this""""""'m,