How To Apply Tape In Hair Extensions | Goo Goo Hair
- Posted on 14 March, 2022
- Tape-In Hair Extensions
- By Anonymous
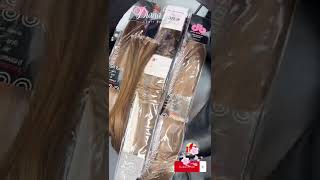
Goo Goo Tape in Hair Extensions,22”
Dark Brown (2): https://bit.ly/3gC4WJl
Light Blonde Highlights (16/22): https://bit.ly/3LqQGRL
Hair Weight:50 grams/pack
Discount Code: Amanda10 for 10% off
Hot Selling Collection: https://bit.ly/3rDIqWB
Goo Goo Hair is dedicated to the development of the high quality hair extensions.
We are so excited to provide you with the highest quality human hair extensions to make your hair dreams come true, giving you a gorgeous natural look.
Follow us get more idea about hairstyles!
Instagram: https://bit.ly/3zmRxLP
@googoohair_support
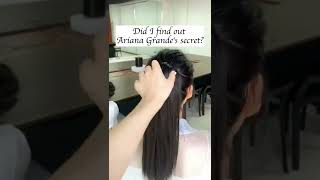
Hi guys welcome to today's video, as you can see, i'm kind of not in my usual spot and hey. I got jammies on just woke up from a nap you can see. My beautiful daughter here has some amazingly long hair in this video. We are going to show you how she went from this to this, so if you guys want to see how to apply tape in hair extensions, keep on watching i'm going to start by sectioning the hair. We want the first section to be fairly close to the bottom, not all the way you do want to be able to lift your hair up in case. You want to put it in a ponytail, so you want enough that's going to cover your first weft, so we're going to put our first about there. That gives about an inch from the bottom and again a huge thank you to goo goo hair for sending us over their beautiful hair. Once again, this time my daughter gets it. Thank you. We do have two different colors. We have this blonde and then we have a dark brown. As you can see, her hair is split colored. I will leave the links to this hair and the colors everything you need to know down in the description box below we have our first section. We lift it place it and drop the hair back over, and then we take our second weft and sandwich it in there. You just want really thin sections of hair. You don't want to sandwich too much hair in between the tapes, otherwise they will not stick and you'll have tapes just sliding out and of course no one wants that when they get fresh hair extensions put in so because she has such a small narrow neck. We can only fit two in here. You don't want to put the tapes right close to the edge so how we're going to counteract this is on the next layer, we're going to start on this side and place it there. So you take down your second section again, keeping it at about an inch and then because we had the gap on this side, we're going to start on this side again, lift place and then drop the hair over it. Now that we have a couple rows in, i am going to hit these tapes with the flat iron. This is something i didn't do when you guys saw me do this on myself, just because it's really hard to see the back of your head when you're doing it yourself, but because i really want these to be on i'm just going to very quickly and very Lightly hit that tape and run the straightener down it's just going to help heat up this glue, so it sticks a little more securely. Now we're done that row again, just taking the same one inch sections all the way up. I do want to mention that last night, while we got ready to prep her hair for today, we did go through and actually tone her blonde. It'S been a while the old toner was out. It was looking kind of orange, so we did tone it and we gave it a trim added a long layer and straightened it. So it was all just ready to go for today. Yeah google hair. If you're watching this, i found your tech talk. I was watching tape and extensions when i found your tick tock. She found your tick tock, so goo, goo hair, i'm sure if you look at her tik tok after this, you will see lots of your hair i'll, follow that she will follow you. This process is so much quicker when you are not doing it on yourself, i got ta say the process is the same step by step that i showed you guys doing it on myself. Nothing that i'm doing is changing besides hitting the tapes with the flat iron, but i kind of did that when i straightened my hair always remember if you really press grab each end of your sandwiched up, tape, weft and squish them both together, you can see i'm Just using the end of a pintail comb just to stick the hair down and smooth it before placing the second weft on top trying to make sure i'm not in your guys's way all the way here. Let'S move that here for this section. Okay, now that i have that weft in we're going to do the same thing with the flat iron and hit these bad boys with some heat this by the way is my brand new croc masters infrared flat iron. I'Ve only used it twice. Both times have been on this kit here very excited to have it i'm special. I guess i was the first person in a second time to use it look at the blend is seamless, you can't see it the color match. We did good job on and you really want these lines to be as straight as possible. That'S why each section, you really see me go through with my pintail comb and get that a nice as a line as i can so. I'Ve been starting on the other side this this time, i'm going to start on this side, foreign, if you take good care of your extensions, also for you people at home. Listening, if you take good care of your extensions - and you know when it comes time, you remove them, i usually use coconut oil. It works amazing to slip those tapes out and then you can remove the tapes, wash them dry them up and you can put new tapes on them and keep using them. You know for the average person you could probably get six months use out of it. I have been known to push a year even two years out of my tape in hair extensions. If you take care of them, that means putting your hair in a braid or a bun when you sleep, so they don't get all matted up. That means using still heat protectors and products in your hair. We have to look at it. This is still real human hair. So by styling it curling it straightening, it you're still damaging the hair. Like you would yours, so i still recommend going in with your thermal protectors. Everything like that you do, i'm not sure where my camera stopped filming at, but i just re-hit this layer with the flat iron and now we're going to start pulling down this dark. Well, if you haven't already like and subscribe, don't forget yeah we're not going to use as many dark. You have a lot more blonde in your hair than you do dark again, we're still doing the same one inch, sections that we've been doing all the way up. Uh all right guys again we're going to hit it with the trusty flat iron. Okay, now we're done with that layer we're getting down. I think we've got one more layer to do and then we'll be too close to the top. You don't want to put extensions right at the top, because well you want them to not be seen. You want it to look like your real hair, yes, and because she always parts her hair in the middle. I can go up fairly high in both sides because she never does a side part, whereas i do side parts pretty deep side parts so mine, i have to place lower. I like done with the side parts i had it before and um i'm going to make it. So you guys can see every step of the way, but without having a cameraman moving around for me makes it a little bit more difficult, darren too to the camera, and you guys guessed it. We are just doing the heat round again. Yes, if they didn't guess well, then you haven't been watching the video all right guys now we're going to take the top down straighten everything all together. Oh yeah, that looks good. I'M excited to see what it looks, like, probably guys, make sure to watch the hair blending cutting video. If that makes sense, that'll be, i think, next video, yes video after this one, i will show you how we cut and blend in the hair extensions. I really like the box, it comes in like when you open the box, there's the hair and then i think, there's a card and there's lashes and a clip yeah and a clip. The hair clip. Those are the lashes they're. Really pretty they're, like you open it from like sliding it like this they're, really pretty all right guys this i'm going to have to take the camera off of my stand and show you guys, because you can't really see this is the point that we are at So far as you can see, our next video will be the cut that it needs a little bit of layering in through here and just clean up these ends because they are not all the same length, alright guys. Thank you so much for watching today's video. I do hope you enjoyed it. If you want to see more hair content on my channel, then don't forget to leave a big thumbs up. Let me know in the comments below, if there's anything, that you want me to try that has to do with hair and yeah if you're not already part of the babies beauty family. What are you waiting for subscribe already and subscribe, like my crazy daughter, just screamed at you, alright guys, thanks for watching and until next time. I hope you all have a fabulous day. Bye,
Comments
Closet Cupid: hey there! how many packs of hair total was used for application?