Tape In Extensions Tutorial
- Posted on 06 April, 2022
- Tape-In Hair Extensions
- By Anonymous
Here’s a step by step tape in extensions tutorial very beginner friendly including a silk press tips and styling.
social:
Instagram : https://instagram.com/cedesstylez?utm_...
Email: [email protected]
#hair extensions #Tape in hair extensions #tape in hair extensions black women
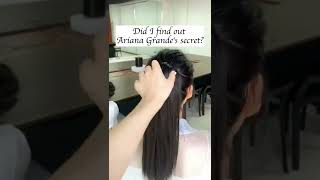
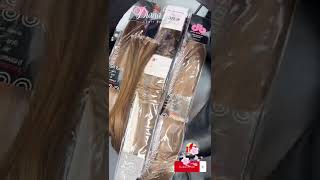
All right, so can we see me i'm doing take things on trina here today. Thanks for volunteering, let me show y'all her here. A true lens just got a ball. I'M going on an extra long ball. We about to make her hair grow in less than an hour, what's up youtube, so today i'm going to be doing tapings, like i told you in the beginning, on trina's hair, so i'm just going to give her a good, shampoo and condition and get her hair. Nice and clean now i told you to volunteer and i'm so glad she did because tapings are like they're, not new um. Nothing about tapings are new, but a lot of the girls are. This is like in right now. Y'All know how you like to hop on and uh. Okay, i'm here for it. You know i'm an extension specialist, so i do all types of extensions and um yeah, so she got her tapings on her own. I believe she got them from amazon, which is okay. You know um and um yeah, i'm gon na install them today, and this video is like two weeks old, but i've been checking on her for the last two weeks axing her update from her hair and so far so good um. Here i just spray some of my favorite just go to the one of the links and go to the link in my box in my description box, and you can purchase this with my website. So um yeah, the from blowout spray, is perfect. It smells amazing. It'S for blowouts and still presses, so you want to always use it on your hair while it's wet and you want to comb it through and um, get it all throughout the hair. So i'm just sectioning her hair right now and just getting it detangled. At this moment, immortal salon level blow dryer um. It doesn't come with a brush which i hate. I hate blow dryers that come with homes or brushes, so i always use my denman brush to comb it out. You could also purchase this blow dryer on my website, too. It'Ll be linked in the description box um. It'S definitely for professional use, but even the average person can use this blow. Dryer um, i'm always gon na blow dry, the hair from the front and work my way to the back. The reason i like to blow dry the front first is because, when you blow dry the back of the hair, it's never going to get fully dry because they're here and the front will the water will run from the front of the head to the back of The head so say you blow dry, the back first section. First um it'll still get wet and it won't be completely dry because the front is still wet. So i always start with blow drying the front of the head, and then i blow dry, the back and i'll, make sure that it's completely dry um. I always pre-dry the hair as well like. I don't just directly go to start blow drying. I always like pre-dry. The hair a little bit without the brush and um, then i start to start to blow dry. Okay. So now my hair is all completely dry and i'm going to start this thick press process. Now in my previous video and i use my flat iron on the rest of her hair, so um yeah, let's speed this up, i'm going to just feed this video up a little bit so that we can get to the good part. It is the best part. The tape ins look how full and thick this is so i'm using four bundles of the tape ins, which is equal to 200 grams 200 grams. Okay. So each um bundle of tape gives you about 50 grams, a bundle okay, so 50 grams. It'S for one bundle. 50 grams is equivalent to one bundle. I'M sorry, and in order for you to get a full enough head, you have to get 200 and that's how you'll purchase them just know that 200 grams equals a full head and um 50 grams equals one bundle or 4.5 ounces. Okay. So now this part - i'm kind of parting her here in the angle, because of how i want her hair to lay and how i want to be how i want the hair to um full and the versatility that i need in order for her to like. Do what i wanted to do, like put it up in a ponytail, still have fullness in the front and um like. I said okay now that i'm at the back, i'm just going to part out all the hair that i want to leave out that i'm not going to be putting in, because i need the hair to cover and the greatest part about the tape is even if Your hair is kind of thin and you leave out a little slither like you'll kind of see in the front of my head. It'S a little bit thinner and i'll, be better taping really close, because i want the hair full and i know that when her hair kind of gets a little older or she sweats it out - or it gets a little thicker on the thicker side like after this. It'S like kind of worn a little bit. You won't see it, but the tape ends black um. Let me just pause right now, when you see me lifting the hair to see the comb, if you can see the comb through the hair, when you lift it up, that means that you're not leaving out enough hair. That'S the test to see how much hair you need to leave out by lifting the hair up and seeing if you can see the comb tail through the hair, if you can see it through the hair, then you're not leaving enough hair out but fortunately, like i Said before tapings have, like the tape part um, that you stick in the hair to is black, so it's great at concealing it's different from you know. Um micro links a little bit because micro links have the beads and um they're still super flat, but the tapers are just way faster. Okay, i'm about to start installing, but i didn't want to fast forward this part because anybody that's watching at the tutorial or wants to learn how to do it. Um. I want y'all to really see this. Probably i can understand and get what's going on so um at this part of the insole, i'm going to be ripping the tape off of one to one piece. This is one piece now when her hair is done, it's going to look super full. Every bundle of tape ends won't look like this. It just depends on the texture that you buy that matches up with your hair. So, as you can see, it was black and i'm going to start off by putting the tape on the bottom all the way to the root as close to the root as you can possibly get it, and really press really really thin slices, because you want the Hair to hold - and you want the adhesive to really stick so i'm going to take one piece put it underneath the hair. That'S how i'm going to start it and take another piece, and i'm going to put that directly. On top of the last now that i've put the tape on on the tape and don't directly, on top of each other, i'm going to take the pliers, and this needs to be like the flat pliers like really flat about it. The pliers need to be like really flat and straight adhesive, together, really good. No heat is required to um to form the tape in or anything you just use the fire and squeeze it really tight and that's going to create the um seal for the paper and um. You just continue this process on, as you go to each piece of hair, and i also wanted to say like as you're going up, you always want to move in a you motion, because you want the hair to fall in the direction of the way hair falls On your head, our hair doesn't go straight down, always move in a circular motion, so there are zones. There are four zones on your head and one day i'll make a video talk about the zones at the end, but for right now. So once i get to the next row, if there won't be a tape in directly underneath it, but it will be like a little bit over so um. How do i explain this in a better way so that you can understand? So if i'm the way, i'm doing it right now, like you see i'm going in this motion, the two tape ins next to each other. There will be a tape in above that, but the space in between will another tape and will replace that in the next row, so um that way, um when you're the hair has an even distribution, so um, i'm squeezing it in, and i just want to show Y'All, exactly what i mean, so the previous row had two tastes next to each other, and even though i'm continuously putting tape into side by side, i'm not putting them directly stacking them. On top i'm kind of doing a jagged zigzag motion. So how i'm installing it? Because that way the hair will evenly be distributed, and especially you want to save the hair, because you don't know you want to make sure that the hair is um put into the head evenly so that when you're styling one side doesn't have once so. I'Ve already installed one bundle and now i'm on to bundle number two and you can easily use the bundle really really fast, because one bundle gives you 20 pieces about 20 pieces and two of those bundles are to create one. So, just imagine if you put them so close together and you don't space them out enough, that you'll run out of tape, ins and then you'll get stuck so and if you untape them you'll have to replace the tape with a new piece of adhesive. So you don't want to have to do that on your first. Try, so just take your time and um figure your placement out properly sooner or later, i'm going to get the um the hair holders. So that way it could hold my hair for me, but i really don't need that a comb works just fine. You don't need to do what everybody else is doing like go by the holders. That'S that holds the hair on the bottom. If you need that kind of um, if you need that kind of guidance, then just use clips that they work just as good. So, okay, now that i'm at the top, i'm gon na put a few more pieces of tape ends in, but i'm going to leave. Um, the top of the hair, the back hair out, so that it can cover those that tape ends and also she'll, be able to part her hair down through the middle and pull it up in the ponytail and separate the hair up, so that she can do More than one different style, as you can see, it's a lovely bun in the back. I love that and she'll be able to do three ponytails now. In this part, i'm going to be doing the tapings facing her going towards her face, and the reason being is because i want her hair to be able to be very full in the front and i want it to stay going in the u-shape. So um. That'S why i'm doing a tape ins in this direction, and i want it to fall really close to my face and i don't want it to fall to her side. Um. That'S! This is the perfect placement for you to be able to give your clients some versatility when you're parting out the hair and then once i do, a few tape ends going towards the face of her towards her face. I start stacking the tape in above it straight and doing straight parts and stacking it above it because she can part in the middle now, if you want to be able to part it on the side, you have to part the hair out in the places that You want to leave out as you leave so that way you can flip the hair around and still get the parts that you want now. This uh install will not call for her to have a side part, but it will have a middle part and um with re. She she's okay with that, because she doesn't want to leave out too much hair, even though this is not 100 a protective style. It still helps in the process of keeping your still press last and longer and adding extensions in attention freeway, and you can get these tape ins pretty close to your parting without leaving out so much here and that's what oh wow wow. So so this install took all of 40 minutes to install, maybe less because i was moving pretty fast and i love love tape, ins they're so easy to install and flat and gives a lot of us now. This is the part that i wanted to share with you guys i'm gon na slow it down, so i'm really slowing down, because you can see a piece of paper, but it's so undetectable that it was not even that bad. You know like that's something that you can get away with, because i feel really thin in the front and because the tapes are black, it's like you won't notice it. If she wants her hair kind of frizzes up a little bit or even now it looks really unpredictable you. You really have to be all up in somebody's head to really notice that now she has to leave and go get her makeup done because it was her birthday and come back, so i could style it. So i couldn't even do this. I wanted to do so. Just check out the finished look wow now, when you add a heat to it, nothing is going to happen. It'S not going to melt or anything you can flat on it here all the way to the root and you'll. Be oh, okay! It'S not going to bother the tapings they're not going to um they're, not gon na melt, so you can proceed with your styling and put using heat and blow dryers and everything as usual. Wow uh wow wow, so wow wow um like subscribe and hit the notification bell.

Comments
ladynefertitibk: Love this! Thanks for the video.
O'LAINES: Came out beautiful
Nosayaba Omo: The background music ismuch louder than your voice it would be nice if you capfuls change that next time ❤️ after washing the hair with shampoo is it ok to deep condition right before you add the tape ins ?
Kamethia Mitchell: how many grams/pcs of hair did you use