How To Install 3-Part Vixen Tape-Ins /Half Up-Half Down Tutorial
- Posted on 14 August, 2022
- Tape-In Hair Extensions
- By Anonymous
Follow my IG accounts:
@madaboutmeechie @iloveposhcollection
Accepting clients in Atlanta & Cleveland.
To book an appointment or register for the Cleveland Hands On Tape-In class scheduled for Sept 11, 2022, TEXT 440.485.0190
*Pay in 4 interest-free installments for any of our products; wigs, tape-ins, bundles, haircare, skincare and more with ShopPay. Available at http://iloveposhcollection.com
•Save 10% when you use this 1 time code: MAMYOUTUBE
•Receive instant 10% discount code & other upcoming sales when you text: POSHBABE to 1.833.734.0809
•Posh Collection hair & products used:
Vietnamese Raw Bodywave Tape-ins
https://iloveposhcollection.com/produc...
Tape-In Pliers & other Tape-In Accessories https://iloveposhcollection.com/collec...
Tame My Tangles (leave-in conditioner)
https://iloveposhcollection.com/produc...
Rise & Shine (serum) https://iloveposhcollection.com/produc...
The Perfect Polish https://iloveposhcollection.com/produc...
Tease Me (holding spray) https://iloveposhcollection.com/produc...
Wax Stick https://iloveposhcollection.com/produc...
Purchase my paperback or ebook:
‘The Wig Recipe’ for over 50 of my custom wig tips & tricks at: http://MadAboutMeechie.com
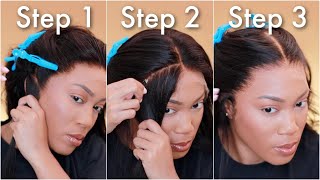
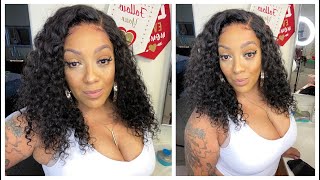
Vixen tape, ins, dixon, soap, no vixen tape, ins, y'all seen it here, guys, vixen tape ends. Why is it vixen tape in? Because you have the versatility of multiple styles in one install, hey guys, it's michi and i'm back with another video. If you guys saw my last video, it was on tape ends and today i'm going to show you another tape in video. But it's going to be. The tape ends done in a up down hairstyle, so i'm just going to get started and what i'm going to do first is just straighten her hair out. I'M just going to go through it with one pass. Just to get it straight enough to add the tape ends so because i'm gon na do a up-down style with her tape ends, i'm going to actually part her hair off to where it would be parted for the up down style and then i'm going to add The tape ends to the back first and then i'm going to add the tape ends to the top. That way, she has a clean part when i comb her ponytail back and then i'm just going to pin this hair out of the way, because we're going to worry about taping this section last so after you separate your top from your back the next section you Want to do is the perimeter to make sure that when she pulls the tape ends up into a ponytail, you don't see the tape ends, because we want as much versatility as we can get with this style, so up down single ponytail or she can wear it Down so of course, the hair i'm going to be using is my posh collection, and this is the vietnamese raw body wave tape ends and then i'm going to add a little bit color to the front of her hair. But i plan to get about. Maybe two bundles of tape ends in her hair, we'll see how it goes, but maybe between two two and a half bundles of hair for her tape ends. So now before i actually start taping in her hair. I'M just going to make sure that i have enough of her perimeter out to where it's going to cover up the tape. So you don't want to start taping before you check this, because then, if you put the tapes around her hair and her perimeter is not covering up, then you're going to have to remove the tapes. So, as you can see, you can't see the tape. So again, we are going to place her tape ends away from her scalp and you just want to lift the hair in whatever lifts with it is what you'll stick between the tapes. You want to make sure you have a straight part, because you don't want any hairs to be pulling from any areas, because that's what will cause breakage, you also don't need to force any hair into the tape. Whatever the tape grabs, that's what you grab you'll go on top of it with another tape. So if you guys saw my first video, then you would notice that i was going across the tape with my comb, but now i have my own tool: posh collection. So it's actually easier for me to go on top of the tape and smash them together so again, away from the scalp lift the tape and whatever natural hair follows. That'S what you grab and just clean up your part go on top of it. Your second tape then use your pliers to seal it together. Okay, so remember just based on how you are styling, your clients, here is how you have to put the tape ends in their hair. You can't put the tape ends in the same way on everybody, so you want to make sure you're doing a consultation prior to adding the tape ends. So you'll know your placement placement is very important and again remember we are doing an up down style. So if you saw my last youtube, video on tape ends you'll notice. I am doing the placement much different from how i did it in the first video okay, so i am close to one of my parting areas so again because we're doing the up down you want to make sure you are not crossing that part and you want To make sure you have a enough hair available that you can cover up that tape without it showing okay, so i am almost at the top to where her part is, but i may try to see if i can get like. Maybe a couple more, maybe about three more, but i want to make sure i'm leaving her hair out right here for coverage, but i'm gon na try to get about three more tapes in the back before i start on my top section. Okay. So now i'm done with the back area. So now i'm just going to take the top of her hair. So my goal is to put the tapes in where she can still wear her hair down or she could wear the up down hairstyle or pull it in a ponytail or a bun. So, let's see if i can accomplish that and get enough tapes in for coverage. So i'm just getting this hair out of the way since we're done with the back section. Okay, so this parting is going to be kind of tricky. I'M going to do a middle part, so i want to make sure i'm leaving hair out in the middle and then i also have to leave hair out on the sides and then on the other side for coverage. So so, there's only going to be a small section where i could put tapes at, but i should be able to get enough to where it doesn't look thin and it looks full for her hairstyle. So my first part at the top - i'm just going to do like what i call a teardrop where it starts a little more narrow in the front and it gets wider as you go towards the back. Don'T need a lot of hair out in the front because it only has to cover this small section, but you want to make sure you put more hair out in the middle and towards the back because it has to cover so many different areas. It has to cover the sides as well as the back hello, okay, so i'm done with this side, but remember you can only see the tapes, because this is her leave out. Once i take her leave out out of the clip it's going to cover the tapes and you won't see the tapes, so i'm finished with this side and i'm just going to start the other side so guys, if you remember the vixen sew-ins that were out. This is pretty much how you're doing your placement you're parting, the back and your sides. Typically, you would do it with four sections, but we only needed three sections because we're just trying to do it up down style. But if you actually remember the sew in vixen, this is pretty much the same thing. So we're going to call this a tape in vixen and, as you know, with the vixen, your placement, your hair placement, is very important. So that's why i feel like it's. The same thing i feel like it's a victim because of the hair placement and to make sure that you have coverage in all areas. Okay, so i put all my tapes in so we have one section over here, another section over here and then we have our larger section in the back. So when i take down her leave out, it's going to cover both both sides as well as the back and i'm just going to go through it and do some blending so that her hair blends in with the tape ends and what i also want to do. I'M going to go into her front and just add a little bit of color where she already has color in her hair, so she can wear it down with the middle part. She can wear it up in a full, sleek ponytail and then the final style. I'M going to show you guys is going to be the up down. Look at that look. How flat that is! Tape. Bands are supposed to lay flat if they don't lay flat, then your placement is incorrect. So let's give her her final style, okay guys. So i'm going to add her color tape ends in her hair, but what i'm going to do is i'm going to do a single sided tape in which means there's only going to be one tape with hair on it. The other side is just going to be the tape, so it's not going to be smashed in between two pieces of hair is going to be smashed in between hair and a tape. Okay. So i'm going to show you how to do that. You could also do this technique on people who have like finer hair, and they don't want their tape, ends to be thick or if their hair is fine, and you don't want to put a lot of weight on it, you can use a single sided tape. So again, i'm just adding a piece of color to the front. Okay, so remember i'm just going to do a single sided tape with hair, so you still apply it the same way, but instead of using another piece of hair, i'm going to get a single side tape, so i'm only using a tape to seal her hair. In then you're going to close it with the pliers there, you have it okay guys. So this completes my look. This is the up down with the tape ends, but i love the idea of calling this a tape in vixen because you have that same process from the vixen sew-in. So you may see that in the title, so i use all posh collection products. I use the vietnamese body wave hair. We also have other textures available. I also use all posh collection products, so make sure you guys go to iloveposhcollection.com or check out the description section to purchase those products be sure to subscribe to my youtube channel at madaboutmichi as well as follow me on ig at madaboutmichi. I hope you guys enjoyed this video, see you next time you
Comments
Tenisha Humphrey: This is one of the best explained tape ins extensions tutorial ever her hair is beautiful. Thanks Meechie
camara pope: Thanks for blessing us Meechie! I always look fwd to your tutorials.
Lorraine Leonard: Great look on her you are always slaying any type of hairstyle period. I'm happy to see you doing hair tutorials.
iKandi: Leave it up to you to come through with the most thorough technique! I’ve never seen the one sided placement. I wish I lived in Ohio!
HJCWC: I love your tutorials and the hair came out beautiful. Can you do a tape-in removal?
Cosyco: Come on prototype money!!! Using a comb for the 1st video...now she has legit tools! Keep it up ma'am
Vanessa Milton: Ur so talented sis. Blessings
Dorothea Newton: Love it!!!
Charlotte Hughes: Work is incredible!!
Miss Free: So pretty
Izo A: Love this
Michell Mitchell: STOP PLAYING WITH MEECHIE!!! You snapppped!!! Love it!! Are you able to do this with thin hair?
Bosslady4life: Will this work on natural hair? someone told me I needed to do a hair mask first or train my hair before I think about getting tape-ins
Va'lure Beauty: SO FIREEEEE.. I WANT TAPE IN'S SP BADLY
Tanya Wallace: Beautiful...
Adrienne Davis: Flawless
BlaqueSuggaDesigns: Amazing, when are the links coming
Hajji Powell: YOUR THE BEST
Ivan Volkov: ♥️ ❤️ Alles sehr schön. Aber zuerst zusammen die Nummern 10 und 1. Eine empru.ONLINE Brünette und eine andere Blondine. Es wäre unfairf, wenn ich 4 wählen würde
Глеб Бодров: ♥️ ❤️ Alles sehr schön. Aber zuerst zusammen die Nummern 10 und 1. Eine empru.ONLINE Brünette und eine andere Blondine. Es wäre unfairj, wenn ich 4 wählen würde
Badr Jony: Alles sehr schön. Aber zuerst zusammen die Nummern 10 und 1. Eine empru.ONLINE Brünette und eine anderei Blondine. Es wäre unfair, wenn ich 4 wählen würde
Tearrah Ramsey: Her hair model looks annoyed
Максим Ким: ❤Only for fans over 18 year⤵️ Alles sehr schön. Aber zuerst zusammen die Nummern 10 und 1. Eine empr.ONLINE Brünette und eine andere Blondine. Es wäre unfair, wennn ich 4 wählen würde