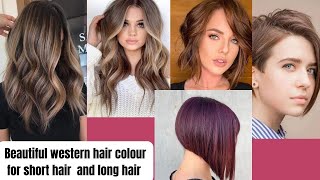
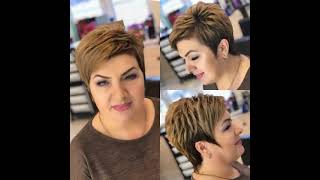
How To Cut Short Layered Haircut For Women - Short Haircutting Techniques
- Posted on 07 September, 2019
- Hair Knowledge
- By Anonymous
Short Layered haircut tutorial for women
Short hair cutting Techniques
*Giving is hold forever*
Hey welcome hairbrained nation, julian purlins zero here for another series of the classic cutting foundation. I have mr. Randy Taylor behind the scenes. He'S gon na be filming. He'S gon na be feeding your questions so keep them coming guys throughout the episode. So today we're we're gon na look at we're gon na look at a short lady's crop all right when I use the term crop. What I'm talking about is cutting the hair down. Quite short, all right - and you know it's a term that goes back from you know my Sassoon days, and you know something that I think is kind of universal. We could also use the term pixie. We could also, you know, just look at it in a technical sense, which is going to be a short layered haircut. That follows the head shape with a very natural, slightly scissor over comb outline all right. So now, with this, what I'm gon na do is I'm gon na start through the top I'm gon na get my proportion. You can see, I'm taking my section combing, all the hair, daddy's saying hi nice, guys, yeah, you know it's. I was talking to Randy a little bit earlier and I feel, like I haven't seen Randy in quite some time. You know: we've both been on the road busy doing different things that you know will kind of get into while we're doing today. But you know back on track back doing the face book, lives and sharing you know, sharing the foundation that made you know. Craft hairdressers really understand their craft as much as possible. Okay. So now, starting out, I'm taking my length, like I said quite short, lifting that straight out from that center section, I'm gon na start a little bit longer. I want to see what the hair is going to do see how it's gon na react all right. So it's laying down pretty well, you know make sure that I'm, you know looking for any awkward growth patterns, any awkward jumps within the hair nice. I feel like I'm seeing all my old friends after you know, taking a little time on the road which has been fun. You know we just got done. The show season, like I don't wan na, say it's finished, but you know it's starting to get towards the end of the show season yet I'll be in Orlando, with my friends from sport clips. Yes, so that's gon na be really fun actually just spent four days out in Austin, Texas, technically Georgetown working with the team out there, which has been great so yeah. So I think Orlando is probably the last really big one before the summer gets well, you know what I'm thinking is: I'm removing weight all right and everything's gon na be kind of form-fitted to the head shape. So what I like to call head huggy right so by starting in the center, I can really start to see you know the shape of the head, getting the haircut to tune in with the shape of the head. But then also you know, I'm looking for where the most awkward growth patterns usually are in through the crown area in through the front hairline now, by all means, was it Mary? Oh yeah, Mary, oh you know you can start this in a lot of different areas and it's just really, I think, finding the area that's going to make most sense for you. I could do a very similar look and start through the sides, and I do sometimes I would normally start on the sides if I wanted to perhaps leave the top a little bit longer, but I know I'm taking it down right, so I'm gon na take it Down and start right from the top, you know get that length in see how the hair reacts and then roll with it marina says hi from Italy. Ah, awesome hello, marinas back right yeah I was, I was actually just in Italy and I was there actually for two weeks on vacation, but now you have to realize you know the only people I know in this world are hairdressers right. So I was there with my hairdressing friends out there in Rome and in Florence, and you know I had a great time, I'm already making plans to go back next year. I have to take my how to take Randy to document the trip help me eat some pizza. Alright, so you can see again. The hair is laying down really nice, taking the sections from the crown through to the forehead, I'm still combing up. So I'm standing on the opposite side so that I'm pulling the hair towards my body. You noticed, I lowered the stand, which would you know equate to lowering your chair if working on a client in the salon, so that I can really get on top of it and see what I'm doing, but by standing on this side. It just allows me to pull it into the center just slightly right, because the heads on a curve here now, even though I'm working with more of a head hugging shape, sometimes you'll get a flatness through the parietal Ridge which you want to try to fill in. With a little bit of weight, so by combing it's slightly up, it allows me to fill that in once I pass the parietal Ridge, then I can go into the side area right, but I'll do both sides of the top first you're calling this a ladies short Layer, yeah yeah, I mean in a technical sense. You know I would refer to it as a lady, short layer. You know fat word, you know, I would refer to it as a crop CR o P, which goes back to my Sassoon days, and you know we also have some. You know fad names, pixie things like that, which I think are all great and you know use whatever term is going to relate most of the client that you're working with or most of the audience that you're teaching right. You know so, but in a technical sense. Yes, a short layered haircut, basing most of the angles off of following the curvature of the head. You know so we're looking at, like a 90 degree straight out round head hugging layers, so this is gon na, be my last section through this side of the top, and you can see I'm gon na hold this here, Randy and spin. So you can see my elevation is coming up, but it's not up square mm-hmm right, so I'm keeping a little bit more curvature to the head shape, which is gon na. Give me a softer more feminine. Look to it. If I was cutting a men's square haircut, I'm gon na extend that up even further right, so they create that flat line from Center to parietal, where this just has a little bit more curve, which tends to give it a softness to it. Alright. So, first side at the top we're cool like the length it's laying down nicely so now. What I'm gon na do is I'm gon na use that same guide line from the center and I'm going to start to work through the opposite side and work on getting a consistency within the haircut now, I've already established the guide line from the crown to the Front now I'm using that guide line, but you'll notice. My cutting now comes from the front to the back. Alright, so people might say well, could you start cutting from the front to the back yeah? So let's say I had a situation where the growth patterns in through the front hairline were quite jumpy to get the right length. I might start on this side first because I'm immediately cutting that hair around the face first, whereas if I noticed that the crown area is a little bit jumpy tricky, I'm gon na start here to get the length right. Alright, so I mean there's a reason for everything, guys everything matters, there's a reason for everything, but once you understand the little things like that and you start to think about them, you realize you know like the question that we had earlier from Mario. You know why are you starting on the top, and I was saying you know I could do a very similar look based on the head shape based on the texture based on the length I may start in sides right. You know, but it's having that understanding of the fundamentals you know and that's why we spend so much time. You know working on the fundamentals to have a really good understanding of what we're doing. Why we're doing it once that thing if you would cut them all at some time? Yes, yeah a good way, they're hard, a mullah yeah. I would definitely start my mullet right here on the top yes and then get a point, pull everything back. You kind of move forward yeah you get like that kind of like David Bowie, mullet, uh-huh yeah, but no I'll try to work that in that's always I'd. You know. I love a cool mullet, yeah, all right again, just looking to see the shape that I'm cutting taking my sections from the back towards the front, and this is gon na, be about my last section and again noticing that the you know the over direction isn't up Square, I am following around the head shape on the curve just slightly and my over direction. You know the more width that I need to create through this side area right in through here, the more I'm gon na over direct towards the center. You know so that's based on the head shape if I had a head shape that was narrower through the parietal and a little bit kind of pointy through the top to compensate for that. I'M gon na do an opposite shape right, so I'm gon na cut it a little shorter where the head shapes the widest and leave a little bit of width right. So nothing ever really follows the head shape unless you're like Randy and myself, who have perfectly shaped heads, we can just shave our hair off and look awesome right. I apologize to your client bro, all right so now and hey guys just so that you do know you can come back because I know a lot of you guys are watching. You can come back and watch later, but it's always fun watching it live already. Sorry, it's it's very kind of starting together. Once I cut this, we got that mullet you're asking for right. So now I want to start to work through the sides using my guide line through the top right, so my sections are going to be slightly diagonal, but primarily vertical right. So vertical sections are more conducive to layering. They give you an easier, more efficient way of layering, but still at an angle, because I wanted to follow the curvatures of the head, whereas if I was doing a square I'd be more true straight up and down right, so we're going to go right. So now here taking that section and I'm gon na use that guideline from the top and then start to layer this into the side so working inside my palm now is going to let me tuck that hairline in just a little bit right. So I'm not gon na, extend it and pull it out to keep it longer. I'M just gon na tuck it in a little bit and then follow my section back over direct slightly forward. But you see, I get the guideline clean first and then I comb towards the guideline to get the over direction just right and then follow that down and just very slightly again just relaxing the wrist to sit that in a little bit there you go yeah. I was telling Randy were just you know, doing a class on. You know how to you know, do a facebook live and all the different things that we need to consider with the camera angles, and things like that, so that we can be as as visible as possible all right so well, these ones I mean this is probably My go to about a five and a half yes, so these are the gold Pig, my limited edition that was made by B Mac alright. So these are a five and a half I like a straight now. It doesn't mean I'm opposed to offset things like that. They'Re cool, but these are my go-to right and then from there. I would use things as like a specialty scissor, so I have longer scissors that you know I may use for one length blunt lines for scissor over comb things like that, but one I'm doing detailed interior work, five five-and-a-half. So here I spun around Randi. So we can really show that angle and I can just show that my knuckles are just resting in just a little bit. So I can just feel the ear and then tucking that in right into the hairline, and you can start to see how that shapes. Building up right, so it has a little bit more width to the haircut in this area where the parietal is where it tends to be flatter, but still wan na curve, not square right, so that would be very masculine looking, so this is gon na give it Just a little bit of softness, alright, so what I'll do now? Is I'm gon na start? The other side with this I'm gon na, take the same sections now. The only thing that really changes is my hand position so, with my hand, position on this side, you'll notice that my fingertips or what's angling in now right so on the one side I'm cutting up. So I have to flip this hand over right, because the scissors coming from underneath on the first side, I'm cutting with my fingertips up because the scissors coming from the top down right. So we learn to you know, get the appropriate finger angle, that's conducive to what you're trying to do getting the guideline from the same place through the top and then working that in to the hairline, making sure that blends really nicely. And then, once I'm happy with the guideline, it doesn't mean I might not need to adjust it a little bit, but I'll get a few sections in. So you can see just combing that hair out of the way cheating my guideline now from the front and from making sure it blends into the top and then, following that through nice yeah, I was out there with Logan not too long ago a couple months ago And did did a a class out there in the Grand Rapids had a great time was a little bit cold for me. But aside from that, we had a. We had a wonderful time all right so over directing slightly forward, then making sure that blends in not only to the guide line in the front but making sure it blends into the top length making sure that's really nice and even and clean. And then this is gon na, be my last section and then I'm gon na check the balance. Before I go on to the back right, cuz, you notice. You know I wanted to get a few sections in before I go back through check the balance. A couple different ways that I'll show you you know how to check it. Welcome back all right. Thank You, Dominic awesome! Thank You Logan. Yes, so first check guys so people say how do you check the balance right? How do you get your guideline from side to side all right, so when we're starting on the top? The first thing is to get a nice symmetric shape from the center to a certain point of the head shape. Now, once we go to the side on the first side, I'm looking at that point through the top that give me an estimate, but it's still, you know about making sure that it works with the face shape correctly. You can see that I'm placing the back of my knuckle on to the cheekbone right so that I can feel the face shape right so to have a connection to it, and then I establish that guideline once I'm happy with the length on the first side, I'm Gon na work that, through to behind the ear, then I came over on to the second side, and I took the guideline from the top at about the same point. Hopefully, right and then work that through the same way now once we get to this point, you have to visually check right. So I'm going to look in the mirror, I'm gon na. Take it go the guy cool. It looks good. It'S looking balanced yeah now from there. I'M gon na start to technically check it with a cross-check right, so I'm gon na pull out start to lightly just clean up any inconsistencies with the edge, but I'm also looking and memorizing the shape that I'm cutting right. I'M looking at the distance that I am away from the head shape Rick. What'S up man, I haven't seen you for a little bit of time: Rick great hairdresser, known Rick for many years out in Oklahoma. Now, when I'm working on the second side, I'm looking for the same qualities right, so I'm looking for the distance, I'm looking at the shape to make sure the shapes the same. You know I haven't created that instrument that met just a hair perfectly to make sure you know like a computerized version of it. So yeah you have to use your eyes guys. This is an art form. It'S like a poem painter, I'm using my eye to create what I'm painting with this I'm using my eye to create the overall shape right and then you know it's doing it to the best of your ability and making it look as clean as you possibly can, And as balanced as you possibly can all right so happy with that, so just comb this down, I always try to keep it. Looking pretty you know, as I'm going, I don't have to look a mess for my client. You know because especially she had a bob before we started right. You know, if I'm doing this big of a change and it looks awful for 45 minutes while I'm cutting it into her head. It'S psychologically, you know not good all right. So here's the start of my mullet marina, so I could layer that through and just leave the bottom long we had a question earlier. A request on doing a mullet know it's coming in all shapes inside. Oh, they sure do they sure do exactly so now. I'M gon na start to take my sections through the back still at that same angle, right yep, yeah watch see: let's do this Randy and now I'm gon na use the guideline again from the top. I'M gon na use the guideline from the side make sure that blends in you see a nice clean line. Also guys look, we have to open and close the scissors. We have to cut with authority right, I'm not nibbling at it right. I want to get a clean of a line as possible. Now, once I get below the ear, I don't have a guide through the side anymore right. So once I get to about this point, I don't have any guideline in front of the ear right in front of the hairline. This is my first section through, but now I'm looking at the head shape and I'm gon na take my knuckles and now angle them in further, so that I start to take that in so that the length follows the curve of the head right. So, just because my fingers are angled in does not make it graduation because the head shape is angled in it's still following the curvature of the head now, once the finger extends further than the curvature of the head. Now, I'm graduating right should use that subtle difference. If we're looking at it really technical for those craft, hair dressers out there right for all of us, hair nerds right so once I go past the angle of the nape graduation layers, so now continuing those sections all the way from the top through to the bottom. Now you'll notice, I'm gon na follow the head shape through the top. I have to lift out away from the head where my knuckles are then, as it starts to curve in I'm gon na start to angle, in follow the curvature down into the nape hairline. So again, just a nice little head, hugging layer following the curvature of the head, and now I'm gon na continue working that through just past the center back now I do need to be aware of how far I pull it forward. So my over Direction forward is going to be how much weight or length I maintain in through the crown area you know. So if I had a head shape, that was a little bit flatter in through the crown, I'm a comb it slightly more forward through that area and then start to tuck in to the nape. But if the head shapes relatively rounded, then I can keep a little bit more of a consistent over direction forward right so again, you know it's not necessarily following the head shape identically, unless the head shape is nice and rounded and oval right. So I need to look at the head shape, see where it's a little bit flatter seriously Lannister. I was gon na say: oh okay, now I know who you're talking about I'm like. I don't want to sorry guys. I don't watch Game of Thrones, I'm one of those. I guess minority minorities in the population that has seemed very, very, very little but she's kind of hot. Isn'T she yeah? I do know what she looks like well, I mean, I think, fine hair. It can work. Really well now your choice, a length, might be a little bit different. You might keep it a little bit longer or sometimes you know you might go a little bit shorter depending, but you know I'm a true believer that you can do a lot of different technical. You can do a haircut on a lot of different textures of hair, but it's learning how to just make those slight adjustments. So I might keep the length a little bit longer on finer hair that would kind of fill it in. So it didn't look too sparse if it gets too short, yeah sorry, dude, sim, keeping the anticipation going man and and and again it's that's what I mean it's like. We can generalize, and you know I mean III, love generalizing, it's alright, you know cuz. I can look at different scenarios, but a lot of times when you take someone with fine hair and you cut it short man. It thickens up pretty darn quick, you know, but like I was saying, if it's really, if it's sparse, if the density is sparse and you cut it too short, it can get a little bit see-through. You know, that's also, you know a great opportunity to beef. It up with some color, you know, do some color to get the hair a little bit more dense. This is one of my favorite things. Is you know like a bleached blonde crop? I just think it is so stunning. You know on a woman thanks, Sherman yeah yeah. Thank you very much, sir Herrmann. Apparently there's only one Herman angel. Exactly oh, yes! Well, we, you know, I mean, I remember you know here in the comments, and I remember you know the names that we hear over and over and and you know I mean I know from the Instagram posts and the tags and the things like that. That'S another thing guys I took a little time off from Instagram. You know it was time for me to kind of reinvent myself, and I think you know as artists. We need to you know, keep in mind that we do need to take a little bit of time reinvent what we're doing relook at what we're doing, rethink about it and then come back fresh right. So you know like I was saying you know Randy and I and a lot of a lot of us were very busy. You know during the peak of the show season you know, there's been a lot of travel, there's been a lot of classes, things like that which was a perfect perfect time to you know to reinvent ourselves. I have some. You know new people that I've been working with and I'm really excited about. You know exposing and bringing out into you know the social media and the education world. You know some great color is some great colorist or cutters some great colorists. You know that you're gon na see very soon coming to you very soon, yeah, all right, so just visually check in the shape. You know, love the texture. This is a great length because it's still long enough to kind of you know rough up a little bit in through the crown. You know I always like a little bit of a growth pattern there, because you know it's a perfect area and a great way to create volume in through the crown people tagged you on Instagram and they're posting. You find somebody and then post them. Oh yeah, always you know, always always you know open to nest on your Facebook. Oh, that would be awesome. That would be awesome, see Randy's opening up the door for you guys. You know - and I think you know as a hairdresser - we have to put ourselves out there. You know, how do you get opportunities? Well, you make them. You know you get yourself out there and you use the different forums that we have. You know make sure you do your posts on hairbrained make sure you tag people. You know on Instagram on my Instagram there's a couple different. You know social media sites that pick up my work and then expose it, which then gets me to a crowd that I may not have ever known or seen before you know. So we start to get into seeing you know, meeting new people, which is great. That'S what I also love about the shows you know the shows are a great way for us to network ourselves and to meet people that we may have never met before you know, and it's like I get it guys. You know it's nice to see people you haven't seen in a while, but if you're sat at the bar with the same old people, every show you know you're not meeting new people right and that's, I think, as nice as it is to see people that we Haven'T seen you know, we want to always meet new people in the profession, and you know what I think for the people that we don't know make sure you come up and say hi and I love that sitting there hanging out, I'm at a show come up And say: hi tell me who you are where you're from what you're doing you know. I know Randy's designs need models for the first stage, all cut so men always you know all of us, randy gerard. You know and many many many others we feed off - that all right sevens wait. I thought that was June. My gosh, I thought some sad thought was in my head, but maybe it's really happening. You know what there might be one out there: okay, so here's where we're at right guys! So now, I'm gon na start to work this side so we're the first side just past the curvature. Now I'm gon na start to work this side back into it same thing as when I went through the sides now my hand position. My fingertips are gon na, be cutting down, I'm gon na be cutting up, but I need to start where I have my guideline, which is from the top of the ear through to the curvature of the head. So I'm gon na take that get it out of the way and then I'm gon na section this off, because it'll have a guideline down here yet so I initially establish my guideline from the area in front of the ear, and now I'm gon na follow that Up you can see that it's blending not only into the guideline prior, the section previous, but it's also blending into the top once I have that blended well now, I'm gon na start to angle in this side can be a little bit trickier because my hand gets In the way right, when I'm doing it on a person, you know I might tilt the head away from you a little bit a little bit forward and down, and it gives my hand the place to go. But it's also easier. You know to rest the hand against the shoulder and push in a little bit where you know the doll heads don't give as much so this side is a little bit trickier to get your hand in awesome and then Cindy is asking a seer questions through the Back are slightly curved. What would the difference be if these sections worse well, when we think about our sectioning, you know the section: is your roadmap to the shape and the technique that you're using so a more purely vertical section? I would use for a more square line right so because this is a little bit more of a curve. We think about diagonal sections following the curve of the head completely vertical sections oppose the curvature of the head so for square layers, vertical sections, horizontal cross check for a more rounded head, hugging layer, slightly diagonal sections, because you know here this is a little rhyme for You all right, the sections tell the fingers: what to do. The fingers tell the scissors. What to do. The scissor tells the hair what to do right, so they all have to work together. So whatever you're cutting the section should be not always nothing's. Ever always, the section should be in a classic sense. Parallel to it. That'S the way we get consistency. Yes, Randy you didn't know. I also do nursery rhymes, I'm so easily amused yeah. Exactly. I think, that's why we get along all right. I'M making sure that blends in following this through all the way into that hairline and remember: hey, what's up James, it's the reunion of the classic cutting foundation today, yeah yeah! No, we were hanging out. Where were we man we were in Vegas had a good time. There was during intercourse and it was also the sport clips big show of the year and I think yeah now I wish I mean you know I wish yeah you know now. Let me let me make him feel bad, but you know hopefully, next year next year, to be in the cards. Yeah yeah, really good. Pete'S are really good wine. My people James, was having a 5 a.m. call times exactly. I see see now now: let's see who's smart, I was sleeping in and having siestas funny. James is a great hairdresser guys, if you guys don't know him he's from Canada. He is part of our Davin Osteen, great hairdresser. Really, nice guy, you know, definitely look them up on social media. Maybe James plug yourself. Put your put your Instagram up there for everyone to see yeah. You know, and this is what's great about having a community - and you know it's like people. Ask me what my Instagram is all the time and hey I'm happy. You know, I'm happy that people do that, but I always say to them. Follow who I follow. You know because the people I follow are like-minded, that I admire you know and I get to you know, work with some great people. You know throughout education there you go thanks, James, alright, so it's just starting to get around to the sensor back now. What we'll notice is you know, as I start to cross over, I want to start to look for the blend from side 1 to side to recite to to side one I should say once I feel this get too high right and I'm working inside the knuckles. I would say 95 % of the way up, but then you just at last, I'm making sure it blends because that's too high right, I can feel once my elbow gets above my shoulder it's too high, so I have to release the pressure yeah exactly you know, And your body's telling you something like hey: what are you doing you know, so you start to get a really sense of awareness of your body. Hand and body position. Are things that I focus a lot on in my beginning: fundamental education, yeah, you know what I shouldn't even say that, because even in the more advanced classes, because a lot of times, people haven't been exposed to the the ergonomically correct way that we should work and Cut hair so that we're not damaging our bodies but also to help our haircuts come out more consistent, because if we're in a really awkward position, you know it's really difficult to have a consistency in our finished result. So here see where my elbow is now from there I flip over and it relaxes the elbow that allows my hands to control the hair more easily. Everything looks set everything matters guys. You know, there's a there's a way, there's a method that has been developed over years right. You know from when I started back in the early 90s in New York at Sassoon. I mean things have evolved from that. That time you know things have moved on. Things have hopefully improved. You know in the way that we're educating the newer hair stylists in comparison of spin around in comparison to you know the understanding of hair that hair color really pops on your shirt. Let'S see that it's all planned Randy. You know the education has. Definitely, you know, like I said, improves to get hairdressers to understand things that it took me years to understand in day number one right and some of the things when I'm working, especially with the newer hairdressers. You know I'm exposing them to things that I did wasn't exposed to because they weren't really as understood at the time, and we always need to be, I think, pioneering education and you know focusing on well. How can we get? How can we get there quicker, better and more efficiently? You don't to get there. Just quicker has to be better and efficient right. So, just looking to see that curvature right, making sure that the balance is nice from side to side and just dusting the edge off, and if I see something like let's say I saw something longer. Well then, all right, let me go back. Let me take that section and see where it is so when I am working in this method, where I'm combing the hair notice, I don't let go lift up, lift up and I'm working through that shape opposite angle. So the first angle was here now: I'm working this way opposite angles. You know I can do this because I'm not changing it right, I'm just lightly dusting off any little inconsistencies within. I guess you get less sleep. I got home last night, like I said I was in Texas in Austin, outside of Austin, technically in Georgetown's and barbecue. I actually and if you everyone, if you ever go to the Austin Airport, they have something called my greatest music. Oh yeah, oh my god. It was awesome, Austin's, really cool, Austin's, a cool place, yeah yeah. Well, that's what could kind of take away. So hopefully it keeps it's it's you know cool was it when they say keep Austin weird that, hopefully it stays weird if it starts to lose its weirdness I'll, move there and help bring it back. It'S that quick, buy that yeah. Just you know great thing. I was out there with my friends and Sport Clips. You know working with their creative team on presentation skills in Georgetown, just outside of Austin just a little. I don't know if you would call it a suburb or whatnot, but just outside of Austin. Oh yeah, that's a great area. Yes, so the balance is looking really good. You know, so you know checking through making sure everything is nice, and even what I want to do now is I'm just gon na go through and dry it really lightly cause. I will do some finishing technique for you guys I'll get a little bit fancy, so I'm not going to come use my comb come down. Could I do a lot of my shorter blow dries like this wicket? Oh, that's right! Yeah, my my one Road Denman brush right here and that's the story that was closed to me. That I believe is when you know this was developed. First with Denman and Vidal Sassoon, it was to mimic a row of homes because we comb wet hair. We brush dry hair, oh yeah, so you have the one row, but it just glides through really easily and I'm not trying to change the hair in any way, shape or form. I want to allow it to do what it wants to do and then I'll work on perfecting it from there they're looking to see the movement of the hair. That'S about try enough! Okay! So now, let's start to you know, do detail, work whatever is appropriate for the hair that you have right. So a couple different things that I'm going to do you know with the amount of hair. It is a little bit denser, so I want to work and remove some weight with slicing into hair, because it does look quite blunt through the edge. So when I get the hair going in the direction that I want now, what I'm going to do is I'm going to take the scissor and take in the back of the scissor, the dull part of the blade and just following it through the hair, and if You notice I'm not closing the scissor all the way, because we can imagine what that would do and it's a lot to do with timing. So this scissor has to open and close faster. Then this is removes because if it goes slower, it's gon na you're gon na feel it drag so the scissor has to open and close faster than it moves and I'm following the head shape. So you see I'm working with the curvature of the head and this is a great way to remove bulk, but maintain your shape that you created now. I started higher and worked through now. I start to start in the middle area, some closer to the edge. You know so see I using this as a counter pressure right, so this helps me feel the speed and by putting that pressure control it a little bit easier, hey what's up Michael who's, Joe, that's what I heard. Yes, I was hanging out with you know. Wayne and Micah polsinelli is also one of our. You know. Educator stylist, extraordinaire, errs with a Venus and davon, has just had its worldwide hair tour in Iceland, which is I mean, that's pretty cool place a nice and what? How will people be able to see that once it's done, Randy, okay, nice? So you can see just by taking that now and pulling it back. It creates a little bit of roughness yeah. It creates a bit of roughness to it. So you know the softness, depending on what you do to it, can translate into texture but again using the backside. The dull edge of the blade onto the scalp feeling the curvature of the scalp AC. And then the amount of pressure that you use is going to be: what determines how much hair right you remove, so the scissors moving a little bit faster. I'M the opening closing motion is moving a little bit faster than actually going through the hair, which is going to create some softness, so I'm gon na get where I want it now, just focusing on the edge no, but I poke them in the eye. Now I'm just kidding guys yeah, no, I mean can't say can't say if it's on that cut my fingers quite a bit right, so now lift it up and I'm working into the edge right. Now, the back of this scissor, you see how I'm backing up this finger just a little bit and the back of the scissor is touching my middle finger and then I'm closing it. You know and then making sure I don't go in far enough, but I don't think about I'm closing in I'm closing out. I close it when it's at the right place right, but as long as my fingers out of the way and I'm using the back of the blade right to touch the finger, I'm not gon na cut myself now yeah in the beginning. You know you have to really be careful and in the beginning you may want to go a little bit slower or not that I'm going fast really you'll have to go fast. You just have to be precise and consistent with what you do. It'S getting the hair out of this scissor, putting a little bit of olive oil on the blade you know still in my blood from Italy. Okay, so you can start to see that now from there I can come and look into the front. You know I would be using the mirror if I had one in the salon and if I was in the salon. I'D stand here, put my finger on the chin, so I can control the head and then work in this way, all right tilt the head. A little bit again control the head with my finger on the chin, I'm looking over a little bit more, but you have to imagine if I had a mirror in front of me. I'Ve been looking in the mirror and doing it this way right, so I could see exactly what I'm doing and see the effect it has around the face, all right so now in through the back similar. Now I'm looking at the curvature they had, I got ta be careful not to cut into this area too much because I can flatten it down. So I'm looking at the curvature of the head and on just above the curve and I'm gon na start right. There yeah work worked into the direction that the hairs grunge. If you go against it I mean you can do that, but it's gon na cut a lot more out, so you can see it's working with and just I mean it gives that a little bit of layering I'm working another like a 45 degree angle through. So I worked on this curve. Now I'm gon na go on the occipital bone again, you use in my hand for back pressure and then I'll go beneath the occipital bone come through not in here I can lift up on to where the heads flat and now I'm gon na work into the Edge this way, but I don't want to collapse it too much by cutting down into you, know the scalp area. Now I'm gon na work this. So, on this side my hand, my palm is facing now I'm gon na go back and these are made by a company called B Mac, which is a true Japanese scissor. I'Ve been to the factory in Japan in Nagata, and they are handcrafted, Japanese scissors. These are the logo all right, so BMAC you can look them up on the internet at the hairbrained pro shop. They have the hairbrained diversion of BMAC. These are my limited edition gold pig for my gold, pig, education right and yeah. These are I it's hard to read that that's good, so these are five and a half, and also with BMAC that have you know a great range of prices. I believe the hairbrained ones are about four. These are about five. I had to up you guys just a little bit. I had to stick it to Gerard I'm, like my scissors cost 500. I'M just kidding guys yeah. Alright, then, in through the crown area, again, I'm gon na lift that up. There'S my line got to break into that line a little bit, but still keep the integrity of it, lift up again break into that line a little bit right. I still want to keep the integrity now I'm gon na start to look at the hairline, and this will kind of finish off everything before I put some product in. So I'm gon na lift that up. So I can see all right so now, I'm gon na work into the natural hairline and again I'm using the back of the comb onto the skin. And as long as I keep my scissor at a safe angle - and I don't go in too much - I'm not gon na cut them or be less likely to cut them. Because I don't want to say that you're not going to. And then you call me up and say: hey, you said I wouldn't cut them comb this hair a little bit forward. Just so I can get that edge. You can see the nice consistency of the density being broken up now. I'M gon na start to lift into it a little bit, so you know scissor over comb, but cutting more with a pointing technique rather than trying to use scissor over comb cutting blunt, you can also use scissor over comb and point into it when you want something. A little bit choppier a little bit softer through the edge and then again lift up work into the hair point through work into the hair point it through, and you see I'm just really sticking to the edge with with that. I'M not gon na go into excited a lot of texturizing internally already, but I want to work the edge a little bit softer so now I'm gon na get the little hairs out of there good. If I was in the salon, I might rinse her off a little bit: rinse the hair get all the little hairs out. So when she goes home she doesn't go to shampoo it and then have all this hair all over the sink. As you can get this little textured look, okay, all right! So this is a stamina. Shine wax just get it into my hands a little bit. No! No, then just start to work from the back through to the front. A little bit give a nice shine, bring out. You know the natural variations of the color start out. Slow, don't want to put too much in at one point now that I have it from the back. You can focus a little bit more on the front and the sides I'm actually looking for a model with hair like this, because I wanted to do we're gon na be doing a photo shoot pretty soon, and I was talking to one of the colorist that I Work with Roberta - and I was saying one of the looks we want to do like a nice, either in either bleaching tone or high-lift blonde, with a little crop shape, which was my inspiration. You know for what I did today. Alright, so you know thing came out really cool. Hopefully you know a little bit tricks and tips right. Working with the the technique recap. I started through the top taking the sections from the crown through setting. My guideline then, slightly over directing the hair just a little bit towards the center to build a little bit of fullness over the parietal work, the same through the other side over the knuckles over directing a little bit towards the center to build the fullness. Once I did that on both sides taking my sections vertical diagonal, then taking the guide line from the top slightly tucking it into the hairline right, and you can see you know the fullness that I built in through here right. So it has that little bit of fullness where the head tends to be a little bit flatter, did that on the other side spoke a lot about hand, body positions, then from there taking the sections diagonal through the back right. You see it. Has this really nice head hugging shape, but at the same time it gives it a very feminine curvature to it, which i think is important. Okay, when we're cutting short lady's hair cut that it still looks. Soft then, from there cross-check worked on a slicing technique. You know, through the interior, pointed through the edges a little bit and then I worked with my davin as shine wax. You know to bring the texture out and to show the nice variations of colors that she has so again guys thanks for tuning in, hopefully, you enjoyed and got a little bit out of it today, thanks Randy for filming, and we will see you again for the Hairbrained classic cutting foundation, peace,


Comments
Nicola Butler: Brilliant! Best layered cut tutorial I have found and have been cutting mine in stages whilst watching a pausing video. It is going really well and just the back to complete - thank you for this!
kelly Rivers: This is one of the most simple pixie/crop demonstrations I have seen- I love it. Puts me more at ease. Will definitely be practicing this soon.
Jepe Harper: You’re an amazing teacher! The way you explain things is immaculate! You dont know how much you helped me, Thank you
A Fajardo: Can you pls advise a newbie like me, on what size of scissors I should use & where I can buy them in Toronto? Thanks!
Stephanie Jacobson: Love this.... My hair is thick natural curl gray mixed in frizzy..In the 70's I had a mullet loved it. My hair does great layered vertical .. Most hair dresser won't listen... You said Orlando I don't live to far from there. I'll look them up Sport Clips... I didn't catch your name.... Enjoyed watching....
Uoo Hoo: Yeah, is like to see a longer mullet where the top back goes down to a point. Please!
D Who?: Really nice technique.
Gloria Garcia: I was memorized watching the hair stylist 00Ps! 4got His name Cut short Hair So seamlessly I love that he was with the The Sassoon era. Well thank you very much, I'm off to cut my hair as he did! I am inspired by Mr. Hair stylist.
Stephanie Jacobson: What about thicker hair?
Linda Russ: Nice
Leonardo Caggiano: Interessante
josette giacobbi: Too choppy looking for my taste….
J, Louis: Va