Women'S Haircut | Low Drop Skin Fade Undercut | Long Textured Top
- Posted on 31 August, 2017
- Hair Knowledge
- By Anonymous
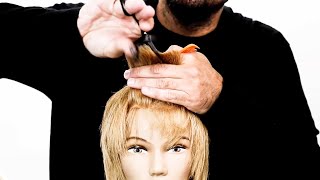
By far this is my best haircut and I am very proud of it. Doing a Woman's haircut transform, transformation, she decided to do a low drop skin fade with a lot of length on the top but with a lot of movement.
What'S up guys Tuilaepa here with another haircut video, this is a really cool one. I'M super pumped. This is a ladies cut, a transformation really, as you can see here, the the the client came in with with quite a bit of hair and she wanted to do an undercut with the Loess can drop fate, and so I love that I mean it's not every Day that you get to cut a lady's hair so to give myself a foundation of the fade first, I sectioned the the top hair with the horseshoe shape and on the sides. I'M gon na take my number two guard with the leather clothes and I am literally going straight up in the air I'm taking the guard, I'm resting it against the skin and I'm going straight up in the air. I am NOT following the head shape doing so. You create a foundation there, it kind of looks like he's already blended yeah, and so what this does really is set a foundation. It gives me it gives me a guideline to follow when I'm doing my skin fade. It also helps me blend the zero to the number two very easily because we are doing a drop fade. I'M making sure that I'm creating that drop around the exit, occipital bone, and so here with my triple zeros, I am creating that first guideline very low skin fade we're gon na keep it very low and we're gon na drop at the back of the head. Now here, because she is a you know, a lady - she have very sensitive skin, making sure that I do not irritate her skin. So here after my triple zero, I go over it with my slim line, pros as I always do. I am pretty much just making sure that everything is nice and clean. All the extra hairs are out and I'm not going up to that exact line, I'm staying about a quarter-inch underneath or so we have that layers of transition here now lever opened. I'M creating my second guideline well technically. My third guideline, but from the skin, fade I'm creating my second guideline and with the lever open about an inch up, I'm creating the guideline on one side and I take it off immediately and then I go to the next side, the other the opposite side, and I do the same thing I create the guideline and then I close the blade halfway and knock that line out here with the number one guard. I have the lever open and I do the same thing. I'M moving about an inch, but I am scooping out. I create another guideline and I remove it as soon as I am finished, so pretty much create guideline remove guideline so here I am kind of scooping out with the number one guard lever, open and close the lever and boom. I knock down the line once I'm done doing that I come back with my number one and a half guard. I'M just buffing out pretty much smoothly now everything with the lever closed and then I open it as well, and then I go over with my number two guard, one more time, just to make sure that everything is. You know nice and even and right so and now I'm just detailing them, I'm just making sure that the dark patches are faded out. I had my one sixteenth guard, just pretty much detailing everything trying to make sure that everything is is in place. I took a pretty long time with this haircut. It was about one hour long and so lucky me. I had the time to do that that that specific time, so it was great here - I'm just doing a little clipper over comb action, just smoothing out a transition on the on that transition here, and so that's that the five-star shaver just to cleaning it up and Then we are done with the sides, so now it's time to do a lot of work on the top, so I'm gon na wet the hair prep it I'm gon na call me back and forth. I am pretty much studying the hair right now and trying to see how I'm gon na do this. Also, I'm talking to the customers too, as well trying to see if she wants to blend the top of the hair with the back and add layers or she wants to. Let it hang, I'm also explaining to her that by blending everything on the back, she will not be able to put the hair in the completely agreed, and so now here there's a heavy line. I'M just smoothing that heavy line out with scissor over comb, and then this is over fingers action here. What I'm doing is I'm not keeping my fingers straight up on a 90 degree angle. I am slightly bending it going with the shape of the head. Once I get that initial occipital bone area blended, I start doing my guidelines now I wanted to layer the hair, very nice, and so I was taking about half an inch layers of hair and I will cut them at that same angle. Not straight up, I will say at about a 70 degree angle, 75. Degree angle. As you see there, the shorter hairs are my guides and I just work my way forward from the back of the head. For the most part, I always land it from the back to the front, using that 70 degree angle, because we want to. We want to make sure that we add layers, because we are making the top of the hair even on both sides. I'M calming the hair. First, to one side, making sure that everything is even once I'm finished with one side, I comb the hair back to the opposite side, and even all that out, you should have a guideline already set from before now we're gon na start, adding the banks and blending Everything the banks you want to leave, maybe like half an inch or a quarter inch longer than everything else, just because that needs to lay over everything else, and so that's what I'm doing here now once everything is blended now, it's time to start adding some texture. So I'm doing some point cutting here. At the same time, I am making sure cross-checking everything making sure that everything is even and if, for some reason something is not even I will point cut that specific part of the hair. That'S an even, and so once I'm done doing a little point cutting, but what I did here is. I took my thinning shears and I was working on the back of the hair and then here's a little little technique that I I love doing, especially with longer hairs like that it adds so much movement and texture to the hair. I love it. It'S great. It'S the greatest thing: I've ever learned honestly, so you commit to one side, you do it and then you comb it to the opposite side and do it again, honestly, I need a full video on doing this type of technique. I can't really explain it in just a few seconds, and so here it is guys this is. The haircut looks great. I love it to be honest with you. I think that this has to be one of my favorite haircuts. I'Ve ever done in my short time. Cutting here so thanks for watching again stay up and stay watching peace.

Comments
HenJack2017: Great video-beautiful work that suits so much the client!Well done!
Danny Noonan: Great cut!!! Love her new hairstyle!!!
Temper Hollow: She has such great thick hair which you need for this type of cut.
Jessica Carrillo: Omg love this haircut , I'm getting a cut like this.
Lesli Allyn Vlogs: Fire cut!
Michael Mareda: I love her haircut
Stephanie Acabal: One time I went to the barber shop and ask if they can cut my hair like this and his girlfriend says that girls is not allowed in the barber shop like where's the gender equality
Juan Cordova: I love the haircut, it fit the structure of her face
Richard Stadler: more like this!
mo na: ❤️
R SM: 3:24, Im having the same issue, the babyliss clippers doesnt fade good, there are small bald spots on my head under the fade. Is it my head or the clipper? I was thinking get a new head :)
Kathleen Leydig: Awesome!
Emilio José: Isto não é corte de mulher muito tudo muito exquisito
Peter Posto: Excellent!
Danny Noonan: Absolutely adore her hair!!! She looks so Sexy in her new fade hairstyle!!!
Claire Stratton: Beautiful
edward woodaqrd: vet well done skin fade us barbers cut ladies hair now and have to know all the styles I cut more ladies hair than mens
Madison Crew: looks so sickkkk
Buzz Cut: handsome girl, great Haircut.
Emilio José: Gostará de mulheres