Structured Wave | Step-By-Step Hairstyle Tutorial By David Lopez | Kenra Professional
- Posted on 13 May, 2020
- Hair Knowledge
- By Anonymous
Learn how to create perfect structured waves with David Lopez! He'll share a ton of tips and tricks & styling secrets along the way so make sure to watch all the way until the end!
If you enjoyed this video, make sure to give it a thumbs up and tell us in the comments below what you'd like to learn next!
SUBSCRIBE NOW: http://bit.ly/KenraProfessionalSubscri...
VISIT OUR WEBSITE: https://www.kenraprofessional.com
About Kenra Professional
We are a purely professional brand dedicated to understanding and serving today’s stylists. Our passion is developing best-in-class innovations, delivering superior and reliable results. Kenra Professional strives to elevate the stylists’ artistry and craft.
CONNECT with US
FACEBOOK: https://www.facebook.com/KenraProfessi...
INSTAGRAM: https://www.instagram.com/kenraprofess...
TWITTER: https://twitter.com/Kenra_Haircare
Structured Wave | Step-by-Step Hairstyle Tutorial by David Lopez | Kenra Professional
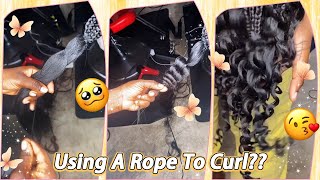
Hi friends, it's David Lopez, celebrity stylist and Kenner professional artistic ambassador here to show you one of my personal favorite signature styles, the structured wave going to show you all the tips and tricks my personal secrets: let's go ahead and get started. So if we're talking about creating your perfect signature style, we want to make sure that we have the perfect canvas to work with. So the kender platinum, prime shampoo is a great place to start. It'S gon na help, increase manageability and elasticity, and it's a really beautiful style, enhancing cleanser, that's color, safe and perfect for everyday use. So the next and final step in priming, your canvas for the perfect signature style is going to be the Kenner Platinum, prime conditioner. The really cool part about it, it's gon na help set you up for maximum products, absorption, meaning that whatever you use to prep your hair to style, with it's going to penetrate evenly and really give you maximum results. Now, what we're gon na do is prep her hair with some product. I am gon na use the heat cast spray. This is designed to be used on dry hair, but for me I kind of like to double up and use on damp hair because it does give me a little bit of grip, but also some thermal protection. So once I've applied the product, I'm going to go ahead and brush it through to make sure I have an even amount of product distribution. Now, at this point to what I'm gon na do is start route directing her hair up and away from the face and just get that really beautiful route direction. So I get a ton of lift. So what I like to do, especially back here, where a lot of clients have like a whirl where they have that split. What I'll do is I'll brush the opposite direction each way. So that way, when my blow-dry is finished, it just blow dries really nice and smooth, and I don't have to play with it too much. I really like to use a boar and nylon mixture brush, for this feels good on the scalp, but also just gives you a ton of control. So now that I have the hair in my CD tangled and all the route direction, where I want it to go, I'm gon na use my blow-dryer on a high heat and low speed. Sometimes, when your dryer has all that speed coming out of it, what it's doing is sometimes stretching out the hair a little bit too much. I want to really control the amount of body. That'S left in the hair, because structured wave is a really beautiful, glamorous look, but for it to feel modern and have longevity. I really want to respect the integrity of the hair. One of the keys to structured wave is also making sure that your canvas is really nice and smooth and beautiful. What you want to do is once you get most of it. Dry, take a flat brush like this, and what we're gon na do is from the mid look to the ends, we're just gon na smooth it out. So it's really nice and and then we're gon na go through and start our iron technique. But for now I went ahead and sectioned out large sections. I'M gon na work my way up and I'm going to smooth out the hair. So it has a really beautiful soft canvas to start with. So now that we have the hair, nice and smooth - and we have really beautiful canvas to work with we're gon na start, the structured wave. Now I like to use the facial features as a guide to where the parting should be if they have a little bit of a low density, I'll, adjust it a little bit but Ric. For now, I'm gon na use the arch of her brow. I went straight back and then I'm gon na go straight over top of the ear to the other side. That is one section there and then, on the other side, we're gon na go basically follow that straight down. It'Ll bring you just to right behind the ear, and this is your first section here. I try not to twist up my sections, especially with a hair type like this. That I know is gon na. Take the shape really really well. So I just prefer to keep everything really nice and flat. Here'S a little tip. I have so a lot of times when you split it down the middle you're kind of left with two sections here that just are not really blending together. So what I'll do is create a diagonal section, starting on the heavier side going this way. So when I curl this one on its own, it's gon na really lay nicely as a veil over the entire section. Then from there we'll split that in half - and this will be our first back section again - I don't want to twist it up. I just want it to be out of the way so to make sure I really get as much hold as possible. I am gon na use, he cast weekender Platinum. What I love about the heat cast spray is that I can use it on all hair types. This is great because you can use it dry. I obviously like to use it wet to give me a little bit of hold as well, but you can see just how lightweight it is. I want to spray it on top. I want to spray it on bottom. I'M gon na comb it through and you see how quickly and easily I can just comb right through it's not stiff or sticky at all. Now I'm gon na start elevating her hair to get ready for the curl. So I'm lifting up and I'm going to use an inch and a half curling iron, I'm using a Marcel, but you can also use a spring-loaded just make sure you use it flat, wrap I'm getting the roots and the mids nice and warm. Because I want this to feel really modern, I'm not going to put too much time on the ends. I'M gon na, let the heat distribute from their roots and the mids down to the ends when I pin it in place. So I'm just going to just gently touch the ends a little bit and then release and then I'm going to pin it in place with a metal duckbill clip I'm gon na provide elevation. So as I'm combing through key cast, I'm gon na start lifting up cuz. I do want to get some lift in the hair, I'm taking pretty large sections, because I want it to feel more like a wave and less like a curl. I want to see less bounce and more body in this look. Leave the ends out just a little bit and that when it'll do is I'll just give him a just a whisper of heat. Now, what I'm gon na do is. Even though I took a horizontal section, I'm gon na gently twist it off to the side to make sure that I do get that direction that wants to flow towards the face. So I have this section in the back. That was a diagonal section. I'M going to split it in half and what I'm gon na do is go from the top of that part right there, I'm going to create another diagonal section going this way and split that into so now. I'M left with these two diagonal sections and you can see what ends up happening is that the sides are forced to integrate. This is really cool, especially for the clients that have that whirl. That wants to split in the back. So now, when I go to brush this they're gon na want to join together as one springy cast mids to the ends. Try to get it both sides don't be afraid of it. It is medium hold. So it's not going to get stiffer sticky on the hair. Then remember what we're gon na do with this section, since it's diagonal, it kind of tells you where it wants to be clipped, which is on an angle just like that. I'M gon na check a metal duckbill clip, I'm clipping it in from the top, and what I'm gon na do is make sure that I get the bottom part of the clip through the section, the top part into the middle of the curl. So it's nicely secured. Okay, so spraying heat casts on here now we're lifting up making sure that we're getting a lot of lift, and this, if you do use a wand to create this, look, make sure that you're using a flack wrap technique, meaning that it's flat along the barrel and It'S not twisting as you work, so you can see the sections that we're working with you can see from the side just the direction that we're going with. So we did use horizontal sections, but you can see in the way that we gently twisted it we're starting to really encourage the hair to want to move forward towards the face and the horizontal sections are going to give us a nice strong structure underneath. So I want to line up my sections, so I'm gon na go ahead and follow the last section that I worked. The first section from the other side and it goes straight across which typically takes you to the back of the ear. Do a little heat casting both sides so same thing. On this side I did a horizontal section, I'm gon na twist it up so that it's being fed towards the face. He passed. It both sides and remember I'm taking pretty large sections, because I just want to see a structured wave, not a structured curl. What that means is the more dense the section that you're working with you can hold the iron onto the hair a little bit longer than you normally probably would what you can do is kind of just touch the iron and to feel the heat of the iron Going through the hair, whenever I was assisting on Fashion Week, this is one of the things that we learned immediately was taking really large sections holding in on a little bit longer, so that you really get that really beautiful effortless bounce. It was something that I've been with me might dress in my career, so remember horizontal section and I'm turning it towards the face clipping it nice and secure. Now we're working with our last section here. So here we're going to make sure we match up a section here, the corner of here to the temple. Here'S an important thing. You want to remember the hairs gon na go on top of the barrel. We'Re lifting up the ends are being fed towards the face. If the ends are going the other way, it is gon na retract into the way that doesn't match the rest of the hair, so just make sure that the hair is on top of the barrel at the ends bit facing towards the mirror. Remember we're taking the hair and we're twisting it towards the face. Sometimes what I like to do is if, in the front I know that I'm gon na want this to be one nice, smooth section. I don't want to split that so then I will go into a diagonal section, so I'll go to this last corner and go to the parting, and then I work with this section here that way. I know when I go to wave or curl the hairline that I'm never gon na split this front piece here. So this is our last section now, if you're, someone that uses a Marcel or a clip iron and you find that you sometimes get those little indents. When you do your setting, there are a couple things you can do to avoid that so make sure. When you go on top of the barrel, the hair goes on top your clip is facing towards. You also make sure that you're not elevating the hair. As you turn it in make sure that the ends of the hair are following the direction of what you're going from the very beginning, that's gon na make sure that you never get that weird little crease or clip mark at the very top of your section. So what I like to do too, is I just kind of like back to beauty school days. I just make sure I kind of tap the section. That'S why I like marcel's, for this too, I'm able to really control the amount of tension that I'm using get that nice and warm and then we're gon na start to bring in those ends. Now this part of the hair has to travel the furthest and when you're brushing it, it tends to straighten out the most. So I want to make sure I'm paying special attention to how much heat is being used here. Make sure you open your clip nice and wide and just gently slide it in there and hold it in place now. What I like to do is because the heat cast has a little bit of hold I'll spray. The whole section over again just to kind of set everything in place, so now that the hair is nice and cooled down, this is a very, very important part, make sure you let the hair cool down I'm going to go ahead and take out the sections such A fun part of the whole step now the heat cast spray is instrumental in getting this amount of hold in the hair. I took really large sections on very dense hair and you can still see just how much light there is in the hair. It'S not drooping or falling. We have the cast from the product. We have a lot of heat protection as well get kind of setting you up for success on structure waves. The next step, I'm going to do is take a wide tooth comb and start combing through the sections and I'm gon na comb everything back away from the face so that when I push it forward, I get that really nice way. Here comes the last magic step, instruction waves, we're going to use glass spray and kenra platinum. It'S a really awesome shine spray that I love, but there's a little twist on it. It has a tiny bit of hold your so you're gon na have some delicate control in here to release throughout the flyaways you're gon na get a ton of shine. It'S gon na be the perfect last step to just really finish off the style and give you that signature. Look that you're looking for like to really concentrate it on the ends where they need the most control. So because I want this to feel a little more modern and wearable. What I like to see is I like to see this wave pattern happening in here, but I want to relax the ends just a little bit, so I'm going to take my flat brush, which is Boran nylon. I'M gon na put the dryer on low speed and low heat and just gently smooth out those ends. You just want to hit the ends just a little bit just to stretch them out. This just helps it feel a tiny bit more modern. I'M able to still manipulate the hair with the dryer and my flat brush and look how much bounce there still is in the hair. So now, I'm gon na continue shaping I'm gon na use glass braids a new way. What I'm gon na do is spray. It directly onto my brushing, because it has just that small amount of hold I'm able to start creating the controlled style a structured wave. Do you want to tuck that behind the ear and I'm gon na start pushing it forward now, when I feel like, I need just a tiny bit more control and more precision, I'm gon na switch to a fine-tooth comb, so I'm going to keep using those creaseless Clips to create the bends and the waves that I want to see and can use the glass spray also on my fingertips to just kind of control small little areas, so you can take an old makeup brush. I like to use kind of blue kabuki brushes like this. I'M gon na spray glass spray directly on it and what I'm gon na do is just kill any little flyaways that are living around the part or the hairline. This just really elevates the look and make it look almost photoshopped in real life. So I can't even use glass free on a fine-tooth comb. I'M gon na spray, the comb directly just such a great finishing product, because you use it so many different ways. So we're gon na finish off this look, I went ahead and let everything set I love using these priests list clips they're, just something that you should really have in your kit, whether you're behind the chair or on set. They really help kind of set everything in place, and it's kind of that little last magic step in something like this, because it really helps set the wings in place. What I like to do, too, before I release just one final blessing of glass spray over the entire look for a final amount of shine and slight hold. And you saw how much of the glass where I was able to layer onto the hair. And it still feels so nice and silky and soft. So here is my final look, my signature style, the structured wave. I really love to create this look. I know that you're going to you're gon na be set up for success with some really beautiful products here from what we primed prepped and finish, starting with the prime shampoo and conditioner going into prepping the hair with a key cast braids and then finishing off with The glass spray we have a lot of shine, control, manageability and a long-lasting style. I know they're gon na have so much fun recruiting this at home. Remember the tips that I showed you when I was curling in the hair, all the directions and all that beautiful advice that I gave you make sure you use it when you try this style. I know that it's gon na be one of your signature. Styles. Very very soon, and I want to see your recreations make sure you tag us on Instagram and app Kenner professional, I'm David Lopez. Thank you so much for watching
Comments
Ben: Stunning. Love this look. My fave.
Jenny P: This timeless and incredible!
Felicia Humer: I feel very inspired! Thank you!
Maryam Sani: Nice clean Great job I enjoyed watching it and I definitely try it in the salon
David Lopez: Woohoo! Can't wait!
Wendy Rathbun: Beautiful work!
Marcials Blends Hair: Absolutely awesome
Pelenatita Kama: Amazing work
Vivek Soni: Thanks Kenra Professionals!!! Most awaited video!!! yay...
Judie Tallman-Deitchman: what dryer are you using David?
flower bomb: Can you get this same look with large hot rollers?
Fonny Irawati:
Sarah McGinty:
פליקס גולן:
Eman A: that is so much spray