How To Do An Easy Boys Short Haircut At Home
- Posted on 04 May, 2020
- Hair Knowledge
- By Anonymous
How to do an easy and super cute little boys short hair cut at home using scissors and a clipper. Tips to blending the top to the sides and trim bangs so they don't look like they've been cut using a bowl haha.
If you enjoy this video be sure to subscribe to my channel for more videos like this: https://www.youtube.com/c/jamiswanbeau...
**********************
PRODUCTS USED IN THIS VIDEO
The Products listed in the first portion are tried tested and true products that i know are good quality. Ive also listed a very budget friendly option below those that I haven't personally tried but looks like it would be a decent set for the price.
__________________________
Sheers I use (this is a sweeter price though, I paid $400 for mine from a professional supply store):
https://rstyle.me/+3VPKDJuaf32d1BEp_Xc...
Clipper I use:
More affordable professional sheers:
https://rstyle.me/+qbj1FxKqz4k-j9N8fWY...
Affordable Clipper/trimmer set: https://rstyle.me/+E5A3GDfUgEITx1X6ghp...
Cutting cape: https://rstyle.me/+tZviBWLsATQ0MzgQHKz...
Lady facial razors:
https://rstyle.me/+VF9E-ofEeLvLR3VFfMt...
__________________________
I haven't tried this set but it looks like a decent set of sheers and thinning sheers along with everything you would need aside from the the clippers and trimmers to do a cut if you wanted to order and try it. If you do let us know in the comments how you like it.
https://rstyle.me/+KCmpoVhnP4bhwarXpRX...
***************************
*Associate links are used where possible for you shopping convenience. I may make a small commission from sales at no additional cost to you. Thank you for you support, it helps my channel so I can continue to bring you more videos like these.
**********************
Follow my Socials:
Instagram: https://www.instagram.com/jamiswanbeau...
Facebook: https://www.facebook.com/jamiswanbeaut...
LiketoKNOWit: https://www.liketoknow.it/jamiswanbeau...
or click here:
https://linktr.ee/jamiswanbeauty
Music: King
Musician: Jef
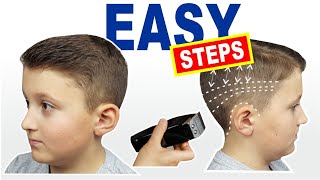
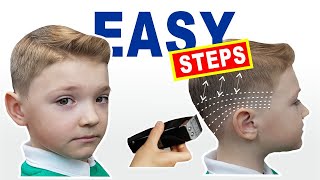
Hi, you guys welcome to my channel and for any of you who subscribe welcome back to my channel, so my name is Jani Swan, I'm a journeyman cosmetologist and we are going to be doing a short boys haircut for you guys today. So, first of all, most important thing: bribes treats or video games work best for for little kids. I highly recommend this if you want them to sit still for the full duration of the haircut okay, so, first of all we're just taking and lightly spritzing the top of his hair. His hair is fully dry um, but what you want to do is just kind of like lightly mist it so you're able to section the top part of their hair out of the way, this kind of takes the place of using clips or anything like that. You don't want to fully saturate the back end sides, because we're gon na go in with a clipper and it's easier to clip or cut on dry hair. If you do prefer, though, clips look, that looks something like this work really great for boy short haircut to hold their hair out of the way. This is good if they do have hair that's longer than what I showed is here, so I'm just gon na be going in with my clipper. Now all the tools that I'm going to be using are things that you should already have at home. If you don't I'll, try to find links for you guys in the description below you can find these tools at Walmart or Beauty, Supply stores and anyone kind of in between the more you pay, the better quality the tool is going to be and easier. The haircuts gon na be but use what you can so I usually go in with either one of these three guards. I do recommend using a guard on little kids. It just makes it easier because they are or can be, a little bit squirmy. So I usually don't do little boys haircuts free style, so we're gon na be going in with the number two. So this makes the hair about a quarter of an inch long on the back on the sides, and it doesn't really matter where you start. I'M just going to start at the front here and work my way all around to the other side of his head. Okay, so notice that I'm starting at his hairline and working my way up and as I get up to that part line that we created, I flicked out with my wrist, and this is going to create a grade in the hair. So it's gon na make it a little bit longer when we do that flick and that's going to make it easier to blend the hair out when you go in with the sheers later on, when you guys are doing the back just feel for the occipital bone. It'S a little bone that jets out on the back of their head. That is generally where you want to bring your clipper cut up to and then flick out with your wrist. When you get to that area in the back of their head, you can take your clipper cut higher if you prefer. This is just a general rule of thumb, and then I just continue doing this all the way around the head and if you guys do notice that there are any clipper guard lines in the hair, just run your Clipper in the opposite direction, and that should get Rid of them sort of in like a crosshatch motion and then just continue blending up until that part line flicking your wrist out as you get to the top okay. So once you have the back and sides blended how you like take the clips out of the top, if you used any and then we're gon na really wet the top of the hair, doing a wet cut up top is going to help you be able to See your guide you'll see what I'm talking about, but you'll be able to get a more precise haircut with the hair being wet, so I'm just spritzing it all day and watch. It is disliking. Okay, so then work all the water through the hair. Okay and then you want to get the hair going in a cute little middle part, so your resembles Nick from the Backstreet Boys, circa 1959 super cute. Look here. Okay, then I'm going in with my centric shears. These are the centric sea twos and a cutting comb similar to this I will try and post links down below the better the shear. You can get your hands on the easier. This is going to be, but obviously just work with what you have okay. So now we are going to I'm gon na try to get this so that you guys can see you're going to want to cut straight up from that clipper the length of the hair from the Clipper cut. If that makes sense and just go straight up and work, your way all the way around the head in about half to one inch sections smaller the section, the better, because you're going to get a more precise cut and a spare. If you have a child with really fine textured straight hair, you'll notice that if you take too big of sections the hair, when it dries it'll, look a bit choppy, and so, if this happens just go back in spritz the hair wet and take smaller sections um. So you get a little bit more of a precise cut. Okay, so when we did those front sections pulling them and lining them up with the sides of the hair and cutting all around the head, and in the last step we we would have pulled the bang part back a little bit. So this is going to create length, so now we can go in and detail the bangs to where we want them to sit. And so, when I do this, I always always point cut the hair because we don't want dumb and Dumberer Lloyd, bangs going on here. At all, so what a point cut is is notice how I'm pointing on an angle, you're almost notching little triangles out of the hair and the deeper you can point cut so the more up and down your shears are the more jagged and different lengths and textured. The bangs are gon na, be so just work all the way around. You want to blend the bang length in with the sides of the hair and work your way all the way around until it's a length, and it looks good where you want it to be at this point. If it's looking still a bit like Lloyd, dumb and Dumberer ish, that's okay, because they're gon na go in and toss some layers in the top here. So just get the length just focus on getting basically the length where you want okay. So this is what you should have so far so now we're gon na go there's different ways to do this, but we're gon na take a center guide. We'Re gon na create a guide from the length of the bangs, so you can see here at the very tip of my finger. That'S the length of the bangs, so we're gon na cut all of this off and I always point cut the top of the hair. So we're gon na go in and notch those little triangles in the top of the hair and we're going to do this in sort of a mohawk type section going all the way back to the back of the head. Following your guide and the shape of the head - and this is going to be our guide for the rest of the top section of hair okay now this part is super fun. So now, when you hold up the hair starting at the front again, you can see that corner sticking out from the guide that we made doing the vertical cuts to the guide. We'Ve been doing, the center cut down the center of his head. All you want to do is point cut those corners out so that those two guides line up. I don't know why, but just this is my favorite part, I'm just trying to move here so that you guys can see the hair better and then just continue to do this. Going from the left side of the head to the right side of the head point: cutting these corners out until you get all the way to the back okay! So then, once I got back to the front, I realized I just wanted to take a little bit more off of his bangs. So I point at doing exactly what I did for the first step of the bangs just made it a little bit shorter and then, when you do this and you take the length off, you want to go back in and REE blend that new length in with The rest of the cut, because, if you don't that's where we get a heavy bang and the whole Lloyd Christmas vibe going on that we're just trying to avoid here the less trauma we can cause our children in their youth, the better right, okay! So now I'm just continuing with the bend it blending in of the new length of the bangs and I'm going all the way throughout checking side to side. So this is how you can double check your haircut since we cut our haircut going from the front of the head to the back of the head. If you cross check it going from one side to the other, you're gon na get a really nicely blended haircut. Without having that sort of like choppy look going on okay - so you guys could just be done here, but I'm just gon na show you guys a little extra step if you're comfortable. This is a scissor over comb technique that I'm using to blend to just better blend in the sides with the top, if you guys happen to have a thinning shear. Alternatively, you could use that here and that's just a little bit more forgiving for newbies and if you're a little bit more advanced on cutting your kids hair. You could go back in with a clipper over comb technique and I find that this works best, especially if you have the wide sort of flat top comb that I'm using here, and I just continue doing this all the way around his head. Okay and then you're gon na want to take and clean up the back of the hairline. So I use a smaller trimmer is what this is called. You can get brands called a peanut I'll, try and link some of the brands down below that you guys could get for this step. This is just a finer trimmer that you can get really detailed with. Alternatively, if you're in a pinch, you could buy a pack of those lady's razor ones for the face, and you could use that to clean up the hairline. If you did use that the razor method versus the trimmer method, you just want to have such a harsh line across the back. It would be a little bit more blended, which isn't that's just fine too. It'S just a different style, and here I'm just doing the same thing with the sides, I'm using my comb as a as a guide, to trim a nice angle into both sides of the back of his hairline and just like what the bottom of the hairline you Could use the razor wand here as well? I wouldn't recommend using like don't use a leg razor, because that you're not going to be able to see exactly where the cut is going to make, and you will take a chunk out of your child's hair. Only the razor wands, not a leg, razor, just sort of clear and then I'm taking the comb and I'm getting all those little hairs from around his ears. I'M just sort of pulling them up and I'm taking my trimmer and cutting those off because nobody wants those. Little flyaways, and just doing that was the other side as well. Okay, and then I just take that little line in their ear right about here, and that is where I end off the sideburns. This is a nice way to get them nice and straight on both sides. Alternatively, you could use the razor wand as well here, and then you always want to make sure that you get rid of all the hairs if they're itchy after a haircut they're, never gon na want to get their hair cut again so optimally you could put them In the bath or the shower rate after their haircut, but for the sake of the video, I'm gon na toss a little bit of mousse in just to show you guys how cute this this cut looks when it's all styled up so usually I'll. Put like a wax or some sort of a paste in boys hair because it doesn't dry and get crunchy, it stays pliable. So if you need to, you can always fix it up throughout the day like when they're, getting crazy and playing and wrecking their hair. It'S very pliable to restyle, and here is the finished. Look. Oh look at that cute little face so then here's just a little 360 of the whole look finished. If you guys would like to see how I cut six inches off my hair at home, I will leave it over on the side, for you guys to click, if you guys want it to subscribe to my channel click my face over on the side here, and I will see you guys in the next video thanks so much for watching

Comments
Nicole M: I’m adding these time stamps for myself because I know I’ll want to double check what I’m doing I really hope you don’t mind! 1:47 sides with clippers and a guard 3:02 prepping the hair for shears 4:00 cutting the top with shears 4:46 bangs 6:03 layers These parts make me the most nervous lol
Jim Congleton: This is a really great guide. Without getting too technical there is easy to understand advice on technique that gets you beyond the beginner stage. Thank you Jami x
Dan The Man: I gave my first scissor cut to my son today using the process in this video and he looks awesome! He loves it! Thanks for teaching this!
Lindsay Whatley: Thank you so much- you’ve saved my son and husbands hair (and dignity) during Covid - after watching this video a million times and giving them several haircuts this year, I’m not half bad! Thank again- great video :)
mr basketball: Best boy haircut tutorial I’ve ever watched. Thank you! I have 3 boys and still practicing.
Jesslyn Barton: Thank you so much for this tutorial! I’ve tried following it twice now and both times it looks a little like a bowl cut. Do you have any tips on how I can correct this?
Elizabeth Henneman: Binge watching your videos. You explain things so well!!!
Let us all make LEGO: I am going to try this today! I love it
Cheekytomato: Great video, quick and informative, thankyou!! I've watched a few boys haircut videos now you're the first person who explained HOW to do the 'point cut' to make it less 'dumb & dumber! Thankyou !!
chinita1974 morena: Your son is so cute and adorable! Thank you for the very helpful tips. ✌
MelDecibel: Thank you so much! Best video!! I practice on my sun. And it is perfect! :)
Smita Savant: Hey thanks for the tutorial. Was actually able to cut my sons hair quite well
Caitlin Sheffer: Thank you! Super helpful and also made me laugh with the Lloyd Christmas references lol. I've definitely given some of those before! haha!
Jen the Nosey Witch: His face when you were spritzing his hair had a giggle during that. Bless him. He's a perfect video model . My lads 26 and still needs a distraction for a hair cut lmao
N. Tulin Tacettin: Awww so cute! At first I thought woah!! Too much hair off but then at the end it was awesome. Cool tattoo...! So much great details...was it painful??? Thanks for this :) great video. You know you are a star right??? It's not boring watching your work!! I dont even have a kid. Lol thanks again!
Psalm85 Godwins: This is a great video! Thank you.
Sound Effects: Your baby boy is adorable. Thanks for the tutorial!
Carter: Best tutorial ever you saved my little boy from Loyd bangs
Jamie-Lee Donnelly: Super helpful thank you I have 4 boys x
Ava Yu: Lucky kid with a talented mom who has useful pro skills! Great job!
Laurie Bartlett: Love his face when you're spritzing! Reminds me of when my boys were little. Nice job!
David Moralee: Looks easy :) but my little boys hair cut would say otherwise :)) Its certainly a talent.
Alexia: Wow! Loved it
Anni Heinemeier: such a fine haircut and such a sweet boy <3
Tini Bliss: Thank you for the video♥️
Florida: This was very helpful, thank you. Next time can you show what his head looks like all around including the back after you're done with the clippers? I'm not sure how high up to go with the clippers.
De Perk: Backstreet boys ref...awesome love it! And ty for this tutorial so helpful!
J V: What angle should you hold your fingers on top of the head?
Dev Stolsie: Great cut mn which product do you style it with here at the end?
Sneaker Love: Great video!!!!
Mariah Dupuy: Asher is so stinkin’ cute! Thanks for the video....I may now be brave enough to cut Marshall’s hair...lol!
Victoria Padilla: You’ve probably answered this before but where did you get your backdrop from? & if amazon do you know the link? I neeeeed it
Jennifer B: Best tutorial there is
Joanne Madden: Hi Jami, are you a hairstylist?? I watched your video where you gave yourself a angled bob. You're gorgeous and did an amazing job!! I was just wondering if you were a stylist and if you were in Oregon. Lol. Thanks for the great videos, grest info. God bless you and yours and take care
Totally Tanisha: He is so handsome. If nothing else, this quarantine is teaching us how to save money. If I ever have a son one day, my husband and I don’t have to worry about taking him to the barbershop when we can just do it ourselves. Thanks for this video!
Tracy VanBragt: So cute seeing him blow the hair off the phone. Good to Go. Lol
Scott Robinson: Looks awesome. Dare i try on my son?
Lindsay Drake: The small clipper you use at the end for the sideburns-which is it? The link you have is showing not available. I think you said it was a peanut clipper? Thanks!
yessenia villanueva: He is so adorable!
Roanna Lloyd: You started with the point cuts then went on to do a straight cut with the fringe or bangs as you call them.
Regina Crystal: New subscriber!
NeslieandSebastian FilAmLife: He so adorable!!!
Anthony Guardalabene: You didn't say what # on the clipper guards.. Great video though!!
gehteuch nixan: ... lets him play PSP ... still bends his head 842.5 degrees. worst mom EVER! he missed all the WAY MORE important coins in his game :( edit: head bending angle corrected...
arelisupertar2010: How do you call your hair cut??
K: Gr8 tutorial but let da boi smile
Jan Skodak: Watch your fingers with that point cutting mommy
JamieLeigh: Where are you from!? What an interesting accent
DC: I love your accent
D Niger: The kid is so adorable but the haircut is pretty bad!
Evelyn Jolliff: Please deny hair uggggggggg indeed so much help
Sohail Malik: If you are here,who is running the heaven
ʚ dreamingxellie ɞ: lol