How To Style Natural Curls & Create A Bridal Hairstyle With Accessories For Naturally Curly Hair.
- Posted on 03 March, 2021
- Hair Knowledge
- By Anonymous
Join our award-winning London hairstylist, Pam Wrigley, in our latest styling tutorial: Working with natural curls. In this video, you will learn how to style natural curls and create two beautiful bridal hairstyles with accessories.
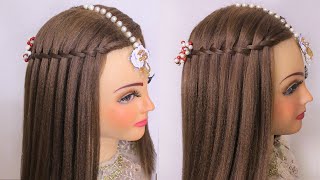
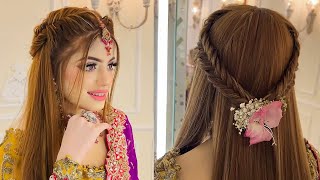
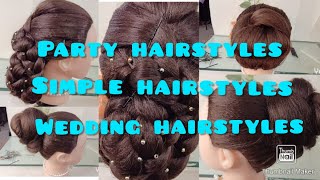
Pam will teach you a fabulously elegant half-up half-down hairstyle, perfect for both brides and bridesmaids. You will learn how to secure accessories to the hair and as a little extra Pam will teach you how to create a gorgeous low bridal bun. We'll guide you through the correct hair preparation techniques and which hairstyling products are best to create beautiful hair - every time!
Links to the products used by Pam (where available):
Water in a spray bottle
Umberto Gianni, More than Moisture, Curl Cream: https://amzn.to/3r9VfVP
Fudge Urban Sea Salt Spray: https://amzn.to/2BJ1onG
Silhouette Flexible Hold Style and Care Lotion: https://amzn.to/33vRsas
L'Oreal Elnett Hairspray professional: https://amzn.to/3dfXoZV
Visit https://www.createbeautifulhair.co.uk/... for more information on learning with Pam.
Want to master the art of bridal/wedding hair and learn with Create Beautiful Hair? There are many ways to learn with Pam:
1. Join our Habia approved award-winning online bridal hair course, learn from home and submit work directly to Pam for assessment and feedback as you work through the models; receive as much support as you need! Complete the assessments and receive a Habia approved CPD certificate upon completion of your bridal hair training. We have a 50% off offer on the full subscription (use code HOMESTUDY at checkout), or join from 9.99 per month on a view-only basis. Click for more information: https://www.createbeautifulhair.co.uk...
2. If you are in London or nearby, enquire into private Bridal Hair 121 tuition for yourself or for a salon! DM for more information on private courses!
3. Check out more of our YouTube channel for a selection of our freely available tutorial...like and subscribe for more information and updates, YouTube link: https://www.youtube.com/channel/UCDKU...
4. Join us on Facebook for more tutorials and all things bridal and wedding hair!! https://www.facebook.com/createbeautif...
Whichever option you choose, please do get in touch and share your fabulous creations and suggestions on what you want to see next!
We've got it covered . . . we even have tutorials covering the curly girl technique!
Great for fans of natural unintentional ASMR!
Hairstyle tutorials include hair prep, hairstyling and hair up, blow-drying, curly girl techniques, working with different hair types, hair textures and hair lengths.
Create hair up & bridal hairstyles and become a bridal hairstylist with Pam Wrigley, UK Wedding Hairstylist of the Year
Just SUBSCRIBE & LIKE!
Once you've created your beautiful curl, you can then decide how you might want to style the hair.. I think what we'll do on Julia is maybe just pin part of the hair up.. I think. Maybe if we were to do this again, I might go for Julia's natural parting, which is probably somewhere over here and already it looks a little bit less triangular.. I think that suits you better Julia. Do you Yeah? I like that look.. So let's go back to our natural parting., I'm going to see a little bit of water to help that settle in its new position. It won't take much persuasion, because this is actually where it wants to go and actually Julia. I think it suits you better. Do you Yeah., Let's, maybe just pin a little bit of the hair back., Don't kind of pull your fingers through the curls when you're working with the curly hair. Try and separate it where it's already separated., Let's do a little twist and less is more.. You definitely don't need to backcomb.. I just put a little twist in the hair and I'm just using a little bobby pin to grip the hair back., I'm going to use a blonde bobby pin, so you can see what I'm doing a little bit better and again. It'S a stronghold bobby pin., I'm picking up a curl carefully, giving it a little twist, keep it nice and loose as in the curl loose. I don't want to pull it too tight. Twist the hair and then, where the curl goes flat against the head, you can open the bobby, pin a tiny little bit, but don't open it too much because sometimes the bobby pins don't close well enough and just slide That bobby pin underneath your thumb., The bobby pin, goes flat against the scalp and it just holds that curl in position.. I might change that now for a dark, bobby pin, so that it's hidden. Same thing and again it just goes underneath my thumb or whichever finger you're, holding that curl with.. Then I might do another little twist in the hair. Again slide the grip flat against the scalp.. Let'S just come back to the front, see she's got enough hair down. Just a little bit more here. I think so. It'S almost like a cascading curl. See where the curls want to go.. You can put the grip on the hair. First slide the grip into the hair. You can do a little bit of a weave here.. I think this bit's sticking out a bit here. So I'm going to open my bobby pin, put the bobby, pin on the hair first and then go in and slide the grip in close to the scalp.. We could maybe do a little twist in the hair here. Again using my bobby pin holding that twist in position slide the grip in and along the scalp.. You could pull a little bit, but you actually don't need to pull too much. We don't want to create fly-aways or fluff. If you feel you need to. You can just dampen the hair a little bit the curls that you pick up. Do your little twist in the hair working with the curl. Place, your grip in position flat against the head. Underneath your finger so that you know that grip is secure. Another little twist here using a brown bobby pin. Open the bobby, pin just a tiny bit not too much and slide that bobby pin, underneath your thumb, with a bit of pressure on your thumb, so that It pushes the bobby pin flat to the scalp and it leaves the hair, soft and loose.. You can just keep going with this., I'm just going to polish up a few of these little curls with the gel the curl maker gel. I think we've got our little half up half down for naturally curly hair., Very careful when you're putting these little accessories in because of any of these little sections here little wires and whether they're sparkle bits or pearls. If they catch the hair anywhere, then it's going to pull out the curl and spoil your style. So bend everything forwards, so it doesn't touch the hair. Just until you get your accessory in. You're going to use your tail comb and you're going to push the hair up. A little bit like when we put a veil in the hair, it's the same method. So if you're not sure what I'm doing, you could have a look at our securing a veil tutorial. We're going to push the comb in and get it behind that row of grips that we've got there and, as we push the comb down into the hair, we're Going to pull the tip of the tail comb, it's going to go into the curls and it'll help you pull the curls up through and in between the comb., Find a little space and go in behind it'll, go in nice and easily behind those grips.. Keep these away from the hair.! You might need to put a couple of bobby pins just across the back of the comb. Just for a little extra stability. Find the comb in there and you just put them crossways literally over the comb, and that will help to hold that in position. And then you can bend these around. Decide where you want them to sit. Unravel the accessory. Where you bent it up. Make sure you're happy with where everything's sitting. You can just grip. Little grips over the sides of some of those little wires.. Just using your bobby pins here. Little twisted updo., You can just twist the hair put one of your bobby pins at the back another one vertical. So I've done one horizontal and one vertical across.. You never need to backcomb, naturally curly hair, but you can just try a little updo., I'm just using my bobby pins as an anchor and a hairpin as an up and over.. We can make a little soft messy little updo using the cows.. If you find you've got a few fly-aways, just get your water spray back and just mist the hair again.. If you do decide to put the hair up, try not to move the hair too much and use big sections and then come back and perfect. Your curl.! That way, you'll be able to avoid any unnecessary frizz or fluff or fly-away elements to the hair.. You can keep these down. I'll, pin them back a little bit on one side.. You can use your fine pins, bring it up and over just to pin any additional curls back.. Take a picture. Look at it from different angles, and you can see if any little bits are sticking out where they shouldn't be. And then you can correct that before your bride is ready to leave.
Comments
Quincy Kosena: Hi Pam! This is so wonderful and helpful! Is there a video for the curls you achieved before filming this? Or perhaps could you let me know the products used, along with curling iron size? Thanks
Katie Service: So helpful! Thank you! I'm going to give this a try.
Safiya Alexander: Hi great bridal inspiration. I want this look for my wedding however I would like the updo for my ceremony and then the curls falling for my reception. Would you recommend pinning up the curls at the back and then taking out the bobby pins to have a down style for my reception thereafter. Would the curls be distorted from the updo?
Ashley Lernor: What products does the beautiful model use?