Bleaching Knots Like a Professional-Frontal, Closure and Wigs
- Posted on 18 May, 2020
- Hair Knowledge
- By Arison Hair
Bleaching wig knots is a process that can seem difficult, for that reason in this article you will find everything you need to know to do it like a professional.
What are knots?
The knots are those black dots in the root zone, which are the product of the implantation of hair in a wig.
The hair root looks dark thanks to these knots.
There are single knots and double knots. Simple is more common than doubles, however, doubles are slightly more durable.
Single knots
These knots are difficult to see and this is why they are the most used.
A small knot is made for each hair, which is tied to the complete wig system. Two or three individual hairs can be tied at the same time.
The most important advantage of this type of knot is that they are invisible, which gives a much more natural appearance.
However, despite the fact that simple knots seem natural, it should be borne in mind that they are easier to loosen, due to regular use.
This could result in the loss of an abundance of hair.
Double knots
This type of knot is excellent when looking for heavy and thick hair.
Its double knot system allows its durability to be greater than that offered by single knots.
Also, hair that falls out due to daily use will be much less, since double knots are more resistant.
The technique is basically to double knot the hair, to obtain a stronger and stronger knot.
The downside to double knots is that they are much more visible because they are larger, which affects the natural appearance of the hair when the scalp is carefully checked.
Bleaching Knots: Pros and Cons
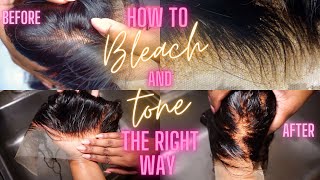
The goal of bleaching knots is to make them less obvious and look as natural as possible as if it were part of our scalp.
The effect of bleached knots is mainly that the hair grows from the person's scalp, giving a much more realistic appearance.
The idea is that the knots that hold the hair are not visible to the eye.
Benefits of bleaching knots
The main benefit of bleached knots is that they will no longer be as obvious and will look natural.
Knots with the naked eye will be confused with the scalp because after being bleached, the color of the knot will fade.
This makes the origin of the hair look realistic.
In addition, after the knots have been bleached, the hair of the wig remains resistant.
The knot whitening allows us to eliminate the black spots that are in the root zone, after the hair implantation.
The hair root will not look dark and will become less visible to the eyes.
Disadvantage of bleaching knots
A disadvantage is that this treatment must be carried out very carefully.
It is not recommended to do a very aggressive bleaching, trying to find a more natural look.
This process is done with chemicals that could damage the hair.
Exposure to this chemical process can shorten the life of the wig or hair prosthesis. If knots are exposed to aggressive bleaching.
It is a process that, when done the first time, must be done with patience and with the right materials. This so as not to ruin the effect we hope to achieve.
Black spots on the wig may weaken after bleaching.
How to bleach knots in a wig?
To achieve a natural skull effect on your wig, follow the procedure below.
The first thing you should have on hand are the materials that will help you to remove the pigment from the black spots of your wig.
Materials:
- Gloves
- Bleaching powder. (Available at any beauty supply store)
- Hydrogen peroxide (Not more than 30 percent)
- Mixing bowl
- Paintbrush
- Aluminum foil
- The front closure or lace wig
Step 1
You must turn the wig over and place it upside down, to have the lace side in front.
If you have a foam head, attach the wig and make sure the wig hair does not interfere with the process.
If the wig hair is baby, secure them with clips.
Step 2
Place 1 to 2 tablespoons of the bleaching powder and a proportional amount of hydrogen peroxide in the mixing bowl.
Step 3
It should be mixed until the consistency is not watered down or very thick.
The goal is that the mix does not go beyond the black spots, but only covers them.
When the mixture is very soft, it goes through the black points and we will not achieve the natural effect, since it will lighten beyond the points. When the mixture is too thick it will not cover the black spots.
It must be mixed carefully so as not to paint the hair of the wig.
There should be a mixture similar a toothpaste. It should not have lumps.
Step 4
The bleach must be applied with the help of the brush and gently on the lace. You should not press too hard, just enough to cover all of the black spots.
After completing the entire process, cover the lace closure with the aluminum foil.
Step 5
It is recommended to let the mixture take effect for 20 minutes.
In the same way, you should make sure from time to time that the knots are no longer noticeable, that is, that they have a light or blond color.
We do not want the color to be brown or another similar shade. Constantly check until you see the color is correct.
Step 6
Rinse with plenty of water.
Do it on the lace side first, so the mix doesn't affect the hair color of the wig.
Then continue washing the wig with water until the product is completely removed.
You can apply shampoo and some hair treatment.
Step 7
Let the wig air dry completely.
It is not necessary to use a dryer, as this could affect the result, remember that we have just carried out a chemical process on the wig.
It is best to dry naturally as long as necessary.
How to whiten closure / frontal knots?
To bleach knots at the front of the wig hair, the same process explained above is applied.
Just keep in mind that the area is limited, as we will be discoloring the knots on the front of the scalp, which we consider most obvious to the eye.
This area is more delicate than that of the rest of the hair since to give a natural appearance to the front area the knot system that is applied to this area is simple.
This gives an appearance of less amount of hair.
This part of the hair by nature has less hair, so the wigs also imitate this natural look.
Therefore, when doing the process, we must be even more careful and apply the mixture as if we were spreading peanut butter on a surface.
Let's remember that this area is one of the most important to give a real hair look that grows from our own skull.
Can I bleach knots twice?
When the wig is natural black, it will be the exception to the rule and we can perform a knot bleaching a second time.
But when the wig is dyed color, even dark color, we will not be able to bleach knots again.
It is only possible to do it once. This is the best recommendation to avoid damaging the hair quality of the wig.
Too much chemical could significantly damage the hair of the wig or shorten its lifespan too much.
Can I discolor knots on wet hair?
Just as it is possible to lighten the hair while it is wet, it is also possible to lighten the knots of the wig when the hair of the wig is wet.
The common thing is to do it with dry wig hair, but if it is wet there will be no inconvenience to successfully carry out the process.
If the hair is wet we can remove it more easily so that they do not interfere while we paint the knots.
Bleach or dye your wig first?
The correct thing is to do the whitening first and then dye the hair, in this way we can have control over the color that we are going to give to the hair.
It is important to bleach first so that the hair is not overly mistreated trying to achieve an ideal color.
How to dye without staining the lace?
It is normal to be afraid of spoiling the lace of our wig when we want to dye your hair, but really if you are careful there will be no problem.
What we must do is use an extra-strong fixing glue, which we are going to apply to all the lace thoroughly.
This special product is known as a cold gel, specifically a "got2b". Special for wigs.
We must apply this product abundantly on the lace, so that having such a strong fixation, it hardens the lace. It should cover everything, the front, sides, and every inch of the mesh.
Then to fix the effect, we must dry the product with cold air. It will only take about 5 minutes until you feel a hard coat.
What will happen is that the ink will touch the lace but will not stay in it.
The protection the lace now has will allow the dye to slip.
After this, the wig will be ready to be dyed perfectly, without affecting the lace.
What products and techniques you apply to bleach your wig? Share below!