How To : Quick Weave Half Up Ponytail | Beautybymalika
- Posted on 31 January, 2017
- Hair Knowledge
- By Anonymous
Hair provided by @herdreamhair
FOLLOW ME ON SOCIAL MEDIA @BEAUTYBYMALIKA
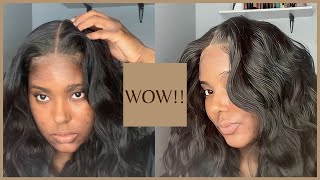
Welcome back to my channel, this is beauty by Malika. Today I am coming to you with a tutorial. This is going to be a how to do a quick review and simple the style there and doing today will be a half-up, half-down type of style right here. My assistant is just sewing around the perimeter of the brain the base underneath this cap. I'M is very simple. Somehow I lost the footage of her doing this part, but it's very simple I'll. Just explain it to you. She just did a perimeter braid around the head, where the hair is going to be put up, and then she just brushed the hair to the middle of the back of the head and did one under braid so that she can sew it down. And so that's why the base is very flat. So it's very, very simple: you can do the base any kind of way just make sure that you have a perimeter braid, and you want to sew the cap around that braid. This is just going to ensure that the cap does not slide off. It does not roll or anything like that. It will stay put so after she has sown completely around the perimeter braid. She will be applying the 30 second growth protectant solution. This solution is just good to create an extra barrier between the clients, hair and the hair glue. So the goal with quick weaves is not back in 1995, where quickly um, you know we're pulling out people's hair because of the takedowns, and things like that. We have come a long way with quick weaves. All of my clients who wear quick, weaves hair grow like wildfires. It'S long it's healthy and it doesn't come up and that's because we create a neat and simple base and we take the proper precautions to protect her hair. So here is the clip of her just putting it on she's going to clip the access cap at the top that we don't need so that she can get really close to the clients, part parting area and the reason she does. That is because, once I go in and put the tracks, I like to put the Traxxas close to the parting area as possible. But again I do not want to you know: compromise the integrity of the clients, edges and her hair. So that's why she's cutting that cap off and putting the solution all the way up to the part, so that is pretty much simple and easy for the prep part. Once you get all of the paste on, you want to just put your client under the dryer. I like to put the dryer on the cool setting because it drives the solution. A little bit quicker using the hot setting is perfectly fine. It'Ll still dry just do whatever works for you and whatever you prefer. So when this client takes her hair down, all she'll have to do, or you know if she comes in and have us take it down. All we'll have to do is take the tracks off the cap and place her at the shampoo bowl. We want to run warm water, warm water will deactivate the solution and then we'll be able to cut the thread around the perimeter. Braid and the cap will come off really easy. None of her hair will come out if you do see any hair in the bowl. After your shampoo, depending on how long the client has her quick weave in don't worry that it's just natural shedding from her hair you'll, definitely be able to tell the difference from natural, shedding and hair coming out because of an install. So now I'm going to go ahead and glue the tracks onto the cap. I am using two bundles for the back from my hairline, her dream hair. This texture is called dream deep and it is Brazilian Here I am cutting the West, obviously, because I am doing a quick weave - and I am just starting in the nape of her hair and putting the tracks in in a smile shape. So you want to make sure you do a smile shape because the head has curvature. So when you follow the natural curvature you know you created even you know even distribution of the hair. So for the size, I love to curve the tracks going forward on the sides, because this pushes the extension hair forward and makes you know the install look a little bit more full in the front, and you know just if the client, let's say her edges, curl Up and do what you know, our hair naturally does because we're black so in our our hair will curl up with moisture it'll cover this so that way, you're helping your client use less heat if she sees them or if they show, of course, they're going to Want to put heat in it and press it out and make sure it's all straight. So if you put the tracks in a curve either the edges are covered and she won't even have to worry about that. So that's my little tip to make the sides fuller and to keep my client from putting too much heat into her hair, so just continue to put the tracks in a small shape until you have filled the entire section of the cap. So now for the last track, I am going to the very edge of her parting areas so that her hair and the extension hair blends seamlessly. So then, we're going to go ahead and get the ponytail area together, so for the hair um that will cover the tracks. I allowed about a half an inch to cover you want to measure out. According to your clients, hair everybody's hair density is different distance. The density means thickness, so you want to measure this accordingly to how your clients hair, presses out, because once is in its natural state, which is curly and then pressed out. Those are two different things. They look totally different, so make sure you do it accordingly to when her hair is soaked out so for the ponytail. I am just using a little bit of a slick stick when I pressed her hair off camera and then to load it back. I used a little bit of the got to be glued hairspray, so just go ahead and smooth this part out. No bumps no lumps - and you want this to be really pretty and smooth. Once you get the ponytail in place, you want to go ahead and break the excess and wrap it around. Now you can do this ponytail two different ways: you can go ahead and leave the ponytail area out and press it out and then pin the hair around the ponytail. I decided to do the glue method, so I'm braiding her excess here and I repin it around. Each other and then I'll be putting a hair wrap around the ponytail. This will again make sure I'm not putting any glue on the clamps here. You are wrapping the hair wrap. You want to wrap it as tight as you can and the reason you want to do this is because you don't want your client to be. You know in the wind being fabulous and her ponytail comes off like a flying squirrel. We don't want that. She don't want that shoot on with it, so make sure that you wrap the hair wrap kind of tight and then, when you're gluing the tracks onto the hair strip make sure you use tension as well, because we want this pointy toe to stay on during the Whole duration of her style, okay, so I like to blow-dry this picture out before I curl it just makes curling just a little bit more simpler and I don't have to put a lot of heat on the hair. I love to blow dry this texture out and just wear it in its natural state. I feel like it'll. This looks so much like african-american hair, like look at her here and then look at the extension here. Oh my god, so just blow dry through the hair. It doesn't have to be super super straight, but you just want to get most of that deep wave out of the hair. Look at that hair, oh gosh, so beautiful, the lens that I use was 24 and 20 and I kind of just sandwich two together. So I would use I used on half of the 24 in the back and then I did some of the 20 and it kind of alternated between the two to create like a natural layering effect in between the hair. So now you just want to go ahead and wrap your ponytail. I'M a good trick is to once you put the hair glue on the trap, just spread a little bit with some hairspray. This will make the glue more tacky and dry faster. So that's just a little bit quick tip for you and then again just remember to wrap the hair with tension. So for the piece that I am wrapping around the ponytail, I just took a small section from the back of the ponytail. I applied some slick, stick and some hairspray and I am just combing it smooth and then wrapping it around the ponytail so I'll, just smooth as you go and make sure it looks nice and pretty and shiny and then also once I get halfway through. I like to just put a little bit of glue on the underside of the hair that I'm wrapping. This will just make it stick to each other and it will not unravel so after you have completely wrapped it just tuck it underneath itself really wrapping this last part kind of tight, so it will completely cook under. You won't have to worry about panini glue. Just put a little hairspray and it will stay so now, I'm just doing a light, face frame and the front I'm keeping most of the UM the length on the hair. She didn't want it as long, so I am keeping most of the lift, but not all of it. So now I am just going in with flat irons and I am creating their girls. I am curling away from the face for most of the curls and then maybe the last two tracks I am going to be cuff. I am going to be curling in the opposite direction. You'Ll see once I curl it. It'Ll all make sense. So you can choose to use um a curly one to create waves or you can go ahead and straighten either style will look really nice. With this install. She saw a picture on Instagram and the model had something similar to this. Actually the exact style um, but I just did the curls a little bit tighter so that they'll last her longer and then after I curl the complete hair. I am going to comb the girls through and make it a little bit more fluffier and then that's pretty much it I'll go in and I'll be using the design essentials. The Purple Label on her edges and smoothing those out that edge control is wonderful. It is my favorite. I'Ve tried every single edge control that you can get at the beauty supply for my clients, and I hate all of them except the design essentials. The hair will not keep white, it will not get like sticky and tacky, and it would also not get greasy. This formula is the perfect formula for our hair. I love it like 100 percent low, not one complaint with this formula, make sure you get the Purple Label and then one another quick tip I like to do when I am trying to blend a client's hair. With extension, here I like to put a little bit of the slick, stick on the ends and spray it with hairspray and then go ahead and flat iron. It I'm doing those steps will allow you to just do. Maybe one pass with your Flatiron and that way you will not give your client heat damage. The hair will still blend perfectly so yeah, just kind of um go ahead and curl the ponytail the same exact way once the ponytail is curled. You want to kind of just rake through it just a little bit. We don't want to make it fluffy like we are going to do the rest of the hair. We just want to break up those curls a little so go ahead and rake your fingers through cross just a tad bit and yeah. Now we're done so. I hope that this tutorial was very easy to follow along with and you are able to achieve this look. So yeah, if you were able to achieve this, look or something simple, please thumb this video up. Please share this. This could be very helpful for someone, especially someone starting off in the beauty field. When I was starting up. I didn't have things like this to help me do styles and learn. I had to really just get in there and get my hands dirty and just learn as I go, so if we can help someone advance in their career in the earlier stages. That is amazing. That is awesome. My purpose here on earth is to not just make my clients beautiful, but it is also to share my knowledge in this industry and help aspiring hair stylist as well. So please share this video and would be greatly appreciated again, if you are not subscribed. Please hit that subscribe. Button hit the bell button too be notified when new uploads are put up, and yes that's about it, be bless. Take here.

Comments
Crystal Steward: I've never seen such a healthy quick weave install, I feel like I should start getting them versus a sew in.
SpoiledSweet2: Yessss a stylist who understands that no one wants glue on their hair...
Tinnelle Shalon: Love it! ❤️ I appreciate your view on educating us ...most stylists are charging an arm and a leg just to pass on info that someone showed them! You have a new subbie!
Ocean.naecO Ocean: I love how you don't mind teaching others that's absolutely amazing especially now a days where everyone thinks everything is a competition. May god continue to bless you keep up the good work
CIC Beauty TV: I'm licensed as well I definitely wanna get strong in my sew in game look forward to more of your tutorials
LaJoyce Ingraham: Love it! Very thorough tutorial! Keep 'em coming! ❤✨
HairIsLee: I don't understand the amount of dislikes... but people can be mean and hateful for no apparent reason.... But away I love it what a wonderful quick and safe way to help protect the hair... love it... beautiful good. thanks for sharing.
Timeless Beauty: Very detailed and awesome tutorial! Such a blessing for your help to encourage someone else! Thank you! Beautiful work!
Beautiful Natural Curls: This is so beautiful! Thank you for teaching as well. I'm a cosmo student and I appreciate you so much for sharing your knowledge! New subscriber!
Melaar: This was by far the most informative and detailed tutorial on this style I've seen on YouTube. Great job! I'm going to attempt to do this style on my daughter for prom this Saturday! New subbie alert!!!
Trinesha Lashon: I love this style and plan on trying it myself. You did a exquisite job on everything in this video. !!!
Alanna Foxx: YASSSSSS girl you DID this! Hairstyle looks amazing and so natural! Great job :)
Ashleigh Steib: This is the BEST quickweave informational video I have seen thus far . Very great education. Thank you so much I'll be trying this way out asap .
Deandra Riley: Awesome tutorial! I can't to try this style. You made this look so easy! Thank you for sharing have a blessed day!
Keyana Williams: All I can say is THANK YOU! From one hairstylist to another ❤️
E Amos: Great tutorial!!! I love this style and your model is gorgeous!!
Victoria Hendon: This was one of the best hair tutorials that I've seen in a while, you did an amazing job explaining and your work was beautiful! #Subscribed
Ej Jones: Another great video! ... I wish I could have my hair done by you. You always slay!
TrishaF: this changed my perspective on quick weaves this looks so good!!
Jay Miller: Thank you for sharing and understanding how important it is to share and show other stylist that aren't as fortunate to receive the necessary training. This really was a helpful & great tutorial
zarlaa bee: you're super talented and your outlook as a stylist is amazing god bless you! I'm an aspiring hair artist as well and this video was everything!
The Clayton's Life: It's so simple but so beautiful. what a wonderful tutorial too. Thank u!!
Cushe' Rae'll: This is a very detailed and helpful video. Great job!!
MsAGray: Absolutely Love that style! This would be very beautiful and lady like for my 16 yr old daughter. Keep slaying our beautiful women of color!
Tolu: Wow, you're so kind to go indepth on this tutorial! May God continue to bless you and your work!
CAKEDBYBOO🧁: perfect tutorial!!!!! I love this style and the way you showcased everything!!!! thumbs up boo!!!
h0neybee77: Thank you for this video. I love that you gave little tips as you went along. They really helped. This is a really pretty style. I love your vibe also. Great work sis. I'm a new stylist and this was exactly the type of video I needed and I love to watch. Thank you.
Business and Bekesa: You did an amazing job. I so appreciate the tutorial. One of the best detailed tutorial. Stay blessed
Beautiful Diva: You did an amazing job hair looks beautiful I’m gonna do my own hair like this today!!
Sabrina L.: This is so beautiful and such a very easy tutorial to follow. Thank you very much for sharing. I also have to try the design essentials edge control
K'allDay: Gorgeous!! Awesome job AND you were careful to care for HER hair!! Loooovvvee it!
abitofpassion: hey Malika. this is Dominique. I just love you!! Your personality and willingness to share is AWESOME!!I wish you nothing but the best !!
Revamped By Shaday: This came out soooooooooooo beautiful i cant wait to try it thank you for sharing!!!!!!
Nina Simone: I'm so in love with this style.. I've tried it before but it always looked weird..but now that uve shown how to wrap the ponytail so that its not bulky, I'm gonna try this again! THANK YOU!! XO
Kearra Porter: Thank you for this detailed quick weave tutorial. I think i will try this on my self before my clients
Kayla Irving: Thanks this was really helpful.....cause I do a lot of little kids hair......and this is cute for a pre teen...
rsimonep: Literally the best half up half down weave tutorial on YouTube. I'm trying this on myself today. I hope it comes out just as good!
MesiaBusby: This is absolutely beautiful and flawless ❤️
freebabe: Thank you for this video and your knowledge! I'm fairly new in the industry and this is helpful and I just subscribed! I loved your message towards the end of the video. Thank you so much!
Jessica Harrington: This is to cute. Blends perfectly! Amazing!
trinna Davis: You did an excellent job!!!!
BrownSkin JJ: You are very talented at what you do! I enjoyed watching and I really love the style! TFS
Carol Mahler: I loved this video, it was the most detailed I've seen while searching for "half up/half down" and the model has the most beautiful smile ever!
Ericka C.: Such a cute style! I had to subscribe because I love ❤ how detailed you were!
Ciera Thornton: Great message at the end about wanting to share your knowledge not just make your clients look good. Thanks for sharing; this came out beautifully!
Marsha Joseph: Very detailed! Thank you. Excellent video.
MRSQTBROWN: I ❤️ this style. P. S. And your client is slaying it girls rock!
Beauty by AnaBel J: MAAM! You SLAYYYYYYYYYYYYED this!!!!! And she's absolutely gorgeous. I'm turning 30 in June. Think I just found my hairstyle
Madison P.: This looks AMAZING!!! This is what I want for my prom can you do this on me
Taylor Atnnette: Man I been tryna figure out how to do this for a while now, tysm!! beautiful job
Kesiah Louis: Yessss I love this definitely going to try & recreate
Nikki Rose: Beautiful! You are amazing at your craft! ☺️
Miss.BeautifullyFlawed: I love that curl pattern it's so pretty
AllThings_Lakirah: This was so so so pretty!!! I love it the most because it's a quick weave.
Naima Phillips: I love how detailed this video was. And I love how you want us all to be successful. You deserve nothing but greatness You did a great job!
Lashanda: This was a great detailed video. Beautiful
girlvssociety21: Thank you for the tutorial ❤️
Sharlonda Harrison: You did amazing Beautiful style ❤️❤️❤️
Tashae Childs: Thanks for a great way to protect the hair.Great tutorial video.
Noelle Martin: i wish i knew someone who could do my hair beautifully like this
official_myegobeauty: I'm also a licensed stylist & your last message is definitely relatable because I didn't have this either when I was first startinf off. That message was true & very inspiring. Keep pushing girl!
J'Chateau: Excellent execution and tutorial! Best I've seen!
Latoya Andrews: Beautifully done!
Ariana Humphrey: absolutely wonderful! thank you for sharing
Candi Cane: That's gorgeous....i luv the install process....great job....its beautiful
Shanice Hardy: You made my day I need this style in my head today and I think I can do this on my head also
Pammie’s World: SOOOOOO PRETTY!! I JUST LOVE IT!!!
Shay_D: New subbie, thank you so much for sharing with us your knowledge. I'm glad you are here to help the upcoming stylist.
Sophisticated Fly Beauty: And I love how you protected her hair while you installed the added hair
Evangelist Shunda Stevens-Perkins: such an awesome tutorial! You did a beautiful job. I wanted to know if the gel will work on natural hair as well. Thanks so much for sharing!
DatChynaChic: Beautiful style and the hair is amazing.
sweetchocalate21704: Gonna try the design essentials on my natural hair. Beautiful style and client!
Sophisticated Fly Beauty: Yasssssss!!!! So fly!!!!! I love it And your model is all kinds of pretty....This type of style is one of my favorites to wear.
Renata Burton: Thank you so much Malik's. Great tutorial!
Nikita Williams: I love this video so much it really helped me out
Nicky Nick: Not only did you do very well with this style, you also have a good spirit. New subbie. Thanks for sharing!
Jasmine Wilson: You did such an awesome job!
LaTanya Yvette: The model is so beautiful..Great install...
ms Nic: Thank you and I appreciate your time you took to make this video. I just have on question, what was it that you wrapped around the ponytail to protect from the glue?? is that something I can buy at my local beauty store? Thanks again for your time
Denise Patterson: You did an amazing job. plus your very inspiring
SHARON SMITH: HUNTY you are very instructional and you did a GREAT job.
beginstepper: I love this look!
Marquita S. Maryland: Gorgeous! I love it
SophSoPretty: This is just beautiful and you seem like a genuinely nice women. Good job!
Jonita Adams: You killed that!!! It came out so gorgeous!!!
xoxo Syreetta: Great job on this video! Can you do a video on a high ponytail like this. :)
Brittany Bee: You did a good job ... Love this
TrishaF: I think you're amazing for sharing your craft with others
kingg cherry: you handled that hair !! God blessed your hands..
Antonia Mercy: Girl u did a great job as soon as I saw the hairstyle I had already liked and subscribe your video before a minute of watching it... Keep it up this is the best 1/2up 1/2down I've seen so far
Ej Jones: Your client/model is absolutely stunning.
Bella: A true professional! Even used wrap paper to apply pony. Yessss
Shortcake39553: You are awesome. Your talent and generosity shine like the STAR that you are. Thank you so much!
Tamika J: Great idea to give knowledge to the beginners like myself.... Thanks
Amanda Davis: It's Neat & Looks Great
Y Walker: I know this is a year old This style is Beautiful Love your work
146lawanna: First time watching and this video made me subscribe...new subbie! You have blessed hands, this is beautiful and looks so natural.
Shaunquella ellis: I appreciate you doing this video. It is very helpful
Mrs. Cinnamon Everett: You did a fabulous job!!
Caramel Tee: TFS.....Respect to all the hard working Hair Stylist/Artist's