Diy Tape In Extension Bob | Create A Fuller, More Symmetrical Bob @ Home
- Posted on 03 December, 2021
- Hair Knowledge
- By Anonymous
Welcome to my channel!
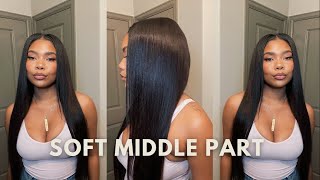
Today's video is a hair tutorial! I'm showing you how I achieve a symmetrical, fuller, blunt long bob at home with Tape In extensions. I only added the Tape Ins to the sides of my hair to even out and make my bob all one length. I don't recommend doing this if you have no knowledge of tape ins or hair in general as it can cause damage if put in or taken out wrong. I didn't show my silk press process as I have a video here showing how I achieve that https://youtu.be/JuoP9MB2i_I I do show how I cut the bob to even everything out.
Tape Ins are from https://www.studiotechilo.com/product-... and I am using one pack of 18in wavy.
Follow Me on IG https://www.instagram.com/simply.genee...
For Business Inquiries Email [email protected]
Hello, everybody welcome to my channel if you are new, welcome back if you're, not i'm g and today, i'm back with a hair tutorial, so i want to show you guys how i create a fuller, uh, more symmetrical type bob. So i do have my hair cut into like a lob like a long type of bomb. It'S not really short, but i mean it's not super long either, but i cut it myself, but i noticed that the front of my hair is not as even as the back so i definitely want to add. A few tape ends to create just a very symmetrical type of look. So i have here some tape, ins - and this is 18 inch, wavy tape, ins from studio teclo. I really love their products. I have clippings from them. I have a wrap ponytail from them that i did a video on. I think i have a clip in video too, so i have one of them up here for you guys to see, but i love their hair products. They make a lot of stuff for girls that want to still wear their hair like their natural hair, but like to enhance it so yeah. I love that company for that and i'll have all of the details and everything below um don't forget to like comment and subscribe. I make beauty, lifestyle, luxury fashion type content. So if that's your thing, then click the button below but yeah. So i'm going to be adding a few of these tape, ins and disclaimer disclaimer. I am not recommending that you do this at home. I am doing it at home. Um i've been doing my own hair since i was a child, basically like seven, eight years old. So i know my hair, i research i study hair is my passion yeah all the things so hair is just my thing, so i know how to i still press my hair cut. My hair everything hair is my thing. So if hair is not your thing, i would not recommend that you do this at home. I would recommend that you go to a licensed professional in your city, but if you do want to do this at home, i'm not telling you to, but i'm just going to show you how i do it at home. So that is my little disclaimer, because the tape ins, if you take them out or if you put them in wrong it - can pull your hair out um. It is a more safer style when it's done correctly. So it's basically just this blue thing. It'S like paper and it comes off, and there is a sticky adhesive right here, so you sandwich your hair, a small amount of your hair in between the two and you kind of push it together and then it adheres to your hair. So it creates a strand in between. I mean around your hair, so that is what tape ins are um like i said i am not a licensed professional i've seen it done a lot of times. I'Ve looked it up on youtube. I'Ve watched some stylists do it, so i think i can do it on my own, but, like i said i do not recommend if you do not know what you're doing so yeah. So what i have here are the tape ins. I have a flat iron. I have some hair clips and a comb, so i'm only going to add a few like i said i just want to make my um bob even like you can see right here like it stops and it doesn't go all the way down, which is not a Problem like if i wanted to wear my hair like this, i could, but i just want to get like that super blunt bob look. So i'm going to start with parting, my hair, so i'm probably going to start a little above my ear and just make a straight part and the thing with the tape is you want to make sure your part is super straight. So let me zoom you guys in so i have a part. Let me make sure it is super super straight and i'm only going to be putting the tape ins on the sides. Okay, so i have my part here. I'M going to take one of the tapes. Take this little blue film off and here is the adhesive i'm going to put my flat iron on it just a little bit to kind of make it more sticky and then just lay the tape right at the root. You don't want to do it like on your route but like a little bit below it, so i'm just making sure that it is tacky. Then i'm going to take another tape. I hope you can see that and then exactly where you laid that tape. You want to section right under it like part of a little teeny piece of your hair with that tape in just a little little piece, and then you want to sandwich it together, and it should look like this and the stylus that i watched. She has like this clamping tool. I wish i would have got that just to kind of make sure that the sandwiches are like really tight together, but i've also seen a flat iron being used to do that too. So i'm going to do that just to make sure everything is sealed and yeah. So, as you can see, i have like a strand of hair right here and i'm going to cut it to make sure that it's even and everything but i'll show you how beautifully this hair, straightens and i'll probably do like maybe five on each side. So i'm going to create another part and just basically do the same thing until i get to my middle part and i'm not putting it really close to my edges, because i still want that to look really natural like i still want to be able to do Baby hair, if i want to tuck it behind my ear, i still want to be able to do that. So i'm not doing it too close to my edges, so, okay, so that is it for this side. I'M going to finish this side, i'm going to come back and show you how i make everything even how i cut it and everything so right now, i'm really like really loving it. It doesn't feel like there's anything it's flat, no pulling no tugging! If i do like this, you can't see it yeah, very impressive, very so yeah i'll come back and i'll show you this other side. Okay, so they are in i'm loving it loving it. Oh i put on like this little strapless bra so that you can actually see the length of the bob and how i'm cutting it so yeah. I just went in like flat ironed a little bit more of my hair, just to make sure everything is sleek. I hope my part is straight, it's not is it, i don't think so. Let me just straighten this part. Okay, i think that's better and then we're going to get to cutting. So i'm just going to take my comb and kind of measure where i want it to go and you could even do like a little asymmetrical type thing, but i think i just want it all one length. So i'm going to measure where i have this part and, like i said, i'm no professional and then i'm just going to kind of cut at an angle. Yeah did i just mess that up? Let'S see, i don't think i messed it up. Oh yeah, yes, and i'm gon na go in and clean it up too, but this is exactly how i wanted it. Yes, this is perfect. Okay, so let me go in and kind of clean it up some more. I know there is a hairstylist watching me cringing right now, yeah, that's better yeah! That'S perfect! Let me go ahead and measure so so i am so satisfied. Yes, yes, so, as you can see, it is not choppy. I have a ball. I have a ball i'm so i'm so happy um. So let's do this side, let's pray that it comes out the same way. Okay, um! I feel like this side is not as even is it? No, it's not, but i mean hey she's got a lot, so i know you guys had eggs and one of my other tutorials to see the back all this hair, so i'm going to turn around. Hopefully the packs. The back looks good. Let me see - and yes so i have a bob - a lob, a longer ball and it's even if you could see the before i'll. Maybe i'll put it right here somewhere, but yeah. It'S perfect and i can put my hair up if i want to throw it in a ponytail i still can but yeah. So this is my little hair tutorial with taping just kind of enhancing the ball that i already had, and i love it. I might do like a review just to see how long it holds up. I think it's supposed to last for like six to eight weeks or something like that so yeah. I hope you guys enjoyed this little quick tutorial, loving it look how it moves like. Yes, this might be my new go-to thing so yeah, thanks for watching and i'll see you in the next video you
Comments
Roberta Gravett: That was a good job doing your own. Not everyone could pull that off so neatly.
Niema Dunbar: Soooo pretty it's so funny bc my hair is the same length but a little longer but the front is a Rab shorter bc I cut accidentally cut it from cutting my braids too short when them out ♀️ so I normally glue two tracks on each side and said let me try tape ins instead of glue and seeing you do it. You did a good job! I'm a retired stylist. Wanted to share some tips. If you know how to use clippers, cutting blunt is another way to cut a blunt bob. Another tip using the razor comb to get the bulk of hair off and either use the clipper to even it. I use thinning shears to thin it out at the ends too to avoid bulkiness.
Taniya A.: I wanted to pick up the shears so bad lol but it turned out perfectly Just gorge!
Bree Brown: I’m impressed sis! How long did it last? Did you keep them in while washing your hair?
Dionne Jones: Nicely done!!!!
ladynefertitibk: Perfect match. Looks good.
Hawa K: You used only one bundle since it’s on the sides. Did you use all of it?
Mommy 42: Great job
Kemnede Wu: I love this
Angela Wolley Wilson: Good job
Atasha Baron: I was thinking of ordering 2 bundles to make the tape in but then. I came across and video and realized that your hair is thick as mines and ordering 2 will just be a wayyyyy too much for me . Looking for a natural go
Kish1006: I love the clip ins but did not care for hair on the bundle at all.
Renotta Williams: I love your eyebrows