How To Customize And Melt Your Frontal Wig | Bleach + Plucking *Very Detailed * Ft. Isee Hair
- Posted on 13 December, 2020
- Hair Knowledge
- By Anonymous
Heey y’all ❤️ thank you for watching this video don’t forget to like comment subscribe and share THANK YOU FOR 60k❤️ On the Road to 100k
TIME STAMPS
INTRO : 0:00
BLEACHING: 0:37
FIXING OVER BLEACHED KNOTS: 4:39
PLUCKING: 5:19
BALD CAP METHOD : 8:27
INSTALL : 11:07
FINAL REVIEW : 19:26
H A I R I N T O D A Y' S V I D E O:
Merry Christmas Pre- SALE , Get New Hair For New Year ! ! !
More Information ALL on https://www.iseehair.com/
The hair I'm wearing in this video is :https://bit.ly/3oJwDSh
#ISEEPrincess
Texture:Bob Malaysian Straight
Density: 150% Density
Length: 12inch
Cap Construction: 13*4 Lace Front Wig
Merry Christmas New Arrivals Highlight Wigs Brown And Blonde : https://bit.ly/3oGNgy0
Special Discount --4*4 Lace Clsoure Wig ALL 30% OFF + $15 Coupon (Code: 15off)
4*4 Lace Clsoure Wig For All Textures :https://bit.ly/3a1HqDc
Other Deals:
Malaysian Straight 13*4 Lace Front Wig: https://bit.ly/2JO1s9T
Malaysian Straight Bundles With Closure Deal:https://bit.ly/3oNT48P
Bob Malaysian Straight Headbands Wig: https://bit.ly/3mhOFcY
Nice Packaging (Free Shipping ) 27mm 3D Eyelashes: https://bit.ly/3oK9BeW (Free Shipping)
♡ C O N T A C T ♡
Email: [email protected]
Imessage/whatsapp: +8613271220951
MORE INFO
AGE : 19
HEIGHT :5’1
CAMERA : SONY ZV1
EDITING : FCP & i movie
SOCIAL MEDIA
Instagram: @Ty.marrah
Twitter: @tymarrah__
Snapchat:Tymarrah225
Business email: [email protected]
PO Box
1785 E Park Pl Blvd
Box :870967
Stone Mountain, GA 30087
#WATCHIN1080P #TYMARRAHGI #vote
#BLM
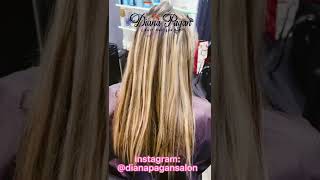
Really feeling myself with this hair y'all, what's up you guys, so today we are staying with another unit from icy hair. Now this tutorial is going to be very, very, very detailed, so, like i said before in the beginning, if you guys didn't catch that, i do have time stamps in the description, so you can kind of go to whatever part you want to go to or just Watch the video all through so now when you first get your wig. If the knots aren't already bleached you're going to want to go ahead and bleach the knots i use bw2 bleaching powder, that's the bleaching powder, i've always used. So three scoops should be enough. I like using 40 volume developer or 30 because it gives you more like leeway, 50 volume. It takes really really fast. So if you are a beginner, i would not recommend 50 volume, but when you're mixing your bleach mixture, you want to make sure you get it thick enough to the point where the bleach just sits on the knots and doesn't seep through the lace. So i like to use this little spatula and when you're putting the bleach on your lace, make sure you don't be heavy-handed now you guys are going to see what happens when you be heavy-handed, because i was being heavy-handed - and i should never did that. But it happens so um, i'm just putting the bleach on there, but you guys are going to see what i'm talking about in a little bit about the being heavy-handed. This is really easy. You really just want to coat all of the knots and make sure that you're getting everything covered so that the knots can fade away and turn blondish so that it will have the illusion that the hair is coming out. Your scalp, once you are laying your wig. Hey guys, so you see how heavy-handed i was. The bleach is just like right through and i took my gloves off because i thought that i was done, but obviously i wasn't. But luckily i didn't burn myself with the bleach but um. If you do get bleach on your hair a little bit, i like to spray water and just brush it out, and then that doesn't it helps and it doesn't turn the hair but make sure you guys are wearing gloves covering your hands when you're working with bleach. Because the bleach will burn your hand and like if you guys do hair, you guys know the pain when the bleach makes that white spot on your fingers and it's just the worst worst pain in the world. So to avoid that make sure you guys wear gloves. Okay, so this was maybe like maybe 10 minutes after you see how it's taking already 50 developer works, so freaking fast, so make sure that you guys, if you do use 50 volume developer, that you know what to work with so now we're washing it out. I just wash it out with well. First, we like to wash all of the bleach out with the water and then we're going to go ahead and do the shampoo and the shampoo that i use. I know most people use high color lights. I think this is called it's like a purple bottle, but the the shampoo is so so purple. This shampoo is a little purple, but it has like a little clear tint to it, so it doesn't have that like purple stain to it. I like that, i just wash it out, i don't let it sit, i just wash it all out and then wash the wig as well with that and then i go ahead and condition it and then start the customization. Okay, you guys. So i did over bleach. My knots trying to be all heavy-handed - this is what i was beating like by being heavy-handed. You can over bleach your knots, but it's easy to bring your knots back. I just take a little bit of black hair dye. Doesn'T matter what type of hair dye take a toothbrush? And then you know kind of don't get all the way to where you turn the knots back. Black leave a little inch apart, but i like to like put the black on back on the hair so that it can look natural and it won't be all blonde. It will just be like the knots bleached, okay guys so on to the plucking. When i pluck. I like to use a brush when i'm plucking - and i like to my hair, is already wet. I like to pluck my hair while it's wet, but i did spray some water on there just to get it back. So when i pluck, i like separate the front piece out because that's basically the pieces where you're going to be doing your baby hairs. So you don't want to poke those too much so that you can still have hair to work with in the front. But when i am plucking my hair, i just go ahead and make everything a fast motion and you want to go from side to side. Every time don't stay in one area, because you can ball the frontal that way. But as long as you're keeping a steady motion and going from side to side, your hairline should look pretty natural and also the more layers that you separate, the more natural it's going to look now when i'm plucking my wigs, i pluck enough so that it looks Natural when i put it on my head and also after i have installed the wig with the lace, glue and everything i do also pluck. While the wig is installed on my head - and i feel like that kind of gives me a better outlook on how the wig is going to come out, because you can pluck a lot - and it looks very - very natural on the wig like on the wig head. But then, when you put it on you'd be like dang, it look like i plucked too much so just so. You won't plug too much i like to pluck just enough on the wig head and then pluck a little bit more just to give it like the more natural feel while on my head, so i could definitely know that it's going to come out the way i Want it to come out and also, i definitely recommend that you guys pluck your wigs after the hair is bleached, because i'm telling you it would be so hard to pluck, because after the hair is bleached, it's kind of more easy to pull out. So it just glides right out and you don't have to be like plucking, very, very hard and after i got done plucking, i just went ahead and blow dry, my hair a little bit more. I like to blow dry with a brush because i just feel like it just gives the hair more volume. So now i'm taking my wax stick and i'm gon na go ahead and take my hot comb as well and start just pushing the hair back slicking. It back so that when we are installing it all, the hair is slicked back in it's very easy to like lay the lace down and stuff like that, and the hair won't be in the way. Okay. So now i'm using the rk by kiss in the number 14.. This is what i'm going to use to tint my lace and erica j and slay by jordan. Put me on to this. You guys after i purchased this makeup for this lace. You guys this is like the perfect shade for me. I also purchased a different color and i tested it on my best friend and that's like the perfect shade, like the rk by kiss, is like the perfect shade. Okay, so now on to the next step, we are doing the ball cap, so i'm using my got to be glued the clear kind and i'm just slicking my hair back. You can use gorilla, snot or anything. That'S going to slick your hair back so um after i do this. I like to make sure that the gel is dry on my hair and make sure that it's very, very slick, so i wrap my hair up and i'm gon na sit under the dryer. I think i sounded there for like 5-10 minutes, maybe and then after that, now we're about to start with the wig cap. Now i used to use stocking caps because i used to think that they melted so so well, but they're too transparent for me and i like the regular wig caps now, because the rk by kiss just makes it look so so bald. So now i'm about to use my ghost bond - and i just put it over my hairline and do not put it where your hair is put it before your hair starts, so that you won't tear your hair out taken off the bald cap and that's why most People say frontal snatch their hair out because they don't know how to take off their wigs properly. I'M going to do a video on properly taking off your wigs. But, yes, you guys don't put the lace glue on your hair. Now i'm using my ors hold spray and i like, using this whole spray as like an extra hold, and you can spray that on your hair, if you want to because all you have to do is use water to take it out. But now i'm just cutting off the cap and you see how much of a hold it is. That'S why i like using lace glue because it just holds the ear tabs as well, because one thing that i always used to struggle with with the ball cap was the ear tabs and make sure you guys are using hair scissors. Like i know, sometimes the kitchen scissors and the school scissors get y'all wigs laid, but i promise you if you use hair scissors like the precision of the scissors and everything it's just going to help you cut everything so much more smoothly. So then, i'm following up with some boho liquid gold on the edges, just to make sure that everything is very, very secure without having to put some more wig glue on there. Now i'm using my rk by kiss palette the same one that we use for our frontal and you guys see how the color match exactly with my skin, and it just makes everything bald. So now i'm using my sea breeze just to clean off all the makeup and all the excess products that was on my skin. Just so, i won't have like a free breakout or anything like just to protect my skin and then we're also using a skin protect. Now this skin protect is by isha but um. I just had that laying around like. I don't really know a specific skin, protect to use that one i just like to use it, but skipper tech does definitely help. So if you do have some, you should incorporate that into your install, but now what i'm doing is just customizing my wig to my head, sometimes depending on how your head is shaped, some wigs are probably not going to fit that close to your ears, you're, going To have to maneuver it that's why you'll probably have to know your exact wig size, but some wigs kind of be too big on one side. So you just want to make sure that you cut it and make sure that it's fitting good on your head before you start installing, so that you can install without any hassles or worries. So now what i'm going to do is i'm going to do the three layers of the ghost bond. So this is the first layer and you want to just dry it until it turns clear and i dry it with a handheld dryer. I don't see it under the dryer for this part, because you know it's no point in setting a dryer doing another layer sitting in the dryer do another layer so and also for my layers. I do one. The first layer is the smallest layer and then the second layer i make it a little bit more wide so that the wig can actually stick very well and then the third layer i just kind of make it the same as the second and then you know Just dry it and make sure that you guys dry your lace glue until it's clear. Sometimes you might have a little white residue. That'S a little bit! That'S fine because it was probably like the way you put it on your hair that you still have white residue, but it's fine. If you still have a little bit of white, you can just go ahead and put it down, but just make sure that you dry your wig all the way. So it can turn clear. While you have your lace on there and when you're, applying your lace, just comb, your hair, don't use your fingers because it's not going to work out. If you use your fingers, use your comb and comb the lace into the glue and then that's going to help it really really hold. I take some ors spray and spray on my ear tab so that it can hold a little bit more. I take my elastic band, put it over my hair and i'm gon na sit under the dryer for probably like 25 to 30 minutes. Maybe and as you guys can see, our frontal is thick to our hair. It'S not going anywhere! So now we're going to go ahead and start cutting off that lace. I preferably like to cut off my lace after i've already like glued the wig down, and i like to use a razor opposed to scissors. I really been preferring the razor now because i just feel like the razor just gives you like the jagged look on your frontal, so that it blends a little bit more me with the scissors. I just like to use the scissors to follow up off what i did from the razor just to get it a little bit more precise for the small parts, but for like cutting your lace all the way. I don't like using scissors because i really don't like using the zigzag method, but you can, if you would like, but me um, i'm not that advanced. You guys i like to use the razor. It just gives me a better outcome and also after you cut the lace, you are not done with your install, so don't get disturbed if you're cutting off your lace and you're like dang like this look a mess like you're, not done yet. So you know just kind of have some faith with yourself and be patient, because you still have a lot more melting to do so. I just go over my hair with the hot comb a little bit more before we start doing our baby hairs. Okay. So now, what we're going to do is separate our baby hairs. First, before we go ahead and lay our wig down one more time and i would say separate your baby hairs depending on how you want it to look kind of already know what kind of baby hairs you want to do before you go ahead and do it And, as you guys can see, i am plucking a little bit more before we lay down the baby hairs so that um, i can have a more natural look because i just felt like i wanted it to be a little bit more natural and you guys, like. I said before i don't pluck my wigs too too much while it's on the head, so i can go ahead and pluck it right here so that i can know how natural it's going to look and it's already on my head. So i'm going to go ahead and do the same thing for that other side. Now i'm just plucking my part when it comes to plucking parts i like to pluck my parts, so it can look natural because nobody with their real hair, like a blowout or something you're not going to have a super duper duper duper straight part. So i like to make my parts look realistic and not too perfect and, as you guys can see, i'm using my hair flex spray. Now this spray is going to get your hair like so so so melted like i'm, going to go ahead and show y'all like i just sat on the dryer now we're back, and you see how melted that looks yes, so now what i'm going to do is Just comb out my baby hairs, while i'm brushing them out and we're going to go ahead and start styling the baby hairs you guys. Also, if you feel like the baby hairs that you pulled out, are a little bit too thick. You can always go ahead and pluck them, like you, see me doing just so, you can have like a more natural type, baby hairs and they won't be too thick, and today, i'm just using got to be glued to do my baby hairs. Now. This is the first time i've never incorporated any mousse in this install like i'm, so surprised that i didn't use any mousse for this install like i'm amazed but um, i mean baby hairs. I really don't know how to explain them. Um you're just kind of just shaping them. You know it's very like you can see what i'm doing more than i can really tell you, but one trick that i like to do what you just see me just do a couple minutes ago, when i took my straightener for the sideburn part, and you know Kind of curled it a little bit just so i can be a little curly and get that little like swoop. That'S a little trick. You can do, but everything else is just you shaping your baby hairs to how you want them to look and, as you can see, i'm adding a little bit more plucking and stuff to it. It'S really just you customizing it and bringing it to life. How you want them to be, and then you guys right here, there is some lace that i just felt like. I wanted to get it off because it was just like messing me up with the baby hairs and you can go ahead and cut off any unwanted lace. You want to have zero lace on your skin, really when you're doing the baby hairs. That'S why you want to cut off as much lace as possible, so now i'm just taking my sea breeze and getting off all that residue from the got to be glued for me doing my baby hairs, and now we are going to go ahead and style. This hair, so, as you guys can see, i did do a little bob and this is a 12 inch wig, but i did cut it a little bit, but before we went ahead and cut it, i just went ahead and straightened the hair now um. I didn't get any footage of me cutting the hair, because you guys i was cutting the hair on camera and i didn't even like you couldn't even see me cutting the hair like it was like. I don't even know why i did that, but i mean all i did was cut it with some scissors, like i didn't do anything special like i just cut like you regular cut hair. But yes, you guys i'm just putting the little finishing touches on there, but we are officially done with this install after i'm done installing my hair and for the finishing touches i like to just go over it a little bit more with some oil and my hot Comb and you know just making it look a little bit more crisp but i'mma. Let you guys watch me, do the rest of that and we're gon na come back with the final review. All right, you guys. So do you guys see how natural this looks like? I'M in love like this looks so freaking cute like this, is what i was going for. It came out exactly the way i wanted to come out. This hair is bomb. I see, hair always comes through with the hair. The lace was bomb, the hair was bomb. Everything about this whole process was just fun, even our over bleaching knots. We fix them and they look really really cute. Like i really love it. I never really tried this hairstyle before i really don't even like straight hair. Like that, but i'm feeling this like this is really cute and you can even like wear it behind your ear. I think i'm end up wearing it like this. A lot because i feel like this is like super cute wearing it like. This is like super duper. Cute, i hope you guys enjoyed this video. I hope you guys gained a lot of information from this video. You know we did it from beginning to end, like i really showed you guys every step on how to lay a frontal, so i really hope you guys grasp the information you guys took from it. You know you guys, like did what you had to do to you, know, grasp the concept and everything really laying lace isn't hard like it's not hard at all. It'S really just mastering the steps that you have to do to do it like it's not hard at all the more you do it, the more you're going to get it. I promise it's going to be just fine. Okay, i really really love the way i installed. This hair, i'm so glad that my install came out a1 for me to be showing you guys, step by step on how to do this, and i'm really in love with this hair. It'S really really cute. This hair 10 out of 10 y'all y'all, already know 10 out of 10.. I don't even got to say: oh, i think it. No! This hair is a 10 out of 10 y'all. It'S so cute like her. So if you guys enjoyed this video, don't forget to like comment and subscribe to your girls, youtube channel and we'll be back with more videos. Stay blessed. You


Comments
Nicole Nunya: Where do you get hair flex from?
MissNiylaNicole: it looks so gooddddd
Kanyin’s Tv: For everyone worrying about your future and plans , here’s a quick verse - “For I know the plans I have for you,” declares the Lord, “plans to prosper you and not to harm you, plans to give you hope and a future.” Jeremiah 29:11 Don’t give up on God, cause he won’t give up on you. He is working in so many different ways. Don’t forget that you are loved and Jesus is coming soon ❤️❤️
Joanna Georges: This was the most detailed video I’ve watched about wigs. I can’t wait to try installing my frontal again
elizabeth noel: this is literally the best tutorial for beginners, im thinking about getting a wig and this is so helpful, thank you!!!!
tq. gabbie: your literally my favorite i’m so scared for putting my first wig on but you give me so many tips
Chocolate Princess Tv: You did GREATTT I came on here cause I want to start doing my own wigs and you gave me so much motivation to do it Also you’re so pretty keep doing your thing
DeniseNicole !: Can’t even tell it’s a wig boo !! So natural looking
Jari Miazah: Watching this video made it seem like it’s so easy to apply a wig definitely gonna follow your tips for when I do my own wig for the very first time
Persia's Glo: I don’t wear wigs but now I feel like I can laid one down after watching this you did that sis!
Kerena B: I really appreciate how detailed this video is! You broke down every step in such an easy and understandable way! Thank you!
India martin: Ouuuuh girl you make this look so easy ❤️ lemmmeee go head an do mine.
Alyssa Howard: I’m so nervous to do mines this would be my first time installing my own closure wig... I keep watching videos on YouTube to gain confidence
eve x: one of the most detailed tutorials I’ve seen lately and the final result
Princess ThaBahamian Spartan: It’s beautiful! How long have you been installing your own wig? I believe this was very helpful for me to try it myself. Maybe!
Khadija G: I'm planning on getting a wig and you explained PERFECTLY how to make it look as natural as possible. Thankyou baddie
Jada Washington: God bless everyone and build a relationship with the LORD ❤
T-Mac Wells: This is the best wig install I’ve seen
Christiyan Jones: You always rock everything
Kyla Underwood: This turned out really prettyyyyy. Btw I would recommend 20/30 volume developer ( for 15/20 mins) for ppl just starting bc it's not as strong. Thanks for this video
Tanya Hutchinson: You really did a great job slaying your wig! Thanks for showing how to install a unit.
Chrisssstine: Girl thank you !!! I just ordered mine today & I’m so excited.
Lor Lex: i’m so in love! this video helped me slay my wig perfectly step by step. thanks girl!!
TheLifeofCalviC: OMG! Is it just me or even though it was over bleached it still looked good with the dye! Like using the tooth brush just made it look more natural! I love it! Might start over bleaching mine now♀️
XxDiablaxK: I be bleaching the roots just a little bit but thankfully when I do it it’s not overly noticeable-even up close. It makes my part look bigger but in a good way
aaliyah marie: the editing, the tips, the quality, the everything !
DAILY DOSE OF DI: its really the time stamps for me! I never see that before and that was so helpful and dope I APPERICATE YOU!!!!!
Dats AliLee: Out of all the detail videos on here this is my favorite❤️❤️You did such a good job explaining everything u did. Thank you soo much❤️❤️❤️✨
Destiny ReGene: omg that makeup is matching PERFECTLY with your skin ❤️ #subscribed great video! can’t wait to watch others
Blaque Beauty: It looks sooo good. Now you about to make me go buy all this stuff. I want to learn how to slay my own wigs.. thank you sssoooo much for this detailed video... love you girl
Latia Byrd: This the BEST detail wig tutorial I’ve seen I can’t wait till try some of your methods tomorrow I love it girl
DaShaa Monaee: THANK YOU for this❤️ i wanna do an install soo bad i just don’t wanna be walking around looking crazy
Shay Jones: This is amazing! Your tutorial was very helpful! I feel confident to try my very first install due to your video! Thanks
Diamond Cooper: You snapped!! You super funny with it. I'm a beginner and you just motivated the hell out of me thanks
Isabelle. bella: Not only did you slay but I you made me feel like I’m able to lay my lace next week. The video is so detailed!! I am so new to installing a lace but you gave me the confidence. I also loved how you messed up and said it was ok because if you didn’t I wouldn’t know what to do if I made a mistake. Your hair turned out beautiful and so are you. I’m so happy to have come across your video!!! Thank you❤️
IamJeniah: this came out so good! thank you for helping me improve!
Shay Shay Beans: Probably the best video I have seen on wigs. Thank u❤️❗️
Nahkilla: This is the best tutorial I’ve seen thank you
Queen Bekah: Thank you so much, the video helped me install my cousins wig today, and it was my first time installing a wig. My cousin said I did good
Iman Marie: This is the best install tutorial I’ve ever seen
Sabri: self-taught tease, yes pretty!
TaJasha Hawkins: I love her she is so detailed
Staci Scott: You did a amazing job
Jassy Doll: This was such a good video and loved the voice over
Chole Jones: Can you do a must have video on everything you need for a slay frontal install?
Isha Sesay: You really make me wanna make wigs just like you fr! love to see it
Lashondra: As an upcoming stylist, I appreciate you so much! This video was so detailed. I can’t wait to put these tips to work!
GlamzByB: whew I wish it was actually this easy , did so good!!
Kimari Nailah: Omg thank you! You helped me fix my lace and edgesu demonstrated it so well
Shantay naughton: omg this is going to help me so much i recently ordered my very first wig and im hoping to get good results with the bleaching and everything this video gives me so much confident that ill get it done
SandS Squad: beautiful keep it up Btw if anyone can help me get my son more pull-ups I’ll appreciate it don’t judge me things are hard as a single mom especially with covid going on making things harder if no one can help then then prayers are appreciated aswell ❤️
Life With Ria: You did the tf out of this
Ne Neee: U made this whole process look soooo simple, I’m nervous thank yu for this video very informative ❤️
Queen Lee: You showed everything from start to finish very detailed
theyenvyc: No matter how much I watch this video , I can’t get it right to save my life lmfao
Jenaae: yasssss I loved this video this made me confident.
April Chanel: it looks so good..imma try to do my own hair hopefully it turns out good
Caitlin Van Lendt: This is perfect
Miyon Carter: This is by far the best hair video I’ve watched and the result was amazing chiefs kisses
Williemae Walker: i love this update and how its organized, now i can do my wig and make my own wigs
Vanessa-May Gavaris: Amazing video , I’ve done my hair myself but now I’m gonna try it out ❤️
layla moore: Your aabsolutely my favorite YouTuber!! I love your content & I will keep supporting you!
Osha P.: I’m going to have to try this
camie 22: This is the most detailed video have ever watched... I downloaded it to watch it offline for later.
Haleigh Briana__: This was so detailed! Thankyou
Hannan Konya: I love this video so much I am a beginner at wigs and this helped so much thank you so much ❤️
Msblackempress: I followed your steps and mine came out pretty amazing, I love it ❤️
Ashley D: This was bomb! Can you tell me where did you get the hooded dryer?
Chrissy J: Hi! This made it look so easy but i have one question if i’m using 30 developer with bw2 powder how long do i leave it in before washing to get that dark brown you got in the video ?
Cayla Burse: omg this is the best wig video ive ever seen. so detailed and helpful. i had to comment. <3
Tahaya: Loved this ! How long do you keep your wigs on ?
Nani: girl it looks so bomb!! tysm for this video
Everyday Life with Sirena: Girlllllll you taught me so much new stuff I LOVE HOW DETAILED YOU ARE ❤️❤️
sarah: this is so helpful and detailed omg THANK YOU! u killed this!!!
Nina NoFlex: Omg!!!!!! For the 1st time in my life I feel like I can lay lace like a pro!!!!
Janay Eccles: It looks so good, where did you get your hot comb from, I’ve been looking for a good one
Kennedy Bailey: It’s so cute you did that I might wanna do something like that for prom
Shelani Wilson: Definitely giving what it was supposed to
Skye McDaniel: This was helpfullll I’m finna get my first lace
Sadies E.: Fire!!..So natural....so gorgeous❤
Maya Dickerson: This... is the best melt I have ever seen in life!! Omg. And your skin is flawless!
Angelina Jack: maybe I’m not equipped to do a wig install on myself...you really made it look simple. I know since it would be my first time it would take a longer time.
Sarah Touchard: It literally melted so much into your skinn
bukunmi abraham: i literally LOVE your channel & the black hair dye on the knots is literally so smart i would’ve never thought that!
Naftaunda_x: It’s looks wonderful ❤️ The wig cap method thought me a lot cause I pulled my edges while using the the wig cap and now I’m scared to use it. But your hair looks wonderful I’m definitely subscribing❤️
Tonette Moales: Loved this install!! Your blow dryer looks like a top for a pot, lol super cute.
B: Girl this video is so informative! Thank you and where do you get the makeup powder from
terita jones: this was so perfect
Sakyiwah Sarpong: Omg thank you I just ordered mine is coming in on Tuesday
kyarna: You’re so talented , Could you possibly do a reinstall video?
Nina NoFlex: Oh and how long did you let the bleaching process? I did it with 50 volume developer for 10 minutes and I still have black knots.
IshaMoy Williams: YouTube wouldn’t stop recommending thus video so I finally watched and now I’m subbed I hate bleaching knots I always mess the roots up
lifeofmyra: Girl that’s scalp!
MayI Bemeok: It’s the bop for me, it’s rock for me, stiff where
Dream Strandz Hair: Love this content, very detailed.
Chanelle Crawford: You did that !! Can I get a list of the products please ?
Molana Pike: Yesss the best install I ever seen!
Maya Adams: Best tutorial ever !
_. layysia: You slayed this
Naysia Brunson: Love this, very detailed. Can we get a reinstall video???