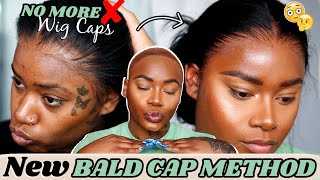
Very Detailed Frontal Wig Install From Start To Finish (How To Melt Your Lace) Ft Eulliar Hair
- Posted on 20 December, 2020
- Hair Knowledge
- By Anonymous
Today’s video i’m being you guys a very detailed frontal wig install from start to finish ! i’ll be showing you guys how i pluck my lace frontal, how i do my bald cap method, tips and tricks for a good bald cap method, how i cut my lace for a natural finish, and how i melt my lace to make it look like scalp ! i hope you guys enjoy this video and learn something new !
wig info -
promo code:eullair2020
eullair official website: https://www.eullair.com/?utm_source=Yo...
13x4 180% density wig 24-inch deep wave wig :https://bit.ly/3oOYUHW
Top-selling wigs and Bundles:https://bit.ly/323yKYu
10A Human Hair Lace Wigs:https://bit.ly/3eeVKIR
613 Blonde Hair Bundles With Closure: https://bit.ly/3kOnyGn
Natural Color Hair Weave With Closure: https://bit.ly/3ei2BkP
eullair hair aliexpress store: https://bit.ly/2TH1HVt
Instagram @eullair: https://www.instagram.com/eullair/
Business email: [email protected]
most recent upload -
Girl Talk: Let’s Get Personal (my mental health, soul ties, sex, toxic relationships & MORE) https://youtu.be/2E9n1rd5j7c
forcing myself to GLOW UP because i’m sad :( *sad bih to bad bihhhh * | Vlogmas Day 3 https://youtu.be/OFTvAnl-N1w
Thank you for watching ❤️
LETS BE FRIENDS ! FOLLOW MY SOCIALS
spam acc @chaderoom
main ig @nelltesfaye
snapchat @nelltesfaye1
business inquires ONLY - [email protected]
So if you guys want to learn how to take this thick hairline from this to this, then definitely be sure to keep watching, because in today's video i'm going to be showing you guys how i pluck my frontal, how i do my bald cap method and the Best tips for ball cap methods: how to cut your ball cap method. Everything a beginner needs to know on how to get a melted front toe because baby, this frontal was melted, i'll, be giving tips on how to cut your lace and also how i style my hair in this beautiful half up, half down hairstyle that you're going to See right now and how i made it give scalp because look at it. It is giving scalp it's looking like it's growing out of my hair. If you want to learn how to get scalp, then definitely keep on watching, get it get it get it get it get it get it again. It'S your girl, double c back on the scene with another freaking youtube video for guys today and, as you can tell by today's title, i am going to be working with aguila hair and i'm going to be bringing you guys. This detailed beginner wig install video, i'm going to be showing you guys how i pluck my unit, how i do my ball cap method, how i install my wig and how i style it so, if you're interested in all that, definitely be sure to stay tuned. This wig right here is a deep wave frontal unit and it is from eli hair. This video is sponsored by them. I want to thank them so much for sponsoring today's video. They did send me this unit to work on and i'm just showing you guys, the tweezers that i used, you guys can purchase them at your local beauty, supply store, and the first thing i did was obviously i wet my unit and i did already bleach the Knot, so that's what you want to do the first two steps you want to bleach the knots before you even get started on any plucking, and you want to make sure you soak your wig with water before you start plucking, because in my opinion, it makes it Much easier makes the process much faster, so the first thing i'm doing here, i separated my first section and i'm just plucking any black knots that i missed when i was bleaching the frontal. So that's why you see me right here taking my time very tedious. Usually i do move faster than this, but right now i'm just making sure i take out those black knots that i missed. While i was bleaching the hair, then i like to separate another section and i like to pluck going backwards. I guess you could say against the hairline for me personally. This helps me get any hairs that i might have not plucked enough or it just gives me like a nice plucked, looking frontal when i do it like this, i like to plug backwards and forwards. So once i pluck going backwards, i start to plug forward. If that makes any sense, i don't know, i don't want to confuse anybody. This is just something very self-explanatory. I'M just taking my tweezer and i am plucking along the hairline going backwards, not staying in one spot, because if you stay in one spot for too long, you can create bald spots. So i'm just taking it and you want to make sure you grip the tweezer. So you're actually pulling the knots out and not breaking the hair another tip i have for you guys, as you guys can see, i'm using one hand to push the hair back and that's so. I can see exactly what i'm doing making sure i'm not creating any bald spots, making sure i'm getting the exact plug. I'M going for and look look at the difference that was the before, and this is the after. It definitely looks much much better. Definitely more natural, and i definitely prefer it this way and i'm taking the last section, which is all the way back like near the tracks and i'm plucking near there just a little bit just to give myself a little more of a pluck. Look since i am doing a half up, half down hairstyle, i did want to get like a really plucked look. You could have stopped where i showed you guys, but i wanted to plug just a little bit more because i was doing a half a half down, which is a style that does require a lot of natural plucking or just a very natural hair line. And then i'm taking in my brush and i'm brushing all the little shed hairs out that i pulled out and there you have it. You have your plug front tool and that's exactly how i pluck my front tools. I hope you learned something and that's the before. Come on like we did that, okay, so now that we plugged our front tool. The next step is the ball cap method before we apply the wig to our head. So i'm just taking my wig cap and i put it over my forehead and over my ears and now i'm just cutting little slits in my ears and you're, going to see me with using the sorry. I can't talk you're going to see me using the ors olive oil hairspray um, i'm using this to create my bald cap method. It'S really good. It has very strong, hold um, definitely 10 out of 10 recommend this hairspray i do use got to be, but this is what i had around and i was like. Okay, let me just use this real, quick, my god to be was in the living room and i didn't feel like getting it, but this hairspray does work just as good. That'S me applying the first layer, i apply the first layer and then i blow dry. Of course, just to get it dry and that's just basically what the ball cap method is um, just spraying hairspray around the hairline. Just so you can get that ball cap method. Just so you can get the ball cap laid on top of your head and then you proceed to cutting all the little excess so to cutting your ball cap really well, i recommend using small scissors like so and just cut really close to the hairline and only Cut using the tip of the scissor, as you can see, i'm only cutting using the tip of my scissors, and this gives you a more precise, cut, a more clean cut instead of using the whole scissor to cut off the excess you know cap, you just want To cut very close to the hairline, and that's basically what i do it's real self-explanatory: that's about it for the ball cap method and boom. Look, that's a clean ball cap right there, but we could clean it up better, like i'm going to clean it up better. I'M going to show you how to do that, but look that's so clean that cut is so clean, wait that is clean, i'm just taking a q-tip with alcohol and i'm cleaning the perimeter around my forehead. That'S very important for the next step and i'm taking some bolt hole active. This is, if i didn't necessarily have to do this step, but i'm just showing you guys. This is if your ball cap doesn't come out very clean. Like you have some like extra pieces hanging up, you can take some bold hold or any hair glue, and you put it along the hairline of the ball cap method and you just brush it forward. To lay it down and make it more clean and make it lay to your skin way better. If that makes any sense, i don't know like. I said: i'm not really good at explaining things. So hopefully this is all like self-explanatory, but this is, if you didn't, get a really clean cut for your ball cap method. You can just use some glue to um press any extra hairs that are sticking up. I said extra hairs extra like cap. That'S sticking up to lay down, but this is also if you want, like a stronger hold on your ball cap, so it can last much longer because i notice, when i do this, my ball cap does last me at least like three wigs like i could take One wig off use that ball cap put another wig on and use the ball cap again, and i can use it up to like three times. So that's just a little tip so now to make my ball cap match my skin, i'm going with the even ebbin tinted lace and i'm just spraying um the shade light medium brown all over my ball cap, because, as you can see, it's blending in with my Skin, more and once your ball cap is blending in with your skin. That'S how you know you're going to get a freaking melted frontal all right if your ball cap is melted into your skin. Matching your skin and you look ball like. Are you about to get a real good install, but here is the unit i have it on my head, i'm getting ready to install it like i said this is ehlers eller hairs, deep wave frontal and i honestly love the texture of this hair. It is so freaking good, but here i'm just hot combing everything back, because i'm getting ready to install the wig, and i don't want any hairs in my way like it is so important that you make sure you brush all hairs back hot comb, all the hairs Back it is so important, so i'm moving on to cutting the ear tabs. This is honestly, my favorite part, because it gives the wig so much more flexibility and you get to see how your wig is actually going to come out. I like to part the area near my ear away, and i like to make a little line through it. As you guys can see, i parted it and i'm just cutting right where the part is, and that is it like. You want to make sure you part that section and cut the where the exact line is. I'M sorry, if i'm not making sense, but here we're going to try again see i'm parting. The area where my ear meets the lace and i'm getting ready to cut that exact line that you see that exact part i cut right through that part, and that is it that's exactly how i cut off my ear tabs. It'S super easy super simple. I like to start off by cutting the ear tabs because, like i said it, gives the wig much more flexibility and i just feel like it's way easier for me personally now i went off camera and i cut a first piece of lace off and guys. Can you see like the melt way before i even cut, but this is where most people mess up on is cutting the lace. I take a small scissor that i can be very exact with and i go ahead as you can see, i am cutting in like a zigzag kind of jagged motion and that's how you get the most natural cut, because you want you don't want to cut a Straight line across your lace, because that is exactly how people will see the demarcation, so you want to cut in a zigzag motion. But here i'm using my got to be spray. I went ahead and got it from my living room because i personally like to use, got to be spray to lay down my wigs and i'm just spraying at least two to three layers of this blow drying the hairline getting it tacky. And then i'm going to place the wig right on my forehead, as you can see, i'm blow drying the first layer and then i'm going to go in with another layer. Now this is the second layer and i'm just applying it to the hairline of the ball cap method, where i'm going to lay my exact wig, you want to make sure you're, not too messy with this hairspray, because once it dries and it gets like white it Just looks really bad and i'm going in with the third layer, but with the third layer, i'm using the ors olive oil hairspray and i'm gon na do the same thing. I did spray it across the hairline blow dry until tacky. I honestly 10 out of 10 recommend this hair like it was easy to style. It was easy to work with once the wig is so easy to style. That'S how i know it's a good wig and this wig is definitely a beginner friendly wig. So if you guys are looking for your first beginner friendly wig, i deck definitely recommend leolai's deep wave frontal like this. This is bone like the texture was really good, but now i'm just getting ready to prepare my hair to go. Yes, i said my hair because is giving scalp. It looks like it's growing out of my skin anyways, i'm preparing to put this in a half up, half down i'm parting out some baby hairs and i'm parting out two sections of hair, because i want to have like two front pieces of hair out and the Rest in a half up, half down, i'm pretty sure we all know how to put our hair and a half a half down. So i'm not even going to explain this because it's just like putting your real hair and a half a half down. I use some hairspray just to keep the hair in place and then i'm going to brush all of that through just to make sure all the product is evenly distributed along where i'm going to like put the hair up. If that just made any sense, i don't know but yeah. This is all self-explanatory. I'M just like putting the hair and a half a half down and that's about it. You guys are gon na see the finished result. They came out so cute so bomb. Thank you to ellie la hair for sending me this hair. It is so beautiful. I freaking love it and i definitely recommend their company. All their information will be down below the description box. You guys can go check them out because i have definitely definitely 10 out of 10 recommend. I only recommend the best hair companies and they definitely have great quality hair. If you say that you didn't love me,
Comments
Alena Rhodes: I love how in-depth she is . I finally feel like I can try this myself
Davida McLeod: Thank girl very much needed. Thank you for the consistency ❤️
Ebonee Arie: yesss girl i needed this fa sure !!
Coco 1017: I absolutely love your content ❤ keep up the great work I hope you have an amazing week and a great holiday
iamkourtlyn: okayyy but who ya'll know slaying shit like my frienddd?
Zaidaplug: You look so pretty slayed that
Aziseez: Girl it gave scalp and the process was easy. You did that!
Jessica Ashia: Slayed that though
Ayy Atari: U always slay ur lace fronts
ImQuaayon: I dont even care that she make feminine vids sometimes. I rock with her shit the long way
Willisia Major: Can you do a closure wig install next please ?
Asia Monique: upload a smoke sesh , you look pretty btw
LAVANCIA MCDONALD: I think you should maybe start a hair business(SUGGESTION)
Josiah Suazo: i was just listening to her apple music
More Of Maria: If you don’t have the elastic band to hold it down what else would you recommend?
Domini_xxv: Can you do a hair video with your natural hair like a curly hair routine or something plz
Asia Webb: Can you do more smoke sessions
Jade May: Gurlll yasss slay dat lace wig
Elecia Jay: Not Chanel becoming a hairstylist
Jayda Lissa: yesss chanel
It’s_Naimah Stackhouse: ❤️❤️
Tayla Chae' TV: im finally early girllll i saw this and instantly clicked
Augustine Houston: WOW,I like your videos, I received the same product from newigstyle..com two months ago, shipped by Fedex,wonderful quality !!!!
Brianna Alexis: do a closure next
Shilah Mckenzi: baddie !!!!
Rachel Tout-Puissant: Hair givinggggg!
LAVANCIA MCDONALD: Heyyy
g'daVinci: what do you do to the back?
Kara: Earlyyyy
Savanah Singh: U should go to cosmetology school
leybibandss: early gang
avie WhiteDami: Need lovely ❤️