Detailed Wig Install With Body Curls & Fluffy Baby Hairs| Alipearl Hair
- Posted on 25 October, 2021
- Hair Knowledge
- By Anonymous
Welcome to IAmBeautifulHustlerTV .
Be sure to SUBSCRIBE & TURN ON YOUR ALERTS
——————————————————
MY PERSONAL YOUTUBE CHANNEL : In The Life Of A BeautifulHustler https://www.youtube.com/channel/UCB9xX...
——————————————————
Hair I’m wearing: 16inch body wave 13*4 HD lace frontal wig, 180%density
Shop Now➤https://bit.ly/3CNCiyr
❤#AlipearlHair Official Store:➤https://bit.ly/3AIAHbo
❤Lace Front Wigs for Sale!➤https://bit.ly/3jTEY55
❤Invisible HD Swiss Lace Wigs:➤https://bit.ly/3CIrCS1
Use code “alipearlyoutb”to save $10!
#alipearlhairwig #alipearlbodywavehair #alipearlhdlacewig
Instagram @alipearl_hair: https://bit.ly/34I3Oyd
Youtube @Ali Pearl Hair: http://bit.ly/2H0Gmmc
Facebook @Ali Pearl Hair: https://bit.ly/3aKwxX3
WhatsApp: +86 15890076489 E-mail: [email protected]
Follow My Socials:
Instagram:_Beautifulhustler
@thebhslay
@iambeautifulhustler
Twitter:_Beautifulhustl
YouTube :IAmBeautifulHustlerTV
✨For Sponsorships ,Reviews,& Questions
Email:[email protected]
786-571-1313
To Purchase Hair & Products Www.ibhslays.com
Allow 3-14 Business Days For All Orders
——————————————————
#Youtuber #YoutubeVlogger #YoutubeReviews #Hairtutorials #Miamihairstylist #Miamihair #Duluthhairstylist #TravelingHairstylist #YoutubeTutorials #GeorgiaHair #GeorgiaHairstylist
#Atlantahair #Atlantahairstylist #Celebrityhair #CelebrityHairstylist #SouthCarolinaHairstylist
#thebeautifulhustlerbrand #thebhslay
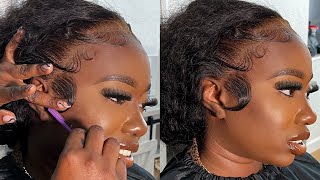
Foreign, hey beauties and welcome back to my channel. Today we are back with another video and i'm going to show you guys how i created this side, part with some body curls, and also how i created the new trending fluffy baby hairs using some holding spray. So today, i'll be using my cousin genesis as our hair model for this video and as you see, this wig is from ally, pearl hair. One of my favorite companies here on youtube to work with and they sent me over this um 16 inch body wave, wig um down to your bottom left. I do have um the unboxing of this wig attached and i do want you guys to know that i did go ahead and uh dip. This wig to be jet black using one bottle of royal navy and one bottle of off black, and it gave me this nice little black tone here and i'm gon na go ahead and jump straight into the installation process. Now i already uh did her bod cap already added the foundation to her cap already cleaned her hair, along with the 99 alcohol aka, the lace prep, and now i'm going right on in with our lace, milk adhesive and for her install today. I think i did about three or four layers but um. I went ahead and applied that first layer and i'm just going to spread it out nice and evenly that way it can turn clear really quickly. So once i finish applying all of those layers, we will go ahead and get you know straight into melting down that wig and getting it slayed. Okay, so i hope you guys enjoyed this video and let's get straight to it. So now i'm going to go ahead and apply that last layer of adhesive and, like i mentioned, spread it out nice and evenly and flat and smooth. So it can turn clear quickly and then, once this layer is uh clear, i will go ahead and begin to tap down the wig by placing that wig right into that glue and also i'll be using my edge brush to help me push the lace in and Smooth everything um as far as getting the hairline to be all you know, neat and everything like that. So keep watching now when it's time for me to place the wig into the glue. I always like to start with the center of the hairline first, because it kind of gives you your guideline on where the wig should lay and then i'll go ahead and work. My way to the sides and just add some pressure using either my fingertips or a comb, and i just like to comb that lace in and apply pressure using that red tail comb and um or edge brush whatever you're using and once i get that wig in Place where i want it to be, i just go ahead and apply more pressure and then have them hold that side down and then i repeat, the same exact steps to the other side place that wig, where you want it to lay take um the brush or The comb that you're using apply pressure by um pushing that lace into that glue and then have them, hold the size down. So now, what i'm going to do now is go in with my blow dryer on the heat setting and begin to blow dry that lace right into that glue, and i also did this step like this as well, because um, the wig was still kind of damp From us um, you know dyeing it to that black color, so it was kind of like killing getting two things done at once: put uh blow drying that lace, but also getting those hairs to kind of blow dry. At the same time, and as you can see here as i'm blow drying, i'm still taking that edge brush using the brush side and just applying pressure um by pushing that lace right into that glue and still blowing dry, you know blow drying it on that heat. Setting so once i am done doing that, i will of course go in with that melt. Belt, tie down a hairline and continue to blow dry, the wig. So now i have to blow-dry that with some more and um you know i did most of it off camera, but i'm going to go ahead and remove that milk belt and begin to go in and cut off all the extra lace um this lace. I don't think this was hd lace, i'm not sure, but just i can't remember at this point, but i don't think it was. I think it was like regular uh, transparent lace but uh just to be sure just check down below in the description box to get the exact details on this wig um. But now that i removed that milk bed, i'm just cutting the extra lace from around the ears, which is a very, very important step. You guys, because if you do not cut that lace from around the ear, it will irritate the person um who's wearing the wig. Like it would apply pressure on the back of the ears, which eventually would cause them to start having like headaches and stuff like that, so be sure to go ahead and cut that extra lace off of their head from around the ears and then once i do. That i will go in with that lace, glider and begin to raise off all of the extra lace in the front of the hairline. So now that the lace is off, i'm going to go ahead and begin to part off the um parting area. Um and then begin to pull down the section for the baby hairs before i add the tresemme holding spray and tie down the hairline and um. As i mentioned, i will be showing you guys how i did the fluff, the fluffy looking baby hairs using the holding spray. So i'm really excited to show you guys that technique here in this video and also, let me know down below in the um caption in a yeah in the comment area. Sorry y'all, um how y'all felt about the fluffy baby hairs, the new trending fluffy baby hair. Look um if you want to see more of those type of baby hair videos, let me know or if you feel like um, just stick with the regular you like them better. Let me know, because there's so many different styles of baby hairs, these days y'all they come out with something new down there every week, okay, so um. I definitely had to try this out on someone other than do it on myself, because doing yourself is a little harder, but i feel like using um the holding spray technique for this install today made you know it pretty easier, but nevertheless um. I went ahead and part off the baby hair section and i also went in with the new and approved wet, stick and applied that around the parting area. Just to get that area nice flat and sleek that way, um it could be kind of pre-prepped before we actually, you know, go in and add the curls so pretty much. What i'm doing to this side as far as section off the baby hairs and just making sure that all tracks are covered um with the wig, because it's not a full lace. It is a lace, frontal wig, which means it has like the frontal area in the front. Of course, the tracks in the back so um make sure you part off here in the back area to cover those tracks up hot comb and wax stick it make it very nice and sleek. And then i will go ahead of course and repeat the same steps to the other side, pull down the baby hairs hot comb, get it nice and flat in between and then of course we would get into re-tying that hairline down and then get into how i Did the curls and just a quick tip, as i show you, i showed you guys in this video. If you want to make sure that the inside, like the top area of your wig, is nice and flat make sure you go in between and make different party sections and hot comb that down so it can be nice and flat and not so puffy. If you do not want that, puffy look! Okay! So, as you guys seen, i parted off sections on the other side and i did go in and add wax and hot comb in between, but um. Now that i have the other side sectioned off for the baby hairs, i'm going to go ahead and spray that hair around with that tresemme holding spray, i'm using level 5., they do have different level holds of the tresemme holding spray and right now, i'm using that Level five and then i'm gon na go back in with that melt belt and tie that hairline down and i'm gon na show you guys in detail how i curled um her hair up. Well, i'm gon na show you in detail on one side, so you can see the whole process and then i just repeated the other side off camera so um once i tie this melt belt, i'm going to go ahead and um comb, the hair down, make it A blunt cut before i begin curling and then we will get into the curling part, so stay tuned. So, as you guys can see, i went ahead and cut that wig, nice and even it looks so pretty already, and i just love the black color and i also added a little holding spray, not holding spray guys, i'm sorry, but he protecting to the hair. And now i'm going in with my babyliss curling iron, my babyliss pro, i think it said 3000 or something like that, and i got this from my local beauty. Supply store, um, it's a flat iron, but it's also good for doing curls as well, because the um, the metal all around the hot, the flat iron gets hot. So everywhere you see me wrapping the hair around. It gets hot, so you have like a curling iron and a flat iron all in one okay. So what i'm going to do is curl all of the hair on the right side of her face going towards the back direction. So i will be curling everything away from the face and, as i finish, continue um well after i finish curling the hair and i released it. I kind of scrunch it together and then i also took that tresemme holding spray and sprayed the curl before releasing it. And usually i don't really add holding sprays to my curls, but i really wanted the curls to last with this install. So that's why i did that technique for this video, and this is also the style that she wore for when we went to the little baby concert y'all, which was so lit. Oh girl, y'all, oh the baby's, so fine in person - that's always the dirt. Oh, my god whoo child, but that's another story for the other day. But yes, so i went in with that flat iron went in with that tresemme and i got the curls to do what it was supposed to do and give what it was supposed to give. So uh just keep watching. I'M gon na show you guys how i curl this whole side completely, and then i will do the other side off camera and we will come back and want to show you in detail how i do those fluffy baby hairs and then bringing the style all together. For the finishing look, so let me know what y'all think down below. Oh, don't forget if you are on this channel, just click that subscribe button and turn on your bills. Yeah show your girls some love period, hello, my you! So after adding holding spread to that last curl, i went ahead and curled the rest of it, give her a quick, little spin, spin spin and now we're going to go ahead and remove that milk belt. When i tell y'all that lace going to be so muffin melted, yeah y'all know the vibes yeah, i know the vibes but hold on. Let me get that thing open y'all. When i be tying that milk i'll just be time, don't even be carrying y'all. Oh yes, get into the milk baby is giving scalp per use as it should. What lace as it should yeah y'all know the vibes. So i'm gon na go ahead and comb those baby hairs. Well, the pre-baby hairs out, and i'm going to show you guys in detail how to create those fluffy baby hairs. Okay, so for starters, you want to go ahead and comb out those sections, and i cut everything like a little more, i'm gon na say more like two inches now, if you're a real um, beautiful, hustler brand beauty, you know i'm saying y'all always say one inch Or shorter yeah, i know i say that in all my videos, but with the fluffy baby, hairs they're, usually more on the bigger side. So i cut the hair two inches and then i went in with like that edge um, like the edges curler and i um curled it underneath now. Some people curl it upward, but i think with the fluffy baby hairs it's best to curl it underneath, but at the same time, if doing it, the other way works best for you, then just do what works best for you. Okay, so not only did i curl those baby hairs, i cut them two inch. I curled them underneath and now i took that same trust in me. Look she already excited the baby here. I only did one of them things but um i went in and i took some tresemme holding spray and i sprayed it on the brush now. The key to getting these fluffy baby hairs is not to get the product on the whole entire baby hair, but just the root part of the baby hair, because once you take your brush and your holding spray or whatever you're using moves a gel. Whatever the focus is to just get the root of the baby hair to be in place, and you want to eat, leave the ends kind of like loose and free from product. That way, you can flip it in that upward direction. Okay, i know i probably sound a little bit confusing, but hopefully you guys can understand it better by the way i'm showing you versus how i'm telling you, but that's the only way. I really know how to explain it. Okay, so you want to focus the product on the root and just kind of leave. The ends like on his own free will, like you, don't want to add no product to the end of the baby hair. That way, it can just flip up and do what you needed to do. Okay, so that's exactly what i did to create those fluffy end baby hairs and everything that i'm doing to this side. I will, of course, go ahead and do it to the other side as well, so um just keep watching, try this technique out. Let me know in the comments like once you try it out how it worked out for you and everything like that. Just tell me how you feel about them in general, so um, but yeah, i'm gon na show you on this side of course, and then i'm gon na show you guys the other side as well. So you get a better view from the other side and the baby hairs are completed, giving fluff fluff fluff, yes, cute cute cute, so now it's time to comb these curls and get it you know all into place. So i like to just comb it. Let me say this y'all: if you have a layer cone use the layered comb, because i hate using a rat tail comb to comb out curls the layer. Comb won't really give you that effect that you're looking for, but i don't know why. I can't never keep up with my layered cones, but nevertheless i just went through and began to comb those curls out using my rat tail comb and also kind of finger combing and pushing the curls. How i wanted to be - and then i also went back in with that lace, glider and just added some very, very, very, very light layers to the top end, just to give it like that, little bang effect or whatever, like that. So i'm just going to hold the hair backwards and not in the diagonal angle, and then i just razor it down going diagonally to give me more of that. Bang look in the hair and look as you can see. Jen was just so excited like she was just in heaven but um. Yes, i just pretty much play with this, so i don't think i cut any layers on this side. Perhaps i just kind of like kept playing with the curls until they gave me that layered look but yes um. I absolutely love this look. It was very cute, very simple. I love the jet black and i just add a little holding spray to kind of keep everything into place. I'M still going to comb and play with it until i get a desired look until i get it to sit exactly where i want it to sit, and then once i am done, you guys will see the finishing look. But let me know what you guys think down below of this look in general, it's like a cute short blunt little. You know curled look with some little fluff baby hairs and, of course, last but not least, we will go in and conceal that part and you know give it that final touch in that final look, but i hope you guys enjoyed this video. It was super cute. Super cute, i love the black. I love the even ends all of that um, but you know y'all. Let me know what y'all think down below um. I hope you guys did enjoy this video. I hope you guys enjoy. You know learn something from this video and i hope you guys continue to stay tuned for more videos to come once again. This is, i am beautiful, hustler tv. Thank you guys for watching click that subscribe button turn on your notification bells. Give this video a thumbs up, get us an algorithm, so people continue to find our channel and help this channel grow, and i love you to all my beauties. I will be going live soon. Y'All so make sure y'all got y'all. Notifications turned on. I got some story times for y'all y'all, don't want to miss it. Y'All don't want to miss it. Okay, but once again, this hair is from ally, pearl hair. This was a um, 16 inch body wave wig and i did go ahead and cut it and make it blunt and last but not least, like i mentioned y'all, i was going to conceal that part so now that that's pretty much done stay tuned for the finished. Look - and i hope you guys enjoyed this video and i will see y'all next time - bye, beauties, love, y'all, you

Comments
Kim Ivey Makeup: Shae, I would love to see some of these perfect installs be styled with tons of layers and curls. You know the ones the models are shaking around the hair just falls perfect every time
lneal2800: Thumbnail is everything! Ready for this look
R K: We need you in Texas. Your installs are always .
Ali Pearl Hair: So pretty with this wig! Thanks for shraing Alipearl hair!
Charlotte Williams: OMG You are talented her hair definitely will bring the clients on in. I wish Memphis TN had a Stylist with your enthusiasm . Thanks for sharing you talent.
Ariel Williams: I wanna come to Miami for a makeover and the experience since I never visited before.
Chiomytata: Waiting the thumbnail looks fire
ms. X: Thank you for explaining how you curled the hair. Most stylists skip that part
Chiomytata: I tried it and it was hard for me a lil but I missed a step tho. Heading to get the spray and try again
Nina Chatham: loved it so happy i found your channel
Kery J: I love this!!!
Always Happy: beautiful, awesome job
Melicia Destyl Dumas: So beautiful
E Season: Your fluff baby hair method worked for me they finally came out good ❕
Shakita Brown: Hey sis!!I love it ❤️
christine parker: Beautiful
Michelle Junior:
stephine brown: ❤️❤️❤️❤️
Sean Yepez: please ma'am give me one wig please for my birthday i want to experience have a long and thick hair because my hair is on top of my ear please i want to look pretty on my birthday and also im your subscriber since last year
Kery J: Do you offer classes?
Queentera _daStylist: ❤️❤️
Shshsh Shahin:
Mz Chocolitt:
deseraymiles87:
Shshsh Shahin:
MichealJm3luv: WHT IS FLAT IRONE ARE YOU USING