Install A Wig With No Ripples X Step-By-Step Dancing Baby Hair Tutorial| House Of Vain Hair
- Posted on 17 July, 2021
- Hair Knowledge
- By Anonymous
♥︎ thanks for watching!!
_________________________________________________________________________
♥︎Hair deets ♥︎
Deepwave Frontal wig
Direct Link for the wig: https://www.houseofvainofficial.com/co...
Length: 26”
Color: Natural Black
House of Vain Website: www.houseofvainofficial.com
Instagram: @houseofvainofficial
Because I Love and appreciate The Gang ..
USE CODE: YOUTUBE
AT CHECKOUT TO SAVE $$$ ON MY ENTIRE SITE!!!
Discount is automatically applied by clicking this link:
https://www.houseofvainofficial.com/d...
_________________________________________________________________________
Links to Hair Products Used ♥︎
hot comb https://amzn.to/3fHJ7Iz
Pencil flat iron https://amzn.to/3yYmqY7
Witch hazel toner (clean skin with this) https://amzn.to/36ZFNUi
Bold hold active lace glue https://amzn.to/3iRDvgM
beige cap https://amzn.to/3gF1wGp
Got2Be freeze spray https://amzn.to/3gwtLpo
elastic band https://amzn.to/3rCux8n
double sided edges Brush https://amzn.to/2NiTc2E
Pack of Popsicle sticks https://amzn.to/3hTuvXY
Sebastian hairspray https://amzn.to/3vMAi5S
Maybelline Mate and poreless 355 https://amzn.to/2SOsylo
Empty spray bottle for wetting hair https://amzn.to/3rejjb7
_________________________________________________________________________
Wanna work with me? ♥︎
Email: [email protected]
_________________________________________________________________________
Stalk me ♥︎
Personal Instagram - @Thechachimarie
Business Instagram - @HouseofVainOfficial
Snapchat - @Thechachimarie
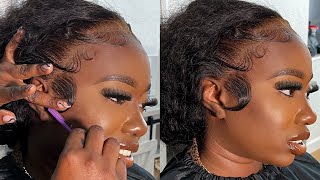
Hey brad, so you guys know i love to just jump right into it. I already have her cap on and i'm applying her cap by using my bolt hold, i'm like dragging a little bit a really light layer of glue along the front of her hairline, and i use a popsicle stick to blend that out. I'M blending that out really really really really good, because i want this to dry, very, very clear, so make sure you use a very light layer and you really like flatten it out and blend it out, really really really good. Everything that i use in this video is going to be in my description box, with a link directly to the amazon store that i bought it from. So you guys do not have to ask me any of those type of questions, because it's already there for you, while the front of the cap was dry and clear, i did go ahead and sew around the perimeter of her head just to protect her hair from The wig, i guess you don't have to do it. You could definitely just sew enough for the front tool, but i just sew the whole thing on and i do like to use beige caps, no matter what skin tone you are. I don't do hair, but if i'm gon na do your hair, like if you're my family, my friend, if i'm doing a hair, fair video, i like to use a beige cap because you can manipulate the beige cap to be any color you want. So i used a maybelline, matte and poreless. The shade is in the description box to match her skin to the cap, and i put that all over the cap and i cut it off and now i'm going ahead and with my first layer of glue, i put my first layer of glue directly on the Hairline of the cap - and i still use my popsicle sticks to smoothen that layer out like really use a really. I really started using less glue and i really really really started paying attention even to the very beginning of the glue, like smoothing that part out too, because that's where the the wig is really going to lay and if that part is white. Your hairline of your wig is going to be white, so you have to take your time and blend this out and use a very, very light layer, and i also like to like do it? Half a half i put like glue on half of the head. I blend it out like i'm doing, and then i go to the other side of the head and i put the layer of glue there by the time i come back to do my second layer on the other side, it's already clear, but honestly it doesn't matter Because i shared in one of my videos that i learned that you don't even have to wait for the glue to dry clear for you to go ahead with your second layer in total, i used two layers of glue. You can still go ahead and use three. Four, whatever, but i just used two layers of glue on her head in this video okay. So while the glue was dry and clear, i did add that same foundation shade to the bottom of her lace, as well as to the top of the lace in front of the hairline. And this wig is actually from my company house of vain. And it's a deep wave, wig 26 inches in medium, medium brown, lace or light brown lace, and if you have a problem, when you apply your wigs, if you have that problem where, in the center of your wigs it's like ripples, it's bubbles, it's not laying flat. It look weird: i find that applying your wig from ear to ear, instead of starting off in the center, helps that so i start off by putting the wig on one of the sides of her ear. I have her hold on to it. Oh, my bad, i got my head all in the camera, i'm so sorry, y'all, sometimes filming and doing this at the same. It'S not easy and i don't be knowing that i'm getting in the camera but whatever, but i started on one side of the head. I started on one side of the ear tabs. I pressed it in like with my fingers lightly. You not like punching her face trying to get this lace to lay in the glue you're just pressing it in with your fingers, making sure that the lace is really like stuck like stuck like down like four flats. Again, i'm saying like make sure it's in there with your fingers: um start off from one ear and then you go to the middle, and then you go to the other ear. You have her your client, your your friend, whoever hair you're, doing your own hair. Whatever hold on to the ear tabs, while like that laces marinating in i'm just making sure that my positioning is good, the lace is laying exactly in the glue where i want it to lay and i'm still continuing on with basically pressing it down into the layers Of glue making sure that it's really down it's really on, we don't want her wig to be doing the slippery slide. We don't want it to act like his round escapes. None of that so now i'm still pressing it in, but now i'm just using my rat tail comb. So you can use your fingers. You can use a comb. You could do like a mixture of both methods. Like me, whatever you do just get the lace in the glue before i cut the excess lace off or anything. I like to tie this wig down and i like to blow dry it on the heat setting just for a couple minutes, probably like 10 to 15 minutes. If i'm doing my own hair - probably maybe even three to five minutes, you know i love to take shortcuts on myself, because i don't have time, but i did hold this blow dryer to her hair for like about five ten minutes, probably just to let that dry Down a little bit before i started cutting it and then it started slipping, and i don't have time for that. So let it blow dry leave it alone. It'S not uncommon for, like the ear tabs to still not be laying down. As you can see, i can still lift the lace from up on top of her ears and that's not good, so we're gon na have to add some more glue to that, but before we do that, i'm just cutting off the excess lace that i don't need. This wig fit her forehead her head. Whatever perfectly i didn't, have to cut much lace off at all. I didn't have to cut none of the hair that i had already plucked off at all. If you miss my plucking videos, i got two one where i show you my own technique and another where i show you arrogant. Taste techniques so definitely check those out. If you want to know how to do that, but i'm just checking out the positioning here, cutting the excess lace that i don't need off of both sides before i go ahead and i add some more glue underneath the ear tabs and yeah i'm pulling her ear From up under that wig just to make sure that the wig is going to lay how it needs to, and if you don't cut enough lace from on top of the ear that will cause you some pain. While you have this wig in your head, it'll be very uncomfortable, so you have to make sure that you cut enough lace off so that it sits comfortably and that you're not ready to just snatch this wig out, because you just can't take the pain so like I said before sometimes the ear tabs are very tricky and for whatever reason, sometimes they just don't lay down as easily as the rest of the wig does so just get up under there. Well, i'm just getting up under there and i'm adding one more layer of glue to this to the specific area where i need this wig to lay down at and of course, i'm going to blend it out. I blended out the tail of my red tail comb and then i went - and i did the same thing to the other side, because the other side was tripping too, but by the time i finished um applying extra glue to this side. The other side was clear and i did go ahead and lay that down. So i might speed the next couple of clips up and just let you guys watch so i went ahead and i pressed the lace into the glue after it dried and i still had her grab a hold of the lace and hold it down. Because while i go do the other side, i don't need this side flipping back up and tripping on me again and then i have to add another layer. No, i don't have time so i had her hold on to the lace and i noticed a lot of people in my comments, be like oh, oh i'll, be tripping. I make them hold the blow dryer i make them hold this. I make them hold that these people are my family. These people be my friends, i don't do hair, i don't do i don't take clientele, and this that's one of the reasons why i don't have time for that, but anyways i put the lace glue. Let me calm, i put the wig, i laid the wig into the extra layer of glue that i had and now she's holding on to both of the sides and just for some more reinforcement. I'M spraying like a layer of got to be spray. On top of these ear tabs, specifically because i don't want them to go flying again - no no just add the reinforcements, and then i did it along the rest of the hairline too. Just because and then i went ahead, and i blow dried this for a couple. More minutes, probably 10. More minutes when i took it off the ear tabs were not tripping, see. I was tugging at them to see if they was going to lift and they were not lifting everything was good. So, if you're having trouble with that, just do that and you should be okay. So now that i know the lace is super secure and it's on i'm just cutting off the rest of the lace, because we don't need it anymore. It did its job and then we're gon na get ready to do some baby, hair, fluffy, baby hair, dramatic baby hair when you have curly hair like curly hair like this, i just feel like dramatic baby hair that look like they swimming is appropriate. I feel like that, looks good with curly hair really curly hair. I love a lot of crazy baby hair, so i didn't really part it out specifically like in a specific way, i'm just taking out the sideburns and then i'm taking out the rest of the hairline. Just by doing like one vertical line across the entire hairline and then we'll start the baby hair. When i had all the hair that i wanted to include in my baby hair parted out, i did hot comb the baby hair forward just to have it lay flatter towards the front of the head, where it's supposed to be um. Take your time. This process i've burned my forehead a couple times. I didn't burn anybody else's. I don't think i probably have to be honest. I always burn my friends by accident, but just take your time with the process and then go ahead. When, then, i go ahead and i curl the baby hair all across the entire hairline. Listen when i was curling this baby hair. I was like this is actually cute. I think on one of my installs i'm going to curl it i'm going to cut it a little shorter and then i'm going to leave it like that. I thought this was actually cute. I don't know if i'm tripping or what, but i think it's a look. I feel like you could do some baby hair, that's like laying flat fluffy whatever, but you got something. That'S just curled and that's just wild like this too. I don't know, i think it's a look. I think it's really looksy. What do you think? Do you guys think i should do like my next install like that? I think i'm gon na do it but anywho when i had all the baby hair curled i started off with my sideburns. Don'T be like me, guys get the rest of the baby hair out of your way, because you're going to be struggling and you're going to take forever and the rest of the hair go, keep getting in your way, and i don't know why i just get the Rest of the baby hair out your way when you cut the sideburns when you cut one part of the baby hair, get the rest out of your way and y'all know i love to use hairspray. This is my favorite hairspray to sebastian hairspray. Everything is linked in my bio again, but i love to use hairspray and my little edges brush to mold my baby hair because you curl the baby hair already. The baby hair is going to be easier to go into the direction that you want it to go in. You see how it's fluffy, how the tips of it is curving and curling, and it's not necessarily stuck to her face. You can't really accomplish that without curling. Your baby hair first so curling them is essential and when i use hairspray on my edges brush, not only do i use that to actually mold and train the baby hair. I use that to push the rest of the hairline back and out of the way too, because she doesn't really want to part she wants a free part. She wants to be able to toss her hair. This way toss it that way, put in a ponytail. Do a side part tomorrow if she want to we're not going to define a part at all in this install, so i'm just literally using that hairspray to mold the baby hair and to push the hairline back. So it could be like a nice cool. Little push back look and because this hairspray that i love so much is so lightweight it doesn't make the baby hair or the rest of the hair crunchy and hard like how spritz or like how it got to be free spray would do so again. I'M just making sure that this, like the tail of the baby hair, is nice and curvy. I'M using my edges brush to like hold it in place where i want it to be, and then, when i feel like it's tacky enough, i let it go and that's pretty much how you do fluffy baby hair um. I don't think i should just keep talking the whole time while i'm doing the baby hair, because i'm literally doing the same thing over and over and over again i cut it after i curled it. You know i'm using my hairspray to push the rest of the hairline back and then i'm using my fingers, along with the brush, to train the baby hair to go in the direction that i wanted to go in, sometimes because the hairspray is not tacky. Initially it just might seem like it's not working. You see how i look like it's not working, but you have to give it time the hairspray is going to get tacky and then, when the hairspray starts to get tacky, the baby hair is going to start to lay in the direction that you're swooping it in So use your fingers as like a guide, use your fingers as like something that could keep this hair straight, while you're trying to curve the tips use your just use your finger, use your finger, use a brush, be patient with this, and you will be okay, we're Understanding, yes, you get it right. Just look good, it looks soft. It looks fluffy, it's like it's trained, it's molded to like how you want it to be, but then again they don't look like so stuck like chuck. It just looks like they look like they dancing. I love them baby hair like they dancing and you got curly hair. Like i love when it's not like so uniform, i don't know diamond's dancing, baby, okay, so i'm moving on to the other side. I'M not really doing nothing different. I figured that that little piece that i have her holding, i figured that i wanted to suit that the other way, so i just wanted to do the other side first and then i'll add it to the front part after i was done this, but i'm not Doing anything different, i'm still using my hairspray on my brush, i'm using my fingers to hold the baby hair in place so that it doesn't just you see when i pick my finger up the baby hair lifts up too right. You got to keep your finger on it if you want it to stay in that position until it gets tacky, so keep using your finger to like keep using your finger as a reinforcement and then keep if you need more hairspray, add more hairspray. If you don't need more hairspray, just keep playing with it with the edges, brush um go from using the brush part using a comb part, whatever part that you feel makes you more comfortable, and you can keep doing this until you like it, and then you see How i'm holding like the hair down with the tool with the edges tool, because i just want it to stay right here and then it's going to dry. Eventually, it's going to get tacky eventually you're using hairspray, and it will stay just like that and it's still not going to look hard. It'S still not gon na look like too frozen, even when you're done so yeah, guys that is fluffy baby hair for that ass. I also wanted to pinpoint you see how like in the middle, how i'm swooping the baby here, it's not just all swooped in one straight line. Some of them is overlapping, some of them go swooped and downed and swooped and down like it, looked like it's going up and down like that's, why i say: look like it's dancing, because it's just it's just it's just it's doing different movements like waves, like the Ocean, like you know, i'm saying that is okay when you do fluffy baby hair, it's okay for your hair to overlap! It'S okay, for it to look messy, it's okay! For it to not look like so perfect, you don't have to sweep all this baby hair and do take your comb and do one straight line like make it line. You don't have to do that. You'Re, not getting a tape. You'Re, not a boy. You don't have to do that. It is okay and i think it looks good if you don't like it, then don't do it and if you don't like it, don't comment on not liking it. I'Ve never ever been called to leave a negative comment on something that i don't like. If i don't like it, i tell myself in my brain. I don't like that and then i move past it, but for you to leave a comment, that's just like sick, literally. So if you don't like it, thank you so much for watching this video, but please run along. Please have a good day and i never go back and forth with you guys in my comments, but i'm just letting you know if you don't like this. Please go talk to jesus about it. Don'T talk to me about it because i do not care. I know everybody has seen the baby hair. That goes like the opposite direction. So, instead of cutting it downwards, like i usually would, when i would swoop it back into the rest of the hair, i actually cut it at an angle going upward so that this baby hair could swoop out towards the face instead of in back into the rest Of the wig, if that makes sense, if it don't make sense, it'll make sense in a minute, because i cur, because i curled it before um. I did this part, it's easy for me to flip it. This way you get what i'm saying. If you want those type of baby hair, where some go this way, some you have to curl it. I don't know, or you gon na, have like a hard time with that mousse trying to get it to curve the way you wanted. So it was so easy for me to just get just to get this to curl outwards because it was already curled so yeah that pretty much wraps up fluffy baby hair, i'm gon na. Let y'all see me, do this last sideburn. Let y'all see the flick of the wrist, i'm not really focusing on the tail of the sideburn like the end of the sideburn, i'm more so focusing on the part that i do want to lay down the rest of it. I just let it flick up with my edges brush, i just let it flick up and when it curls, i might hold it there for a second. So it stays in that area like i'm doing right there, i'm holding it, but i'm not really focusing the hairspray or my brush on the tail of it, because it's going to curl regardless and yeah guys. I feel like i've been talking too much baby baby, baby, baby hairs, dancing, y'all, know that song, but that's it for the baby hair but, like i said we're not putting a part in this wig because she wants it to be like a free part. Pushback. Look. You know real tussle. You could turn this way to turn that weight, putting points, so you can do whatever you want, but what i am going to do, i'm just going to use my hot comb a little bit just to um flatten out the front part. A little bit more really emphasize the pushed back free part look, and what did i do next? I don't remember. Oh yeah, i'm just showing y'all like how she'll be able to have so much versatility with this pushback. Look if she wants to like party right here. One day she'll be able to do that. You know again. This wig is from my company house of aim check out the website. I will leave a coupon code in the description box, so you guys can go shop. Anything with that code and um. I had bleached and plucked this hair before i did it, but now i'm just gon na wet it a little bit more. You know, get the curls a little bit more defined, not really doing much to it. To be honest, okay, so guys that basically wraps up this video. Thank you so much for watching. If you guys have any questions that i didn't answer in the video, please feel free to ask me in the comments. If you have any constructive criticism also feel free to leave that in the comments, but don't tell me that what you don't like that is none of my business honestly, i really don't care, but i was just saying how it would look when she does do her. Ponytail, it would look slicker than that. Obviously, but yeah it's cute. It'S a cute. Little look! It'S looksy, i'm here for it, it's a yes for me, but yeah! Thank you all! So much for tuning in and i'll see you next time. Bye. You

Comments
Londiyani Manda: Slayed as always .. can you please do a video on how you install lace on darker skin tone ?
itGRL: appreciate this video!
Samantha Robinson: DATME: https://ok.me/ehOj —p—o—r—n——s—e—x————۞ CHOOSE YOUR DREAM GIRL !❤️#今後は気をライブ配信の再編ありがとうです!#この日のライブ配信は、#かならりやばかったですね!#1万人を超える人が見ていたも ん(#笑)#やっぱり人参最高!#まさかのカメラ切り忘れでやら1かしたのもドキドキでした #今後は気をライブ配信の再編ありがとうです! #この日のライブ配信は、 #かならりやばかったですね! #1万人を超える人が見ていたもん( #笑) #やっぱり人参最高! #まさかのカメラ切り忘れでやら1かしたのもドキドキでした #垃圾
Дарья Ковалева: DATME: https://ok.me/ehOj —p—o—r—n——s—e—x————۞ CHOOSE YOUR DREAM GIRL !❤️#今後は気をライブ配信の再編ありがとうです!#この日のライブ配信は、#かならりやばかったですね!#1万人を超える人が見ていたも ん(#笑)#やっぱり人参最高!#まさかのカメラ切り忘れでやら1かしたのもドキドキでした #今後は気をライブ配信の再編ありがとうです! #この日のライブ配信は、 #かならりやばかったですね! #1万人を超える人が見ていたもん( #笑) #やっぱり人参最高! #まさかのカメラ切り忘れでやら1かしたのもドキドキでした #垃圾
nadia albert: These baby hair is out of control nope nope