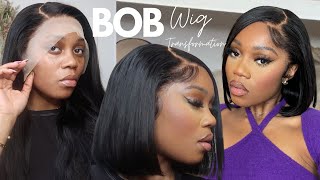
*Detailed Wig Install* How To Bleach&Tone Your Knots, Baby Hairs, Melt Technique | Yolissa Hair
- Posted on 03 May, 2021
- Hair Knowledge
- By Anonymous
Hey Beauties
Welcome back to my channel Hope You Enjoy This !
I ALSO RECORDED THIS MAKEUP LOOK STAY TUNED....
LASHS DETAILS:
STYLE: BOUJEE
HAIR PRODUCTS
BABY HAIR GOO: https://sochar.co/collections/hair-pro...
HAIR DETAILS:
●▬▬▬▬▬▬▬▬▬♛ Yolissa Hair♛▬▬▬▬▬▬▬▬●
HD Lace Wigs $30 Off, code “HDWIG”:➤https://bit.ly/2Nc9haQ
30’’ water wave 13*4 HD lace wig in Video:➤https://bit.ly/30HLhPS
❤ #yolissahair Official Website:➤https://bit.ly/2NcJAaa
Top1 #yolissawaterwave Lace Wig:➤https://bit.ly/3rLwvUh
Best #yolissa613wigs :➤https://bit.ly/2Ncqm4r
Up To 40’’long lace wig :➤https://bit.ly/3qLlbWS
Hot Selling #lacefrontwigs :➤https://bit.ly/3bFtHCr
Follow Yolissa Hair On Social Media
Instagram: https://www.instagram.com/yolissa_hair...
Facebook: https://www.facebook.com/yolissahair
✔Wholesale Contact +86 15803834514
♡Lets Keep In Touch
Instagram: Charleenforever
Twitter: CharleenForever
Snapchat: Charleenforever
Business Inquiries + Product Reviews: [email protected]
Hey guys welcome back to my channel, so this is the wig. I wanted you guys to have an idea of how the wig looks without the knots being bleached. So the first thing that i like to do is i spray two thick layers of got to be, and this is just to keep all the hairs out the way this is going to help you without bleaching any strands, random strands or baby hairs, or anything like That i like to finally brush the hairs into position. This will keep all your hairs out the way and help you bleach your wigs, so much better. So after i do that first round i go ahead and do a second round just to seal it, and then i'm going to begin to bleach. The knots also guys i did have bleach on my hands so do not think my hands are ashy. It'S actually bleach and the bleach that i'm using is the bw bleach and i'm using 40 developer as well. I put this in slow motion, so you guys can kind of see a gist, well, not slow motion but regular. So you guys can see how heavy i'm actually using my hands - i'm not going in too hard, but i am making sure that i am really pressing it in i'm gon na move the wig around, so you guys can see. I tried to show you guys just now how thick that it is. It'S always best to make your consistency of your bleaching very thick. If you use it watery, it will seep through. It will fall on the hairs. It will go. It will bleach past the knots and it'll actually get on her hair, which will actually make the install look crazy. Okay, we got we don't we it's like we're living in 2021 and we're not doing the ombre dots, no more, the ombre roots, okay, y'all! You guys have to get this together anyways. This is how it looks now. I'M gon na flip it around and show you it's fully spread. There is a little piece in the center part. That'S missing, but i did end up fixing it and, as you guys can see, this is how your knot should look. So now i'm going to go ahead and put my timer on and i'm going to be putting my timer on for 15 minutes and then i'm going to show you how it looks after 15 minutes. So now that it's been 15 minutes, you can see you can kind of still see the knots normally. I would actually wash it off and see what it looks like, instead of just leaving it on it's, it's always best to be safe than sorry. You guys over bleaching. Your knots is really not it's hard to fix, but it's not that hard, but it's like. If you do it the first, the fir right, the first time you won't have to do it again. Anyways, i'm gon na go ahead and rinse it off and then show you guys how the knots look right now, all right guys. So, as you can see the knots barely bleached, it did lift up a little bit, but it didn't bleach as much as i would like it to, but you can see the brownness of the roots, so i'm gon na go ahead and do another round of bleaching. The knots and basically sometimes this happens, so i just wanted to show you guys. Sometimes you don't get the first round, so this is how it looks after i bleached it the second time, and i let it sit on for 10 minutes this time as well and as you can see, it is bleached more i'm going to go ahead and rinse. It out and show you guys how it looks. Look at my ponytail y'all, so yeah y'all. This is how it looks. I'M gon na go ahead and it looks really good. As you guys can see, the knots are definitely bleached more. It'S giving more of a scalp. Look y'all so don't ever be afraid to re-bleach it again. I didn't even dry the lace i just like patted it down with a towel and still released it while the hair was wet. Now i'm going to be taking my mv it's by eva nye, i'm going to list it right now, okay, guys, so i used to be a big fan of the. I can't shimmer lights. But, to be honest, you guys to me this is way better than shimmer lines. I love it. It takes less time and it smells so good. So i went ahead and i washed it out and i'm going to go ahead and show you guys now what i used to condition. I'M just going to be using some silicone mix and i'm brushing through the hair, and i do have the silicone mix on it. I'M going to put another round of it right now and i'm basically just spreading that all through the hair, some um of summer, i was gon na save summer mix. Silicone mix makes your hair so nice, it smells so good. Y'All make sure you guys check it out if you haven't already now, i'm just going to go ahead and begin to apply the wig i'm going in with my scissors and just cutting around my ears once it is fully fit, i'm just going to center out my Part because i will be wearing my hair in the middle part, it's also great to center your parts just to help. You apply your wig on easily i'm taking my so sharp hair wax thick and slicking down that top. So i can hot comb it back. Everybody'S been asking when i'm going to restock on the hot cones and y'all the restock is on the way. Now i'm taking my so melted lace glue. You guys can purchase this lace glue on my website. I am almost fully sold out, but i do have another order coming in y'all, so now i'm just going ahead and spreading this all over my hair. I usually use my finger, but i didn't want to get my nails too dirty because, like i'm getting ready for a photo shoot, that's why you guys can see. I am moving a very fast y'all. I am late to a photo shoot as i'm filming this video. I literally had to be at a photo shoot, but i was home doing my hair y'all, i'm behind on everything. I'D be late to everything i will be late to my own funeral, like i really really take my time and i'm always late. So now, after i put this second layer, i'm just letting it dry and i'm going to go ahead and begin to apply the wig yo. My makeup was so pretty. I hope you guys like it, because i did go ahead and film a makeup tutorial everybody's kept asking me for makeup tutorials, so i hope that you guys watch it and enjoy it. I'M going to be trying to do more makeup, tutorials and drugstore makeup tutorials, for you guys, so you guys can see how to whip up your makeup. Okay, y'all, because i do get a lot of compliments on my makeup. So now i'm going ahead and finishing up and applying the wig i'm going to be pulling the wig back a little bit just to see what parts aren't fully glued down and just reapplying glue to that. Also in this video, i will be showing you guys, a different baby hairs method y'all. Finally, i'm going to be trying a popular method that doesn't really involve the front baby hair suit, but they kind of skip out on that part. It kind of gives you like a widow's peak vibe. So yes, y'all, stay tuned and keep watching all right. You guys! So now i'm going ahead and beginning my baby hairs as you guys can see. I always do a front part, but today i'm gon na be doing that type of widow's peak baby hairstyle. So i will not be doing a front swoop. I'M actually gon na, be i'm actually gon na be slicking up my front soup with gel and i'm gon na be doing just skipping that part and doing the sides. I'M gon na make the sides come down a little bit more than regular, because i'm trying to give it that hairline, i don't know if you guys have seen girls. A lot of girls have that natural hair line where their baby hairs tend to peek out more. In the front, i honestly love that hairline, so that's, basically what i'm trying to mimic right now with my baby hairs, the gel that i'm using is my baby hair glue y'all. This is like one of the best sellers on my website. It'S always selling out. I love my gel, so much so make sure you guys check it out because it is some bomb gel. Okay. Now i'm just going ahead and slicking down the sides. You know i wanted it to match evenly as much as possible. I know i couldn't make it perfect, but i tried to make the match the best that i can so you are going to see me doing a lot of back and forth, brushing and combing and cutting out y'all, but i ended up nailing it all right. You guys so now that the front suits all the not front suits, but the two baby hairs are finished. I'M gon na go ahead and do my sideburns and of course, i'm gon na be giving myself that cute baby hair swirl. Once i finish that, then i will do the space in the middle. I just wanted to get my baby hairs perfect on the sideburns first before i actually do that middle part. All right, you guys so now, i'm finishing out my baby hairs with that. Little center part y'all, my baby hairs. Look this so cute. This install was absolutely beautiful. Y'All! Look at my baby hairs. I love when the hair just looked like this, like i plucked it, but it's like really pre plucked and pretty all right guys. So now i'm just finishing out the hair, i'm just going in with my hot comb and i'm just hot combing certain areas. I am going to rush because i'm running late to my photo shoot that was supposed to start at 7 30. But now it's actually it's. It was supposed to start at seven. Then i asked him to move it at 7 30. He agreed and now it's actually it's um. I was 15 minutes away, but i'm really longer than 15 minutes later. All right that out, i don't plan on um. I don't plan on wetting it. I just want to clean up, so i can show you how long it is, but it comes to like the middle lower past my waist area. So this is how it looks. I am wearing hair from the alyssa hair. I have all the details listed down in the description box below on this here and how you guys can purchase it. Thank you guys so much for watching this tutorial. Bye,


Comments
Kayla Michele: girl i wanna see you do a side part on curly hair . this is super cute tho
Caylai Shay: This whole look is a vibe
K. Swanson: Yes I always hated shimmer lights, it makes the hair dry in my opinion, but the Eva Nye I love it!
AjiaDiorWigs: I love the edges they look so nice and natural. You melted this jawn ✅
Pamela Gordon: Love it so pretty ❤❤❤
Just Deashia: Hey what does it mean about hair density ? I want the exact wig you have which one do you have
Finest Relaxation: The gel looks like it’s a consistency of edge control. Is it??
Maniii Johnson: soo pretty !
Marche' Holcombe: Very pretty how is this hair with shedding?
Dee Luther: Good Video as always Stunning thumbnail tho You looking Hella Gorgeous Makeup always on Point EnJoy your night Too Happy Spectacular Productive Week ahead Stay Bless n Be safe always
Day Fenty: What did you use on your edges
fluffalexx: I got this hair, I can’t wait to install it
Keisha Thomas: I love curly hair so much♥♥♥♥♥♥
Michelle Davis: Hi can you list the name of the purple-shampoo you never put it in the Description
terricaaa turnerrr: Not ombré roots
RK Gang: I love that purple shampoo!!!!!!!!
Naturally Neidra: You must was real late you ain’t say what time it was currently. LOL. cute tho
Lil Bad: Do you have to bleach your wigs every time you get a new one??
SouthBabySiiya:
Zaidaplug: Hella gorgeous
Amiya Mahone: Are you going to drop the curly hair product?
Keisha Thomas: Wow I love this hair...,can I get it
Victoria Marie: They taxin
Malexiciaa Miyuanaa: Middle parts & curly hair , can we get something different ?
Trisha Deniese: Cute but less side bangs