How To: Apply Lace Glue For Beginners! Myfirstwig
- Posted on 12 November, 2021
- Hair Knowledge
- By Anonymous
Hey Queens!
___________________________________________
Shop the same #LaceFrontwig:
https://www.myfirstwig.com/philiperic-...
√ 100% Human Hair
√ BEGINNER FRIENDLY WIG
√ READY TO GO WIG
√ SUPER REALISTIC LOOK
√ SKIN MELT INVISIBLE LACE
---PHILIPERIC - INDIAN HAIR LAYERED STRAIGHT LACE FRONT WIG - PE007
Hair Length - 20 Inch
Hair Texture - Silky
------
Shop more LaceFrontwig: https://www.myfirstwig.com/13x4-invisi...
Myfirstwig Lace Glue: https://www.myfirstwig.com/myfirstwig-...
* Protective Styles & Pre-Customized Lace Wig For Wig Beginners *
Website Link: ?https://www.myfirstwig.com
Instagram: ?https://www.instagram.com/myfirstwig_c...??
Facebook: ?https://www.facebook.com/myfirstwig
-----------------------------------------------------------------------------
PRODUCTS USED:
Wig Head https://amzn.to/3FpdM7F
Wig Tripod https://amzn.to/3kuAPWB
Wax https://go.magik.ly/ml/16r5a/
Electric Hot Comb https://go.magik.ly/ml/13zhm/
Elastic Band https://go.magik.ly/ml/16kka/
Blow Dryer https://go.magik.ly/ml/1bet3/
Razor https://go.magik.ly/ml/15fh4/
Brown Wig Caps https://go.magik.ly/ml/1awcr/
Heat Protectant https://go.magik.ly/ml/13zi0/
Powder https://go.magik.ly/ml/14v1y/
Flat Iron https://go.magik.ly/ml/14v3m/
-----------------------------------------------------------------------------
Join Herbalife With ME! : http://ashleybedeck.goherbalife.com/en...
FOLLOW ME ON INSTAGRAM: https://www.instagram.com/ashleybedeck...
FOLLOW ME ON TikTock: @Ashleybedeck
FOLLOW ME ON TWITTER: @Ashleybedeck
I use MagicLinks for all my ready-to-shop product links. Sign Up Here:
https://www.magiclinks.com/rewards/ref...
SEND ME COOL STUFF:
P.O. BOX 571084
TARZANA, Ca 91356
CAMERA/LIGHTING USED IN THIS VIDEO:
Royalty Free Music I Use: https://www.epidemicsound.com/referral...
Canon G7x: https://go.magik.ly/ml/1b8he/
Canon 6D Mark ii: https://go.magik.ly/ml/1b8hd/
35mm Lens: https://go.magik.ly/ml/1b8hc/
Ring Light: https://go.magik.ly/ml/1b8hb/
Disclaimer: All opinions are my own and honest as always. Some links may be affiliate links which means I make a small commission if you purchase the item through my link. Thank you for your support!!!
SMOOCHES! ❤️
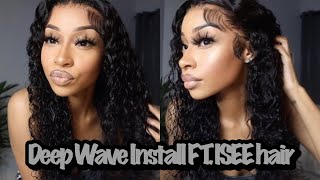
Hey love bugs welcome back to my channel if you're tuning in for the first time, i'm ashley and today we'll be playing this beautiful wig from start to finish, she does come courtesy of my first wig and you guys know my first wig is one of those Top-Notch luxury hair brands, that is, for the beginner friendly girl, who may not know how to install and style their wigs i've teamed up with them to teach you guys how to install this beautiful one here also. My first wig actually has a glue line of their own, so i'm actually going to be using glue today. You guys know i typically would keep it glueless with a extreme hold hairspray, but today i wanted to switch it up for you guys and show you guys how i glued my wigs down. Now it worked it's literally not going anywhere at all. Also, i opted for no baby hair. My last video got an amazing response from you guys and of course i did absolutely no baby here and you guys complimented me on that. So of course, i'm gon na give you guys exactly what you want. So without further ado, i don't want to hold you guys, i'm going to jump right into the video if you haven't already go ahead and subscribe now, let's jump right into the video jumping right into it. This is the packaging you guys already know they come with the top notch packaging. As always, and there's some goodies inside i'll show you at the end. This is a look at the wig straight out of the box, as you guys can see. This is about a 13 by 4 lace wig, it does come with the adjustable elastic band inside and it's also a little bit of lace at the back. Just in case, you want to bond it down, i'm going to just go ahead and cut off the excess lace in the back, so that i don't have to worry about that later and then we're going to go ahead and transfer her to the mannequin head, where We will be prepping the wig before the install now this is what the hairline looks like again. It'S all in their name, my first wig everything is ready to go for a beginner to not have to prep anything, so something new that they included was their lace glue, i'm going to be trying that on camera, for you guys today, this is my first time In years, doing lace blue instead of like a non-glue adhesive. So you guys should be excited for this because you've been asking for it. I'M going to go ahead and prep by just adding a little bit of wax along the entire parting area and kind of just stamping that out and pressing it out as much as i can. I'M going to also repeat this step around the hairline as well. We are going for a no baby hair look, so i want it to be as flat and sleek as possible feel free to tweeze out the hairline. If you see fit, i chose not to because again my first wig represents beginner friendly wigs. I just want to keep it simple, beginner friendly and not do anything too crazy to get you guys lost in the sauce. The one thing i can say, or the critique i can give myself is - i should have - went in and straightened out the parting you'll see in the end the parting was a little bit crooked and that just is my personal fault, but of course, i've been still Wearing this wig two days later, and it is perfectly fixed, uh in real life. So i just wanted to point that out here. Make sure that you always make sure that your parting is centered with your nose. That pretty much is the center of your face and yeah. Now i'm going in with my flat iron and a rat tail comb we're going to be doing the chase method to silk press the hair. I added no product, no heat protectant or anything like that, but i definitely highly recommend that you always use a heat protectant to protect your hair, taking my time to just really make sure that the hair is super silky. I recommend doing this when you have time it doesn't seem like it makes a huge difference, because the hair is already straight. It kind of gives, like you know, just bring the flat iron through it. To kind of you know, pull out any crimps or you know kinks, but if you really want to look like the instagram baddies, go in section out the hair, take your time and soak it out. Never out of my baby. Won'T you keep me company now we are done with all of our prep, let's go ahead and prep our own natural hair and then we'll go ahead and install. I love love love how flat it is and how amazing this wig came out. I'M going to just take a little bit of rubbing alcohol, yet the same one you get from the drugstore and a cotton pad and just remove some of the dirt debris as well as the makeup from my hairline sorry, i kind of look like a clown right Now, but you want to make sure that the hairline is clean. I should have went further and just really made sure it was even more clean because it does make a huge difference in how you know clean and flawless. Your hairline will come out, but, as you guys can see, that silk press really did make a huge difference. It'S absolutely gorgeous before we even cut the lace off. This is a size one cap which is a small cap. I believe - and it definitely fits super snug on me, and here i am giving you a color shot on the website. If you want this one, i have it linked in the description box. You can just choose same as picture for the color and there are also another um, a couple other color options on there. If you wanted like a natural brown or natural black, or you can just do what i did and i love the fact that this one came with a dark root as well as a darker hairline, it just makes it easier to blend with your complexion without having To be done up, i'm going to go in and make sure that the wig fits around the ear tabs, basically cutting off any excess lace around the ears and then we're going to go straight into bonding the wig down. So for bonding the weight down. We'Re going to pull the entire lace back. I highly recommend you work in sections and we're going to go ahead and get to work, so i'm doing small dots of the glue around the entire hairline. Honestly, i'm very rusty at this. I don't apply glue literally at all, it's been a year since i've used glue just because i don't feel like i need to to slight a wig, but it works perfect when you go on vacation, we've been in quarantine, so i haven't been on vacation, but whenever I do i find that um, you know bonding your wig down, helps you to not have to do anything or less maintenance to your wigs, while you're out traveling, as you guys can see, i applied the glue right in front of my makeup. Big mistake just go ahead and remove all the makeup or don't even apply it at all until the wig is bonded down, because this is going to make a huge difference in whether the um glue gets clear. So i did one step or one coat, and this is the second one be sure to make sure each layer gets completely clear again, i'm very impatient and was ahead of myself and just sitting there like. Alright, i'm ready for the next one, but use a blow. Dryer to help it to dry a little bit faster, which is what i did not do and you'll see that you'll see a little bit of the demarcation. That is a um pretty much a mixture of me not allowing it to dry completely, as well as the makeup on the hairline again. This is my first time in a long time, and you guys know i don't use glue. So while it continued to dry, i went ahead and took a fresh spoolie of elastic and i just cut off a nice generous piece to prep for being able to bond and melt this one down. So now i went ahead and covered the entire perimeter. My hairline with the lace on top of that glue again, i highly recommend that you wait a little bit longer because it's going to be harder to get it to dry. What i'll say is after i was finished, i went ahead and put the elastic back on the hairline as i went ahead and continued with my night after i finished filming i took my shower and i kept the elastic band on and i woke up in the Morning with elastic band still on and again, the wig was absolutely melted. It'S been two days and the wig is still bonded on my head as we speak again, because i have a big forehead, i was able to put it completely in front of my hairline, not risking my edges, but again. My only thing is just take your time and allow it to get completely clear if it's not clear, do not put the lace on it, because if you are planning on going out that day, it's going to be clockable, you can cover it with makeup, but it Won'T be as flawless as if you allow it to get clear added that wig band on it, and then i went ahead and removed the excess lace with an eyebrow razor on both sides and that pretty much was the install stay tuned and i'll show you. What was inside the box and give you my thoughts, also again straighten out your parting and add a little bit of concealer and that'll, be a perfect, perfect, perfect completion to this look also, i'm gon na buff in my foundation, at the very end with my beauty, Blender yeah and that's pretty much. I can't get it off my mind. [ Applause ], you give me motivation, make my life vacation when we are together, so we are done with this look. It was actually super easy, but i'm excited that i was able to give you guys something a little bit different. You guys know i like to keep it beginner friendly over here. So working with the company like my first wig, is right on target right on cue. For me, because their wigs are literally beginner friendly, they come colored. If you want color, they come styled. If you want style, they come in the length you want, and usually the lace is already ready to go. You guys know i'm extra, so i did go ahead and um do a little bit of a silk press on the ends. I made it super flat around the crown and, of course i went ahead and sleeped out the hairline, and i think that just makes it just you know one step above and just gives it your own style and flair. You always want to take care of your units and make them look as good as you possibly can um you know so that you look good. Obviously, right you want to look like you went to the store or the salon and got your hair done at the store, but you want to let you guys went to the salon and got your hair done. You want to make sure you look like you know. Whatever quality of the hair is, this is top-notch quality, but even if you have beauty supply store quality hair, you want to look like you got your hair done and you paid some money for it and that's why i'm here to teach you guys how to just Make it a little bit extra amazing? So, as i mentioned, we did something different this time around. Typically, we keep it beginner friendly and we shy away from glue. Now, if you are a big forehead girl, like me, glue is really not that bad um. It'S all about taking care of your hair um, it's all about making sure you brush all of your real hair like gel it back, so that it's not in the way trying to put the wig or glue the wig in front of your hairline so that the Glue is not sitting anywhere near your real hair, especially in the center. Removing it properly is also key among many other. You know things but big forehead girls. Like me, we can push it way in front of our hairline and still like i got y'all seen. I pushed it in front of my hairline and i still got a big forehead, so you know it really doesn't faze me as much anyways. This is the packaging from my first wig, as always nice, beautiful box, and it's right on cue for the holidays. I always love their packaging, excellent quality and then in there, of course, your wig comes in a case like so, and inside is your wig caps and then also this little information card here, which typically will tell you exactly what wig you have so on it. It says your order number, the texture is silky um the length is 20 inches. The hair color is same as picture, so it doesn't specify on here exactly like what color brown this is or the you know. Ombre effect it just says when you go on. There click save as picture and it'll be this or there are other options for colors on the website as well. My cap size is a size one which is typically translated as a size, small and the cap. Construction is. This is a swiss lace, lace, front wig, so that's pretty much it. Obviously, this is a light brown, a beautiful light brown that complements my complexion as far as the length and density, i think it's right on cue to be, you know very holiday, appropriate and thanksgiving is what two weeks away from now. This is a perfect look to switch it up, but again be timeless because you know when you take pictures with your family. If i take them in january 2, 000 or you know, if i take them down, you want to be able to look back on your holiday pictures of me like, oh you look so pretty like. I looked so good back then, instead of looking like girl, that hairstyle is absolutely insane. I want to. Let you guys go, don't forget to check the description box for a link to this wig, as well as details, um and listen links of everything i used to complete. This look also don't forget to check out the lace glue from my first wig. It definitely has a nice good hold to it and it's definitely not going anywhere at all. I will keep you up to date, i'm gon na. Of course, this is mine to keep, but i'm gon na keep you updated on how often i use that glue and how well it um holds up for me, but until then i'll see you guys in the next video i'm asking you to keep you tuning in For the first time, thank you guys so much for watching. Don'T forget to subscribe! Share this video with your friends and, as always i'll see you in the next one smooches


Comments
Ms. Dani: yes!!! Love your videos, they’re actually how I learned to do my wigs!!
Yahriah Ahava: Perfect color!! I love that on you!! Just gorgeous!!! You are always so helpful!!!
Kersha Beaver: Love everything ❤
Honey Isweet: Beautiful unit and looks so natural
unique Bea: Hi ma'am. My name is omolara, I want to learn wig making and installation, certified. How do I get in touch with you.
Certainly Cee Caldwell: Hi Ashley, Great wig, great color, great melt. You doctord that hairline. This wig is you Ashley I love this wig you do such a fantastic job. Thank you
Laura Stephens: This is love Myfirstwig. What density is this please?
Jackie Randolph: You are amazing person each wig is beautiful on I love the baby hair but you lovely without baby hair
Daniel Simpson: Love the unit. When will you have a wig sale?
sugarhill327: Gorgeous
Emanon Kay: This install & color
rac Gillett: Cute, thanks for the tips
Tinisha Robinson: OMG ITS GIVING WHAT WIG YOU SLAY LOVE ❤️ ALL YOU INSTALLS YOU BE GIVING THESE UNITS THIS MY HAIR LOL DO YOU BE SELLING YOUR WIGS