Wig Transformation | Blonde Wig Tutorial
- Posted on 01 October, 2021
- Hair Knowledge
- By Anonymous
#wigtutorial #blondewig #protectivestyles
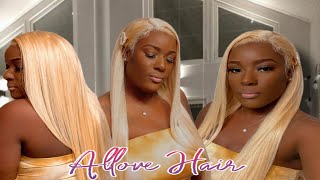
Hey beautiful souls! Kei here I’m back with another video! -Pats self on the back- Anyways, I have a wig tutorial for you all. I made this wig years ago and decided to revamp it to save on money and time. Yes, frugal is me! I let the color stay for an hour. I wanted to do a money piece in front and highlights throughout and I am absolutely in love! Let me know what y’all think! For me this is a huge part of self care and self love! When you look good you feel good and that I did. Stay tuned for the videos and photos at the end. I feel like this is very much my alter ego. Help me come up with a name for her y’all. Anyways, go ahead and grab your favorite drink, a snack and enjoy a day in my life! O’ and don’t forget to like, comment and subscribe!
As always I’m going to list items below so check out the links! If you have any questions be sure to drop a comment!
- - Product Details - -
Dark and Lovely Hair Color Kit Honey Blonde https://www.walmart.com/ip/Dark-and-Lo...
Dark and Lovely Hair Color Kit Luminous Blonde https://www.walmart.com/ip/Dark-and-Lo...
Clairol Professional BW2 Hair Powder Lightener for Hair Lightening https://www.amazon.com/Clairol-Profess...
Superstar Stabilized Cream Peroxide Developer 40V https://www.walmart.com/ip/Superstar-S...
---Check out my other videos---
SELF-CARE ROUTINE | New Moon in Leo https://youtu.be/zmwY01Tnqyg
A Day In My Life | Saturday Shenanigans | Vlog Fail? https://youtu.be/NTp9AIIgoTo
Mini Morning Routine | Mommy + Toddler https://youtu.be/-KVUYGOn-uY
GRWM: One Year Old Edition | Mini Vlog https://youtu.be/nedvUmwwqPU
Importance of a Doula https://youtu.be/S1f2e-uKq-g
17 Essential Birth Tips https://www.youtube.com/watch?v=EkE3tT...
Positive Unmedicated Birth Story https://youtu.be/KKBR2b3zBJI
---Want to watch my older videos?---
SEDUCTIVE Lip Looks! https://youtu.be/5RQ4vWHJMqE
Follow me on Instagram :)
https://www.instagram.com/findingkei
Hey y'all, it's keith here, so i know you're, probably looking at this and wondering what the hell am i doing. Basically, i didn't have my wig head because everything is in storage, so i had to make a makeshift wig head um. So that's what i did. I used the towel to kind of add some dimension and then put this walmart trash bag over it. Um y'all know we'd be using those as trash bags and everything else. So i just put this over the towel to add um some like a protection, because i didn't want to dye my towel so yeah, it's just adding the level of protection. Now, i'm just going through to make dine it a bit easier. So i'm going to put it into three different sections, one section on each side and then one big section in the back y'all meet betty. I wanted to give her a special shout out for being my guinea pig, because without her this video and the making of this wig would not have been possible. So say: hey to betty. I'M gon na go ahead and mix my mixture um. I use the 40 volume developer and i also use the carousel bw. I think that's how you pronounce it it's on the screen. Now i can't even tell you how much of the mixture and the liquid i put in there, because it's really just the eyeball type of thing and, to be honest, i still failed, because this was literally like droopy like if you look very closely in the video You'Ll see like i had to put a blanket up under betty, because when i tell you i would give stuff all on my floor, so i was just like yeah, i'm i'm not a professional. We already know that and then i had to put on my gloves, because you know safety first, but right now, i'm going through and i'm basically um sectioning off one piece from both sides: the front pieces. They are going to be my money piece. I just wanted these to be the lightest pieces of the entire head, so i decided to go ahead and bleach them in the very beginning, and then i went back to the side that you see me on now and basically, i'm just sectioning off a middle piece. Two end pieces: a middle piece, two and pieces, a middle piece, two end pieces as i go up, so the first piece was the only piece at the bottom. I would go ahead and do the two end pieces and then the middle piece and the two end pieces and then the middle piece. I really hope that that makes sense, because sometimes i feel like i'm not the best at explaining stuff, and i really just want to make sure that you guys really understand the process that i did here. This method is called color block. I just recently learned this out from my hairstylist by the way but anyways. So this is the color block method and i just basically wanted more blind pieces towards the front of the head versus the back of the head. I wanted more brown pieces, so i'm just going to keep doing this entire process throughout the entire head. When i say i absolutely love how this wig turned out, like i absolutely freaking love how this wig turned out. I wanted to accomplish and i basically wanted to try something more out of my comfort zone. I have been going through this point in my life, where i want to try new things and really get out of my comfort zone, so that includes stuff. From my looks to adventures to whatever i just want to get out of my comfort zone and grow, because how can you grow being in the same spot? So i've tried blood and you know what i absolutely love it and i don't know if i'll ever go back to blood. You know this is the first time that i have ever tried a blonde wig. I believe, like i really yeah. This is the first time i've ever tried a blonde wig and so 10 out of 10 highly recommend pass, go collect 200, like where is it at like betty, then turned into a whole bad over here, and actually she didn't turn me into a whole bandage, and I appreciate her for that so betty another shout out to you boo, because you you did the thing we did. The thing together like thank you, so i'm not going to show too much of this part because you guys have already seen me. Do it on both sides, but i did want to show a little bit of the back, so you see what i'm talking about and right here i literally ran out of bleach y'all, so i had to make work. I had to squeeze it really hard, but i'm gon na put the um products that i use on the screen and i wanted to add some extra dimension into the wig, so i'm just going through with both of these colors, so the luminous blonde i strictly used In the front and the honey blonde i strictly used for the back, just because i wanted the contrasting colors, like i said before, i wanted more blunt pieces in the front and it turned out absolutely perfect here. It is guys here is. The final reveal. I know y'all see it. First of all, like look at this dimension. Look at this depth! Look at this beauty, like, oh, my goodness, like even the slight little variations of the luminous blood. That'S in the front like it's so good! I'M sorry that you guys can see um this side as well, just because of the lighting, but it's given everything that it was supposed to give like. I cannot, i think so she didn't spoil me tonight. Okay, i got full how many you


Comments
FindingKei: Hey beautiful souls! All links are in the description box. I left the color on for about an hour, washed it out. After the second application I washed it out after 30 minutes. If you have any questions, drop them below and I’ll answer!
Robbie B: I didn’t know I needed this but I needed this. Thanks for the tutorial. Turned out great!
EDen: Betty done took me out! Such creativity and ingenuity! #BettyTheBaddie
Nicole Okpara: Heeyyyy Betty!!! That was creative I would of never to thought to make a wig head
Queen Char: Okay Betty I see you girl!!
Nicole Okpara: It’s the end for me baby!!!
Robbie B: Heyyyy Betty! Lol