15 Minute Install | Start To Finish | No Bald Cap Method + No Lace Glue Ft. Incolorwig
- Posted on 14 November, 2021
- Hair Knowledge
- By Anonymous
Business Inquires: [email protected]
SUBSCRIBE TO BE THE FIRST TO KNOW WHEN WE RELAUNCH
☝
●▬▬▬▬▬ #Incolorwig ▬▬▬▬▬●
☛All the hair can be paid in 4 installments
☛Get Extra $10 OFF Use Special Code: Y1TB
————————————————————
Hair Direct Link:https://bit.ly/3mRrzNP
Hair Info:Highlights 13*4 Lace Front Jerry Curly Wigs
https://www.incolorwig.com/ ➤Hot Sale Wigs:https://bit.ly/302aQyA
Mose Popular Highlight Colored Wigs:https://bit.ly/3GZ4Mr6
30% OFF Keep Colors Wig:https://bit.ly/3GYdWnI
Affordable Lace Part Wigs:https://bit.ly/3bLGv9W
☛Top Selling #30 Ginger Curly Lace Frontal Wig:https://bit.ly/3mOX3nx
☛Invisible 5*5 HD Lace wigs:https://bit.ly/3wlJjDR
2021 New Arrival Wigs:https://bit.ly/3bQyvUM
Affordable Wear & Go #HeadbandWigs:https://bit.ly/3mMyPKL
Recommend Colored Bundles & Closure:https://bit.ly/3qbkBoF
Instagram @incolorwig: https://www.instagram.com/incolorwig/
YouTube @incolorwig: https://bit.ly/32FRNsy
Facebook @incolorwig: https://www.facebook.com/incolorwig/
Tiktok @incolorwig:https://www.tiktok.com/@incolorwig
Inquire Now: WhatsApp number: +8618703861608
#Incolorwig #ColoredWigs #HighlightsWig #JerryCurlyWig
PO BOX
Miya Lashae
9702 E Washington Street, STE 400 182
Indianapolis, Indiana 46229
Instagram @miyalashae
Shop Instagram @shoplashae
Age: 22
Location: Indiana
Camera: CANON G7X
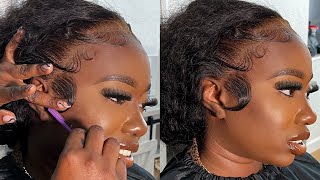
Hey babes, if you want to see how i get this quick and easy install on this hair from in color wig, then just keep on watching this video because, as you can see, i did that. Thank you in colorway for sponsoring this video. They did send me a beautiful highlighter wig, along with some goodies in the package, so they sent me some lashes, some hair clips and then also this really cute hair scarf that i can use to style my hair okay and then nonetheless, they also send me this Beautiful 24 inch highlighted wig, and what i like about this highlighter wig is that it is not like the super bright highlight. Blonde tones is more of a chocolate brown highlight. So i really like that, because it's more neutral and perfect for the fall, so this wig, i will say, does come with a free part, a lace front free part, but i did make it a side part. So going on to the install y'all first thing i do is put the wig on my head and i hot comb it down and try to get it to lay down as flat as possible. Before i begin to install the wig, i haven't tried to take a lot more time on my installs and i have been trying to perfect my um, quick and easy install. So that's why i wanted to make this video, so i'm going to go ahead and i'm going to take the makeup and i'm going to put that on my lace. I will say that i did bleach the knots on this unit. It'S definitely a must that you bleach the knots on your unit, but i have been going in with my foundation as well just to give it that super natural look. I have learned that going in with the foundation on top of the bleach knots just gives it everything it was supposed to have gave like it gives you wet lace literally, so i'm gon na go ahead and start my install. So how i do my installs nine times out of ten now i have been doing more baby hairs and trying to perfect my baby hairs. So i pull out my baby hairs and that is how i end up laying my lace. So i pull out the parts that i want to be my baby hairs and i spray it with the got to be sprayed glue in the yellow bottle. And then i go ahead as you guys can see, i held down the hair and then i'm going to be using my comb as well as my blow dryer, to hold everything in place until that dries. It literally dries within like 5 to 10 seconds. So it's super easy to install your whole wig, so i always work from the left to the right, because i don't know i just like my left side better. That'S like my good side. You know how as women think so that is how i do it. If i'm doing the side part now, if i'm doing the middle part, i'm most likely going to start with my middle baby here. So if you're doing a middle part, i normally start with the baby hair in the middle, so that i can have that middle of the lace lay down and secured. So it really just depends on how you have your wig parted. So, for the side part, i would most likely start from the left to the right and then, if i'm doing a middle part, i'm going to start in the middle, because i want to make sure that, where the closest part to the part, i want it to Look the best, so if i do make any mistakes i want that to be after. I have already secured my lace on everything else, but this wig turned out pretty much perfect, so i'm gon na go ahead and do the other side, i'm sure y'all can see that the lace was giving. So i'm gon na go ahead and um do the same thing. I'M gon na pull out my baby hairs and my sideburns and i'm going to got to be spray them, and i will use my finger to hold the hair at first because i obviously have to hold down those baby hairs to keep them in place until they Got to be spray dries a little bit. I was smiling in my daughter so and then, after that i go in with my rat tail comb. Sometimes i use my three in one edge control brush and then i just want to make sure that the baby hairs are laying down flat and they're. Not sticking to my head as well, because it got to be spray, can cause the baby hairs to stick to your head. But i make sure that i try to comb out my baby hairs before i fully fully dry that section of hair and then i also try not to spray the got to be spray directly on the hair. I tried to spray it on the hairline. So then i go in and i cut my baby hairs. You guys and i prepare to lay down my baby hairs. I'M not going to go too into detail with my baby hairs, because once i perfect my baby hairs, i might do like a baby hair video. So i'm going to just let you guys watch this portion of me doing my baby hairs do so after baby hairs. I go on with the got2b spray again, and this is just kind of like my to secure the lace spray. So i go in with that. Final spray of got to be spray on my hairline and i do like a final blow dry, make sure that my baby hairs are laid because i know some people like to do like the big feather baby hairs and stuff like that honey. I just like my baby hairs to be swooped to my head, so that's how i do mine, so i am just making sure my baby hairs are laying flat making sure that the lace is laying flat and that everything is just looking good and then i also Do take time and try to comb out any of the got to be spray that might be making my hair on my hairline hard, because you don't want the guy to be spray to fully dry and make the hair hard. So just make sure you comb back. The hair as well just to make sure it's not anything getting stuck together. I want to make sure that my wig is laying flat. I used to have this problem where my wig was not laying flat and now i'm taking the time and i'm sectioning my hair and i'm going to be using my got to be spray and i'm going to hot comb. It and i like to use gossipy spray over the wax um sticks just because for me personally, i feel like the got2b spray holds down the hair a lot better and it makes it a lot more flat. So that's what i'm doing, i'm just spraying a little bit of got to be spray. You literally only need a little bit and then i'm just going to hot comb that down in sections. If i'm doing the middle part, then i'm going to do this for both sides, but i am just doing this on one side since i'm doing a side part, i am going to hot comb down the other side, but i'm only i'm not going to section it. So for this top part, i did go ahead and comb it through, just because the hot comb might not comb every piece of hair through. So i wanted to go ahead and take my actual rack rat tail comb for the top layer and then make sure everything was laying super flat. So, like i said i am going to hot comb, the other side. I just didn't layer it. So next i'm going to go ahead with my spray bottle and it literally just has water in it. So i went ahead and just sprayed my hair and then finger combed, it i will say y'all. I love love, love. The texture of this hair is so pretty, and this hair did have a little bit of shedding. So this is the shading that i got and i'm going to go ahead and go in with my eco styler gel, and i'm going to put just that amount that i showed you guys throughout my entire head, because i did not want to put too much so I kind of spread that out throughout my entire head of hair and just finger comb that through and yeah like that's literally all i did for this install this install took me like 15, maybe max 20 minutes. The longest part was just doing my baby hairs. So yeah y'all seen that sped up. It was probably like five minutes total. So this is what the install looked like when the hair was still wet and then i'm gon na show you guys, like the texture and stuff like that, the curls are so so so pretty like. So pretty so juicy. I love this texture of hair. I love this hair in general. Make sure you guys check them out in the description box down below and baby girl. This is what the hair looked like after it dried. The curls are still so freaking beautiful you guys, but they just got bigger and fluffier and, as you guys can see, the hair really didn't get frizzy at the ends. It got frizzy just a little bit, but not too bad. So i hope you guys enjoyed this video. I hope i helped you guys out. I love you guys, make sure you guys like comment and subscribe and i will see y'all in the next one: okay, girl, peace,


Comments
Karen Jamerson: Really pretty. You have managed to master the wig install without a fuss. You keep your technique simple yet it looks awesome ❤️
bychanz: Gorgeous as always!
Life As Kiri: Girl i wish i could do this your hair be coming out bomb asf
Dee Luther: Another Great Video Super Cute thumbnail tho Your Pretty Self Nice Cheeks Structure Happy Sunday Too Have A Lovely Week ahead Be Bless N Stay Safe Always
LivingWithNina: so im first??