Zigzag Twisted Low Bun And Bangs With Braiding Hair / Low Swoop Bun
- Posted on 02 February, 2021
- Bangs
- By Anonymous
#lowswoopbun #swoopbunwithbraidinghair
#twistedbunwithbraidinghair
Social Media
* Facebook : londoncurlstyles
* Instagram: @thelondontayy
* Business only email : [email protected]
Location: US -Columbia, SC
——————————
Products:
Got2b glue spray
Got2b cream
——————————
Keywords
low swoop bun natural hair,low swoop bun using braiding hair,low swoop bun with weave,swoop buns,swoop low buns,swoop space buns natural hair,2 buns hairstyle,2 buns with braiding hair,2 buns hairstyle black hair,2 buns hairstyle long hair,2 buns hairstyle natural hair,2 buns hairstyle tutorial,2 buns hairstyle with braiding hair,2 space buns with braiding hair,sleek bun,space buns black hair,swoop knot low bun with weave
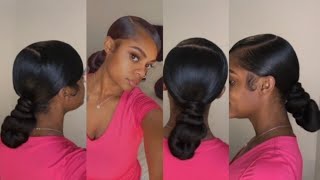
Hey y'all, what's up welcome back to my channel, this is lunate coming to you today with another video in today's video. I'M going to show you guys how i got this cute cute cute, look! Okay! It is two like space buns or two buns, with the two little bangs in the front. I think it's super super cute, like my ears, are big y'all, but it still looks cute on me. Okay. So if it looks cute on me, it would look cute on you. It will look cute on you too. Okay, so don't be alarmed, don't be ashamed! Okay, so if you are new to my channel, my name is london table. My real name is taylor. If you're an og subscriber, you know, we do give hugs around this mug and if you are new here, we do give hugs, okay, so um, i'm not gon na ramble too much in this video. Everything that i use will be in the description box below i'm gon na go ahead and give you guys a hug get me. You acquainted okay and we're gon na just go ahead and jump into this video into this tutorial, because i know you guys are waiting. Okay, come on girl. If you don't already know, we do give hugs around this mug. Okay, this style was actually inspired by this youtuber named kasaya may um. I'Ve been following her for some years and i actually seen this really cute hairstyle. She did about a month ago on her channel, but i decided to kind of jazz it up a bit and just do my own version, so i decided to do two buns instead of the one bun she did like a swoop bang. I decided to do two little bangs and then i added a pop of color and it just to give it some spice. Okay, this you know i always get a little spice in my life, okay, and also i did a zigzag style in the middle. So that way, you know it just gives it like a little pop like a little extra-ness. Okay. So without further ado, i'm just gon na go ahead and jump into the video, and i will talk to you guys in my next video bye, guys all right y'all. So i am starting this style off on an old silk press: greasy crusty: silk press! Okay! So, as you guys can see, look at the front of my hair, it don't got wet, i got gel on it, etc. So a key to loosen up like gel and hard substances on your hair. Is i like to use a mousse okay, especially a mousse that has alcohol in it, because that alcohol will dissolve glues and it'll, dissolve like heart gels, and things like that. So i'm just massaging that mousse at the front of my hair to loosen up that gel. When i got it all loosened out, i'm going to kind of comb it to get all that residue and flakiness out and then i'm just going to blow. Um use a blow dryer and then i'm going to just kind of blow out and make sure that the front isn't wet anymore and just kind of get it all blown out and semi fresh for this style. Okay, y'all! So now that i did that, i'm just going to start the zigzag part, nothing to it. Just go left to right to left to right. If you have problems with parting in the back, just use a mirror to help you with the back. That is what i like to do, but for this i did not have to use a mirror. At least i didn't feel like it. I just girl, i just i thugged it out with what felt right, and i just went with that. If you want to be honest, so yeah all right so boom now that that is done, i'm just going to go ahead and section off one side of my hair just going to use a rubber band, nothing crazy, just use a rubber band and then i'm going To part the section out where i have my two bang pieces: okay, now, if your brain is not long enough guys, you can always add little little tiny pieces of track to make your bang as long as you like it or, if not you know, it still Works like you, don't even have to have super long bangs. If you don't want to, i think the style is still cute if the bangs are not long okay, so i'm just going to section it off with a rubber band because i just feel like it gives me a lot more security. Okay. So now i'm going to start off with one side, so i like to section off edges y'all, i'm an edge girl. I love me some good swoopy soup edges. Okay, i like a lot of edges, especially my natural hair, not necessarily with wigs but yes with my natural hair, okay, so i'm going to section that off and then i'm going to put a duct clip on that and then yeah. So now, since my hair, like i said it's straight, if your hair is not straight - basically straighten it before you even start this all of this okay straighten it out, stick press it out. It does not have to be perfect, but for the most part it should be straight okay, so now i'm going to just start with the blow drying. Okay, guys so got to be glue spray. That is all that i'm using to basically make sure everything is molded right. I like to do it in sections. If your hair is thicker than mine, do it in more sections and then me, okay, so i'm just going to spray the front comb it and brush it into place, put my hand on it and then get a blow dryer and dry it on warm heat. Okay and low circulation, not high circulation, okay and i'm just literally gon na - do the middle, and then i'm going to do the back the same exact way guys once i got everything slick and ready to go and sleek, i am going to put um two or Three rubber bands, and just to kind of you know just to kind of secure the placement of everything and secure that ponytail, okay and then i'm going to to do the other side, the same exact way, guys all right little baby. We are done. Okay with that part, now it's time for the fun part to add the ponytails okay. So i'm using the queen bee precise, braiding hair the 50 inch, i'm using one pack of color number 27, okay and one pack of color number one be super super cheap, super affordable. All you need is two packs. That'S all i use okay, so i want a custom color, okay, so i kind of want it to be mostly black with highlights of that 27. Okay. So i'm just going to kind of figure out and just piece it together grab. One piece of the 27 then grab one piece of the 1b, so it gives it more like a highlighted. Look! Okay! So now that i got what i feel like is enough: hair um i'm going to just go ahead and split the hair in half fold, one at the top and fold one half at the bottom get two rubber bands and tie it on the base of my Of my ponytail, you guys can see what i'm doing is self-explanatory, tie it until it's very, very secure okay. So when i do that, i do realize that i want to cover up this uh. I want to cover up this blonde a little bit more okay. So i do add another piece of another little section of black hair. You add it the same way guys the same way. I added it initially you're going to add more hair. If you need more hair, the same exact way like you see me doing, lying it across and then just tying it with the rubber band really really tight. Once i'm done, adding hair i'm just going to tighten it up with my hands, just kind of tighten it and make sure that everything is secure and then i'm ready to proceed. Okay. So now that i am ready - and i detangle it with my fingers - one key is you - can use like an oil-free type of spray just to kind of detangle if it gets too tangly. Okay, so now you're going to break off a section of the braiding hair with your comb and then you're going to start wrapping the base. With that i like to use the got to be glue spray around the base, just to kind of secure that little piece that i'm wrapping it works like a charm, there's got to be glue spray. It'S really only thing that you need when it comes to securing all of that okay, so i'm just going to keep on going wrapping, wrap and wrapping until i'm i'm done once i'm done, i'm going to give it a final spray around the rim and i'm going To use the blow dryer again the blow dryer on warm okay and i'm just going to make sure all of that is secure and dried and nice and neat okay, so yeah guys, there's always a way to fix it. If you feel like you, didn't get enough hair, you can always just keep adding hair to the base. Okay, keep adding hair, keep adding hair until you are satisfied. Okay, you're, never really going to know until you do the twisty part, and then it's not enough. So guys, i'm just literally going to start twisting. Okay until i get to the length that i want the bun to stick, i want it to sit above my shoulders. So once i get to above my shoulders, then i'm going to twist my body around and start wrapping up. Okay, one key thing i realized is holding the bun, the bottom of the bun with one hand, and just twisting and twirling with my fingers and just literally start swirling back up and around that base. Guys simple, it's really simple it's hard to explain, but i hope you guys can see what i'm doing always make sure you're still twirling the hair and twisting the hair around itself. So that way, you still have a twisted look okay and then i'm just literally going to twist up up up until i get close to the base of the ponytail okay, like i stated again once i get to the desired length that i want my bun, i'm Going to start wrapping up and i'm going to hold that other hand that i'm not wrapping with um with hold the bun. With that other hand that i'm not wrapping with okay and then i'm going to wrap and twist wrap until it's going upward towards the base. When i am done to make sure that everything is secure and not flied away and all the flyaways are chilling and comfortable and stuck i'm going to use that got to be glue spray to make sure everything is good. And then you use the blow dryer again on warm just to make sure that everything is 100 secure. Okay, if you were confused just like, i was initially watching the video just keep replaying it while you're doing the style, and then you will kind of understand what is going on. Okay, so again, i'm just going to get a rubber band fold. A half of you know on top of my head and the other half is at the bottom, and i'm just going to secure the base with the rubber band okay fold it over. So that way you don't see any type of hair. That'S been added. Put some little bit of oil free spray just to detangle the hair, and then i'm going to you know, cut some ends. Just to you know the ends of straggling and then i'm going to start wrapping once again guys um wrapping the base with that that little piece of hair and securing it with the got to be glue spray, okay, wrapping combing, making sure that it's good and smooth Just keep going going going going until you are out of hair when it comes to the wrapping. Okay, i'm still going, i'm still wrapping still wrapping. Okay, we are done. We are done, i'm just gon na tuck, it okay and then spray it a little bit. Okay and we are good to go guys, so that is how it looks. Okay now this is my second time doing this one, because i messed up, i feel, like the other. The other time was like too thick, so i did take it out and redo it. That'S why you see my edges done on that side, but i'm going to show you guys how i do my edges. Don'T you worry so, yes guys, so i just figure out what lift i want to get to, as you guys can see, i'm just holding with one hand and then twisting and wrapping with the other to me, it's easier just to keep switching hands like that. To make sure that everything is, you know where it needs to be, and everything is secure. So it just helps me just to kind of keep switching hands, but i always make sure i kind of have one hand holding and one hand wrapping and twisting okay, so yeah guys very, very, very simple, like that. Nothing to it just keep wrapping the base. Keep going keep going, keep going and then all the fly aways you're going to spray with the god to be glue. Spray. Okay, simple y'all, it's so simple, it's so simple guys! So that is how it looks. Okay, i think it turned out super super bomb. Okay and i like to use the got to be glue gel in the in the yellow, not the black, the black is too jelly. I like the cream product in the yellow bottle. Okay, so i use that for my edges, guys - and i just kind of you know, spread it on there and then just start. You know do a little swoopy, swirly, swirl yeah and then the little pieces in the front you're just going to flat iron that and make sure that it's flat ironed and sleek, like i stated if it's too short for you, you can always add little pieces of Track hair or whatever the same color, just to add a little bit of length. I was going to add a little bit of blonde in my bangs, but i can always do that some other time, maybe with another color. If you guys want to see this in another color so yeah, i hope you enjoyed this video guys. I think it was super super cute and simple and quick okay, so yeah um. I hope you guys enjoyed this video and i will talk to you on the next video love. Y'All bye, all right. I hope you guys enjoyed this tutorial. I hope it was informative and easy for you guys um the first time i did do it. I did mess up as you guys can see, but with practice and trying to get really the concept in your head. It may come easier to you guys than it did to me. Okay, so, like i said, i haven't tried a few times just to kind of get a feel for everything, to figure out how i wanted everything to be done, as you guys can see. So i hope you guys enjoyed this video and i'm building my family up on youtube. Okay, we're almost at 40k, hopefully we'll be 100k by the end of the year. Okay, fingers crossed fingers crossed if you guys just subscribe, it's free um yeah and i give a lot of content. So i hope you guys enjoyed this tutorial and i will talk to y'all in my next video bye guys. I love y'all, bye,
Comments
London Tayy: Time stamps 2:19 start style
KristiannaOnMars: I’m definitely gonna try this!!!
KristiannaOnMars: Cuteee!
deseraymiles87:
Kadi Santana: Hair twin!!!
Vibrant Vibes: Babbbyyy u loook cute girl ima have to copy and paste