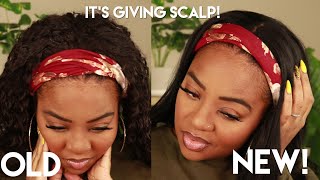
How To Style Clip-In Bangs Using The Bangover From Hotheads Hair Extensions
MODERN's Artist Connective member Amanda Kimball (@amandajeank) shows an effortless way to switch up a client's look without regret, demonstrating how to cut face-framing layers and a seamless blend using the Bangover from Hotheads Hair Extensions. Learn more here: https://bit.ly/2OQZE1i
Hey everyone. My name is van akimbo artist, connected member here at modern salon and also got on instagram as a managing que. I am so excited to be sharing with you how I like to cut a clip in bank extension. We have our lovely model Camilla. Isn'T she gorgeous guys wait until you see her with a bang? She was totally bent for one, but she won't commit to one. So I can't get her to actually cut a vein. Then we have a my assistant angel. Yes, so you might be seeing her pop in and out throughout. This live some equipment, a extension on I'm going to be using today it's on hot Headz, hair extensions called the bang over and what I really love about the bang over now. This is hot Headz. All across the board is the quality of hair. The quality of hair is absolutely amazing. Also with this bang over. It comes with a lot of hair on it, which is amazing because I'm able to go in and create a beautiful bang, but I'm also like with hair along the sides. So I can create some really beautiful face framing layers, so I can match my clients. Click. The pay attention to her natural hair, so what we're going to do is we're gon na cut this thing: extension on the mannequin, so we're gon na stricture, our clip and bang extension. Now our clip and a extension comes with three pressure-sensitive clips, so you have two in the front and the one in the back is gon na secure on the crown so notice. I have her hair in a ponytail. It doesn't have to be perfect. Just get the hair out of the way you're gon na. Take the clips slide it in at the hairline. When you get there snap it in you can hear a little pop you'll feel it too, with your fingers and then this one. So I'm gon na hold down here stretch it to the back of the crown snap it into place and you guys can pull it right just to give a little tug business. A good now you're gon na secure it with your wig pin you're gon na go down in the center and pop it into place. So that's like your extra security blanket we're gon na. Let this piece down make sure you get it really really damp. We want to make sure that we have a nice stance hair for the razor to glide through, so we're not tearing up anything here, so I'm spreading it out. So I'm gon na start by taking some hair weight. So I'm starting down the center - and I just took a vertical section and I'm holding at 0 degrees and I'm going in with my razor I'm sliding my fingers down, because I want to keep it long first. I don't want to cut it too short, so I'm actually approaching this as if it was a real bang that was growing out of my clients head. So I'm sliding my comb out of the way. So I just slide it down using my thumb, I'm coming in with my razor now when your razor cutting you want to make sure that you're coming in at an angle - and I am tapping so you guys - can see that it's just a quick motion and getting Rid of that hair, so that's the center cut. So now I'm near the eye, I'm taking another section there's my guide, I'm coming in my razor is at an angle I'm actually starting to slide with my fingers a little bit because I'm thinking about how the Bang is arcing on the face right now now remember Your cuts don't have to be perfect, we're just removing hair. So now I'm approaching where the face-framing layers would be. I see my guide up there, I'm coming in at an angle. I am lightly tapping and moving my hand at the same time, lightly tapping lightly tapping lightly tapping, and you can see that there's beautiful face framing leaders right there, so we're gon na come to this side. We'Re gon na add a little bit more water comb. Your section again make sure you spread it nice, so I'm grabbing another vertical section going in I'm coming in an angle, I'm starting to move down. Let go my last piece. My guides right here, I'm coming in at an angle, lightly tapping lightly tapping motion. My fingers are sliding my razor sliding, like little tiny tips coming down coming down coming down. So that's like my rough draft right, just a nice shape. So now I'm going to remove this and place it on my model, the tools you want to make sure that when you are placing it on her head that all the hair is tucked away, because you don't want to get a situation where you are combing you're, Paying attention and you're combing her natural hair as well and then you're cutting, there's no going back so same thing on our bottle. I'M going to secure it right here at the hairline, so I have the clips open, I'm just gon na pop them in here's one. There'S the other and we're gon na stretch it to the back. It comes in seven colors. It also comes rooted, which I absolutely love. It'S like the perfect like ombre. Okay, so you have it on your models, hair or it will be your client. It'S my model and you can see the shape right. You can see it's right at her nose and we're gon na. Take it shorter, we're gon na clip the section in half, so I'm gon na leave the sides down, but I am going to clip about half of this back wetter is better. Just keep that in mind. I have isolated a section right in the front, so you want to make sure that your sections not too wide you want to use a section that you can control nicely with your hand like in your fingers. You don't want too much hair, so I'm gon na go in we're gon na cut this shorter. So you can see that so it's right at our eyebrow right now, I'm gon na take the next section. So I'm using the guide for my previously cut section that you can see right here. I start angling it down and away. My fingers, in my hand, is moving I'm lightly tapping using the guide from my section. I'M going in lately sliding my fingers down. So the site's a little bit longer, that's fine! The best thing about the razor is, I just love the creative freedom that it gives. Whatever you want to do, it can be done with this piece. So again, I'm going in lightly tapping with my razor keeping my hand moving. So what we want to do is create like a little bit of layering some texture in there and like debulk, her bang a little bit. So I'm just gon na grab a small section starting in the center. You just have you tilt your head down for me just gon na grab section of hair and I'm gon na go in with my razor in the mid shaft of the hair. So I'm not gon na raise her near the root or at the end. This is something that's done right in the center and I'm just lightly tapping and just removing little bits of hair. So you guys can see that that right, we're creating texture, getting rid of some weight, adding a little bit layer. All in one motion same thing: I'm going in come over here: you're keeping your blades slightly got an angle for this, so it's just removing a little bit of hair. Let me put your head up, so I'm gon na go in fine. Now I'm just grabbing little bits of hair just lightly tapping yeah. So if you look at her from the front, it absolutely looks like it's growing from her head. It just looks so real and that's why I love it and it's just great to have the baby, because some people want to bang and they just don't want to do it, and this is a great alternative for them to let them enjoy a bang. For a day, and then the next day they take it out. Okay, so we have two here that I just let go from the clip that we need to cut. What'S the section again look again where everything is living spread it out so again, I'm taking a small section of hair. You can see the short pieces underneath I'm coming in number, always cut things younger. I just want to make sure that it's perfect, because I can't go back and change it once it's done so again. Lately, taffy working on this side same thing, so you guys can really see that this thing is coming to life right this hair over here going in so I'm just looking at the face framing. Does it match so you're just really going in and fine-tuning right now, like how's it looking? How is it gon na lay so just manipulate it a little bit all right, so I want to dry it and see what we have so far. Okay, so I'm just using my fingers right now spreading it out, so I'm just letting the piece talk to me if it wants to go this way, I'm going to let it go this way, I'm not gon na force. It there's no need to just to work with it and I just have it on low setting. As far as it goes, I told you guys, isn't she meant for a bang or what right look at how adorable she is you're gon na? Let your ponytail out, so you guys can see that she has some highlights right, which is fine. So what I chose to do the match our hair color is, I chose the match, but the dark color, her hair is highlighted in the front and then the highlights get lower as they go he's down to the canoes at the head. So I just went ahead and colored it through the furrow, natural hair color, and I figured the blonde my life.you looking more like in that way grabbing her section with a piece of her natural hair. We'Re gon na go and give it a curl just because she came in with wavy hair today, so we can't have a straight bang, so we're just gon na give it a bend. So you guys can curl your clip in extensions, so I'm not holding it on there. I'M just slightly moving my curling iron and getting a little bit of a curl up there. If you can get a front view of her so now you can see that her clip in goes right into her blonde hair. So it looks like an ombre on its own, so you'd never know that the front of her head was highlighted. Let'S take a step back, so I can see the big picture. What do you guys think? Is she super adorable instead of leaving it down like this? Maybe we could throw like a braid in it. What do you think about that? Like a fun braid? Okay? So now we're gon na stuff, her of her hair into a low ponytail to the side. Now I'm gon na go in and hold the base of the ponytail and I'm going to create some lifts. So it's not flap up against her head so scarf any scarf. Does it matter, let's just dress it up a little bit we're gon na tie it into a knot, and you don't want your knot to show. So I'm going to slide it around tuck that little lip in and we're gon na create a braid. So I'm going to take some of the hair with the scarf on one side, you got hair in the middle hair with this scarf on this side. Okay, you're just gon na, do a simple three strand: braid and don't worry if you see the sliding away from the ponytail holder, it's fine. We can go back in and do some detailing after I'm going to secure this with an elastic at the bottom he's pulling. Those through Camilla's hair used to be a little bit longer, but we just gave it a haircut and I'm just gon na use a little bit of product to pancake my braid. So you see there's some white product, that's okay! I'M just gon na go get my braids a little bit of texture because she does have short pieces, so I don't want them all falling apart and falling out of the braid. This right here is fine slide it down at the bottom you're left with the two pieces, a couple different things you can do, you can tie it and let it hang right there. First, let me see what she looks like from the front. Yeah, I'm like it hanging down right or let's just say now, she wasn't feeling the hair like the these two hanging down like this. I know whatever you're feeling like right, also gift. You like a couple different, looks that you can put on Instagram as well like changing up the style. First to me is not for is it's just texture, and I love that I think that's so hot. I want to thank modern salon and hot nuts hair extensions for having me today. If you don't follow me on Instagram check it out, follow me at Amana teen k. You guys have a great day.

Comments
Mary Rodríguez: With those incredible beautiful eyes, who will ever put attention to her hair?
Lolli D: Amazing tutorial, thank you so much ! Both u girls are beautiful
Shine Diamond: The model looks like a mannequin! She so beautiful!
Stampmmos: She is meant for bangs she looks gorgeous in them
michal maystar: I'd like to know where I can buy those extensions
Heather Lingawi: Most beautiful girl I’ve EVER SEEN!!!! She is stunning!!!
Pum Sandhu: How amazing.
Michelle Ferguson: Gorgeous!
maria sanchez: Woo the bangs looks Natural perfect for her . She looks more beautiful
Nichole Flores: BEAUTIFUL
Vicki H: The little bit that I could see of her bangs looked great however the camera angle was awful. Most of the time I was only able to see your model from her eyebrows down. Never once saw the full finished bang or center part of the hairpiece.
Acacia Guell: Love it
Olivia: Model is stunning! Not into the scarf braid tho.
Camille Igawa: Hi Amanda Kimball, How can I get this extension? I don't have a stylist but can I get it from you?
Dia Darvis: How do you make it look real
Mia: Can we order the clip in extension bangs straight from you if were not a licensed hairstylist?
Corina Guerra: Thank u!!!
luvfitall: She’s gorgeous !
Acacia Guell: I need one please ☹️
Stampmmos: If u think she looks good in bangs imagine her in a beehive hairdo she would look beautiful
marlene Santos: I do have fake bangs to but they need a cut . Can i take to an hairdresser to cut for my face shape?
luvfitall: What color is this? The website unclear on colors.
Evening Whispers ASMR: Scarf looked kinda strange but the bangs look great.
Milton LaBarr: Underrated!
Alex G: She looks like Dakota Johnson.
Natt Acev: Who is the model?
Traci's Tube: Wait is this for Patrice . Not to use yourself
USA Health: She looks like dakota johnson
Yannick Recanatini: 11:41 damn
M Mo: Looks fake
MONA mona: She is a Barbie
mark cebak: dicrbtre