Long Haircut Technique With Side Bang And Face Frame
JOIN THE FreeSalonEducation.com Community and Share Your Photos , Videos, and Chat with other industry Pro's Sign Up Here:
http://www.freesaloneducation.com
BEST WAY TO FOLLOW US:
1. SUBSCRIBE
2. FACEBOOK http://www.facebook.com/freesaloneduca...
3. TWITTER https://twitter.com/saloneducation
4. LAST AND MOST IMPORTANT... OUR WEBSITE http://www.FreeSalonEducation.com
Millennium Systems International http://www.MillenniumSI.com
freesaloneducation.com is a website truly dedicated to the growth and success of salon professionals everywhere. We provide all the help you need to be the best in the salon industry- exclusive free education videos posted constantly, live video podcasts for hairdressers, and a online store dedicated to only selling the best products available.
Matt Beck, founder of Gratitude Salon Education is excited to invite all stylists and future stylists to Freesaloneducation.com! Now more than ever Matt and his team at Gratitude Salon Education are showcasing their passion for education and for the salon industry by offering an on-line learning network at no charge.
"A teacher of mine handed down videos to me in beauty school. The knowledge I had gained for free was amazing! The many artists and teachings in those videos inspired me to further my career and become an educator" says Beck.
Now, almost ten years later, Matt has launched http://www.Freesaloneducation.com and http://www.ShopFSE.com Two sites dedicated to providing the highest quality step by step education on a weekly basis for anyone who wants to log in, be inspired, and learn! Stylists can expect education on cutting, coloring, styling, barbering, and business tips. You can also look forward to totally free educational videos sent by email and live web classes broadcast from in the salon. This truly is a great affordable (obviously) investment that stylists can use to study at their own pace and convenience.
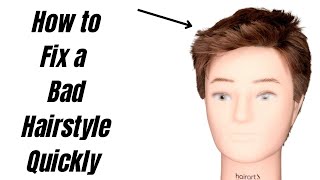
Hey guys Matt Beck here from free salon, education.com and I'm going to show you guys a quick side, bang face frame haircut. This is something I learned quite a while ago, but I've used it for about ten years. So you know you tweak it. You make it a little more current, but it's just a really standard way to tie in a side fringe and a face frame at the same time. So what we're going to do is we're going to start off with the side parting you guys can see here. So you want to figure out which side they're going to go to if they're going to go down the middle. You can do this haircut as well, but works a lot better when you're working off of a side fringe, so we're going to turn our head and what I'm going to do is I'm going to take diagonal forward sections through this haircut now, when I learned it, A long time ago, I was taught to bring everything to the same point now. The challenge with that is, and what you'll see if you, if you just bring everything to one section it or one elevation level, is that everything is the weights going to start to build up, and we've talked about this in the past, how the head kind of Peels away so by the time I'm pulling all this hair from back here. All the way over here were really really building up a lot of weight right around the eye in this haircut. So what I'm going to do is I'm going to bring everything towards myself and that's going to be the first cut. So you can see my elevation if this is 90 degrees coming straight out from a head this way, then this is at a flat, zero degrees. So that's going to be a nice steady point that I want to keep the elevation of the hair as we do this haircut. So here we go so we're going to cut. I want to determine my length so if we're looking at right around the eye, then that's where I would look kind of eyeball it a little bit and then bring that hair right over to myself. Keep it at that zero elevation and we're going to cut palm to Palm now we're just cutting a nice straight line there. Everything is being cut parallel to the parting, so you'll start to see that angle already happening in the haircut now, I'm going to take another diagonal forward section we're working about half inch sections through this haircut here and now, because the head is starting to move away From me, my elevation is going to change slightly as I work through the haircut, so everything is coming towards me with a little bit higher elevation, so keeping that 0 degree elevation throughout the haircut. So you can see there it's going to be nice and light, because we keep elevating our hand so working through still working with diagonal forward sectioning, and this can be really condensed down so, depending on how thick the density of their hair is it's really determining how Thick, your your sections, are your partings are so as long as you can see that guide underneath you're good to go, bringing everything to me and we want to really try to keep that flat out out of zero degree angle there. So you can see that angle starts to work really nice throughout the haircut. So this is an easy way to cut a side fringe tie in on a face frame all at the same time for your guests. So I'm going to elevate just a little bit bringing it through and I'm shifting my elbow in a little bit shift in my finger angle just at the end, so I want to push a little extra weight down in the haircut. So you can see, as I comb this over you got a nice face, frame that side bank can kind of kick over and it works really well. So no I'm not going to do the whole haircut for you guys. You would do the same exact thing on the opposite side. Pulling everything over will keep this video, nice and short. I hope you guys enjoyed this video. Please leave your comments below. Let me know what you want to learn. This is free salon, education, com make sure you subscribe and we'll see you guys on the next video thanks.
Comments
Cara Collier: this was awesome! Thank you! I learned a few different ways to do a face frame and this is the easiest way to do it. I appreciate your tutorials very much. All the videos seem to mention problems or concerns I have had with multiple haircuts, so you have been so helpful!
Kathy Byrne: I absolutely ❤️ how you do the face framing!! Even though I'm not a professional stylist it's something I've always wanted to do!! But, I was sidetracked and was talked into getting a RN degree. I love taking care of people, but after 15 years of nursing I have became exhausted taking care of sick people all the time. Don't get me wrong as I love my job, but my heart has always been in wanting to be a hair stylist! Any suggestions would be great on how to get started without taking out a loan to go to beauty school.? I know its a long shot, but I really enjoy watching and learning from you!! I've been watching 3-4 videos of yours per night!! Your excellent at what you do and extremely knowledgeable!! I can tell you like to teach!!!
Karuna Sharma: You simply ROCK!!!! Beautifully explained. Keep teaching and inspiring !!!!
C. M.: As usual, awesome technique and tip-thank you!!
Sherry Baby: You rock...seriously. I love your tutorials. I have a question. I'm a student at Aveda institute. Just got on the floor and I am nervous when it comes to texturizing. I have a hard time doing it because I am afraid I will take out too much hair when I do... Do you have any tips on how to do that? How to be able to tell where and how you need to point cut? Deep, angled, etc. ? I watched your point cutting video. Love the pount to your buddy then your body technique.
Thathairdresserguy: Awesome Matt thanks for sharing! Better then just hacking at it and hoping it's even like some stylists I know do! :-)
Kerry Campbell: loved it Matt,,just halved the amount of time to do that cut !!
Jennifer Gonnello: First let me say that I truly love all of your videos. I have learned more from you than I did in beauty school and assisting in the salon. Thank you so much for taking the time to do this. I want to purchase some mannequins for cutting practice techniques and color. Can you please recommend a brand and where do you purchase yours from? Thanks again to you and everyone that contributes to this channel.
Joycesim207: I tried it and it works great!t. Thank you again:))
Kelly Medina: Nice and easy to teach to students. Thank you.
A J: This looks great in the video.can you tell us if there's a face framing that works both ways that is side as well as middle?
Angela Stephenson: Looking forward to getting to know your work and learning so much as a new future artist.
Phillip McNulty: i would greatly appreciate blow drying videos. i went to a paul mitchell partner school and i learned to do a pre dry then a finish dry, now that im out of school, nobody seems to do pre drys. most people seem to do a rough finger dry before going in to finish dry. not sure which aproach i should take? even just some tips on a basic blow dry and/or more specifically giving people with baby fine hair VOLUME. plz and thank you. appreciate everything you guys do!! -Phill
Lesa Mather: Do you have any technique for the long layered cut with a side part? My long haircut results are the illusion of it being shorter on one side..... and I know it's because the layer from the side part has further to travel across the head.
Jatin Sharma: 1 create guideline with diagonal forward section 2 bring all hair towards you 3 keep fingers parallel to the section 4 elevate section according to the head shape.
Sheema Khan: I have a question ..I cut my bangs so they fall on the left side when I style it ...I want to know if if there is a way to cut bangs so they can be styled both sides...because now when I comb my hair to the right side I don't like the shape of it...for the left side swept bangs I followed your video and it turned out great
Valerie Looney: are the lights that you have in your salon for filming purposes or for everyday use in your salon...i have horrible lighting where i am and need some ideas thanks for all you do!
Dawn Booth: I love this technique, where have you been all my career?
Katy Naber: Wonderful!!
eloise m: Could you do tutorials on cutting our own hair at home?
nnnz zz: hello , I would like to know how to create a "v" or "u" shape on medium or little long hair at the back when the bottom part hair or half part hair of the head just aren't sufficient enough to reach where the guide is in the very first place where you bring all the hair to that guide point .thank you very very much and great videos !
Debora Burns: would graduation be lower with a weak hairline? What would you suggest? thank you
naghum ahmad: you are a real artist i like your work amiiiiiiising
zaldy Bangot: Nice cut thanks!
Lady_J.:classyfyne:.: I absolutely LOVE your videos your amazing .... BUT WHY ARE YOU SO ZOOMED OUT & far away lol??
Soneca Maia: Excellent video
Gabriel Gonzales: every section that you take matt. you elevate at a slight 45.. and how far back do you go, to just behind the ear.. cool technique. i remember learning this when i took a class with robert.
BOBBY PILLAI: thanks like ur haircuts. great job.
AboveitJ: Someone help! Where can I go and get my hair done by him??
ania jones: i have a question. im new to doin hair and i bought my first 100% black synthetic hair mannequin. my question is am i able to add sum color to it?
T.N. Nicholas: Very cool, thanks for sharing.heres a challenge for ya. Hair cuts for woman with thinning hair.Whatcha got.
Endang Rastaman: thank u Mr.. im from indonesia
Marilyn Webster: I agree...where were you all MY career? Oh, you weren't even born yet. Well, this just goes to show that you NEVER are too good, too old, or ( hopefully) too arrogant to learn from someone else. Cudo s to all of you & many blessings
prathiba durai: this is the first video with so many likes and without unlike
sakandh neeka: your the best
Madhu Singh: where ur salon because i want to my haircut from you.please tall me
suhail Mohd: Pleace Hindi me bnao
Lea Nixon: Another video which doesn't show the end result of the layers.
Maria Gonzalez: Where r all the women stylers.