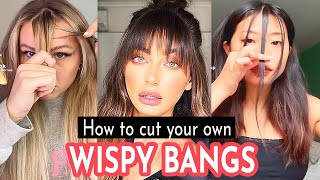
How To Cut Curtain Bangs At Home | Step-By-Step Tutorial For Low Commitment, Foolproof Bangs
Hey loves! Here's my step-by-step tutorial on how I cut my curtain bangs at home. This bang trend is my favorite and I love how LOW commitment it is. These bangs will grow out effortlessly and are super easy to conceal for those days when you're full of bang regret.
If you cut your bangs with me, send me a photo on my Instagram! I would love to see them.
CONNECT
Instagram - https://www.instagram.com/mandilynnett...
BUSINESS INQUIRES
Hello, beautiful people welcome to or welcome back to my channel mandy here with yet another bang video, because i just love to cut my bangs. So today i'm doing something different, i'm doing the trendy hip curtain bang, but i'm putting my own like little twist on it and i'm making it a little bit more effortless and low maintenance and less of a commitment. I would say they are definitely a curtain bang, but they're a little bit longer and they're a little bit more subtle, because we know i like subtle when it comes to hair. If you've watched any of my bang videos less is more. So if you want to see how i got my bangs to look like this, just keep watching okay, so we are about to start cutting. I just want to make a quick disclaimer. I am a licensed professional, so i feel beyond 100 comfortable doing this on myself. If you do not feel comfortable - and you are not convinced, then you don't feel like you know how to do it. After watching this video go, get some professional help and make sure that you're not gon na be botching. Your hair bangs are a little bit scary because they're right in your face, but luckily the bang that we're doing today is a little bit more forgiving because we're not going to go too short and there's room for error um but yeah. I just needed to put that out. There make sure you feel comfortable if you're going to be cutting your bangs at home and if not just go to the salon. So my hair is parted in the middle if you wanted to or if you are the type of person that, like only parts their hair on the side and you have like a favorite side, i would cut to that side. Do not try and cut curtain bangs in the middle and then try and sweep your hair off to the side, because it's going to look like a justin, bieber bang and we do not want that so just make sure you're cutting to the part of your hair. I'M kind of wanting to wear my hair more in the center and i feel like it's a classic curtain. Bang look! So that's what i'm gon na do today. My old situation is here. I cut like wispy short bangs a while ago, and i do have that on my channel, so i will link it in the cards. It'S very thin and that is the key to the wispy bang. But curtin bangs are a little bit heavier and they're supposed to flow into your hair. All you're gon na need is a comb, a clip, some scissors, it's pretty it's pretty simple and self-explanatory um. I do have a mirror here. So if you see me staring off into the abyss, i'm doing it in the mirror, because the viewfinder is just not good enough for me. I don't trust it. I'M gon na start thinner and then make like work my way too thicker. So this is like the perfect amount for me. I don't have the fullest hair, so i try and not cut like such thick bangs. If you have a very, very full head of hair and a really full hairline, yours is going to look a lot thicker than mine, but, like you can see how far back i went, i sectioned off my hair with a clip in the back. I got my pieces here in the front. I got my scissors handy um and we're we're just we're gon na. Do it. Your starting point may look different from mine. Just follow the same principles and you will be able to create the shape. Even if everything is one length, i also have a flat iron with me forgot to mention that - and i mentioned this a lot in my last bang video. It'S important to have some sort of styling tool, because styling as you go is really important to make sure that you're getting the right look for yourself when it's styled with curtain, bangs and cutting curtain bangs over direction is absolutely necessary, and over directing just means that, When you're positioning your hair and directing it to cut it you're over directing in like the opposite direction - and that is what's going to give you more of like that, angled fluent look and i'm going to show you what i mean right now. Do you see that so i have it angled to this side, because when it falls it's going to fall more fluid and i'm just going to go in and kind of start cutting you're always going to want to cut like on a diagonal. Make sure you guys can see it okay cut on a diagonal like that, if you have heavier hair hair, if you have heavier hair, you might want to consider texturizing afterwards. I don't really have heavy hair, so i don't have to worry as much about it. You can see that i'm already starting to get that fluent shape, and now i obviously need to make it shorter, but you're getting the idea of the over direction. I just wanted to give you guys an example of that, so i'm going to continue cutting on up and now now you can see that my hair is already almost like to the length that i wanted it to be in, as you can see, because i don't Part, my hair. This way it's falling a little bit weird, so that's where the flat iron comes in handy, because i can start kind of shaping it. How i want it, it's a subtle, beautiful korean bang. I like the length um. I think i'm just going to add a little bit of texturizing, because i love to texturize. It just makes it look a little bit more like worn in sometimes when you cut fresh bangs. They look a little bit like blunt, and so i just like to go in slightly and point cut. My hair is thin. I'M not gon na go crazy. It just kind of gives it like that lived in a little bit more, i don't know jagged almost but like the jagged's, a bad word, it's just a little bit more like. I don't know how to describe it all right now that i'm loving how one side has come out and how it's falling, i'm going to replicate it on the other side. What i'll do now is i'll grab my shortest piece. I love where that is that's just such a good length. I'M gon na take my shortest piece from my right side and match it up with my left side and use it as a guide. So the same concept where i'm over directing, except you can kind of see like right here, that's my guide! So now i have to make sure all this connects. And yes, this is like just gross ends that need to be cut. So that's what i'm doing all right! So now it's over directed i'm going to kind of go in from the bottom and angle, the cup, how we did with the first side i'm going to try and use my blank wall, so you can kind of see. That'S just about even with it i feel, but you don't really know until you let them out. Definitely it's going to need some more, maybe oh, actually, hmm interesting. I do see that this side is longer than this side. So what you can do is you can bring them together and just check how even they are so i'm going to bring it all together. I see a little bit more of a tail on this side, so just making sure everything is nice and even okay. So here she is, i just put my hair in like a low bun i'll have to like pin up some pieces, because my hair is so short, but this is her. This is the finished. Look it's safe to say these are my favorite bangs. So far i can tuck them behind my ear. They'Re super low commitment and they were the easiest bangs to cut um. I almost like had trouble finding more words to explain because i feel like it was just pretty straightforward and simple. If you have any questions about anything, leave them down in the comments you guys were so awesome on my last bang, video um and a ton of you guys sent me photos to my instagram and showed me like how they came out. You guys all looked wonderful, so if you guys happen to cut yourself some like low maintenance curtain bangs, then let me know send me a photo. I want to see and that's it also. I had people asking about like these baby hairs here, they're, not baby hairs. That'S breakage, so you could cut them. If you think that they're cute, i don't recommend doing it, how i did it through damage, but that's why i have like these little wispies here. What are you gon na? Do all right guys that is it for today's bang tutorial. You know i love to cut me some bangs and why not share it with you guys. Thank you guys so much for watching another bang, video with me. If you like this video and it helped you or you want to try it give it a thumbs up, share your bang stories below, and i will see you guys soon. You

Comments
Liz M: Thanks for this video! I’ve been trying to improve my mom’s confidence and I used this tutorial to cut her some bangs. She loves them!!
constellation: thank you! im glad someone with my same face shape has done this :> edit: I followed this and my bangs turned out well for my first time, its so cute!
The Fifth World: beautiful- thank you☀️
Regina Jasso: Thank you for this I feel much more confident know
eggy121: definitely doing thisss
sude: Im gonna try it tomorrow