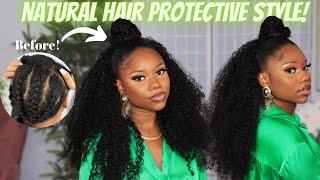
Pronto Bob W/ Bangs ! No Cornrows! Natural Hair Protective Style
Heyyyy Girlfriends! In this video I'm showing you how I achieved this #HalfUpHalfDown #ProtectiveStyle Frontal #Quickweave look using no cornrows! This #FringeBang & #TopKnotBun look was a SUPER easy style for #NaturalHair & its #BeginnerFriendly !
Connect With Me!
BUSINESS INQUIRIES: [email protected]
INSTAGRAM: MeechNicole
TWITTER: MochaMeech
Hey girlfriends good morning, good afternoon, good evening, wherever you are in the world: Hey Girl, hey! So if you would like to see how I achieve this half-up half-down, quick, weave style using no cornrows, then let's just get right into this video. So this is my natural hair state, you guys with no product whatsoever, so I'm just gon na go in with my like biggest wide toothed comb I can find because obviously I don't want to be trying to rip through these tangles and everything - and I am just Going to separate this into two sections, I'm just going to start with one of those sections and I'm going to split that into subsections, and I'm going to use my eco styler gel to basically smooth my hair out completely and you don't have to use eco styler. You can use whatever in jail or product that you know that smoothes your hair down and gets it sleek. I know a lot of people like to use that brown hair gel. You know the one we are using, that's like still $ 1.00 somewhere. You can use that whatever you prefer, so I'm just gon na basically start working this in my hair. I'M gon na make sure that I get this literally coated in my hair, so I'm gon na be very generous with this. You guys, because I want to protect my hair as much as possible, so yeah. Basically, I'm just gon na go in I'm gon na start parting it and I'm going to apply it throughout the entire section of my hair, as you guys will see, and then one time finish with this time, I'm gon na do the exact same thing. On the other side - and I'm actually going to turn around, so you guys can see the way that I'm working it in and smoothing it out and I'm actually using a Denman brush, make sure that you get a really good, detangle or brush. When you do this because again, especially if you're going to start on natural hair or here that's an I flat ironed or anything like that, you want to make sure that you're being as gentle as you can with your own here now, the reason why I'm doing It this way versus doing actual cornrows is, of course, because this is a quick weave um. I wanted to lay super flat, but I don't want to do a whole bunch of braids. I'M just trying to you know, get this quick style, something that I can wear for Valentine's Day. You know. That'S not gon na take super long to do and that's not super technical. I know a lot of you guys. I'Ve always comment on my stuff, like oh man, I wish I could cornrow. So this is another alternative. If you do not know how to cornrow, this style is perfect for you now I do do to like little plants like in the back, not plants, because plants are like another name for cornrows, like French braids, to break down my ends. You don't have to do that. Some people will put it in a ponytail and then split the ponytail in half and just put the cap on. I didn't do that because I don't want to put any kind of rubber bands or hair ties on my hair underneath the quick leave. So I mean it's really your preference. However, you decide you want to do it so now, I'm just going to go ahead and detangle my hair, and I am going to start on this side and it's really crazy. Looking at it from this perspective, like half of my hair sleek down and then the other half is like you know this afro, because it's just amazing how versatile here is and I'm not gon na get. You know super into that, but just the fact that our hair can go from one state to another state and look like two completely different heads of hair. It'S just so crazy to me. So again, as you guys see me applying this product, I am being super super generous, like I did not miss a spot. I know y'all can tell because of all the residue from the jail, but I was just trying to make sure, because this is my first quick leave and I just need to still have hair when I take this down. So I just yeah, I went overboard with the glue, but I'll be with the jail, but you know it's. It was all for a good cause, so yeah, I'm just gon na, go ahead and break this down and then we're going to go ahead and get our wig caps on and I'm actually gon na wear to wig caps. I'M not just gon na wear one, because again I want my hair to be as protected as possible. So I know sometimes people also like to use the strips well. I did not use those in this video. I just put my capsule in, and I set under the dryer to create a barrier between my hair, the jail and then the two caps that I use. So hopefully that's enough. There are several things too in this video that I did not use that I needed, but I left them at my salon, and I will just touch on that when we get to that point. Okay, guys. So obviously the is the frontal and I have no idea where the clips are from this and I'm so sad, but nevertheless, basically all I did was I set the frontal on my head in the position that I wanted it. I took a white eyeliner pencil and Mark that on this black cap, so that I could see once I took the frontal off and put the 30 seconds hair glue on it. I did use that I did not show this day on you guys. So again. I did not use any needle and thread in this entire video, so yeah. I used a 30 seconds glue and I only put it on the back like band part, I didn't put it on the entire bottom of the frontal. Like I've seen, people do so yeah. I just put it on that back band that you were usually so and then obviously the front part. I also use some got to be to lay that down as well y'all, I'm so sad about this clip. I don't know where the clip is, but nevertheless, if you can't understand like what I'm saying just get the frontal, however, you can get it on just make sure it's secure because remember you're going to be putting it half up and half down. So if you have to sew it, that's completely fine, but nevertheless, I'm just gon na keep measuring these tracks and laying them down with this 30 seconds glue and I'm also using a little bit of spritz to help with the hold now. This is where I was saying that there was stuff that I needed that I did not have like example, my blow dryer. You really need a blow dryer if you're gon na be doing a quick weave, but I had to finesse the situation because, obviously, like I said, I left it at my salon and I had already started this video so yeah, I'm just going to keep measuring these Tracks cutting them and then laying them down on my black cap. Now what I ended up doing was once I got all the tracks on, I did end up sitting under the dryer, so it kind of helped me because I had my hair dryer at home, but if you don't have a blow dryer, I'm you could get away With this, if you just let the track set, don't try to style the hair while the glue is still wet. If you don't have a blow dryer, just let everything said: don't touch it. Don'T comb it out, don't do anything because the tracks are gon na cut down, so that's just a little tip if you ever need to finesse it quickly. I would also like to add that this style can also be achieved with a closure. I would probably suggest like a 5 by 5 or 6 by 6 closure. Obviously the sides - you won't be able to pull up all the way, but you can still you know where the top not burn and do the bangs. If you wanted to do this style with a closure instead, because I know a lot of you guys kind of freaked out about frontal. So if you want to do this with a closure yourself instead, then you can definitely do it that way as well. So here I'm just going ahead and I'm parting out this frontal I'm going to part a strip in the back to cover up the tracks from the quick weave and then I'm also going to start calming up the sides just so I can kind of work. My topknot bun in place now I did not show in detail how I cut the bangs. I did show a little snippet of it of me using my thinning shears to cut them, but I do have a very detailed video on cutting bangs and it's not too long. So if you don't know how to cut bangs, you can just go and watch that video. So while I'm working my hair up to pull it up into this top knot, bun I'm gon na actually be super gentle, because I don't want my frontal to start lifting and even if it does, all you can do is just add some glue and just keep Working or you can just tie it down or even use the elastic band method to hold it in place as you kind of work, the hair up into the ponytail, and now I'm just going to be using my thinning shears and getting my bangs to my desired. Look, I really dislike thick bangs French bangs kind of work best for my face because I don't have a big forehead space. So when I wear like bangs that cover up my forehead, it makes you look weird yeah whatever so yeah just make sure that your bangs are to your desired. Look, you don't have to thin them. If you don't want to. I get a lot of questions about where you can find thinning, shears and I'll actually put a couple links in the bio. I mean what the hell links in the description box for where you can get some thinning shears, I'm sure you can get some for super cheap on Amazon. You don't have to buy an expensive pair whenever you're doing like ponytails or stuff like this. This is probably my favorite part, because this is when the look starts to come together whenever I use my hot comb and I flatten it out. This is where it starts to really look like scalp okay. So I'm going to make sure that I'm flattening this with my hot comb and even in my bang area, I want to flatten all of this just to give it as nice and sleek as possible. So here I had a little bit of hair left over and nobody wants a little skimpy top, not Berlin like it's not gon na, be cute. So we're just going to take some hair from that hair that we had leftover and I'm just going to start wrapping. It around my ponytail just to give it a little bit of fullness and then I'm just gon na twist it in my top top bun, and it's super easy to get this day. I hate putting bobby pins in my hair when I do ponytails and buns and stuff, even if it's on a frontal or a wig. So I'm just gon na use some got to be free sprayed on it and then I'm going to use my flat iron and I'm going to basically just set it in place you. So you can honestly be done right here, but I decided that I wanted to do more of a Bob look instead of long hair. So that's exactly what I did. I'M just gon na take the hair and I'm going to just start cutting in a blunt v. Cut make sure that you're not like pulling the hair once when you're cutting it, because once you release it, that tension is going to make the bob shorter than what you think it's going to be. So just keep that in mind whenever you're doing any type of bob cuts or blunt cuts or anything of that nature, and this is the final look. Thank you guys so much for watching. Please don't forget to Like comment and subscribe. I love you guys and God willing. I will see y'all in the next video bye.

Comments
Re’Mona Lavon: This color is so pretty and compliments your skin tone well
Monique Jackson: Your channel is so underrated... you’re so beautiful and talented ❤️
Shontez Cox: I love this hairstyle thank you I can’t wait to do it.
Dayna Bledsoe: I love this video this was very helpful
Pink Velvet: Oh yes girl you did that per usual
xolani: i gotta try this thank youu ; can you do more of these videos (new subbie)
King Of MakeUp: You have long sideburns just like me!❤️ and my baby hairs grows into my eyebrows too♀️
Kimberley Lyons: Super cute ❤️
Chana’s Beautie: Nice❤️
Elle Emme: This too cute
Ashani K.: ❤️❤️
Dayna Bledsoe: Do u know where u got this hair from I like the length
Chana’s Beautie: What’s your ig name?
India Gibbs: Yes