Affordable Wig Tutorial With Bangs Feat. Darling Hair | South African Beauty Blogger
OPEN ME
Hi friends! Today’s video is in partnership with Darling Hair SA. As you guys would’ve seen by now, Darling’s got a new look and to go with it, they’ve released a whole bunch of new styles and colours to go with it. When they sent me their new Bae Magnet weave, I just knew I wanted to make a wig with bangs. I’ve been wanting one for ages, but I haven’t had the opportunity to make one until now. Let me know what you think of the final look!
Remember to like, comment and subscribe please!
PRODUCT DETAILS:
Darling Hair Premium Collections
Bae Magnet 20” Weave
100% Human Hair Feel
OTHER VIDEOS:
What #Euphoria Taught Me About Gen Z Makeup: https://www.youtube.com/watch?v=_yQbmz...
My Morning Skincare Routine: https://www.youtube.com/watch?v=CVX0AO...
MUSIC:
Shesha Geza – De Mthuda & Njelic (Saxophone Remix)
SOCIAL MEDIA:
Blog: http://www.foyinog.com/
Twitter: http://www.twitter.com/foyinog
Instagram: http://www.instagram.com/foyinog / http://www.instagram.com/facesbyfoyin
Facebook: http://www.facebook.com/foyinogtheblog...
Email: [email protected]
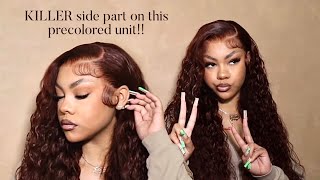
Hello, everyone and welcome back to my channel today. I'Ve got a very exciting video for you guys today, I'm gon na be showing you how I made this super super super, affordable, wig, using darling, hair extensions. This video is sponsored by them. So shout out shout out: it's just gon na be a very easy tutorial on how to make a wig with bangs. This is the first time I've ever attempted to make a wig with a fringe before, especially because the bundles that they sent me didn't have a closure or frontal. So I had to kind of get creative and how I was gon na execute it and I've been thin. One thing to get bangs for a long time, but I don't have the commitment to cut my own hair and I don't feel like sewing in a weave. Like commitment issues, so I wanted a wig with bangs and when they came to me with this opportunity, I was just like perfect timing. So if you wan na see how I created this wig, then just keep watching okay. So before I get into the tutorial portion of this video, I just wanted to explain the hair that I am using. It is the darling premium collection and this particular style is called the magnate right so darling. As you know, completely rebranded they went from red to purple and in this new rebrand they also came out with a lot of new hair extension types and a lot of new colorways. So this is one of them. As you can see, it's got a bit of an ombre. It'S just like natural Brown. It'S like color 1b into color for type of ombre, which looks super super natural, and this is one of the styles that they came out in a premium collection. The other collection contains just your regular braids, like the EZ braid and the darling one-million, to do braids and stuff like that, and then they have. This collection of like speciality leaves and cool colorways, and things like that and that's where Bay magnet comes in. Yes, it's called big magnet, so hide your kids, hide your wife and hide your husbands, because anyway, so I'm just gon na open this packet quickly and just tell you a bit more about the hair. So, first of all, it is 100 % human hair feel. So it is not sure about Brazilian, your Peruvian all of those things, and I think that's what makes it great because, like I said, I've never made a wig like this before and having such an affordable option gives me room to experiment. This hair still looks really decent. It doesn't look like cheap plasticky type of hair, so it does give me the room to experiment and play around with different styles and colors without like the commitment and especially the financial commitment. So that is something I think is really really cool so like when you open it. It does look like this and like this is the color like in its full in its fullness. It says one pack enough and when they say one pack enough, they mean it. I did this entire unit. Double double sided like so, if it has a single whiffed and I folded it in half, so I used it like literally doubled up, and I literally did not even finish the one packet they send me two packets and that's why I can show you guys this, Because I still have here a whole bunch of here left over from the one packet, so they definitely give you more than enough to do a completely full head of hair, and I feel like this density and this fullness. It'S like the perfect level. You know what I mean: it doesn't look like too too, full too unnatural to super Wiggy. I feel like this is a great like type of density and thickness, so they are very generous in may in their packets it. It comes with this little infant pack sheet on top, it gives you so like hair suggestions, and you can see the other colors that they come in. They have like a red ombre and a blonde one, but also something to note is that this is a weave and it does say that you can make wigs with it hints, but also you can use heat on this head. It is only up to 150 degrees Celsius, so I know like a lot of straighteners and curling irons do go hotter than that, so my advice to you would just be to use your devices as they're warming up or to set it to the lowest possible heat Setting, if you can so that is a disclaimer, so you can't use heating tools on it. You can try straightening, you can add more curls, but there is a temperature restriction. So do you take note of that, but, like guys, this is so much hit like it is so thick that they gave you so so so much here. This is actually like two separate sections, so they give you like. It'S not one super long track. They. It is super long tracks, but they do cut it in two. So I used one track and that basically took me up to here like yeah, and it was just the rest and the fringe that used the other pack. So, like you really do have enough hair. I think this is available in stores if it isn't ice Dan to be corrected, but I think this is available. I think she cute, I think she cute like I like thanks. I like this little wispy fringe. I did this in such a way that I didn't get too much here on the French, so I didn't have to film it out, but I was prepared to turn it out. I also had the option of putting wig clips, but I have such a fat ass head that, like I don't need wig clips, my wig will sit on my head. She is put perched and pretty she's not going anywhere anyways. Now it's time to go into this tutorial portion of this video that one will be done by voice over because I'm just sitting and sewing it, took me like under, like just about three hours or less to sew. This complete unit like it was pretty quick, pretty easy, pretty user friendly yeah. Let me know what you think and sometimes coming up it's easy to play with color, it's easy to play with different hair styles and cuts, and I think this is a great looking and feeling affordable solution for many of us. So without further ado, let's get into the tutorial okay. So, as mentioned, this is the BAE magnet wig hundred percent human hair feel one pack enough - and this is in this natural brown black ombre, as I explained before. So all you need is pretty much your curved needle and thread a wig cap stocking cap. Some hair clips, if you need some scissors and a wig head, so I started off by putting that the wig cap onto my mannequin head. Apologies! If you can't see very clearly, I know my mannequin head is black but yeah. I went with the edges of the tracks and I put them together. I folded in half and I took my curve needle and thread and started at the base of the wig cap, and I put it through the weft and this time I'm using the wood whiffed correctly. So I start by using the weft and I put my thread through it, and then I start at the base of the neck, the nape of the neck, and I tie a knot and then I go over this a few times to make sure it's secure before I start sewing and putting it through the rest of the track and the stitch that I'm using and the stitch that I used to all my wigs is called the blanket stitch. You can google it if you want to get a bit of visual representation of what it looks like, but if you can't see very clearly what I'm doing, I'm just kind of like looping the thread through my stitch as I go and as you'll see later in The video I kind of wrap the thread around the needle directly, instead of looping it through. So that is an alternative way of doing this stitch. So now I'm at the end - and I don't like to cut my widths coz cutting them - does lead to some like shredding the shading of the track. So I just like to fold over and keep going, and I just do that for the entire head, and this is one of the views that I have of me doing this hold of a method. So I kind of just go a little bit further up with the whiffed and then just like stitch around until it bends, and then I carry on as I go as I'm sewing. You'Ll see that I don't only stitch through the width, that's something I do at the beginning and end and like intermittently throughout. But it's not something that I do like all the time, because it does get a bit like anaphors to get it through like the heavy stitching, but it does help it just feel more secure. So right now I have to switch over the thread and I just like do a double to triple knot with the blanket stitch method and then cut it off, and then I read thread. I don't use too much thread at a time because it is quite long. So it does not, so I often go for like one meter at a time if you have multiple needles, it works so much better because you can just thread multiple needles at once, and then you don't have to worry about it. This is how I knock my needles, my thread as you can see. I just put it on my finger and I like rolled it off and it created a really easy knot for me and then I just pick up where I left off. I go through the weft again and like I do that, sometimes I do it a few times this time. I don't need it at once, but usually I do it a few times to make sure it's secure and then I just carry on sewing. It'S really really simple from here on out, so I skip quite a lot of it because I'm just I'm just sewing so there isn't much to see like it's just sewing, so I'm just saying for the rest of the head in general. As you can see, I leave about a finger or two space in between each of the tracks that I'm sewing. This just helps make sure it's not too too full, but it leaves like a good spacing amount in between and something that I have to be very conscious of, while I am saying is just to make sure I'm not getting hair caught up in each stitch. So that's something you really do have to be mindful of because it can cause knots and just not foots, like I said well as you could see there, I wrapped it around to do like a double or triple like blanket stitch type of thing that helps it. Just like not well and just to feel more secure, okay, so, as you can see, I've reached the stage where I have to use my other half of the packet. As you can see on the like weight cap, this is where usually a frontal or a closure would go, but I'm just continuing onwards, with my bundles just like how I started, I'm just putting it through the edges through the weft and sewing it onto the wig Cap and from here on out, I'm not gon na go back and forth. I'M gon na start going around and what I try to do here in order to make sure that the like circle and the end of the wig isn't too far forward, and also to make sure that my fringe isn't too full. Is that I sewed across the edge of a hair line, but then I left more spaces from the front than I did from the back. So by doing that, it sort of pushed the circle where the like wig kind of finishes. Further back so that you don't see it instead of it sitting at the very front of like my forehead and sitting on top of the fringe. So this also helped get some like spacing and like a bit of like room for the fringe to sit, and that was quite helpful as well. So I kept going round and round until I just had this tiny little circle left towards, like the middle. Back of my head and I stopped right there and I created my little bit of a closure and it wasn't quite clear, but all I did was I faced my mannequin head forward, so I could see exactly which way it was going and I took one the Tracks, it wasn't doubled up at this point, it was just a single track and I folded it around and around to create this kind of like little spiral of hay and what I did from there is. I took a straight needle, not the curved one, but I don't think it matters which one you use and I like showed it through that didn't sound like right, English, but, like I just tried to like sew it so that it was stable as this little circle. Thingy and then with the tracks facing downwards. I was sewing that into my wake, so I did like a few stitches from all directions, just to make sure like it was being pulled evenly from all directions, and that way it kind of works was like a little bit of a closures just to help. You hide the tracks and it does have a little bit of a bump, but you can use like a straightener or something on top of it and it like it's pretty pretty like fine. You don't really notice it at all. Okay, now we're in the final stages of the wig and I put on a wig cap just to protect my own hair, and I just put the clips on to like the loosest hook, because, like I mentioned, I have a big head, so I don't need any Extra security like the wig, sits on my hand pretty like securely, and I brought all the hair forward, so I could see where the fringe is going to sit and I just picked out a section of it. The section wasn't too wide because I just wanted to deal with the front part of the fringe. I cut other pieces later, so I just took that little piece and then I cut around my nose. I didn't cut too much off at the first snap, just because you don't want to cut too much rather like cut too little, and then you snip snip snip, and that's exactly what I did. I was just trying to see pretty much I just kept cutting until I could see, and then I started thinning it out with a little bit of a razor tool, and then I used the scissors again to like just add some, like I don't know depth and Like stuff to the cut so that it didn't look too straight and after that, I plugged in my curling Tong, literally just plugged it in and curled and the fringe a little bit while it was still heating up and beyond that. I was pretty much done, so this is it. This is the look. This is the wig. Thank you for watching her to like comment and subscribe and I'll check you guys later.

Comments
Busisiwe Nojoko: The accessibility thank you for this! You look lovely.
Nandipha Damoyi: Always so helpful and informative. Thank you, thank you. ❤
Thembakazi Sonwabe: I love this look on you, looks beautiful!
Chante Moffat: Ah I LOVE your wig, looks stunning!!
Joliqhawe N: This is such a helpful and easy to follow video, thanks Foyin!
Hlompho Tsebe: Omg I just bought hair with bangs, it got shipped today I'm soo excited. I'm learning a lot from this video
Yolanda Sogiba: The bangs look good on you Now I want bangs
Remo Motsuenyane: What do you think the best way to get volume with this hair would be?
Sherly Smith: Looks great
Nkhensani Manabe: You did that!
Felicity M: And we see those lashes
Felicity M: Sis wooow imma try this heeey
thabile thalente: where did you buy your wig clips
Karabo: What colour is this?