Dyi: How To Make A Fringe Bang Wig Using A Closure
Hey Dollz! Watch me create my wig with Bangs using a Closure. No Glue! Hope you find this video helpful.
If you have any questions leave me a comment below and don't forget to SUBSCRIBE!!!!
HAIR PROVIDED BY
GlamorousDoll.com
Please watch My Previous Tutorial
Highlighting & Countout Tutorial
Brow Tutorial
Wing Liner Tutorial
Eye Lashes Tutorial
Connect With Me:
Instagram:
@BeautyBy lashonda
Facebook:
Snapchat: BeautyByLashonda
For Business Inquries: [email protected]
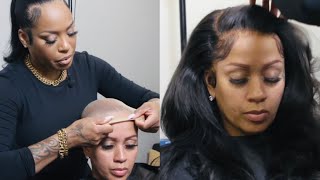
Guys it's a Shanda and welcome back to my channel today is going to be a DIY on how to make a wig with fringe veins, using a closure. I'M first going to be using this little wig cap that i got off at Amazon for really cheap, probably like under 10 bucks. I like this kind, because it has these little elastic bands on the side where you can adjust the straps in the back and I'm just going to be using my Styrofoam head and I'm going to place my wig cap on there like so - and I also like This wig cap, because it is very breathable, I'm then gon na - take some tea pushpins and place them on each side, just to kind of hold my wig cap in place and then I'm going to take my closure. I want to say this is about a pin to a 12 inch of soup base closure. I'M just gon na go ahead and cut the lace off the front of it and if you guys hear some raindrops in the back, it's because it's raining cats and dogs. Here so never mind the background. Noise, yeah and also this wig cap, I want to say, is a size medium. I kind of wish I would have went with a large, isn't too small, but it just sits like perfect, and I kind of wish I would have went with a bigger size just to get a little bit more space. But I'm just pinning down my closure on each side in around the perimeters of it. Just so I can hold it steady in place and see exactly where I'm going to be sewing. I'M going to use just some nylon thread and a c-clip, and I'm just going to sew all the way around. The perimeters of this closure sewing it down on my wig cap and I'm also gon na put in the little pony tail. So I can see what I'm doing here, you guys and I'm just going to go ahead and store. It sewing that and I'm just going to take the thread and kind of wrap it around the hook. Maybe a couple of times uh once I start to sew but yeah like I said it's pretty self-explanatory, I'm just going all the way around this closure. Oh just to kind of put the closure in places it's my first time ever doing a wig with a closure. I'M not really a closure girl, but I did want bangs and I didn't want to use that little glue roll your little track up and put it on the top and fan that I didn't want that myth. I wanted to look like scalp in the top, so that's why I went in and did it with a closure, and I am very happy that I did it. I'M going to show the same way in the front here, but I was making sure to leave a little bit of space on my cap because you guys see I am going to go around this whole closure with a track just to kind of make everything. Look. Seamless, so I left a little bit of space in the front, so I can sew a track there and once I'm done it should look like this doesn't have to be anything super neat, but it is nice and snug and then I'm going to go in with This Asian straight hair that I got from a company called glamorous tall, calm I'll, be sure to list it in the description box down below. If you guys want to check out this Indian hair and I'm just gon na, take a track and I'm gon na. Take my little seating hook and go right in between the width of this, so they ate when I first put it down. It'Ll lay flat, so I'm just gon na do that and then I'm going to go ahead and sew one a track all the way around. The perimeters of the closure, once I'm done with that, I'm going to go ahead and put all of the hair in a little pointer, just kind of get it out of the way, because we won't need that until we get back to the front of the head Again and I'm just gon na go ahead and start sewing my tracks on the back. I did double my will on the bottom and then, as I got all the way up to the top. I start to use one track because I wanted to lay very flat in the top. I also making sure that I didn't sew on my little band. You see hanging at the bottom there just because I want to be able to use those adjustable scraps to tighten and loosen my weak to my desire, and once I saw across the head, I'm just going to take the hair and go back across. Like you see me doing here and I'll pin it down, and I just start sewing again, so I'm just going to keep doing that all the way across the Dome of the cap, and so I completely got all the hair so long and I did use about Four bundles of this Indian straight hair, I did kind of run almost out once I got to the top, but, like I said once, I started using one track it pretty much even out or bundles is plenty. It looks really nice in full, so Lee's completely get away with about four and a half bundles. If you wanted to have a full wig, not quite sure about three, I think you may need to go ahead and roll with a four and, like I said once I got to the top. I did start to use one track and to close in that little space you see there and I'm just going to sew all the way around the top of that little closure up there. You won't see me do it, because some kind of way the video got cut, but you guys get the idea. This is what the finished product looks like when I'm done sewing all the hair on. I did just open up my closure a bit just as you see in the top here and then brushed it down, and then I'm just gon na go ahead and take a little bit of mousse and put in the top. And it's going to make sure that the hair lays flat, because the closure was the hair was all going to the back. But now I want to kind of go towards the front, so the mousse is gon na help lay that down and then once I'm done, putting a little mousse on there not much just a little bit to hold it down. I'M going to take my curling one and just kind of print it down in the top to make sure it lays nice and slick. Now I'm going to go in and give the wig a bit silk press! I'M going to use my Moroccan anti-freeze oil in my flat irons and my wig old brush and I'm just going to go over the whole head and make sure the hair is nice and straight and once the hair is nice and straight I am going to go Ahead and try the weed on so that I can cut my bangs. I feel more comfortable cutting my bangs with the week own so that I can see exactly where I want the weight to fall. I'M just going to twist the little hair in the front and take some scissors and go ahead and cut that give it a bit more of a French look. I'M just gon na take my little razor comb and I'm just kind of gon na slightly go over the front of my bangs just kind of making. It looks a little bit choppy so that it all fall. You know not so nice and neat, you know it's just kind of unit that fringe look, so I'm just gon na go with it lightly and down the sides of the front of my week as well. I'M not sure what that little bird piece was doing, but I did see - and I did go ahead and comb that down. But I said I'm gon na take my flat irons and just slightly go over my bangs in the front, just kind of pressing it out and giving a bit of a bump not too much because I don't want you know old-school rolling in the front right bang. I still wanted the same, the leg kind of flat, so I just went over a couple times my flat irons, just to give it a bit of a bump and yeah. That'S pretty much the majority of the bang week um. I think it came out really for the first time, I've ever made a wig with bangs, I'm a little worried at first, but I think it came out great and I am going to show you guys how I made the top part. Look. You know a little bit more real and added a couple of Clips, so stay tuned for that. But yeah like you, can see right here in the front it just kind of looks like you know, and that's a wig, but I'm gon na go ahead and open the weights up and I'm gon na take my foundation and I'm just gon na dab it right In the center of the week, just to kind of give it that Scout look so as you'll see I'm doing right here, I'm just taking a little bit of my foundation powder and pressing that right in the center here and you'll see in just a second. It'S gon na look so much better and, as you can see, it looks so much realer with the foundation in the top versus leaving it plain, and then I'm just gon na flip the week inside out on the minute and I'm gon na place these two little Cones these little wheat cones, I'm gon na soak each one of them on each side of the week. Just so I have something to stick under my brain, so I can make sure that it feels secure, even though the week was nice and snug. I just like this, a whit clip just for like kind of like a little safety net and that's pretty much going to do it for this week's tutorial. I hope you guys found this tutorial helpful if you did feel free to go ahead and thumbs it up and leave me a comment in the comment section below. If you have any questions, I think the wig turned out great guys. If you guys want to see me make more wigs and more things with hair, then please go ahead and let me know - and I try to get it up and don't forget to hit that subscribe button on your way out guys and I catch you all in My next video bye dolls,


Comments
C Ellis: This looked pretty good and simple to do x
Keshia Thomas: New subbie here! I have been searching for a wig tutorial with bangs (without the rolling of the tracks because I don't like that either). Idk why I never thought to use a frontal lol. You did a great job and I will be looking forward to more of your videos. I will be making this wig very soon! Thanks love
BeautyWithTy: I love this! Very detailed! I'm going to recreate this and tag your video in my description box!
Ebony Durham: Thank you for this! I’m going to try this soon! I’m nervous about cutting my bangs tho lol
Avianca G: Thanks for this video. Finally a wig using a closure for bangs made easy
Latoya Fitzgerald: Beautiful. I'm a beginner at wig making and would love a fringed wig so I think I'll use your method it's lovely
Becky Naomi: Such a helpful video! I’m making my first wig shortly and wanted a wig with bangs so I’ll be using this technique! Also your accent is soo cute!!
Tarisai Ejeta: so helpful, gonna use your technique x
carolyn mcneil: I love this look
Hunter Hunter: I love it omg
fakeafrikan: Hi, love the video, quick question - did you cut off the wig net below the lace closure?
Deja Lee: I love it
dachoqlit1: I love it
Becky Naomi: Started following this tutorial today and almost finished my wig!! In terms of cutting out the cap to expose the lace.. the part that you left in the front to add an extra track of hair, what exactly happens to that? Do I cut that part out or not?
SHAKO TV: Nice video, would try it
Tammy Jones: Hi beautiful I love this tutorial great job can I use spandex dome cap to make this bang like this? cause normal when people do closure it will be alil space in the bang so I like that technique will try I hope it can work with spandex dome cap
bubba gee: Love it
Monique Cooks: I Love this. I live for your work you should be nice and make me 1!
Jacob Empress: Hey I watch the video and I like it just to ask which closure did you use? Is it free part or middle part closure
Ttaurus Taurus: I love it
Deja Lee: When I did my wig with bangs I flipped the closure so the long end was facing my forehead
L Davis: I might have missed it, but what were the lengths of the hair that you used for this wig?
Cynthia Hall: New to your channel, I know you recorded this video in 2017 but do you know the vendor from amazon that you purchased the wig cap from?
Carrie: Very nice! Can you make me one.
Ebony Durham: I got a cap like that but I usually use doom caps. So does the looseness of the cap mess up the structure of how the weave is sewn in?
phara noel: You should of cut the cap part away from the lace closure area but the wig looks great
Niecey Thorpe: just curious as to why you didn't cut the lace out ?
Ty Mo: Ok but I think I’m missin a huge step when it comes to fitting the wig .. or maybe it’s becuz I never have my hair braided down
Miss Joy's Art Room: Where did you find the razor comb?’
Learn and Earn: Why didn't you turn the closure the othe way. Would it have made a difference.?
Tatyana Wilson: How many bundles did you end up using?
JJThePlayer Roblox: Fringe is a bit wonky however this was a good video
Ashley J: Do you still cut out inside of the cap ?
Rexine Hazel: Thanks ....omw to make mom dukes her wig
Lynn Spurlock: Can you make me one Awesome
Kameron Marie32: T Lewis awesome
Malindi Thamali: Is it a three part closure or free part??
Florence Owens: ohhhh sis the views on this video!
Sierra Hicks: Where are you from? You say “flat INES just like me lol! #Country #BamaRaised
Dymond Black: Mane I fucked my bang up . It’s not horrible but it’s not as perfect as yours
¥oshi Xo: You thought you were smart saying fringe bang when fringe means bang.. get your vocab up boo