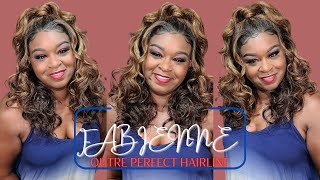
Smartlace Lite - Get To Know Our Three New Styles!
Introducing Jon Renau's 2022 SmartLace Lite™ collection featuring light hair density wigs in our popular light weight cap. This innovative cap offers an ultra-natural looking lace front that extends from ear to ear for the most realistic hairline and allows the wearer to create an array of hair styles! The silicone nape fits snug against the back of the head to prevent any shifting, and the polyurethane ear tabs are perfect for use with adhesive for those wanting extra security.
Styles shown (in order):
Emily (right) @mrsladyrad
▪️Carrie Lite - Petite | 4RN
▪️Miranda Lite | 22F16S8
Chanelle (left) @chanelle_jonrenau
▪️ Miranda Lite | FS17/101S18
Browse Collection here:
https://jonrenau.com/wigs/collection/s...
Find a retailer near you:
https://jonrenau.com/store-locator/
I am Emily and I am Chanel and we are the Jon renau Educators. Hello, welcome, welcome um, as people start logging on. We love to know where you're from so please as you're coming in and saying hi hi everyone. Thank you. Let us know where you're logging in from um it's fun to go back and take a look yeah and then um also, today we're going to be talking about the smartly slight summer expansion. So we have three new styles that we're excited to share with all of you, but if you have any questions, this is your time. So please put in all your questions in the chat, whether you're logging in from Facebook or Instagram, even if you're checking out the the recorded version later, we check the comments, so please leave any questions that you might have but yeah. Let us know where you're coming from love. It see you and welcome. In yes, hi from the UK wow, I always like to see like, what's the farthest distance from us yeah exactly we like to kind of gauge it, but we love it. We do so today we are going to be talking about the new smart lace, light styles that are now available. As I mentioned, there are three new um options when you're looking at that smart lace-like cap and the first one that we want to talk about today is actually carry light. Now carry light has been available, I'm wearing her right now in color 4rn um Carrie light has been available for a little bit right now, but based on your feedback, we've got all of your. Your um requests, so she's now available in a petite cap, so yay. So for those of you who are really hoping to be able to wear her - and maybe you are true petite - the good news is now Carrie is available in a petite cap with Carrie light petite. I don't know how many more times I can say: petite yes, but it's available so um and the actual launch date for um. This entire collection is tomorrow, so you're getting a little bit of a sneak peek by us doing the live today, yeah um! So that's another really fun thing about maybe doing a little bit earlier, yeah exactly you can see a sneak peek and like Emily was mentioning um. If you guys have any questions, we'll kind of go through the comments, as we are um doing this. You know this training with you guys. So, just let us know if you need anything or any additional information, but if you want to show them the next yeah style, so I'm going to go ahead and take this one off. The next style that we are going to be showing today is Cameron light. So um Cameron light was already part of this collection, but now she is also available in a petite cap, a very similar style to Carrie just a little bit shorter and whereas Carrie is available in Remy, human hair Cameron is part of our traditional synthetic collection. You can see I'm using those back ears back nape area with this cap design. It'S a little bit more delicate because it does have that lace front from ear to ear, giving you a really natural hairline. But you still want to be careful about not pulling or damaging that lace. Remove a couple hairs here. So what I do is I actually once I get it on, I kind of rock it back a little bit so that it's in the correct position and because this is traditional synthetic fiber, I'm going to use my wide tooth comb and the color that I am Wearing right now is 433 in case you're wondering so I'm going brunette today, I'm going to go over to blonde here in a second though yes, but again, just that beautiful lace front all the way from ear to ear Chanel's going to go ahead and show us The um cap design here in a minute, but you can see, I have a couple pieces. I want to pull out here that kind of got tucked underneath so our kind of our inspiration and our um, you know Mantra if you will, for this collection, is smiles from ear to ear, because it really does give you guys that freedom and that um, you Know, comfortability of being able to pull your piece away from your um hairline. Look at Emily. There she's just tucking her piece right behind her ears, as well as being able to wear glasses, um, there's so many benefits with having that extended lace from ear to ear. It really does give you guys that freedom and a well and being able to you, know if you're wearing a traditional cap, maybe with a lace front and let's say you want to you, know, do a braid or something like that. You kind of have to stop from ear tab to ear tab, but with this you could really start a braid on one side and really give yourself that headband look yeah with starting your braid over here and then going all the way to the other side. Yeah. Exactly exactly so, this is Cameron light now available in a petite cap, so Cameron like petite, is available in average and petite now yep and then the last style that I'm going to go ahead and put on and you'll notice how I'm taking it off. I'M not pulling back with the ear tabs, I'm just gently lifting it from my head um. The last style that I'm going to put on for you today is the Miranda light. Now Miranda is a top selling style, very, very popular because of her beautiful layers. As you can see here and her length before Miranda was available in a lace front single mono part now available with that smart, lice, like cap design. So now I love how you say: it's like she got a facelift yeah, so she went to the ultimate cap. If you will um really highlighting her beautiful style yeah, I just love her. I'M wearing her right now as well in Palm Springs. Blonde um, so you'll see the difference between the Venice blonde here and the Palm Springs um, and it's just it's very beautiful, and I do want to mention too that, with all of these smart lace, light pieces um, the lightest color in all of our color Blends Will be shown in the front hairline there, so you can see how Emily's piece has that lighter color in that color blend right along that hairline that really softens the hairline and just as is you know, a beautiful nice little touch so nothing in the solid um. Like an RN, if it's solid, but if it is a color blend, the lightest color will show up in that front. It really just helps soften this knot. Yeah, I'm a little bit closer, exactly see you see where that lace is too and how far it goes. Yeah so we're going to talk about the cap, design, real quick and then I'm going to talk a little bit about applying and removing with adhesive um. So let's go ahead and pull out that cap. Yes, okay! So for the actual cap design itself, as Emily was showing you guys, it does have that extended lace from ear to ear. So I do want to pull it up very nice and closely you'll see that lace goes all the way to below that ear tab. So our smart lace is a welded lace, which is two pieces of material that are ultrasonically fused together, like a hashtag. So it's going to be very durable and strong um and then we have those polyurethane ear tabs. They do have metal stays in them as well. To make sure that it's nice and flush against the temple for extra security, Emily is going to talk about adhesives a little bit and where you can apply the adhesives and then we do have our mono top here. So this monofilament single monofilament section. So this allows for multi-directional parting anywhere in this section, and then we do have our hand tied back here so our hand, tied back, is going to be great for movement, and then we have our 360 degree stretch panel that Emily's out demonstrated. Yes, thank you like. I wish I had more hands, but thank you yeah. Thank you so much um so and it allows for a nice hug for your head, so that's hand. Tied back is, I think, should be um kind of that most natural. Looking movement. A lot of flow, especially with some of these longer Styles, it really just feels nice and elegant um, and then we have that silicone strip at the nape there. This is again for extra security. It'S nice and soft. For those of you who do have some bio hair um, it's very gentle, it's not going to pull or cause any additional damage on your biological hair um. It'S very soft and comfortable yeah, and it's great for when you are styling, so we're going to show you guys a little bit how to style and do a really cute um little Up Style, ponytail and a moment here, but um that silicone really does help. Keep that style in place absolutely and because we are going to do a little demo on how to create a different look with this, I'm going to show you how to apply adhesive now adhesive isn't necessary with these Styles because of the design of the cap. With that lace extending the way it does, it will hold in place just based on the tension that the circumference gives you. However, if, if you want a little bit more security, I'm not going to have to worry about it as much or maybe you're like me and you just like wearing adhesive um, I'm going to show you exactly how to do that. So I'm going to go ahead and take her off real quick, remember to put her back on in a second, but the first thing that you want to do anytime, you're, going to be using adhesive is make sure that you first have a solvent. So here it is, this is our number five. This is our remove. This is John Renault lace. Let go really important to always have a Sullivan on hand. You want to make sure that, because um, you are using adhesives, you're, applying them to your skin, that you not only do a patch test, make sure you won't have any kind of allergic reaction to the product, but that you have that solvent to dissolve the adhesive. So first thing I'm going to do is actually spray on a Q-tip, I'm trying not to spray the camera. Oh thanks. It'S nice and sanitized, now um and then you're gon na go ahead and just gently clean off the area where the adhesive will be applied. What you're doing is you're removing any oils um any makeup, anything that might be on that adhesive um on that lace. That could prevent the adhesive from really sticking or adhering. So you want to just go ahead and gently you'll see I'm using that Q-tip. I'M just gently going through and removing any of that you can see a little bit of that makeup that I was wearing is on there now and then you're going to take your uh lace front, adhesive, we're using this one. This is by a walker. It'S the blue liner and because I'm applying the adhesive just to this front area of the lace, to kind of follow my natural hairline so that it's invisible. I actually take this adhesive and I cut it in half so I'll show you right here, I'm using a pair of small little sharp shears, I'm going to go ahead and long ways or so that it matches the same width of the area that I'm going to Be applying the adhesive to and see how it kind of lines up like so and then I'm going to it's kind of hard to do. I want to make sure everyone can see it and I'm not doing it off camera, but I'm going to go ahead and remove the backing so that I only have the blue. Everyone see that being mindful not to touch the adhesive very much and also knowing where I'm going to be styling it I'm going to apply the adhesive around that ear area and gently press down. I'M going to do the same thing on the other side, using the other side of my strip gently, remove it being mindful not to touch the adhesive too much. You don't want any of the oils from your fingers going on that material and then again, I'm going to make sure there's no hair in there gently line up the adhesive right there around that ear. Now, if I did not have biological hair and I wanted additional security, I could go ahead and either use the red or white liner and I would actually apply it to this polyurethane area. That'S where these tape tabs come in play, but because I'm just going to be applying it to um right around here on my hairline, I'm using the blue liner, because blue means lace, and I want it to just be on that lace front now I could apply Another one right in the front here um, but because of the style that Chanel is going to do on me. I want to make sure that I don't have any adhesive right there, where you might see it. Although it is um transparent, it doesn't have a color to it. Sometimes it can pick up a little bit of shine, so a little bit of powder will help remove some of that shine, but because of how we're styling it, I always recommend putting your adhesive on either side of your part to prevent anything from being shown. Yeah, of course, it's great so pressing it down. Now I'm gently going to remove that blue. You can see it comes right off from both sides and again, if you have any questions while we're going through this, we will um be revisiting. It we'll go through the comments here again, just being really mindful not to touch the adhesive too much but pulling it off and then before I press down on it, I want to make sure that it's lined up correctly. So I'm going to go ahead. I know where my adhesive is: I'm feeling pretty good about how I'm going to put it on, so I'm holding it with my thumbs here back where that silicone is I'm going to line up my forehead to the lace without pressing down. Yet because I want to be able to move it, so I know that my nape is in the position that I want it to be, and now I gently Rock back that lace. I check before pressing that it's in the placement that I want it to be kind of move the hair out of the way. So I can see it. I check that yes, this is correct. Yes, this is correct. I'M lined up and then you're just going to gently press down. That'S all it takes and I can go to a rock show yes and do some headbands have a good time and it is secure. So when it's the end of the day and I'm ready to take off my piece because our pieces are not recommended to be worn overnight, this is a synthetic wig. You don't want to sleep in it. I want to make sure that the end of the day, I'm using my lace, let go to remove the product um same way. I cleaned it. Take a little cotton swab spray it a couple times and then gently go underneath and roll under that lace front. Make sure that this is really saturated with your solvent so that it goes smoothly underneath and then you can just gently lift it off and out of the way, then remove any extra adhesive that might still be left on your base material and dispose and then you're Good to go yes, okay! Now, let's have some fun and I'm gon na show you guys how to do what we call like a Barbie pony right, um. It'S basically going to be taking two different ponytails and incorporating them to make a really long kind of waterfall. Cascading ponytail um: this is a fun little easy summer style to get that hair up and off of your nape area. So I'm going to go ahead and actually demonstrate that on Emily. So I'm going to have you over yeah slide my chair over here now. If you guys have any questions, while I am doing this process um, I do like to prep all of my pieces with a little bit of a pick-me-up dry shampoo, because um she is a traditional synthetic. This will just kind of remove some of that shine and add a little bit of grit to hold this style in place. So I'm just going to kind of add a little bit of this dry shampoo right up to the top here foreign. I love this product. I do feel I use it on my biological hair as well as my pieces. Yes yeah, I feel, like everyone uses this on their biological hair. I feel like it's definitely um one of those things that I have in my lungs at all times. At least it smells good too. It smells so good. I know, and because I do have adhesive on my ear tabs. I should still be pressing to just protect that lace, front area while she's doing this style, but Chanel doesn't have to worry about this part lifting because it is nice and secure. Yes exactly so. What I do is, I basically take down the center so about like the top of the ear, a little bit of the middle of the ear I'll take one ponytail now, because she does have some layers in there. It'S okay! If the layers kind of fall out a little bit, it'll make it a little softer, and this is a really easy way to give more volume um in your ponytail with any of your pieces, foreign or updos or braids. Whatever you want to do to create your Unique Look, it's also important to make sure that you are not leaving that style in um, because you don't want to create cold crimping. So I'm I'm going to rock this Pony for the rest of the day. But then tonight I'm going to make sure that I take it out and then brush through it or comb through it and use the HD smooth detangler to remove any of the cold cramping that might be occurred from having this style stay in too long. Do you have any questions over there, while I'm styling, you guys, can kind of watch me as I'm going as well. We have a couple questions um from Facebook and from YouTube from Facebook. We have um I'm going to have a hairdresser style, my hair for my son's wedding. Where do you recommend I put tape, so it doesn't move well. First of all, congratulations! Yes! Lori Palmer, Paul, Masano, Lori! Well, Lori! Again, congratulations! Um! On your! Your very exciting! Uh change uh, it's always fun when someone gets made. I love big get-togethers like that um, but for as far as lace goes depending on how the style is actually going to be created. My recommendation, like you saw me, do here, is make sure that the adhesive is not completely invisible, but you want to be able to dance and have fun and pull your hair up so make sure that it is in areas where it's nice and secure so around. That Temple area you want to be careful, you don't want it to pull too much but again on either side of the part. So if you're a stylist is going to be pulling your hair completely back off your face, then my recommendation is to apply that adhesive. So that it's right at um, the the where the nodding starts on your piece so that it's back behind and doesn't visible throughout the lace so around your front hairline, but where the knotting starts on your piece, yes and like Emily, was saying, congratulations so exciting. Okay, so, as you guys can see here, I'm gon na actually have Emily I'm gon na turn her. You see that we have two ponytails right um. I just clip this top one up, so this is something that you can do um, because if you are doing this yourself, you'll just be able to clip that up and I'm actually going to kind of I'm going to have you hold the top there. Emily perfect or just the top of your leash yep and I'm just going to kind of create a little hole through this top ponytail. And I'm going to take my fingers and grab that bottom Pony and I'm going to pull it all the way through. And what this does is it kind of just creates a longer Pony effect, so you can kind of go in here and kind of juice. A little bit of tossing and pinching in here, but like Emily, was mentioning. We want to make sure that every style that we do, we make sure that we are removing it that night, so because this is going to kind of give you that longer pony look, you can kind of go in there and again I use a little bit Of that pick me up dry shampoo, just to kind of make sure it has a little bit of that grit as well. Can you review the colors you're wearing one more time? If you can remember, I'm wearing Venice blonde and I am wearing Palm Springs blonde, so Venice blonde is going to have a little bit more of that kind of beigey kind of um warmer tones where the Palm Springs is going to be a little bit more ashy. In that sense, so that is how you do kind of that ponytail. That is going to just give you a little bit more of that oof a little bit and then you just kind of keep tightening it in there. I'M gon na have them actually. So you just kind of go in and you can see here how, based on the style it'll, make it a little bit longer versus just having just a just standard Pony yeah super fun yeah. I like it a little different. I love the way you call it like a Barbie pony, because that's how I feel, but especially in being blonde, I'm like yes, I love this just a fun little Style and, of course you want to be mindful not to do anything for the back combing, because She'S, a traditional um synthetic. If it wasn't human hair, I would kind of go in there and kind of back home to kind of combine the two together and as well as like using the right product and everything, because this is really fun. I like it good. I love playing with it. I'M like yes, I love this stuff. The amazing thing is that we're able to do that with this cap design. Yes, so we're able to pull this up and away from her neighbor - and you can even see here how her name was just nice and um. You know like tapered there. It looks nice and feathered a little bit. We do have a little bit of that return. That acts as if you know some biological hair, some baby hairs in there. So it's very, very natural yeah yeah, it's easy to do. You saw how quickly she did it. Yes, so you just take the top one and you just flip the bottom one through yeah um go ahead. Okay, so we talked a little bit about how, at the end of the day, you want to make sure that you um take down the style. So you don't get any cold crimping, but let's also talk a little bit about what do we do on a weekly basis or every six to eight wears when it comes to our pieces. So when we we do recommend because we do have carry so. That is our human hair. So, with our human hair we recommend that argon, smooth, um luxury, shampoo and conditioner so um. You will notice that with the human hair it does have a cream conditioner. So you want to make sure that all of your conditioner is from your mid legs to your ends and rinsing that out um. You do want to make sure that you are giving your pieces a shower, not a bath, so making sure that you're using cool, running water and drying all of your pieces on a um which stand and then with the styling element of human hair. After your piece has dried for about 24 hours um, we want to be mindful of you know where we pin um on the blockhead when it comes to the smart lace like pins um. So because Carrie we can't dial her. She is human hair, so we do recommend only pinning in that velvet connection. So you'll see this corner right here you can put a pin through right on top right here where that velvet connection is and then on this other corner, along with the um, the elastic band on either side and then right above the silicone strip and below the Tag here you can apply a t-pin. We do not want to puncture through the silicone the polyurethane, the lace or that monofilament on top, as well as the hand tied, because if you run the risk of you know ruining the base materials and then loosening up those knots. So anything inside that velvet connection or along the adjustable tabs, you are able to pin through your Blockheads. So when you are styling her on a blockhead, that would be where we recommend I just kind of remember the more natural something looks the more delicate that it is so a lace front, very natural. Looking your your parting here, very natural. Looking so make sure you stay away with anything sharp, and this also includes at using any tools like um wire, brushes or Combs that could cause damage to those delicate areas, so, whether it's human hair or synthetic, it's. Why we recommend, with human hair, that you use our German paddle brush and with your synthetic pieces we recommend our wide tooth comb? Yes, okay and then yeah yeah, so with synthetic, because we do have two new synthetics as well. We have Cameron and Miranda um. So we would use our fiber love, conditioning um spray and our fiber love shampoo. So our fiber love shampoo and our Five Below conditioning spray is what we would recommend and with our synthetic you actually will leave that conditioning spray in when you are air drying as well. Um, so again go from the Midlake to the end with synthetic fibers. You do not want to you know over product it if you will um so being very mindful not to use a lot of product because it doesn't absorb so just gently misting. Some of that fiber love conditioning spray to really make sure we get all the tangles out to not cause any sort of tension on the piece itself when it comes to our synthetic fibers. Yes and another thing I want to point out, because we are talking about our shampoos and conditioners, they are Salon grade, meaning and they're all they are formulated for alternative hair and alternative hair fibers yeah. So because of that, it's not the same as you're going to get. If you go to your your stylist, and maybe they have some beautiful product, you absolutely love. It'S not right for your alternative hair, there's no blood Source when it comes to your alternative hair, which means it's not getting the same oils um and you know protection. So you want to make sure that you're providing that, because it's not attached yeah our product has been specifically formulated for alternative hair. So that's a good point, absolutely um! So again, these styles are launching tomorrow so July, 1st um yay we'd love to know which one are you excited for leave a comment. Let us know which one you are looking forward to receiving or you cannot wait to order and then also, if you aren't sure - and you want to revisit all of these Styles - they are on our website. So jonrenauer.com you'll be able to check that out, and then we also will have our lookbook coming out soon. So you can get a little bit of style. Inspout from that. We also were posting pictures on social media, so um Facebook Instagram, you can kind of see um in natural light and in different settings yeah. What these different Styles look like yeah. So we want to thank you all for joining us uh. We really appreciate your time. You know there's a lot going on and things are super busy. So thank you for spending some time with us today. Again, if you have any questions, um we'd love to answer them. So if we do, we have anything on a YouTube or Facebook on YouTube and Facebook. Okay, okay, perfect! I don't think I've really seen just a lot of people coming on so hi and thank you um. If you do have questions about where you can purchase these Styles, we have a store locator on our website and you can go on there and I'll. Tell you exactly where you can go to contact your local retailer or um your favorite detailer, yes right! Well! Thank you all so much for joining us today. We really appreciate your time and we look forward to seeing you again next time. Yes, thank you. Everyone bye,


Comments
Teena Covert: I have 4 Jon Renau Smartlace Lite wigs! My family thinks they look the most natural! Thanks for all your good work!
Sharon Steele: I caught the latter half of the livestream but just completed rewatching the video in it’s entirety. I’m excited for the petite smart lace lite wigs and for hoping to buy Miranda in the newest upgrade also! Great video, informative and fun! Thank you Jon Renau and ladies!
Vicki Jordan: Just got the catch up,love the new styles
Janette Carrell: From Spring, TX! Please don’t forget the ladies that are at the age when they have thinning hair. We need shorter versions than the younger crowd. Make them with less volume and more realistic, but perky body! We need all the help we can get.
Annie Matthew: Hi. These features are wonderful. Would I be able to cut bangs/fringe on a Miranda light?
Maxi Maxi: Bendiciones hermosa Celina que Dios te cuideq donde quiera que QUINZAA.Monster encantan tus videos.
WIGAMANIA: From Malta . Big J R fan .
Liz Millner: Seattle, wa!! Happy 4th!
Davidlewn: LP reacted d ryt way, she is Vaniaa.Uno need of over drama, or over consider ations. She don't deserve *considerationss. Lp പറഞ്ഞ പോലെ,, ജീവിതം തുടങ്ങിയല്ലേ ഉള്ളു, പഠിക്കട്ടെ.
Faith Vogel: This is just a general comment. Will you ever consider Miranda in Venice blonde with a 12 root? Venice blonde is an odd color to me because it's so close to 12 FS 8 and yet Venice is so far away from Palm Beach blonde. Plus Venice looks muddy with that dark root n nape color. . I don't know, that color is what I normally buy in Miranda but I don't love it. . Just my opinion but I wanted to voice it. Palm Beach is gorgeous but it's just a little too cool for my coloring. 12 fs8 is too brown so I turn to Venice. I'm wondering if you have a non-rooted blonde that's just a tad warmer than Palm springs and then I could just add my own root. Do you have any suggestions? Thank you.
Leonor Nielsen: From Sweden