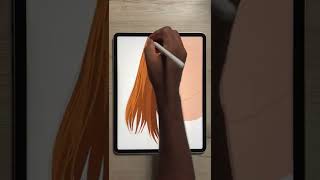
Modern Beachy Waves + Twisted Bangs Tutorial | Collab W/ Missy Sue
- Posted on 16 April, 2015
- Bangs
- By Anonymous
PLEASE READ:
Today's tutorial is a collab with the beautiful and talented Melissa, from MissySue! In this video I show you how I get my favorite modern type beachy waves, and an added bonus of how I twist my bangs. I hope you all enjoy!
Melissa's Channel: https://www.youtube.com/user/msncook11...
Melissa's Video: https://www.youtube.com/watch?v=gZ0Rwd...
Melissa's Blog: http://www.missysue.com/
Products Used:
Hot Tools Tourmaline 1 Inch Curling Iron | http://goo.gl/0JeayI
Bumble and Bumble Invisible Oil Primer | http://goo.gl/NGM9Jw
Bumble and Bumble Surf Infusion | http://goo.gl/e5wxFm
Bumble and Bumble Dry Spun Finishing Spray | http://goo.gl/Tz3gNX
Osis Elastic Finish Hairspray | http://goo.gl/SFMWBm
My Recent Videos:
This Week's Wednesday Wisdom:
https://www.youtube.com/watch?v=CTyBjz...
This Week's Monday Must Haves:
https://www.youtube.com/watch?v=qCn9O1...
Spring+Summer Green Smoky Eye Tutorial:
https://www.youtube.com/watch?v=-ujNbm...
My Makeup:
Face:
ColourPop Blush Birthday Suit | https://colourpop.com/product/birthday...
Dior Glow Maximizer Primer | http://goo.gl/oWTvDb
Dior Nude Air Foundation Ivory | http://goo.gl/sCeenu
Nars Radiant Creamy Concealer Vanilla | http://goo.gl/SzZtY5
Nars All Day Luminous Powder Foundation Mont Blanc | http://goo.gl/hB9c4f
Tom Ford Shade and Illuminate 02 | http://goo.gl/MihtSU
Dose Of Colors Peach Glow | http://goo.gl/AH2CxP
Eyes:
Mac Paint Pot Painterly | http://goo.gl/vfgduZ
Mac Eyeshadows Malt, Wedge, Woodwinked, Swiss Chocolate, Embark | http://goo.gl/XOYws6
MUG Foiled Shadow Center Stage (lower lashline) | http://goo.gl/oFPwB5
Cailyn Cosmetics Gel Liner | http://goo.gl/YSWZXS
Mac Eye Kohl Blooz (waterline) | http://goo.gl/SLn2D5
House Of Lashes Iconic Lashes | http://goo.gl/KqXzII
Dior Diorshow Extase Mascara | http://goo.gl/cHrAJJ
Lips:
Mac Pro Longwear Lip Pencil Etcetera | http://goo.gl/LHBBSv
Mac Lipstick Pander Me LE
FOLLOW ME FOR MORE FUN:
WEBSITE | http://www.mallory1712.com
INSTAGRAM | http://instagram.com/mallory1712
TWITTER | https://twitter.com/mallory1712
PINTEREST | http://www.pinterest.com/mallory1712/
Fave Place to Shop:
ShopLately | http://goo.gl/a3oXfB
My Favorite Hair Styling Tools:
NUME | http://goo.gl/A2wHv4
NUME Titan 3 Wand Set | http://goo.gl/6i0a2T
Fighter Diet Greens | Great for HAIR, SKIN, and NAILS |
Disclaimer: Some links are affiliate links. I get sent a lot of fun free goodies, and when I decide they are good enough to mention, I feature them in my videos! All opinions are always honest and my own!
By hi, you guys today is a hair tutorial, but it's not just a hair tutorial. It is let me take a moment. Oh a collab, with Melissa for Missy su blog. She has an amazing YouTube channel and an amazing blog, like I have been repenting and painting her hairstyles for the longest time ever, and I just recently for some reason discovered that she had a YouTube channel and I about flipped out - and I just purch watched all Of her videos and learned so much I mean she is the braid Queen, the hairstyle Queen. So I am just freaking out right now that I'm doing a collab with her, because this is a huge dream, collab and she is beautiful and you guys once you see her hair like once, you see her hair, you are going to pass out. She has the most beautiful hair I've ever seen in my entire life, like for real for real. It is just long and flowing and thick and just beautiful, it's its dream, hair. Okay, it's dream, hair! You guys seriously! You'Re gon na want to miss a beat with her channel and her blog, oh she's, just amazing, but today's tutorial, what I'm doing with my fine than medium length hair is I'm showing you guys, since you have requested for so long so many times how I get My beachy waves, and also how I twist my bangs like this I've had so many requests. So I thought this would be perfect to include in this collab. So if you would like to know how to get just beachy messy carefree waves for fine to medium length or thick to long length hair, I think this you know technique will be for everyone just keep watching and I hope you guys enjoy so I've already prepared. My hair, with a heat protectant and I used bumblin mumbles hairdressers, invisible oil primer. This protects up to 410 degrees and you can go over your hair, like with a straightener like 40 passes and it's still zero damage. This stuff is amazing, so I've already prepped my hair with that. Now it's time to sectional, I'm just going to go with my part that I have here split it in the middle in the back and clip off this entire side section. Now I'm going to section my hair on this side, leaving a little bit on the bottom layer. Now I like to do my hair in three layers. I have very fine thin hair, so that's all that I need to do, but if you need to do more, that's totally okay still going to work. Now I Section I like to I like to section this bottom half into two sections. That'S all I need because my hair so fine and I like to start curling now. I always want the sections around my face to go towards the back. So I'm going to start with this section going towards my face, so I'm just going to wrap this around. Also, I forgot to mention this is a Hot Tools: tourmaline one-inch curling iron and I like to leave about an inch of the ends out and I like to hold this for 10 seconds. And then I can just go ahead and release. And then I like to pull from the bottom and hold this for just a few seconds to kind of loosen that curl now I'm curling this section away from my face, leaving about an inch or an inch and a half, you can really vary throughout the head Of ends out, because that will give you a more beachy appearance, so just holding this for about 10 seconds, I'm going to release and again pull down on that curl to go ahead and kind of loosen it up a little now on this section of the hair, I'M going to go ahead and start with the back going away from my face and the section right here going towards my face. So we have a little bit of a broken up pattern there and again just hold for ten seconds and release and just go ahead and pull that curl and, like I said, we're just going curl this towards the face, leaving about an inch of ends out now On this top section, I'm going to curl the back section towards my face and the front section away from my face, and we kind of planned that with the layers, because I wanted this part to end up away. From my face, like I said, you're just going to hold this for 10 seconds and pull the curl and we're going to go ahead and repeat that, on the other side, you now that the whole head is curled and ready to go. We'Re just going to let this cool and once the curls feel cool, we're going to separate them, and I'm going to show you my favorite products to finish off the look because I feel like the method of curling is right up there equally as important as the Hair products, hair products have a big part to play and sort of beachy curls are really any style that you want to create. Okay, now, our our hair, our curls, have cooled and I'm not going to brush these curls out. I'M going to separate them with my fingers kind of like this, and it just causes some nice separation instead of blending. The curls like a brush can do so. As you can see, a lot of separation is happening and some movement and it's not perfect and brushed together. So that's really important. If you ask me just not brushing the curls when you want them to look a little beachy but pulling on them and just sectioning them with your fingers. I think that is the way to get the perfect kind of beachy look. So I'm going to layer some of my favorite products that helped me achieve the beachy look, so I'm going to use bumble and bumble surf infusion spray. This stuff is amazing. It gives you kind of beachy texture without the grit, so I'm just going to go ahead and go section by section, and you got to make sure that you really shake this stuff and I'm just going to spray this. As my hair falls see, you can already see a better kind of livelier texture kind of beachy non-caring kind of look. The next key ingredient for me is the bumble and bumble thickening a dry spun finish spray. I'Ve used this for a very long time. I'Ve gone through many bottles. If you have fine hair like me, you will love this for achieving volume without having to tease your hair or anything like that. So you just go section by affection and just kind of spray it in, and it just creates a lot of nice kind of thickening movement. That'S the best word that I can think of it really thickens up the hair. You know it gives it a matte kind of finish and just really just gives you movement, I'm all about movement, because I barely have any with my hair. So you could leave your hair just like this, but I am going to show you guys how I twist my bangs a lot of you requested a tutorial on this. So I thought why not include it in my beachy waves tutorial, because it kind of goes really. Well with this look - and I just blow a bubble in between my teeth - I hope you guys saw that so I'm using my favorite bobby pins, these are from Sally Beauty, the meta grip premium, Bob pins, that's what it says, and I usually only need about one Of them, so I'm going to go ahead and what I like to do is take a pretty big section like this, and I take it it's about. Oh gosh. I would say about an inch and a half thick and I just split it in half like that, and I take the first the front section and I twist it over the back section, grab a pretty thick, a thicker chunk than what we started with and just Repeat those steps and just make sure that you hold the twist or it can untwist and I'm just going to keep doing this until I kind of go I'll, show you guys right out around the temple, because I want my hair to be kind of loose right About here and then that's when I'm going to pick up a section right here and leave that hair in front of the temple, because I like the way that looks kind of loose right there and I'm going to just twist it over again. And I'm going to stop right here like this and I'm just going to finish off the twist and just twist it until we get to the end now. This is when I take my bobby pin and I stick it in the end of the twist and I hold it and then I go ahead and section by section pull the twists not completely out, obviously, but I pull them to kind of fatten them up. So they're, not real. You know tight against my head. I just do this right about until there take the bobby pin out, and then I like to lift a section right about here. Not all the way in the back of my head, but right about there right where the beginning of the back of my head starts, and I like to pin it under that section of hair, and I take the bobby pins. Stick it in going towards the back of my head turn it around, and then I have it go in towards the front of my face and that's called jackknifing or whatever you want to call it. And then I place it right over and you only need one, because these bobby pins are amazing and then this is when you can kind of pull it a little, looser just like that, and then there is your final twist now I like to spray my hair And I am using my favorite hairspray of the moment: it's the OSIS elastic finish hairspray. I love this because you can really you know after you spray it. You can still run your fingers through your hair, so I'm just going to lift the hair and let it fall and then just kind of shape it out like that and we are finished. This is how I get my beachy waves on the usual day, so I hope you guys enjoyed this tutorial. Let me know in the comments below there's any other hair tutorial. You would like to see, and just remember the best part of doing beachy waves is they relax as the day goes on, so they get even Beach ear, even prettier, and it's really just it. It looks like you didn't, put any effort into your hair, but you look kind of really casual cool. You know what I mean faking it till you make it. So. Thank you so much to Melissa for Missy soup blog for doing this to this little tutorial, collab with me. She is amazing. You guys you will not regret subscribing to her subscribing to her blog. She is like my favorite all-time hair person on the face of the earth, so I am so honored to be able to do this collab with her you guys seriously. Once you go to her channel, if you're not already subscribed, you're going to be hooked - and you are just going to like purge - watch her - it's just she's amazing, so that is it for today's video. I hope you guys enjoyed this tutorial in this collab. I love you guys and I will see you in the next video bye. You guys hi, you guys and happy Wednesday, it's time for Wednesday wisdom and I'm really excited to kind of talk about this because of some comments. I'Ve been getting I've been getting a lot of comments like this
Comments
Sarah K: Awesome tutorial! I have fine, thin hair and will definitely be giving this a shot! Thanks so much for this!
Jamie Ryman: Love it! Thanks for doing a hair tutorial
Missy Sue: Love it, girl! You look fab and such a fun collaboration!!
gaslightanthemfan: Thanks for sharing this with us, I'm going to try this hairstyle all summer!!!
Berit: That looks great. Love the twisted fringe
JoLeonhartt: That looks amazing! I'm always so annoyed with my thin hair and never do anything with it. But I will try this tomorrow -thank you!!!
Nays Place: Gorgeous I love this look!! You look so gorgeous! x
Mrslolalynn: I loved seeing step by step how you did this!!
Alyssa M.: Loved this!! I always struggle with holding my curling iron the right away to curl towards/away from my face- but after watching this I think it might have clicked for me!
Chellybelly813: Yay! I love this look, and I still use Bumble & Bumble because of your suggestion! I also have very thin hair! xo
deannapav: Thank you for sharing this hair tutorial loved it!
harrypfan75: Love it! I have very fine, thin hair too so I will give this a try!
Jen Morrison: love this! so cute! i'm gonna have to try it!
Wendy Mendoza: Love it! I'm so gonna try it!
Simple Beauty: Beautiful, can't wait to try it! Can you please do a tutorial on your makeup, love it! Xo
Brittany Kantack: i didn't know beachy waves were cool. my hair naturally does this. I've been straightening or putting more curl in my hair since high school! cute tutorial. I also twist my bangs. ^.^
sophiastorerxo: Omg this would look amazing for a prom ♡ This is so gorgeous!!! Love this hair look ♡
Julie Nolan: Thank you so much for this!! I will be trying this tmrw for work!!
Sara Grace: I loved this! I have a very similar tutorial but I grab more hair in each section and don't twist it all the way back if that makes sense lol... but I like the way you only picked up hair in the front section and pinned it further back, I am going to try it this way next time! Annnnnd you are so right about Missy, just checked out her channel and I am jealous! XOXO
Starry Melissa: Ohhh this is great for Spring / Summer & the hotter weather coming . Thanks a bunch ! Subbed to Melissa's channel as well .
Alison Corbett: So helpful, I'm growing out my bangs right now so I think with a few more bobby pins I can make this work nicely.
laineybugger: Oh girl I've been waiting for this tutorial ❤️❤️❤️
Poupée Girl: I just watched your videos the entire day. You look great with straight hair! Your nails are also to die for, nail video please! :)
Ana: omg your tutorial is so helpful! thankyou so much!!
Melissa Rose Bruner: SO pretty!! I am going to try that twist ♥ xoMelissa
kathryn estler: your hair looks so pretty like this. Hope you have a great weekend huggs
YG: I always thought you knew about her that's so funny! This is so freakin cool!!!!! One of your top collabs ever!! So off the walls happy for you!!!
skylilly1: Looks super cute!
Bzg: Hair and makeup are so on point! Stunning. Are you going to do a tutorial on the eyes?
razzldazzlrose: I really like the Bumble and Bumble Dryspun Finish Thickening spray, but I wish it weren't so darn expensive! I went through my bottle way too fast. Since then, I've been trying all sorts of other "dry thickening" sprays to see the differences. So far I really like the Garnier Deconstructed texturing spray, but the spray isn't quite the same. I've also tried the Loreal Boost It volumizing spray, one by Joico and one by Fave 4. The Fave 4 one is okay. The Loreal and Joico sprays are too direct and don't provide a fine, even mist. So...yeah, those are my thoughts. I just felt like sharing. :)
megan lash: Thank you!!!! I love your hair :)
Andromeda V: Very cute Well done!
Cristina Renteria: I finally pin pointed who you remind me of. Emma Stone and those fabulous, beautiful collector's 1950's Barbie dolls that look seductively to the side. You are a beauty and have become a favorite to watch. xo.
melissa63881: Beautiful!!
Stephanie Pratt: Your so beautiful and I love that hairstyle! I have total opposite hair mine is so thick lol
Adriana Pina: Gorgeous!
Beauty By BeeZee: Very pretty!
Kathleen M: such a lovely hairstyle ... I have fine hair ... I have to try it!
Lydia Mccoy: Yay!!!! So excited to see how you do this! I've been one of the ones requesting... A lot... Can't wait to try it!
Jemca: Loved it
dvoted4life: love this t4s went to missys channel and loved her style subbed again t4s
oshmommy: I have a funny word thing for ya. To purge is to rid yourself of something, maybe binge is the word you are looking for. Binge is to take in large quantities quickly. I absolutely love both you and Melissa! You are my blonde goddesses of the YouTube! This was a great look!
BostonBarbieDoll: Love it!! I would like 2 see a tutorial like the one in your "Halo Eyes" The up style you wear most often. Where are you from originally? -xx's
Brianna Elizabeth Freedman:
somethingtoconsider1: Cute!
photosbyjen24: What are those yellow hair clips called? They look like they will hold my fine and thick hair better. Thanks
Kristina Tanasko: will you soon have a chanel summer collection review?
natASMR: I LOVE THIS!!!!! You so purtyyy
MykaleBlack: Your hair is getting longer :)
dida b: from algeria toooop Nice