How To Cut & Style A Synthetic Curly Wig & Make It Look Natural
- Posted on 22 January, 2022
- Bangs
- By Anonymous
How to cut & style a synthetic curly wig and make it look real.
Cutting a curly fringe / curly bangs bangs and layers at home.
Rad Swan Wig in shade 02, shade Dark Brown: https://radswan.co.uk/products/radshap...
Headband is the Rad Grip, also from Rad Swan.
Lip Colour, Lime Crime Plushes in Milk Tea: https://rstyle.me/+ugSExwjqnF39E1zkxUA...
Blog - http://www.samio.co.uk/
Instagram - https://instagram.com/samiorenelda/
Home Account - https://www.instagram.com/samiohome/
Style Account - https://www.instagram.com/samiostyle/
Twitter - https://twitter.com/samiorenelda
Pinterest - https://uk.pinterest.com/samiorenelda/...
*Items marked with a (*) have been gifted as part of previous paid collaboration, however I have picked these out myself and I not been obliged to feature or mention these items in this video.
**Items marked with a (**) have been gifted, however I have picked these out myself and I have not been obliged to feature or mention these items in this video.
***Items marked with a (***) have been paid for in part, or full with gift vouchers, with no obligation to feature or mention within this video
--EQUIPMENT--
Vlogging Camera: https://amzn.to/2kYLqKa
Main camera (Canon 5D MKIV) - http://amzn.to/2plTnvv
Backup Camera (Canon 80D) - http://amzn.to/2Ixpcti
Lens - Sigma 50mm 1.4 ART - http://amzn.to/2FMzLLi
Lens - Canon 24-70mm f4L IS USM - http://amzn.to/2plxgp5
The links used are affiliate links. This doesn't affect you when purchasing from any of these sites, it's just means I receive a very small percentage of commission on any purchases made, which comes from the retailer and does not affect the price you pay.
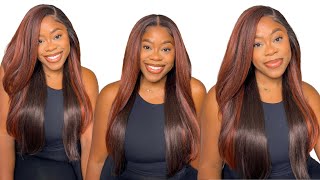
Hello welcome back to a new video if you're new, i'm samio and in today's video i'm going to be sharing how to cut and style a synthetic curly wig. If you follow me on instagram, you may have seen me wear this wig quite a lot recently, as it's been my go-to protective style, i've kind of ditched the box braids and full locks for this winter. Just because i really can't be bothered and a wig is great, because it also doubles up as a hat because it is freezing hair. So i'm keeping my hair under wraps in little plaits, which i'm gon na, show you in a minute um and it's keeping my hair nice and protected, which is nice. It also is a great chance to play around with a different style. Whilst i'm giving my hair a little rest and letting it grow, so if you want to see how i did this style, i didn't create the wig, but i trimmed it into this shape and how i styled it and all that good stuff then keep on watching. So here she is, if you follow my instagram, you may have seen me already style this for a real, and i do already have this exact same wig. However, what i found is, i keep wearing that particular style tied back in a pony which i really like. I find it just nice for day to day, just like tied back and out of the way and as i've been doing, that it's kind of like molded to the shape of a ponytail. So i thought i want to get another one of the same styles. So i can wear this one out and down and keep the other one for a tied back style. So i thought it'd be the perfect opportunity to show how i style it in a longer form. Video, because obviously a reel is quite quick, so this wig is from rad swan and this is shape. Zero. Two you'll see it comes with a front lace and the first one i had of this wig was my first experience with a front lace. Wig - and i was a little bit nervous at first because i thought it was gon na be so tricky, but actually it's very easy. You just have to trim this yourself. So when you're cutting your lace, you want to make sure that you're cutting it jagged. If you cut it too, neat it'll just look really obvious, so you can't really go wrong here. If you cut a little bit too much of the baby hair, you can always cut in more later on. So just don't worry. I was a little bit nervous about this at first, but once you get going, it's quite easy. I actually find once you've kind of cut your first piece. The easiest way to do it i find, is just to hold it up like this, and then you can see the edge and continue to cut just like that in a sort of zigzag motion. So now i'll remove this, so i can't comroll or anything. So i just do a few separate plots on my head like this, and then i just slick them back. I also purchased the rad grip, which is like a headband that goes underneath. So it's up to you whether you want to wear a wig cap with yours. I'Ve used this one loads and i find it really really convenient, so it just velcros in place and i adjust it and i could tie the plaits back, but i'm just going to tuck them in to the headband like so and then in here you have a Few grips, i don't tend to grip the front ones and i've never had a problem with it. I just gripped the back one and there's this elastic bit. The elastic bit goes to the back of the head. In fact, let me loosen this because my big old head will uh find this a little bit too tight. Okay, so i've got this elastic band as loose as it'll go now, so i'm just gon na pop it on. So you just want to adjust it into place, so here it is initially. Obviously, you can glue down the edges if you want, i don't bother doing that, because what i actually do is i wear it all forward with a fringe which we're going to trim in shortly, but just to show you this particular style at the moment. I think this one has a middle part, naturally um or you can put it into middle part, at least, and if you see the rad grip underneath it's got like a nude part, so that, if it shows your scalp, it actually makes it look more natural, which I really like, and you can actually put that red grip to either side if you wanted to side part as well. So as you can see, it's very defined and together at the moment. But what i'm going to do is i'm really going to start to separate these curls just to help make them look as natural as possible, and i'm just going to finger detangle these and really gently pull them apart. You don't need to use a brush or anything. Your fingers work. Fine, you might want to go to town on this for a while, because as you'll notice, they're really rebellious and they're wanting to like clump together in this really twee look but we're gon na rough them up, and i find adding that frizz. I think really adds to that natural look, which is what we are going for today and just like with natural hair. You just want to make sure that you're doing your finger detangling starting from the tips of the hair and then working your way up slightly, and it is normal to find some of the hair come out as you pull it. But don't worry. There is enough hair on this particular wig you're, not gon na miss any of it. I promise so, as you see, we've added quite a bit of volume. If you know me, you know i, like volume, also now i've combed it out like this. It'S making me want to not put a fringe in it, because i quite like the middle part. I like this, but we are going to cut a fringe because samuel you'll wear it more of a fringe and yeah. This is cute, but let's go with the fringe. We'Ll go with the fringe, because that's what we're doing for the video anyway and then from here we'll begin to trim. So now, i'm just going to pull a few hairs from the front. Oh my gosh, why do i love this as well? It'S like some 90s tv character anyway, we're gon na trim these parts and you'll see i've tried to go as close to the hairline as possible, but still grabbing a big enough chunk that is gon na make a difference when we give it a trim. So these are just gon na start to form the start of the fringe and a little bit more baby hairs. So that's the first cut as i'm cutting this i'm always being careful like if in doubt cut less and then you can always cut more afterwards, because of course it is curly, so it will spring back up. So just be aware of that. Before going to town with the scissors, so that's that initial part, this is just a bit that will kind of form the under part of the fringe. Now i'm going to take these clipped bits down, give it a judge, and now i'm just going to kind of grab the front middle section that i'm going to work the fringe from i'm just gon na use a bobble to tie up the rest. For the time being so this is what's gon na form the start of the fringe. Again we're gon na. Take it nice and slow, just breathe, don't get scissor happy! I'M saying this to myself, because i always do last time it turned out right. So, let's hope that it does this time as well, these very front bits that are going to be shorter, i'm going to kind of taper it around the face and then i'm going to graduate it around, not a hairdresser. By the way, i just kind of go off my own technique, but, like i say it worked well enough last time i might actually clip these very side bits out of the way to start so i can just work on this very front section now so here I can go a little bit shorter because i say trim with caution and then you can always take more off afterwards and i'm not too worried about the frizz hair because, like i say, i just feel like it makes it look more natural, and this is just Gon na layer up the fringe anyway, i'm gon na leave that like that for now also, i should probably add i'm cutting all the hairs at an angle and i'm trying to get as small a trunk at a time as possible, especially with these front bits. Just so that it just looks as natural as possible and kind of blends in as evenly as possible and as you'll see i'm starting to taper it round the sides of my face ever so slightly. So, as i get to the edges, i'm not going to go as high up as the middle. I'M just going to kind of go down around the sides and that's why this kind of like not stuck down. But it will not matter once it's all cut in place, so here it is starting to take shape. Don'T worry we're not done yet i'm just going to take down the rest of it to see what we'd get going on um. So you can already see we're starting to form a little bit of a fringe, but we have a lot going on up top, so i like a really rounded shape, with a little bit more volume on top, so i'm also going to blend in these bits. Taper a little bit more around the edges of the face. Just so you see here, we've got a bit of a step. I want that to blend, and i also want a little bit more rounded volume on top as well and again, it's just pulling these bits from around the crown area and then pulling them forward and you'll see them start to like bounce up more like we're already Starting to really get that shape, which is what i'm going for, you also might want to grab a few from the back as well. The back of the crown should i say, but again be careful, don't cut too much, don't go too low down. So i'm just working around this crown and just cutting off the same amount from all angles and it seems to seems to do the trick. I'M really pleased with how that is all starting to look on the top. Now i'll probably end up chopping a little bit more, i'm already going to chop a little bit more. I will probably end up chopping a little bit more in a little bit, but i just want to work on these side bits for a while. Now, because you see how we've got these really long bits next, on my face, these need to kind of layer in, shall we say, can you see i'm just pulling this section down the bit that just feels unnaturally long next to the rest of it, because we've Got this step and i'm just gon na clip clip, i don't know why. I said it like that clip wow. How many times can i say, clip so we're just gon na clip that out there and you'll see we've got this bit that i just need to blend in a little bit easier like so we actually go a lot shorter with these bits. But, like i say, don't get scissor-happy, we will come back to them if they do require about. This is probably a better angle for you to see it. There we go yeah, it's happening. It'S blending. Do you see how we get in this nice rounded shape? I could really feel myself trying to get scissor happy. Then i felt like i was like a pro hairdresser i had to. I had to slow down for a moment, let's just uh, let's just unhook that bit. Oh yes, that is, do you see what i mean like the shape is just compared to this side. We'Ve got all of this triangular motion. This is just blending in, like i say i do feel like. I can still take a little bit away from the face. Hair because i like it whilst it is in my face, i do like it to kind of be off it a little bit, but you know this is starting to take shape. I'M gon na i'm gon na trim a little bit of these bits here. Just to add to the roundness i have to say i find this very satisfying. It'S like you're, making a creation. I mean it's not like. I made the wig, but i have to say if this is the satisfaction that hairdressers get when doing a cot. I feel ya look at that. That is good, oh, that is that shape is just delicious, so these are the hairs that are really close to the edge of the wig. So i guess it's we can class these as baby hairs. I don't mind cutting these. Quite a bit shorter, with precaution, of course. So already you can see this nice shape compared to this side, which we still need to do a little bit of work on again. This side's taking shape nicely just want to get these stragglers here. I'M gon na kind of trim some of these front bits a little bit more because, as you see they're just kind of hanging a little bit too much in my eyes. So again, i am going to go with caution and the tiniest bit needs taking off these bits. I'M gon na do a few more from the top. Now and now it's just any last minor adjustments and trims here and there to finish off. This is just me deciding if i'm done or not, because sometimes with trimming your wig, the hardest part is to know when to stop, and i think i'm done. I might end up trimming a few extra bits later on, but for now i'm going to stop here because i'm liking the shape i'm liking the volume i'm happy with it. I can't fully see the back, but we're just hoping that it's all good. This is a good thing about being a wig, because you know it's not real hair, but also the bad thing about being a wig. Is that it's not real hair because it won't grow back, but it's fine i've. I feel, like i'm happy with it. This is my second curly hair, wig cut um and yeah, i'm pleased with it. So that is how it's done. This is my protective style for the foreseeable, like i say, i'm keeping my hair back as much as possible in those plaits, and this so far has been great like every time i take my hair out. It just feels nourished and good. So hopefully that will help retain some length and it's nice experimenting and playing around with a different style, whilst my own hair is getting a little bit of tlc, so that's it. I hope you enjoyed this video. I will leave the link to this wig and anything else. I'Ve mentioned. I don't think i mentioned anything else, but i'll leave a link to this wig in the description and the color, the name all of that stuff. If you enjoyed this video and found it useful, please do give it a like and hopefully i'll see in the next video thanks for watching bye. Oh, i just realized. I didn't do the all-important, wig grip test, so i'm going to do it for you now we ready it's foolproof baby. No, but i actually just cut more of the top, and now i think it looks better right. I'M gon na go. That'S the end of the video thanks for watching bye.


Comments
Mali Hayes: I’ve been wanting to try a wig for so long and you’ve inspired me! ordered the same one! would also looooove a longer curly one too! thanks for the inspiration lovely lady x
RadSwan: Absolutely gorgeous!!! You make it look so easy and bangs look amazing!!!
Michelle Burden: Excellent!!! You look beautiful and the wig styling was incredible!!! Thank you for this video! Love it!!!
Amber Dee: Lovely end result Samio, thanks for the inspiration, now I’m gonna see what I can do with my Radswan xx
Yvonne J: This is fantastic! Thank you for sharing; I just purchased this same unit last night I was finally convinced after watching you! I will be tracking the UPS man like a bounty hunter, LOL
Valedah7: You did an excellent job, you have an eye for styling hair.
Dolores W: That wig is gorgeous!
Merrybandoruffians: Where did you get the turban at the beginning of the video? It’s really cute
SuperSkinandHairCare: You have a lovely spirit. Thank you for the video.
Yvonne J: Ohkaaay Ladies, my #2 unit has arrived, the UPS man will live to tell his grandkids about a crazy recipient who climbed aboard his truck and attached herself to his windshield wipers to get her Radswan order - I'll be following your styling steps above, one by one, to shape my unit like yours -- I love the shape. Pray for me, lol So happy to have rec'd my Radswan unit...❤
Valedah7: Are you from Ireland? I love your accent.
June: Not available in India.... I love it ....
Sofia: ur so pretty