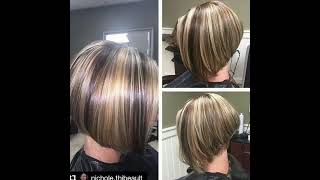
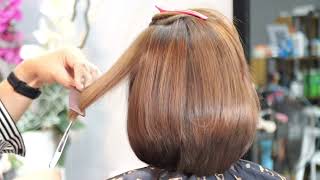
Short Curly Women'S Graduation Haircut Tutorial - French Inspired Bob
- Posted on 11 March, 2022
- Bob Hairstyles
- By Anonymous
Learn how to do a graduated French inspired bob on curly hair. Instead of using vertical graduation Russell horizontally graduates the bob. This method give a more solid shape and bevels the graduation for a much rounder shape. Horizontal graduation is perfect for this shape and style on curly hair.
Social Links:
https://www.facebook.com/JataiFeather
https://www.instagram.com/jataifeather...
https://www.youtube.com/user/JataiFeat...
https://www.pinterest.com/jataifeather...
https://twitter.com/JataiFeather
FREE Jatai Academy Education:
http://www.jatai.net/jataiacademy/
Shop Jatai Products:
https://www.jatai.net/product/jatai-to...
Russell Mayes
https://www.instagram.com/russelllmaye...
Welcome to jatai academy today we're going to do a cute little round french inspired bob on some hair with a curl, and i want to keep that kind of beveled around the front. So let's get started all right, so we're going to get started here in the back, i'm going to take a natural or center part down to the occipital bone to the mastoid, all right! So since she's already a little cropped back here, i'm just going to take that a little bit tighter and i want to really bevel that in so i think what i'm going to do is i'm going to start horizontally and then just stack that as i go Up so each step, i go up a little bit. I continue my horizontal graduation that go up and out now i'm not worried about it being too perfect right now. I just want to get the general shape of this in i'll. Do the same thing on this side, follow the center length that i had, as i start to horizontally graduate this now. This may end up getting quite a bit shorter. That'S why i'm not worried about everything being absolutely perfect! I just want the basic rough shape in so then i can fine tune it later. Now we're just going to kind of check and make sure that we're somewhere in the general vicinity. This is kind of like cross cutting. If i was to go through normally, i would take a vertical section and hold out and graduate and then walk that over and walk that back to the left, and then i would go through and cross check it. So i'm basically cross checking it and just guessing at what my graduated shape is going to be and then i'll go back in and cross check vertically and clean up my line that way. Okay, once we got that kind of fitting in like i want, then i'm going to continue up and start to build my bob shape now here i want to hold this at that elevation, so whatever the head shape is showing me is the elevation that i'm going To hold it at so right in the center i'm going to take a flat little section comb it out find where i should hold. It find my length cut my length straight across and i'm holding it at that elevation as i come into the next little flat section find my elevation there's my line underneath get that down cut that across here. There'S my line, it's showing me to hold it there. So that's where i'm gon na hold it so the head shape is showing me the exact elevation that i need to hold it at there's my line cut that across there's my line underneath cut that across make sure my elevation is proper check that all the way Through again at the proper elevation, looking pretty good check, my links see if they match and they do so. Let'S move on to the next piece. So now we're going to start in the center again and i'm going to go off of the head shape to determine what the elevation is going to be. So my elevation is going to be like that and i'm just going to keep elevating at whatever the head shape is showing me as i go up the head. My next piece: there's the proper elevation now an easy way to find it. If i don't want to hold my comb there, every time is when i comb the section at where i think it should be. I think it should be there. If i look here at the root, if i hold it too high, you can see how the roots start to get really soft. If i hold it really low, you start to see the the hair curve across the head and it starts to reflect and get real shiny. So i want to rock right between the two: that's the elevation right there there's my line. I'M going to cut come on straight across now. Remember i want this to kind of go straight and bevel at the front, so i'm working my line now. This is just going to take a little trial and error until i get everything just like i want, and i think a little bit more right there in the front. Now you see right here, it's showing me to hold it straight down, so i'm holding it straight down at zero elevation. We'Ll take a look at that see how that's looking. That'S not looking bad, we'll have to clean our transition right here behind the ear up. But that's looking pretty good, so, let's move on to the other side check that out a little bit right there, a little bit there looking pretty good, let's check our face out and that's not looking too bad, i'm going to start in the middle and do exactly The same thing i was doing before using the head shape to show me the elevation for my graduation comb out smooth, there's my line cut that straight across next piece. There'S my elevation cut that straight across next piece. Here'S my elevation follow the guide and continue until i run out of hair. Now, as we as we near the top, i have an off-center part. So what i want to do is i want to match that off center part on the heavy side and that's the highest that i'm going to elevate both of these sections on each side of the head so that the elevations match. I don't want to over elevate this higher because then i'm going to bevel this side more than i'll bevel the other side just following the guideline underneath i'm trusting my elevation getting that and then this side here. I want to remember this section here so that i don't elevate it too high. I want to elevate it right where that last section was which is going to be somewhere about right there about right. There there's my line from underneath, get that and then the last piece on this heavy side same elevation that i did for the last two sections. If i feel that this builds up too much weight, i can always texturize that and thin that out a little bit, but i want the elevations to match as closely on each side as possible. I can change the weight distribution through other ways very cute. Let'S do the other side so now, since on the heavy side, i have a bigger parting right through here. I am going to go through and bevel this front a little bit more than i will the other side. It'S still going to stay asymmetrical around the front, but i just want to round this shape out a little bit through here and i'm going to follow the same sort of elevation guides that i was using before by using the head shape. So here's my head shape. There'S my elevation, i'm just going to visualize where this is falling and where i want this to kind of come from, so we're going to start about right. There take that across and then see how that's going to fall and if i need to take more off or less, but i just want to pay attention to. I want to make sure that i'm beveling everything properly and keeping the shape round. I don't want to build any kind of corners into it, so so i think that's looking all right. I'M going to take a little bit on this side to match the flow. Just take a little of that and bevel that front corner check. My lengths check my flow, i think that looks pretty good, so let's go through and dry it and then i'll go through and clean up this nape area a little bit more. So i got everything dry and i want to just go through and really fine tune. This nape area, where it goes from straight to curly, and fit that in a little bit tighter. So i'm using my tokyo thinning scissors and i'm putting the cutting blade on top and i'm going to start and just follow the line that i already had there and just go through and do a little scissor over comb to release some of that weight and make That a little bit softer and a little bit shorter and drop my comb clean that up a little bit through there by just visually, seeing what sticks out and just cut off. This is just purely visual, seeing what sticks out and then cutting it off and kind of whittling it down into shape, and once i feel like you know, that is not bad. That'S pretty good! I would charge for that. Okay, i think we're looking, i think, we're looking pretty good. This is our end shape. We'Ve got a nice little beveled little bob a nice fit in clean in the nape. You know a little, even at the little bevel around the front, a little off center part. I think it looks pretty good, and the thing about horizontal graduation versus vertical graduation is vertical. Graduation tends to give you a much stronger corner than a horizontal graduation, which will automatically bevel your shape and cut a curved line into it. If you're going off the head shape, so for something like this, where you want a little bit of bevel to keep it from getting that kind of like corner and bell shape to it, i think that this works really well. So thanks for checking it out, please check out the jatai academy, there's all kinds of stuff on there that will make you a better hairdresser and we'll see you next time. Thank you, foreign. You

Comments
anglebobcut: Very nice.