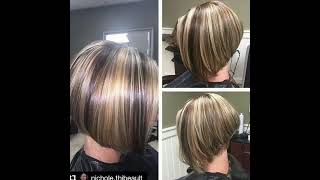
Perfect Textured Bob Haircut & Hairstyles Tutorial Step By Step | Layered Cutting Techniques
- Posted on 06 September, 2022
- Bob Hairstyles
- By Anonymous
How to: Textured bob Haircut & Hairstyles Tutorial Step By Step
Layered Bob Cutting Techniques
"I Love Haircut - I Love Hairstylist"
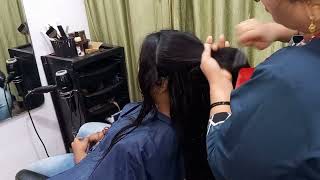
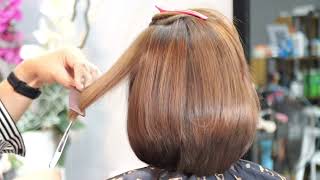
So what i'm going to do is before i go back to cutting i'm going to do a quick recap of what we've done already. So this is going to be a beautiful bob to the jawline. We'Re going to have a really nice textured, layered haircut, which comes all the way to the front into a fringe and connects. So it's just going to be a really soft commercial, bob, very nice texture in the front and something you can do in your salon. Every day as well, so how did we do this? We'Ve literally just started, so you didn't miss anything. What we did was we used our comb to start by cutting the outline with the scissors in the comb and when we had finished doing that, we put the head down. We placed the cone coming down to the very bottom and then at the end we put our fingers in to then remove any graduation. We see sticking out from underneath the reason we do this is because we want to remove the graduation before the end of the haircut, so people normally blow dry then check the graduation. I do the opposite. I put the head down and i remove the graduation before so that when i finish and i start to blow dry, the haircut is actually finished, so i don't have to go back and then we've got a really nice clean line with no graduation. When you come up, so the secret is not a lot of tension up putting a nice shape in with your comb and then head down slightly comb it and then only put your finger in at the very end, all right so guys, because you were telling us Before tell us again, where you're tuning in from what are you doing today if you're liking the haircut and if you have any questions so as we go through, i'm going to be explaining each step so now that we've done that baseline from the occipital bone up There we don't have to worry about the graduation, so in reality, when you think about when you do a haircut, you never see the graduation from the underneath coming from the top of the head. It'S always underneath, so the graduation always comes from below the occipital bone. Once you've started to work above the occipital bone, you don't have to worry about the internal graduation, the one underneath your line does that make sense to everyone if it does give us a thumbs up, let us know, if not i'll, be more than happy to explain It again, oh - and we have vasily here to ask me any questions that you guys have as well, so we keep the hair nice and damp, and then we start to work through our line technique again so combing the hair nicely from the roots down making sure We have natural fall before we start, so i really like to prep the hair before i continue. So what i do is i really comb the hair down prep it nicely. So it's all sitting in the right space make sure the head's, nice and upright, and then when i go in the hair, is ready for me. So i come all the way down and i cut on my comb. That gives me a much cleaner line than if i cut further away, so the comb goes from the root to the end. Yes vasily. I think some people ask us to explain a little bit more about the graduation yeah perfect. So i'm going to finish cutting this just so you can see what i'm talking about and then i'm going to re-explain what i meant by that, because i think it's a really valuable thing to know. I certainly help me a lot when i learn about it beautiful so when we think about graduation underneath what we've got to think is where it comes from. It comes from here, and it pokes out the bottom of the haircut okay. So the reason that happens is because, when the hair sits down, if you look at the two sides, when the head goes down, so put your head forward, probably head down, you can see that the sides don't move so much. But the sensor moves a lot. Okay, bring your head back, so you see where my thumb is: there's a large gap that comes when the head goes down, so put your head down again and so that creates extra length in the underneath. Okay. So the reason we get graduation is because of the amount that the head moves when we come up and down. So basically, when you get the graduation it's from underneath here, it's not from the top, so you never see the graduation from here. It'S always sticking out the bottom, so what we do is only from the occipital bone, so from about here is their graduation, not from the top. So what we need to do is when we've cut the hair one two three sections, however many till the occipital bone. We then should cut the graduation out. We do this by putting the head down combing the hair down and cutting out the graduation from our fingers. Once we've done that we don't need to cut graduation out from the next part, because that is not where graduation lives. The graduation lives underneath not from the hair on top so once you've done that, where you've pulled the hair down, you've cut the graduation out, you can put the head back and then you can start cutting the rest of the hair cut without worrying about the hair. Underneath because the hair just sits over the top of that, we'll have one more question following projection for other net graduation, i'm not too sure what that means. Am i following projection. I'M not too sure what you mean by that sorry. If you want to uh write it again, i'll definitely try and answer it. I'M just not too sure what you mean by following the line. Who did that question? He also comments great hands and you're the best. Thank you so much also claire ask you: will you use the same technique on another box, yeah so undercuts? Normally, you don't have to worry about the graduation and it becomes much easier so literally. I would continue the same way that i'm doing now, if there was an undercut, so if the undercut was already there, what i would be doing is, i would be combing the hair down in the same way so from the roots at the top. All the way down to the ends - and i would be using the comb and the scissors to cut a nice straight line through, but so when you have an undercut, you don't have to worry about it about the graduation. But undercuts can also stop you from having a lot of fullness and volume. So if you wanted to do the haircut we're doing today, that's very kind of full and layered and soft. You have less hair to play with when it's when it's an undercut, so undercuts are great if they have too much hair and you want to remove some weight, but maybe not the best. If the hair is a bit finer and you want to create more fullness like we are today beautiful, so what you do is because we just finished the major part of the haircut we've finished the back, i'm going to do another check. So when i check i'm going to check the length on either side, so i take a bit of hair from either side and i pull it down to feel that we've got a nice balance and then i'm just gon na check the line with a bit of Tension when i do this, i never put my finger from the top and push all the way down. I don't do that. What i'll do is i'll, let the hair sit nice and free, and then, when i come down i'll, just put my fingers at the very end with a bit of tension and that way we don't again create graduation or anything sticking out, and we can do this Throughout the haircut just to give a last check before we move on so uh, would you like to tell us why you came to greece this time about the seminar, so i'm here with armor education and armor education? Has these amazing courses they offer with us, and we've been coming here for about four years now, so it's been really nice, it really does feel like home and another family we're doing a creative course with them this time. So it's going to be something really interesting and exciting that they haven't seen here before in greece from us and uh yeah. I think you guys have to stay tuned, so you can follow us at slate, hair education and then you get it. We do a lot of free live education on there as well, and you can follow our classes that we offer in london and internationally, and you can see the creative course coming up beautifully. So what we've got here is we've got the area over the ear. Now again, the hair is not very thick, so i'm in a good position here, where i can actually just put it through my cone and create the length so making sure we comb all the hair really nice first. So we want the hair to be placed where it needs to be before we start. So it's like putting down the really nice foundations before we start. So i almost everyone talks about this area from the ear right and they're always worried about making a hole or what to do here now. There'S a few secrets here that i'm going to share with you. The first secret is sometimes when you do this area and you blow dry. You end up with one long piece behind the ear and i'm going to show you where that comes from now. So if we comb this hair - and we take the section which sits just above the ear and we move the rest of the hair away, so what i'm going to do is i'm going to comb this really nice, i'm going to put a clip here now, this Hair here, if we look, you can see that the hair here naturally wants to sit behind the ear. But what people do is they take this hair, that's behind the ear and they bring it over the top and they cut it and when, naturally, that sits back because it will naturally sit back. You end up with a long piece. So what you need to do is all the hair that sits below the ear. You need to make sure that that comes behind the ear, so comb that hair that naturally sits there behind the ear and then what you can do is you can connect that to your line so making sure that all the hair is together and we connect it To our line so now, when we finish the rest of the front, we know that that's not going to be a problem. The second thing is actually having it too short over the ear, because you haven't accounted for the ear. So the next thing to account for is the ear. So again we separate it. We have this head section over the ear, the front and the back. What we do here is we comb the hair over our finger, so we just gently place the hair over our finger and then we keep combing down and we don't put a lot of tension. So i'm being very, very gentle right now. Aren'T i right very, very gentle: lots of love coming good she's wondering why that happens sometimes great tip. Thank you so much so this is a really good one. For me. We can see if you come from the front here, you can see that my finger is touching the skin, but it's away from the face, and so this is giving us a bit of elevation to account for the ear again. If you come from here the front here, you can see how we're over the ear but we're not pulling it we're, not squishing the ear, we're just allowing the hair to sit naturally over the ear, and then we connect it in, and so that is now accounted For the ear, so now we have the length without the hole and without the long bit sticking out and for the front we can just comb it very gently and we can start to cut with the comb again and now. What that's done is it's a really gentle way of creating the outline in the front that we need so we'll do the same thing on the second side now, and so we'll do a little recap. What i'm going to do is i'm going to ask you to just help me out ellie as well, and you can hold the water spray for me. Thank you beautiful. So again, if you're just tuning in what we're doing is we're doing the hair behind the ear. Now so, if you ever get that long piece that sticks out where that comes from is it comes from the hair that sits, naturally behind the ear. So what you need to do is take all the hair that will naturally fall behind the ear, and you can see from the growth patterns where that hair comes from okay, and what we're going to do now is we're going to allow that hair to sit down. Naturally, so we can move the ear away if we have to and we can come in and start to cut so once we've connected that we move it and then we're going to focus on the area above the ear uh. Do you have a favorite side to start maggie left right? No, to be honest, i normally just start wherever i arrive at, i don't. Actually. I think the most important thing for me is constantly checking my balance. I feel like whether you start left or right providing you actually keep checking as you're going. Then it shouldn't really be such a problem. When you stop checking. That'S when i think most problems start beautiful so again that one the trick is combing over the ear, not a lot of tension. If you use tension, what happens is you'll get a hole at the end of it or if you have the head over, then the hair moves over the sides and again you get a hole. So the concept is keeping the head up very loose, no tension. Just tap the bottom and you get a nice clean line that connects cool so again, just combing the hair down finding that natural full and then connecting it in beautiful. So what i need to do now is come from the front and do a little check when i check i like to come from the front area so where it is, is the two sections from the underneath, so i don't start from the top. I start from underneath - and i pinch those areas between the cheekbones and i come down to check the length on either side. Then i can move my way up and check again. Okay - and this is maybe a millimeter here and there it is beautiful, and so that's it so we have done the whole outline at the bottom. So a little recap for you. What we did was we started at the back in the middle, creating the lovely line using the comb all the way through we put the head forward. Combed down, used our fingers to cut out the graduation afterwards put the head back up. We finished the line in the back behind the ears. We then took the section behind the ear combed it down and connected it from behind and then brought the rest of the hair that sits, naturally over the top of the ear onto our fingers to connect with our fingers and then afterwards, we connected the front okay. So it was done in those stages. It was back ear and then front as well beautiful. So i think now we're ready to start playing with the front. So the front is a lot of fun as well. We'Ve got different sections going on in the front. So if we just pop the head down, we can see we have the two front sections which for me, is going to determine the outline in the front. So how soft it's going to be. The center section defines all of our layering from the back to the front, and then these two sections on the side will be our layering, which will connect from the front to the back. So i'll work through these as we go through, but just to make it easier to understand. If you stand on this side for me, we have the layers which are going to come from the back and connecting to the front which will give us our length in the front. We then use that to connect either side and then we're going to connect through the whole thing using the back lengths. But before we do that, we're going to have a little bit of fun. Okay, we're going to do a nice little technique which is going to allow the hair to be more free. So what i don't want is, i don't want to lose the length here because we have a nice length and we want the hair to be really full, because it's quite fine. But we want to see movement and we want to see texture. So we're going to do a lovely little technique that we show on our curly course, which is a weave cut, and so first thing we have to remove some of the hair. Now again, the hair in the front is not as thick. Why is it not as thick well look at how much hair we have in the back? It comes all the way down to the bottom and then look how much we have on the side. So it's essentially, we don't want to cut the sides, but we want to lighten the back okay, and so what we're going to do is we're going to do some weave cutting so we're going to start from where we want to see the softness. So this will be our second section and we just control our first. So we take a section - and this is where we want to start seeing a little bit of texture. We lift the hair up and we start to very gently just weave out some sections just to create some softness, and what we want to do, then is we want to slowly get rid of some of the ends, and what that will do is it will just Nicely break up the hair as it comes through, creating a little bit of softness and a little bit of flickiness throughout the haircut. Then we move on to the next part and we do the same thing. So we lift the hair up, we come down and we start to weave cut all the way through just selecting the hair that we want to see softness in and then what we're going to do is we're going to take that forwards and we're going to cut At the ends, just because we want to see a soft little bit of difference and that again will just really break up that line and create the softness, but still having balance within the haircut. So we've done that side. We can move it over and we can start working on the other side as well, so again not cutting the front at all, because the front is where we have a weaker hairline because of the density of the hair. And so do you use a specific elevation in this technique? Yeah i try and just use 90 degrees. So i pull the hair straight out, i'm just trying to lift it up, because when i weave i don't go that deep, so i'm just taking the top of the section. So if we see the section doesn't really matter how thick it is because the truth is all i'm doing is when i weave i'm not going all the way down, i'm just grabbing the top of whatever i think is needed, holding the hair out, and i just Start to slice out the ends and that again just gives us that nice soft texture from here as well, so this would definitely be an abstract for me, so this would come under our abstract three. So the reason is because it's slate, what we do is we have our foundational courses. We call them geometric. So those are your classic haircuts. Abstract is what we would consider either more advanced, classic haircuts, mixing shapes and techniques or going into salon creative, and so this would be our third course, our abstract three, because it gets into salon creative, a little bit with the texturizing and disconnection. And then, obviously you have what we're teaching this time in greece, which is our full-on creative course, which is something most clients would be pretty brave, to get to be fair. Okay, great! So that's what we've done to prep the hair to lighten it before we go into our layering amazing guys, don't forget to let us know where you're tuning in from don't forget to ask us any questions. If you have any we'd love to hear from you guys. Okay, beautiful, so we just have plenty of love from people great one, please watching guys, nice beautiful so now. This is a really important part, because what we're going to do is we're going to create the length that we're going to see in the front and we're going to also create the length that we're going to see in the back, and so we're going to do. This by first just taking a small amount of hair from the front and we're going to move away the rest of the hair. So what we're doing here is, even though i'm cutting here, what i'm thinking about is where i'm going with the haircut. So i'm looking at this as a guideline from the back, so i've got to visually pick this up and see where i'm going with it as well. So looking at the length in the front, where do you want to see the length in the front and then where do you want to see the length in the back? So if your fingers were not pointing in the right place, you could end up cutting the hair too long or too short. So again, just lifting the hair up and cutting it in. We can always drop it down and see the kind of length we're creating. If we like it or not, if we want, we can go a touch shorter as well beautiful, says hello. We are the best, oh bless. Thank you so much, and we have people tuning from ireland from greece and from germany. Amazing from ireland is that maria by any chance, yeah yeah hello, maria yeah maria's, been coming to see us for a long time and is a good friend now. So i had a sneaking feeling it was you, maria people's going on from my usa. If they hear a comment, beautiful color nice, so what we're doing now is we're connecting the front to the back. So i'm picking up the hair in the back as a guide, i'm checking where i'm going and i'm removing the hair and all the weight, beautiful debra says, but she loves the way he did. Thank you, debra beautiful. So when i'm going back now, what we're going to be doing is we're going to be connecting it to the length. So i can see my guideline at the back. I can see my guideline at the front and what that means is. I can go straight in and start to cut the hair, and so i love this because what it's done is it's given me a complete guide from the back to the front everything is blended. Now i've got my technique really sorted. I know exactly where i'm going with the haircut from the back and to the front: i'm excited looking good. So now we have these two areas, and so these two areas are going to be how we're going to connect the front to the outline. What i want to save what i want to connect to, and so we're going to take this little clip out beautiful and we're going to start to connect. So i love this as well, because it's been really simple: sectioning we've had the underneath: we've had the center we've had the two sides and then what we'll do is we'll connect the back so for now i don't need all of this. I can just move this hair away for a second and we can start to work on the rest of this hair, so my combing it down what i'm doing is. I just want to connect from the bottom to the top. So again i have a really nice clear guide for myself, where i'm going. What i'll do is i'll come from this side, so you guys can see as well what i'm doing and i'm just going to spin you around. Can you see if you come here? Okay, so we start from the corner and we're going to start to work our way up. So what i'm doing is i'm using pointing technique, because i don't want to create any harsh outlines in this. I want everything to be really nice and soft and blended, and there we go more people - michael's gon na gink from that last texas. Lithuanian. Thank you so much guys that make everything look, easy, loving this haircut. I promise you. If you try it, it will be easy as well. This is why i love this haircut because i find hairdressing quite hard. I think that's why i'm a good teacher, because i never found it easy and i think when you don't find it easy, you kind of have to find easy ways of doing things, things that make sense and are just easy to follow. And so for me having these kind of parameters, these guidelines to work in is what makes it easy, because i do the outline first. I kind of i know that i'm not going to mess up the length and then because i've done the fringe area. I know i'm not going to mess up the layers and now that i've connected the front, i really have no option. I have the front outline the whole of the back outline the whole of the center layering, and so all i have to do now is connect the dots of the front to the back of the top to the side, and it's done. What i will do is, at the end of the program, i'll write, a link to the website. You can go on and get the gowns they're in the uk, so you'll have to see if they ship over, but they are fantastic gowns and we will show you as well and you can do all kinds of cool things like get your logo done on it. As well but in case you're wondering where slade hair education and you can also go on our website at slatehair.com, that was a little plug. I hope you liked it cool. So now what we're going to do is we're going to start to connect. What we've done so first thing is: we can lift up the hair from the center to the fringe area, and all we're going to do here is make sure that there's no bulk at the top now, i'm sure there's not going to be, but i'm just going To lift it up and again, i'm going to be chopping into it, so we can use a nice soft pointing technique. So, even though the outline we've done really strong because we're creating softness internally, it's going to have a really nice blended feeling as well, and because we did our clever weaving technique again. We'Re going to have that element of softness to the whole thing. So we've maintained the weight while creating texture and softness. So what we do now is we just take these sections, which run all the way from the top of the head to the side. So we have at the bottom here, we've cut at the top here. We'Ve cut so guess what we're going to have in the middle hair that we haven't cut and what we need to get rid of. So we can see the length at the there that i haven't cut or that i have cut sorry and the hair at the top that i have cut. So we'll start at the bottom, finding the hair that we've already cut and we're just going to start connecting that all the way to the top. We'Ll have a question nicely from claire yeah. Have you ever done a haircut, but you wasn't completely heavyweight? Have i ever done a haircut? I wasn't completely happy with yeah many times many times. Of course i mean when i was a trainee, i can't say i was the best trainer. I think that goes back to what i said before that i think the reason why i'm a good teacher is because i really struggled in the beginning to understand haircuts. I think when i was in college i mean i was probably the worst hairdresser in the class. To be honest, i think it took me a really long time to feel very, very comfortable, but i think it's that feeling that pushed me to learn every day to want to be better to want to be better. That'S what drove me to go work at sassoon for a few years and become a teacher at the academy just to want to improve every day as much as i can. So i think i've never done a haircut that i'm completely happy with. I think it's more probably the real answer, because every day i want to be better at what i'm doing, and i think the moment. I think that i'm good enough is probably the day i should quit. So that's that's a pretty honest answer to be fair. Great people and hello from latvia from christine hello haircut is amazing and hair colors too uh we're gon na have a good chat about the hair color soon. So i think once i start drying. We'Re gon na have a good chat about the hair color and we can explain everything that's happening as well, so it's really easy what i'm doing here. I hope you guys can see. I'M literally taking the hair from the bottom that we've already cut as a guide and the hair from the top that we've already cut as a guide. So if we lift this up, we can see that. Can you see the center's got a guide and then, if we come from the bottom, you can also see the guide at the bottom. So what we're doing is we're looking for the hair in between and we're looking to connect it so we're finding that guideline and we're just coming in and we're connecting it softly beautiful and that nice pointing technique is just going to give us that beautiful texture. We need, and what we're going to do now is we're just pivoting from the top, because we're connecting just that little section in the middle to what we've already done and then the last one, and so don't worry. If you missed that little bit here we're going to redo it for you now, i'm making you run around here. Aren'T i yeah, but that's okay, beautiful so again for a little recap. What we did was we created the outline okay, once we created the outline, we did a lovely weaving technique where we weaved out hair, and then we cut it, which created this nice texture that we've got where it's more airy. You can see some small pieces in there as well, so it's going to make it really flick out and soft. What we've done after that is. We'Ve got the outline now. The outline we've got for two reasons: one because we cut the center first come around i'll help you out here. So we've cut the center first creating the length we wanted in the middle and then what we did was we came across and we connected from the sides what we had done, and so what you can see now is the last section that we haven't done. So what connects from the top to the bottom? So nothing is it. You sleep, everyone comments, how i lift my comp and you do it the same. It'S one of those techniques - that's invaluable, because it's very important to know how to go from soft texture to strong texture. So i think our all hairdressers, when they're first learning, should sit in front of the tv and learn to kind of move their chrome about. I love it. We should call it the flick, cone club get ourselves a t-shirt. You know it was funny because when i was first taught hairdressing, my first teacher taught me to kind of like flick. The scissors back and forth, and my first boss told me he hated it. He thought i was going to kill someone, so i had to spend the next two years learning how to not do it ever again: cool beautiful. So what we're going to do is we're going to take the center again as a guide and we're going to comb it over, and so what we're going to have here is we're going to have again the hair underneath that's cut the hair at the top. That'S cut and everything in the middle must go and we're going to do this sectioning. Very simply we're going to come across all the way connecting from the top to the bottom and then at the end, at the bottom, at the back, we're going to come through and we're going to pivot the sections to connect it okay. So, let's put theory into practice, we can move away some of the hair, and here there shouldn't be too much to cut. We should literally just be finding a small amount. That'S our small amount right there and we're just trying to blend it in that's all. We continue across so again finding the hair at the bottom. We want to get rid of to connect and coming up, and i just think this is a really great great great technique to use in the salon, because everyone wants a softer feeling these days. I find everyone wants something: a bit more effortless and a bit more real. Looking, let's say something: maybe that doesn't look so contrived. Doesn'T look so much like a human. Does it and i mean razors are great, but i find for me. I also like to have a lot of control when i'm working, so for me the balance between control and softness. So i i sometimes like to work with my scissors first and then i can always go back in with the razor and soften it afterwards. So did you just raise her on wet hair, dry hair, always on wet hair or on wet hair, because it it can really make the hair quite frizzy, otherwise and and hard to work with. So i try and always work on it wet hair. I might use it on dry hair if i'm just detailing, so if i'm doing just maybe softening a fringe, i might use it on dry hair, but otherwise, if i'm doing a whole haircut, it's always on wet hair in uk all over the world. There'S people that is afraid of razor, because we have this thing in greece, you know most of the clients are kind of afraid of phrases. They have a bad experience exactly. I was about to say that so i think the point with raises is: if you've had a bad experience, you definitely don't want it again, because it's not a very forgiving tool. So you have to really know what you're doing and the problem is. People think eraser is different from scissors, but it's actually not. The truth is whatever you do with scissors. You do the same with the razor it's about doing it on the right texture of hair and understanding that that it's exactly like scissors in terms of you still create shape. In the same way, you still create technique. In the same way, you still have to know how to cut hair before you can use a razor as well. Otherwise, it's just understanding how and when to use it in the right way. This is looking great, so it started to really come together. So we've got that really nice soft texture through the top we've got the length that we spoke of as well, and what we can do is i'm sure at the end we could even go through maybe a bit with the razor and just soften the fringe area. Just to show everyone how it works, but that's looking really nice cute length, nice bit of texture and softness yeah, i'm really liking that okay beautiful. So what we'll do is one more time we'll just cut all the hair forwards to have a little look just to see how the hair is falling, but i'm liking the way that it's falling down. So what fabio it's amazing stinker says says that is beautiful. Nice guys, so what we'll do is to make it less complicated, we'll do a lovely little recap for you as well now so we'll just explain everything we did one more time and then we're going to start to style it. So what we've done is we've worked from the back and we first created a line technique, so we created a line in the back. The very first thing that we did. We worked through this line in the back and we take it all the way to the front. So we had sectioned off the front and we worked through creating a line technique. Afterwards, we created a weaving technique, so we weave the hair in and out and we cut the end of that to create a nice little bit of texture. We see we had a section in the middle of the head, so if we turn over so we had this lovely little section that took a middle section and we cut that from shorter in the front to getting longer in the back. And then we connected it from the front. So if we first comb the front down and connected that shortness on the front into the length we had and then we took sections around the head, elevated the hair up and connected from that point, okay working all the way back same on both sides. So let's do a little bit of styling now so before i started, i had put in a bit of the everlasting color already, but we're going to put in a little bit more of the leave-in conditioner now just to reignite a little bit, and now we want To get a nice soft feeling in the hair, so we want it to be more beachy and airy, so we're going to put in a little bit of the hair resort spray. So this is going to be amazing for that beachy. Look that i'm going for and what i want to do is lift some of the hair up just so we have in the front area and then i'm going to come from the side as well perfect. We have more comments. Uh chris says that it looks amazing victorious from estonia says. Thanks for the inspiration, beautiful, beautiful color cut and model zoe space says welcome to you. Welcome back and we have more to come uh. How many people have you educated in greece over the last four years? Have you candidate? I have no idea, i mean more one than 100, it's definitely more than 100 300. At least i mean uh. You know we started off with a great show here, didn't we, which was our first one. I don't even know how many people was there in our first show, but uh yeah. It'S been many many people over over the years, so it's always been exciting to watch it grow and come back and meet new people each time as well. It'S looking so cute. Oh, my god, i'm excited already, so how much hair is? What are you putting sorry how much your result are, including, oh, just like a nice spritz in every section. So what i'm going to be doing now is we're going to be starting to dry it in maybe what we can do is we can get my silly to come and chat about the color before i start. Yeah come on so hello, guys, uh for the color of step. Sorry, i do something very fine forever. It'S just a simple single process. I will work with color me by kevin murphy. It'S an ammonia, free, color line everywhere. It'S not actually quite fine in texture, medium density, it's a level five, so i use like a 8.04 44 and 10.44. It'S our copper type of series with 40 volume, because i want to do work. This color in a kind of yellow under like pigments, and then i use the next the new series we have with kevin murphy. It'S the new lunch. It'S coming the next few weeks, so we use the gloves. Oh thank you. The closet is a new acidic lighting from kevin murphy and we use for all the back of the hair, one part clear or two part clear and one part: 8, 44 and one part 886 for the fringe area. We want to make it a little more pink. So i use the clear with 8.86: we leave it for 20 minutes. I have a good with gloss. It'S that you get 25 more strength after a single application and 37 more freaking hair, so hope you like it. So i think what we should do is, at the end, we're going to put the colors onto a comment, so we're going to write a comment at the end that has all the colors that we've used as well. So you can go back, so this is what we call a sock dryer. It'S the only thing i ever use. Okay, i'm gon na stand! No! No! No! No! I'M gon na stand here, because maybe you can hear me over the hair dryer, but what we do is we call this a sock, dryer and what it does is it diffuses the air, but it doesn't create any of the flyaway. So normally, if i was going to use a diffuser, the hair would be flying everywhere, but right now i'm using the diffuser and you can see the hair is not going anywhere and that's really important for me. So we're going to create a nice dry natural dry without all the fridge, so you can get these from wires park. So we have wireless car and there are amazing, diffusers okay. So what i'm gon na do is i'm also gon na add a little bit of hair resorts. This is a really amazing product, we're gon na dry. It in really nicely to give us a little bit more of a beachy feel. So what i put in first was more like a prep and now we're going to really get the hair texture going, which is what we want. So i'm going to really make sure i have it in my hands, nice and even and then i'm going to start scrunching it so we're bringing out that weave cut and we're also bringing out the texture in the hair and the movement. So visually i'm just going through the hair getting all of that nice bit of texture and movement to pop out beautiful. So maybe you have a couple of questions yeah. How can you remove more weight for clients who have high density hair yeah? I mean look: removing weight, there's lots of different ways, but obviously layering is the best thing to do so. Once you've layered a haircut you the amount, you layer it, the more you layer it, the lighter it's going to be after after you've tried all of the layering techniques. What you can do is you can start going to more advanced techniques of thinning hair. It can be with thinning scissors, it can be pointing you can also do what we did today like weave cutting. You can do what we call channel cutting so channel cutting is when you create different lengths internally and it creates softness. So there's a lot of different ways: you know on curly hair. We do a lot of twisting and then cutting into it as well. So it really does depend on what you want to see in the hair. What you leave out this is such a cute, color vasuri, it's amazing, really nice, so we can see that that product is really coming to its own. Now the resort's popping out it's giving a nice bit of texture, which is what we want a nice bit of softness, and so we really want to use our fingers to create the style so yeah. We just use our fingers to scrunch it in, and so our fingers are enough. That'S the thing when you have the right product, you can just use your fingers and it will bring everything out. I wish everyone can smell it yeah, and then we can also see how the back is popping out as well. It'S starting to really show the texture that we want to see in it. So that's the love for you. Yeah everyone's got a lot of love for you. Right now is, and i mean it's one of those things where it's a real salon, friendly, creative cut. You know it's a really easy to do, and so on creates a really nice texture. So me and the salon now i don't really use a nozzle anymore or a brush everything i do. I try and do a little bit with my fingers. Just create openness, create texture, create movement, so it really looks effortless and it's something that clients can do at home. If they see you doing it with your fingers, you think you could probably do this right. If you saw me sitting here with an hour with a blow a hair, dryer you'd think when i get home, i'm never gon na. Do this sorry, looking great, you have one more question yeah. So it's really important that the hair kind of soaks in the product that you're putting in a primer, but when you're putting in a styling product, it's always better. When it's half dry, you don't want to be drying watery. You want to be drying products in, and so i always find if i put in products i dry, the hair, 50, 60, 70 80 percent then wet it with product and then dry it in again, so i will never put all along with dry hair. So i think, there's no point on putting it on all wet hair. It kind of goes against what you're doing almost so. What we can do now is, we can add, a little bit more product to it as well. So one product we haven't put in yet and we're going to now is a little bit of the killer waves. So we can see here, we've got the killer waves, and so this is a little bit of a heavier product, but that's what i want. I kind of want to give it a bit of heaviness again and then i'm going to style it again. So it's just kind of adding that product back into it, adding the density, so i kind of made it lighter. Now i want to make it heavier and then i'm going to make it lighter again so kind of just moving the hair around a bit and playing with it. It'S looking great all right so last bit of drying just make sure this product is in. Do you have don't know what night any something? So let me come from the front and see good. So michael will have a question yeah. Yes uh. What did you do? Why did you do vertical sections and then you changed to pivoting sections? Okay, so why did i do vertical here and then pivot? So the reason is because if we look at the area in isolation, so if we looked at this area, what happens is here? I can connect the hair flat, but at this point, when i get to the back of the head, i can't do that anymore without having a gap. So, in order to connect the bottom with the top i have to somehow get from here to here, and the only way really for me to get from here and then connect to the back where my thumb is, is the pivot. So what i'll do is i'll? Go one two three and then to connect the back area because the back is round. I have to use a pivot technique, so go one two three round. So whenever i'm pivoting, i'm pivoting for two reasons, i'm either pivoting to create um a little bit of a round shape, or i'm doing it to create a triangle shape we're having the last pit a little bit of night rider, it's quite a strong product. So i'm gon na add it onto my hand and then take a very small amount into my fingers. First, just to play with it, and then we can just gently twist the ends and touch it just to kind of bring out a little bit of that texture. And so it's trying to be gentle with it and just play with pieces just to give it that little detail. You know it's nice we've used quite a few products that the client can take home with them as well, and it's very easy to do so. They can see all i've done is use the right products, but with my fingers to create the look so there's none of this difficulty of them having to figure out how to use a curling iron or anything else, just creating the right base. Okay, it's looking good beautiful. So what we'll do as well is we'll do a little recap for you guys in a second amazing one, more question: yeah. Yes, i always use it on curly hair. I will always use it on curly hair. It'S the best thing. I'Ve ever bought in my life, it's really fantastic, so you know i work in fashion a lot. We do a lot of magazine, work and stuff and i i haven't used seen anyone use a diffuser in a really long time. You know it's really the new thing. I think it looks really cute guys, i'm really happy with it cool so stand up for me. Amazing. Thank you. So much so just look at me, yeah nice, amazing. So what we'll do is we'll give you guys a little recap come this way for me cool. So what we did was very very simple: we had first the section which was placed in the back of the head, so it was a section from the occipital down and we created the line. This gave us the length on either side and the outline at the bottom. Once we had finished that we took the section which came from the ears and we continued the line, so we had the line in the back. We connected the line in the front once we had done that. We then took that section and we started to weave in and out with our scissors and cut the length off. If that doesn't make sense. As soon as the video is off go back and watch it it'll it'll make more sense, then we then took a lovely little center section. So from the center we took a section and we came up and we created the length we wanted in the front, and we connected that to the length that we had in the back. So that created the first length, both in the back and in the front. Okay in this nice, rounded cutting angle. What we then do was take a section from the front and created the length in the outline on the front same on both sides. So now we have the outline throughout the whole of the bottom and all of the outline from the front and an outline in the middle. We then came across and we connected from the top working all the way from the front to the back and then what we did here was when we came to the back. We pivoted around to connect it into our layering in the back same on the other side, we came in from the front and we worked all the way through just pivoting around, and then we added some great styling products from kevin murphy.

Comments
Sylvia Gillespie: New way of cutting that I have seen. Very nice
T K: Nice job!!!
Arthur Gaboyan: Beautiful
Sylvia Gillespie: I love the color. It looks like a copper