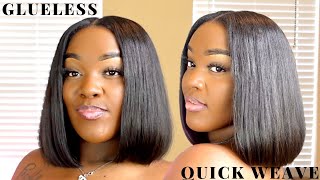
How To: Protective Quick Weave | Side Part Leave Out |
- Posted on 27 October, 2022
- Bob Hairstyles
- By Anonymous
Welcome back to my channel, I hope you guys like this side part quick weave. She have a leave out. Leave me a comment about videos you guys want next! Thank you for watching !❤️
What I Used ( Local beauty supply )
2 Black wig caps
3 packs of ORGANIQUE BREEZY WAVE
Morning glory
Hair Glue
Spritz
Wax stick
Heat protectiant
Foreign, hey y'all, welcome back to my channel. If you want to know how to achieve this, look then keep on watching and if you haven't hit that subscribe, button already go ahead and do that right now. So if y'all been here since day, one and y'all been seeing some of my other videos on my hair, tutorials y'all will notice that I haven't really been on YouTube and I haven't really been posting, but I'm back and better than ever. I'M gon na tell you guys. The reason that I haven't been posting is because, oh yes, I am expecting my beautiful baby girl will be here soon get that out the way, but I'm gon na get right into this video now. So this is her foundation. A basic little braid down and I went ahead and I threw the cap on there after I threw the cap on. I picked up some scissors and I basically cut holes where her ears are so. I could pull them out through the cap foreign in with some spreads and I'm going to spray that all around her cap. Besides, the leave out do not spray any sprays or apply any morning glittery to the leave out, but um. Some of y'all know that some of y'all know that, but for the people that don't that never did quickly it's before you know I just got to explain the process. So after I spray spreads, you could use, got to be glue any type of holding spray. I'M gon na go a little more blow dryer and I'm going to dry it out all the way down before moving on to the next step. So now I'm going in with my morning glory. I was being a little ghetto because I couldn't find my brush, but I just used some gloves basically to spread out that morning, glittery, but I'm putting it everywhere and I'm gon na go ahead again with that blow dryer and I'm gon na make sure that this Morning, glory is completely dry before moving on, so I didn't record my next step, but basically after that morning, glittery dried, I had went in with some glue around the perimeters and I let the glue dry and then I had cut off the excess cap that we Didn'T need so I went in with a second cap just for Extra Protection, but basically everything that we did with the first caps. Like all the steps that we took, you would go ahead and repeat the same process with the second cap. Please don't matter how I look in this video y'all know I'm in my third trimester and if you ever had a baby before you already know how I feel like right now, but I'm at home comfortable in my own little PJs, but don't mind me because I Look a little Kettle, but you know still getting the job done. Foreign, and this is the brand of hair that she used. I really don't know how to pronounce it, but I've seen a whole bunch of people on Tick Tock using this hair. But it's in the pattern Breezy wave and it's pretty affordable. I think it's synthetic hair, but it came out pretty good, so y'all go ahead and try it so starting off the liquid. I normally glue in two tracks at a time when I'm starting off and I'm in the back, but once you get to the top, you can single with this, so it can be flat. Thank you! So now I'm starting off with the second track and I'm measuring it. It'S important to measure the track placement before you glue it down, do not Curve Your Tracks just keep on going straight across straight across as if you're doing a middle part, I'm going to show you guys um when I started curving the tracks foreign straight across, but Now I'm gon na go ahead and I'm going to curve it, but as I'm curving it I'm not going to go all the way to the leave out, I'm going to leave some space for when I'm going to close off the um last track foreign. So this is the last track that I'm gon na place at a curve, but as y'all can see, I did not go all the way to the leave out because I don't want to close it off yet so now I'm going to take these last couple of Tracks and I'm going to go straight across instead of curving it and that's basically how I close off my quick weave foreign foreign like this, but this is my little sister, so she know it's all love at the end of the day. I get really really serious when I'm doing hair, but you know it was an accident, so the last track I just go in with some spreads and put a blow dryer over it to make sure that is super secure. So now we're moving on to my favorite part of the install, which is the styling. So what I'm doing now is spraying some black spray on her hair, because she have some parts that the tracks will show in through her hair. So, in order to cover it up just spray a little bit of black spray on there and make sure that's dry too, so I got my wax stick and I'm putting it on only the roots of her leave out and the ends. I don't put it throughout her whole leave out because sometimes wax sticks can make um your hair oily, and I definitely don't put it on my edges, because too much products on your edges will cause your edges not to lay properly I'm just High combing. Her leave out so it can be super flat. So after you made a couple passes with your how come this is how your Levi should look, I'm going back in with the wax stick, a little bit more, I'm just putting it on there lightly and I'm gon na go and um flat iron. Her leave out. I didn't show this on camera, but I sprayed some heat protectant on her hair, so none of her hair is getting heat damaged. Foreign! That'S why I keep on going in with this wax stick just so her hair can blend in with the weave foreign foreign. You cannot see no tracks like I just love, love love, this quick weave that I did on here, because it looks so good like this is a real hair. Y'All cannot tell me this is not all her real hair. This is hers, foreign, a little bit of holding spray and I'm going with my brush and I'm going to brush that down just so, I can get her hair to really lay flat and blend in with the weave. So now I'm working on her edges, but before I actually mold them into place, I like to frame them to see how I want the edges to lay and y'all could be so so mad at me. But as I was recording this process of me doing her edges, my phone had that. So I didn't get the whole thing, but I'm going apart a section of her edges out and then I'm gon na go ahead with my small curling irons and I'm going to curl them under. So whatever you got to mold the edges down with you can use whether it's holding spray edge control in this video. Today I am using holding spray, so I just got her holding the blow dryer while I'm actually framing the edges down into place yeah. I'M really sorry that I didn't get this whole thing recorded, but with doing edges you basically just wan na use your finger to basically follow the comb, but you doing it when you're doing your edges, you're doing it in a c motion, but use your finger to Follow the comb, so it can stay. So this is how her baby hairs came out. I did a little squiggly swirl, it looks so cute, it's giving princess, but the before - and this is the after leave me a message in the comments and let me know what type of video you guys would be interested in seeing next, but that's all for today. So I hope you guys, like this video and um thank you for watching
Comments
Isis Luster: Niiice job