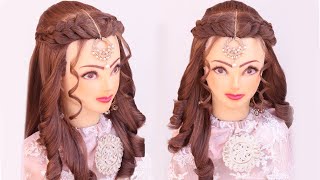
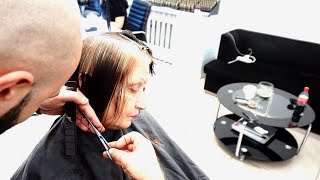
How To Cut A Layered Bob, Soft Bob Haircut On Curly Hair | Curly Cutting Techniques
- Posted on 17 June, 2021
- Bob Hairstyles
- By Anonymous
How to cut a Curly bob Haircut for women. A curly bob is a type of bob haircut for women with naturally curly hair or who add curls to their straight hair.
"I Love Haircut - I Love Hairstylist"
So what can happen sometimes with curly hair, and let me know if you agree what can happen is that the hair can turn into almost like a pyramid shape where we want almost like a soft oval. So, overall, when i'm thinking about cutting curling curly hair, i like to have a little bit of a more hi from the uk. Awesome awesome: pittsburgh, wonderful hi, you guys, so i want more of an oval shape with the curls that undulate from the inside hi. Netherlands. Welcome so what i want to do is create a layered look, but not like a stacked situation or any type of graduation. I really just want the shape to be softer with less weight in the middle area, as well as towards the ends giving a little bit of volume up here. So the way that i'm going to begin is by finding the most dense parts of her hair, and you can see that her hair is starting to dry and curl up. This is the best way to cut curly hair, that is worn curly since ladonia wears her hair, both curly and straight. What i'm going to go in and show you guys, is the curly layers first and then how to create a strong perimeter for when that hair is worn straight and smooth. You can get the best of both worlds. So, first and foremost, i use my moymoy moisturizing mist. I know this is kind of a hot ticket item to find right now i found a few at my local beauty supply and i was so excited. Are you guys loving this product? Let me know, i love it because it's a nice lightweight spray, it smells beautiful and it gives me a little bit of moisture without weight. So i can use that to perk up my curls a little bit, so i'm going to reach in and find the most dense areas of her hair. Now this is where i'm going to start working you guys. So if you have questions i'll be turning around and checking, but if i'm a little behind, forgive me so i'm going to reach in and feel for her most dense areas for lalonia it's in this area just below and around her parietal ridge. So i'm using my fingers, it is definitely helpful to have these talons claws as my sectioning tools, but you can also use a pin tail comb with wide teeth. I don't want to disturb the curl pattern too much, so i'm gon na just use light tension on my sections here. Okay, and i can see the way her hair naturally falls now raise your hand if you're ready for the scary part, also hey lonza. Thank you. Okay, so for me, when i'm trying to avoid creating a harsh step or a harsh line, i'm not going to create one from the jump. So the difference between my shears here is this: is my typical cutting shear right? It'S got a straight edge blade, but for this i'm going to use a texture shear now these are a little bit funky, but um they were an impulse buy they work for me, but what i would suggest would be probably a medium grade. I'M trying to think not like 30 teeth, but maybe 20 teeth, texture, shear, not so much a thinning shear. A thinning shear is probably going to make too much weight and too much frizz. So this isn't a technical, traditional or excuse me a traditional or classic technique. This is very much visual and it's something that works for me behind the chair, so i know a lot of times as stylists. We find our own way raise your hand if you've had to figure it out the hard way and that's sort of been my experience with having a high volume of clientele with curly hair but finding different ways and tips and tricks to make it easier for me. So this is called weave, cutting i'm going to observe her curl pattern and see where her curl goes. This way, first, we'll say to the left first and then these curls go to the right. This curl goes slightly to the left, so i'm going to lift up where i see the undulation in the difference and because i want her hair to be directed backwards. It'S like a giant thick weave right, okay, i'm gon na comb this section lightly and and make sure that those curls are going in the same direction twist my section with good tension, okay twist that all the way up to the base. Anybody scared! Yet because it's coming we'll take that texture, shear and about where you want your layer to start, i want her layers to start around the middle of that section. So i'm going to go right in and just cut on top of that section, but i'm not pressing. My scissors all the way closed. Okay, i'm just cutting in those top layers, and you can see that it's slightly loosening that curl can everybody see? Is anybody freaked out yet? Okay, then we'll take our comb and comb that hair out of the way that's going to give us a softer undulation of the curl you can see it starts to wake up a little bit. More and she's got more volume up here towards the root and less weight down here towards the bottom. I'Ll show you again on the other side. Pardon me okay! So now i want this to flow backwards again, so i'm going to find where it starts to curl to the back and find that curl pattern. You can use your fingers. You can use a wide tooth comb just so long as visually. You are finding that curl pattern, that's cohesive! Now for this section you can also redirect a curl pattern a little bit so for this, this kind of bows out a little bit where i want it to swing together. So taking that section again, let's comb it a little nicer taking that section again now, because i'm on the other side, i want that same angle, so i'm lifting my shoulder up and over this way to twist where, when i was coming from the right, i went This way, hi you guys, what do you guys think so far crazy. Tell me something i don't know all right so then we'll go in again and i like to use a little bit of an angle. Okay, i don't really like to go in just totally horizontally. Just because it's less comfortable for me, i definitely like to use a little bit of an angle and once you see the curl loosening up to a point where you feel comfortable, then you can comb that hair out and you get that nice soft shape. Oh my gosh, i love that. Do we love that al yeah? He doesn't know what he's talking about, but he likes it. So we're good, even more so so for those of us who don't do hair, it's even more essential that it looks good for those of us that understand classical hairdressing and where things are supposed to lie or lay. Rather, it can be a little bit nerve-wracking for us and we can go okay, yes, that's balanced, but if we can and convince our clients that our work is balanced and beautiful, then they're going to keep coming to us right awesome. So i'm going to go in again and keep reaching for this density so now that i've created this lift and separation on the sides there's a little bit of a dense heavy kind of bunched up curl here in the middle. So i'm going to take that little guy here in the middle. Do you sleep on your back on your side? Sometimes when we sleep on our backs, it can squish the curls a little bit too so giving that nice good tension and again just gently lightly. I mean i am fluttering that shear, okay and my shears need a little bit of a sharpen. This is much better on wet hair and with sharp scissors. Okay. So that's starting to wake up a little bit. I want it to just wake up a little bit. More, i had to give it some support with some push and i want it to just do it on its own, so i'm going to go in again a little bit higher, because i want it to lift up a little bit higher there. We go see that that's what i'm looking for after i cut it. Let me know if you can see so this is gon na, be i don't wan na again. I don't wan na disturb the curl pattern too much now, that's just below the parietal ridge. Using diagonal back sections, okay and again, this is a very visual cut. This has everything to do with the way that your client's hair naturally falls. That'S so funny you can see the back of me um, so we're going to continue that through the back, the top of the back section in order to give this area here a little bit of lift, see how this is slightly sloped down. It makes a little bit of a flat spot, we're going to create that texture, to give this a little more lift here and again, separation and weightlessness towards the bottom. Let me know if you have any questions or concerns, if you, if i have completely freaked you out, that's fine, i'm doing my job, so i'm just using my fingers like a wide tooth comb and really putting gentle tension to kind of replace the hair back into Its natural placement now on top of her hair, it gets styled more so those curls are starting to be a little bit more lazy, and i want to redirect i'm taking a little bit of finer sections in my weaves, but i'm still skipping really largely in between Here now you could also use if you had a sharp end to your texture, shear. You could use your shears okay to do the weave, combing and then switch to your textures here. For me, i'm just saving myself a step. I would like to use something different. This isn't my favorite texture shear. Why don't you guys share with me your favorite texture, shear? So, even where it's a little lazy, it's giving us a little bit more of a curl pattern. I'M going to come back for that guy, a little bit later when her hair is dry so again, just reaching for that top section and looking for where i want her curls to wake up a little bit a little finer, i'm going to switch my body position Here now, because her hair is getting a little bit drier, i'm not using my smaller tooth comb, because i feel like it's messing with the curl pattern too much. How do you guys feel about combing or brushing curly hair? I prefer to let curl be curl as it's supposed to be. Naturally, okay, there's my nice tension. I'M going to lift it up just a little bit, i'm giving slight elevation for comfortability, but up here on top i'm going to hold it out a little bit further for some more control and we're starting to see that curl loosen up a little bit and i'm Just holding on to the ends with my with my fingers down here and i'm probably cutting more in the mid section than i am towards the ends, because i don't want it to get too stringy or wispy. And if you've ever watched me before. You know that my tray is never where it's supposed to be, and always out of my way, which isn't always the best thing to do so. This is starting to give me a little bit more of a wave okay. So i'm going to continue that and let that dry and start to see that lift up a little bit more as it gets drier now towards the sides. Again, we have that lazy, wave situation, so i'm going to go through i'll show you, even though my shears aren't sharp on the end, you can still weave cut. Do the weaving part portion it's just a little bit harder? Okay! So, since her is really heavy here over her ear, i'm gon na go ahead and feel again feeling for that density. It'S really right here so near her parietal ridge. When i'm trying to preserve length, i don't like to drop below that parietal ridge so much when it comes to curly hair, so we're gon na wake these up a little bit using our finger. Oh beautiful hairdresser, uh at work. That is not a beauty mark. That is hair color. I apologize i wore my gloves and everything so here we're separating that out where i want those curls to wake up a little bit. We'Ve still got some texture underneath here that i'm okay with, but i want this part to give us a little bit of lift and separation. What do you guys think so far so for this i twisted the hair and over direct back, because i want the curls to flow backwards again, diagonal back uh, scissor angle and just loosening that curl up comb it out. That'S going to get rid of all that extra hair and extra weight and we're going to sort of shingle the curl a little bit and that's starting to give us more of a broken up, shape and a layer. If you will same thing for the top section. Now she's got a very heavy top section that can sometimes weigh down the hair underneath it and it won't allow for that volume. So we have to ensure that we can create the volume on top as well. So i'm going to go right in where it's straighter and i want to create more curl. Now, i'm going to use my finger because her hair is getting a little bit dry and i'm going to take big sections for this top section. This is to create the most separation and disconnection. Again. I mentioned that this isn't a classic or technical technique. This is way more about visualizing and feeling and seeing how your client wears their hair. Something else that i did when i was prepping her hair for this haircut, um now, typically uh for a curly haired guest. I would prefer that they come in with their hair, naturally, air, dried and then cut around that go back through and cut your strong perimeter for a straight shape. But let's say that you have a brand new guest that you weren't sure that their hair was going to be curly. This is a great time to uh utilize, this technique, so we're starting to see that separation and we're starting to lose a bunch of that weight under there, i'm going to keep going at it until i get to a place where it's not so heavy, and i Don'T see those straight chunks in between if you have questions now is a great time to ask shingle it out a little bit. Why do you use horizontal sections, so i'm sort of going horizontal, but i'm slightly angling up to create a diagonal back section um here i'll. Have you turn your head? This way just a little bit, so it's horizontal, but it's slightly angling uh diagonally for a little bit of softness. There is that leona. Also i like it slightly more horizontal, because i want to remove sheets rather of weight rather than ribbons of weight. I really want it to be removed. I want to remove a lot of weight, but i want to have some control hairdressers in their control. Never right. I love that. You can really see the curls start to unwind and then you can use your fingers as well. There we go see, i'm starting to see the shape come to life just a little bit more, usually mechanical damage, chemical damage, things like that tends to have a a negative effect on our curls, so you can see that as her hair is drying on this side. She'S, starting to get a little more lift and shape you're famous now ladonna, you look beautiful, so she's starting to have more lift and shape on this side, where this side's still hanging a little bit heavy to her head. So that's where you can see a little bit of the difference. I also love how beautifully her highlights came out. Super excited to see that smoothed out. So, let's see one more time on that other side, how we break up that weight as well as perk up the curl feeling for the density again, i feel like it's really for her near her parietal ridge. So here's a little secret about ladonia's natural hair color. It'S white, so we did some things today to uh fix that and make it not so stark and a little bit more of a soft brown. This is our 6n, a that's level, 6 natural ash. So it's got to be a cooler. It'S going to be a cooler result, natural finish for great coverage and only using 10 volume. So i love that. I don't have to worry about too much warmth exposure. It gave beautiful natural coverage. It'S not super opaque that it feels like a sharpie marker, um, the oh, the softness comes from low ammonia content in lonzo's, hair color, and what that also ensures is that, when the natural, platinum or white hair that grows back out will have a softer line of Demarcation versus the more opaque reflection, so looking for that curl pattern again, and sometimes, if you can't see it like, if it's lazy towards the ends, you can look towards the scalp and see where that s pattern is going to fall now. This is something that was really scary for me when i first learned, but this is how i learned how to cut curly hair - and i haven't had a complaint yet about it. This may be technically incorrect. This may do some things that people may not like, but i know for a fact that my clients have always enjoyed this haircut and it works for me behind the chair. So i love to share anything that works. For me, it's a secret for you guys as well, so i'm just cutting in this side's a little bit thinner. So i'm not as aggressive beautiful see. Now we have some curl where there was no curl before it's nice and aerated light. I'M gon na go through here and separate this out into two more sections, because she's got a little more hair on this side, shingle that out a little bit so the curls a little more woken up on this side. I just want to get rid of that weight mostly, and i start to see the heaviness here. This is broken up quite a bit and is nice and light and loose, and creating more of that round. Shape that i'm looking for, but in here is where i want to break it up wherever it starts to bunch up a little bit for this haircut is where i want to break it up a little bit. This is for somebody that wants to wear their hair. Naturally, curly but remove some weight and then also wants the ability to wear it straight or smooth, rather so see all those little hairs and pieces that we've created comb that out and we've got a reactivated. Curl pattern slight, but feasible: okay, shingle that out again a little bit her hair's starting to get a little bit too dry for me, so i'm gon na go back in with that mormoy mist! It'S got that nice wide spray. So i'm gon na shingle that out a little bit more. Oh yeah, your curls liked that okay and because this is her fringe area. I want this to flow back with me again. I'M gon na give this a little bit of a comb and shingle and twist away from the face. I know some people are probably still freaking out going. What is she doing again? This has only been useful to me and has never caused me an issue alrighty. Wonderful - and there goes my comb, so thanks guys, i appreciate it now. I'Ve got a lot of volume here in this back section in the middle, exactly where i want it, where it was really flat and heavy previously. So i'm so excited that by the time that i came back to the back and the sides, we can really see this curl pattern activated. What do you guys think thumbs up all right now, where we cut the curls more uh visually, we're going to cut the perimeter with more precision? Okay, so i'm gon na find charisse if you're watching me, i'm borrowing your comb, i'm sorry friend, all right! So i'm going to find the high point of her head and that uh apex rather the highest point and then i'm going to separate her hair out. Okay, because she's got that nice volume and body. Now it's going to hold it out of the way. For me, we'll split that in half, but i'm being really gentle. When i take my first section and using my fingers to separate the hair here, light tension. Oh no, i see somebody said: oh, no, nils! Okay! So now i'm gon na go in i'm gon na use very light tension with my comb here: okay and i'm going to bring up that perimeter using point cutting so horizontal comb, uh diagonal cutting angle. Can everybody see okay, okay, i'm just holding her hair where it naturally falls. If i were to put more tension on the hair, i would think that i would make a really hard perimeter, but too hard uh. It wouldn't fall, i'm glad you're, loving it um. I just don't want it to fall too strong and too heavy so that it doesn't still look harmonious when she wears her hair curly see, i just went for it and pulled it out too much, and then i'm using point cutting again for softness control safety. What are some of your favorite lanza curly, haired products or cocktails or hairdressers right? We love cocktails. What do you guys think awesome? So if you haven't heard yet, our big event has been rescheduled for february. I believe 22nd to the 24th, something like that. It'S towards the end of february, where we're going to have our national um education event that we are so excited. It'S been a while, since we've had one and we're really excited to um, get back into shape. With that be sure to talk to your brand consultant or your local foundation, museum, smoother yep, that's one of my favorite favorite cocktails to use and pull and tie all that together and really smooth out some curly hair, but keep the body absolutely. Who is that leona you're my girl, all right so be sure to sign up for our big event and come see us because we're really excited and we've really missed you for the last year or so i know all of us could use an education vacation. Personally, i'm employed by myself as well as lonza, so uh. For me, it's an investment and it's a little bit of a break, a step away, and i get to enjoy time with my colleagues and like-minded people. Now, i'm just going to continue around the sides here. Creating this perimeter and then i'll show you what i'm going to use to blow her hair out. So now we have we're starting to get a much rounder shape, but a nice strong perimeter here on the ends. Don'T worry i'll, make it shorter towards the front. She has a lot uh fewer hairs. It gets really long in the back for her. So once we get to the front, we're basically just doing baby snips to ensure we get the shape, so we're probably going to go back through in detail a little bit more with her. But i really want to share with you guys my favorite go-to products when it comes to a quick blowout for smoothing out curly hair. So that's going to be my smooth down spray. This smells like cookies. It gives a lot of shine and really helps speed up. Your blow dry and give some awesome control for those of us that want to wear hair a little bit smoother. Sometimes it's also got some humidity control, as well as our cactus flower extract, which ensures heat protection throughout our entire line. I absolutely love that the blow-dry sprays themselves have heat protection and i mean that's tons of heat going into your hair. So why wouldn't you want to protect from the first instance, where he's going into it? Next, i'm going to use a little bit of my design. Foam now i love foundation mousse for more control, but i want a little bit of more light airiness through the ends, so i'm going to use my excuse me, design, foam, see super light and airy where our foundation mousse is going to be for a little bit. More of a solid control i like to really make sure i get around the hairline super important. You can do a beautiful, smooth blowout all over, but if this hairline is fuzzy, it's not going to tie together so well. So if she were to scrunch her hair, a lot of people do this at home. She'S going to get a lot more body here on top and a lot less weight here down towards the bottom, go ahead and turn your head this way, so she's got a lot more of a rounder shape where previously this was very flat and very bowed out. So we're having a lot more volume here on top, which is going to let a lot more air come through and with our hot summer months coming. We need as much personal ventilation system as we can get right. Okay,

Comments
Maria Elenice: Parabéns amiga beijos Fortaleza
Mary Hall: You created terrible frizzy, by texturing curl hair, well know to cause that
Nume Prenume: You talk way too much.