How To Do A Protective Quick Weave W/ Paper| Middle Part Quick Weave Tutorial Ft Kriyya Hair
- Posted on 04 August, 2021
- Bob Hairstyles
- By Anonymous
#protectivequickweave #howtodoaquickweave #middlepartquickweave
Have you ever done a protective quick weave using paper? Try this glueless protective quick weave! There are so many ways to do a quick weave . Quick weaves over the years have gotten a bad name due to personal experiences of improper quick weave installs :( . NO WORRIES! Over the years quick weaves are quickly becoming the "GO TO" hairstyle. Quick weaves can be done with liquid cap, gel, paper strips and MORE! I hope this full quick weave tutorial helps someone at home or a professional hairstylist! In todays quick weave hair tutorial I used 3 body wave bundles provided by Kriyya Hair (all details below) . I colored the bundles blue black .
WELCOME BACK BABES
If you're new don't forget to L.I.K.E. COMMENT SHARE & ***** SUBSCRIBE TODAY ******
CONNECT WITH ME ON SOCIAL MEDIA:
Instagram : https://www.instagram.com/_tatitv
TikTok: www.tiktok.com/@_tatitv
⬇️ EVERYTHING I USED IN THIS VIDEO ⬇️
Mega Wrap Strip
Edge Effect Edge Control LEVEL 5
Needle & thread
Stocking cap
Paul Mitchell Super Skinny serum
Fantasia styling spritz
Nairobi Sheer Spritz
Babyliss 1 1/2 inch Flat irons
●▬▬▬▬▬ #KriyyaHair ▬▬▬▬▬●
☛Get Extra $8 OFF Over $89 ! Use Special Code: kriyyaytb
☛Get Extra $12 OFF Over $149 ! Use Special Code: kriyyaytb12
I’m using Kriyya 3 Bundles Body Wave Hair 9A 24’’26’’28’’:https://bit.ly/3zQFKGy
https://www.kriyya.com/ Hot Sale Wig:https://bit.ly/3zVuMzm
Wear & Go Headband Wig:https://bit.ly/3fdbkpO
More 13x4 Lace Frontal Wig:https://bit.ly/3rJKj2l
☛Top Selling Straight Headband Wig:https://bit.ly/3yaDQQx
2021 New Arrival Wig:https://bit.ly/3rLEqla
☛5x5 #HDLace Wig:https://bit.ly/3x9Ndid
Hot Sale Bob Wig:https://bit.ly/3xcO7Kz
Affordable Bundles & Closure:https://bit.ly/3xcO7Kz
#BackToSchool #KriyyaBackToSchool
Instagram @Kriyyahair: https://www.instagram.com/kriyyahair/
YouTube @Kriyyahair: http://bit.ly/37QTENf
Facebook @Kriyyahair: https://www.facebook.com/kriyyahair/
#quickweavehairstyles #quickweavewithleaveout #protectivequickweavewithleaveout #howtodoaprotectivecapquickweave #protectiveshieldquickweave #middlepart
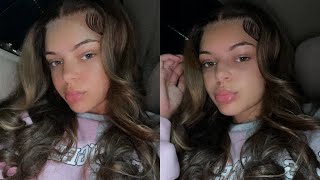
Hey babes welcome back to my channel. I am tatiana if you are new, welcome, welcome in today's video i'm going to be showing you how to do a protective middle part, quick weave and it's going to be a glueless, quick weave. So, instead of incorporating any of my other glueless methods, i'm actually going to be using paper this time. Yes, i said paper, not the real deal writing paper, but it's going to be like the next strip on paper that you can get from your local beauty supply. This is going to prevent any glue from actually seeping onto your hair, and now i am going to be wrapping those strips all over my head. I always say that you're going to look like a mummy. Y'All, don't judge me. Okay, i'm doing this for y'all, but you're literally going to wrap all of that around your head literally just like that. You'Re going to put your cap on and what i'm going to start to do is fill each braid that i've braided and i'm going to be sewing onto that braid. As close to the beginning of that braid as possible, i like to go ahead and sew around where my leave out will be first and then i'm going to sew those first two braids that are in the front around the perimeter of my head. When threading your needles, remember to give it a knot at the end to avoid it from slipping through the cap. Also, when you're done using the actual thread when sewing on your cap be sure to go ahead and tie your thread about one or two times and cut off any excess. Now you can go ahead and cut off all of this excess paper that we have and then i'm also going to be cutting around the perimeter of my cap, not too much just enough to where i can be able to see where i'm going to be placing My tracks, but this is what it looks like so far. You can go ahead and place your tracks the way it is like that or like i'm doing, i'm just cutting off just a little bit of the elastic part of that cap. So from korea, hair i'm going to be using 24 26 and 28 inch body wave bundles, and you know me i have to have my blue black. I love blue black. It looks so nice and rich and then i'm just going to give it a nice, shampoo and condition and we are going to go ahead and start our track placement. I kept my first tracks double because they were still close together when i unraveled the bundle. But what i am doing is placing from one side where my thread starts by my leave out and i'm bringing it all the way around to the other side where the other thread is placed at so you can use that thread. That is around the perimeter of your leave out as your guide as to where to start and where to end your actual tracks. What i'm going to do in the end also is place tracks. On top so you'll be able to see exactly what i'm talking about when we get to that part, but for right now all i am doing is just curving from one side to the other side connecting right there. On top of that thread onto the other side, where the other thread is at, i also say that even when you're done placing all of your tracks, you can lift up all of your hair, put it into like a top little bun with like a clip, and If you have any excess paper that you may not want, you can go ahead and cut that off as well to close off my quick weave, i'm going to be placing my last few tracks parallel to how my hair is parted for my leave out, and i'm Just going to be getting it as close as possible is, it is a must that you blow dry your hair before you cut off the excess cap to avoid any tracks from lifting up and not being completely secure. So because i want to be able to use as much tracks as possible and get it as full as possible. What i am doing now is placing that one track right here and i am laying it literally directly on top of the rest of that paper. So you see how the white was there and now it's gone. I literally just laid it right there on the paper so because i wanted to use as much hair as possible and also be able to get in as much hair at the top. What i am doing is pressing out some of my tracks to get it really flat and then i'm just applying just a nice little amount of hair glue and i'm placing it pretty much directly. On top of the last track, applying some of my smoothing serum onto my leave out, i'm going to be combing that throughout and then i'm going to go ahead and give it a nice press with my babyliss flat irons, because i didn't want just one length. I wanted to do some face framing and also give my hair some layers to really make my style pop. My face framing is beginning a little bit lower than usual, i'm starting it kind of like right. I would say, maybe like right there by my mouth and then i'm working my way down. Okay. So now we got our long layers. We got some face framing going on like y'all. It looks so much better already. So now i'm going to be going in with my nairobi, shear spritz, and i'm going to be lightly misting my sections and giving myself some flat iron curls. They give it a really cute and flirty look now. I will say make sure that you do not like comb at your curls after you've curled it. You want to wait till the hair has completely cooled down before you actually go to styling, because the hair is still forming how you want it to go when you curled it all. The information regarding this hair is in the description. Below and again i am wearing 24 26 and 28 inch body weight, bundles from korea, hair going in with my wide tooth comb. I'M just going to be combing out some of my curls to make it a little bit bigger. I will say if you're looking for more of a wavy look to use a rat tail comb, but if you want to be able to keep your curls, but just kind of you know separate them, i would say to keep using a wide tooth comb right now. I'M just going to be touching up some of my edges. Just in the front, with my edge control, i was using my edge effect level 5 edge control. I didn't do my edges all the way down like ear to ear only because it wasn't necessary - and i wanted to give my edges some time to breathe underneath so this is a good time honestly. So there you have it. This is my glueless quick weave, install using paper to prevent any glue from actually seeping through the cap and onto your hair. We didn't need to use any spray. We didn't need to use any gel. No liquid cap, i'm always reading the comments and different people are saying different things. There are so many ways to do. A quick weave, a stylist have so many ways, but i just want to show you this one. If you weren't a fan of spray, you were scared of glue, possibly still getting on your hair, no matter what technique i showed you. I hope this technique helps you and i will see you babes in my next video, keep watching because i'm about to announce the winner of my last video for my 99 j kinky curly wig, okay, so i just got done doing the middle part, quick weave and I must say y'all, i'm in love. I love this so much. I can't wait for you honestly to take down it's gon na, be so easy like it's so easy ain't gon na be no glue on your hair. There'S not gon na be any spray. No! None of that, so i hope you really enjoyed this video, but i did say that in the next video, which is this one yeah, i would talk about the winner. Well who's, the winner of my last video doing the 99 j kinky curly wig so live right. Now i am about to pick my winner. I have a lot of entries, but i'm about to pick my wonder randomly let's see, okay, so i decided who my winner is and i wish i could see their page. I really do, but it's not private, but it's. Okay, but if you're watching this video - and i hope you are the winner - is alicia williams - if i am saying that right, i know she's an island gal and she's a libra. So if you're watching this, you are the winner, congratulations and be sure to dm me. So i can get the information, so i can send the wig to you and yeah. I hope you all enjoyed this video be sure to give it a thumbs up comment below. If you haven't already - and i will see you babes in my next video - you
Comments
Shawnte🤎: You make it look so easy lol amazing work ❤️
La'Joia Creary: I love the end results came out so bomb !! Congrats to the winner !!
GlammedbyReni: Your the reason I learned how to do my hair ❤️❤️
Kira B: This looks so easy!!
Maxine2: This is so dope and so effortless!!! You slay Boo!!!! And congratulations Alicia!!!
Nicole Flax: I learn something new and something better from your videos every dang time. Thank you because I got my daughter a sew in with that closure and I'm not digging it like I'm feeling that leave out fo'real!!!! I just want take it down and do it this way but I paid 2 much for it but afterwards this one is it tho. I be saving your videos because they're very informative and straightforward. You look beautiful and this look is another banger! Congratulations Alicia! Enjoy your wig! As usual this video is .
Joy Wright: I’m surprised you didn’t use the black neck strips. This is bomb thou
Anquanetta Taylor: Love it! I have a question. How do you protect your leave out from heat damage? I'm natural and would like to do this style but scarred I will burn my hair out trying to blend it every couple of days.
Moonlight and staryeyes bestries: You are very gifted and talented. Thank you for this tutorials and the others.
Jazzy Mzpretty: Love it
Angela Collier: Beautiful!
kelly roberts: Simply beautiful! I wish you could do my hair.
LiY LiY: Thank you. I was looking for a video of someone using the wrapping paper on THEMSELVES and not a client. You Betta work !!!!!
cris johnson: Amazing
Kellee Mcfadden: Love it
ms_jblessed: Perfection!!
lovely ladyt: Love it!!
Rae Austin: Love it
Fantisha Sherifa: Oooooouuuuuuuuu! This is gorgeous!
Amireer Baker: Gorgeous. Periodt.
Amber Drownes: I need to do this, GLUE LESS! Did I miss something? What was the technique without the glue? Yes , I missed that part of the video, oops!
Chelsi Junior: This is cute
Nicole Kemp: so pretty
Diva Wright: If it's glueless what are you using to bond your tracks?
tiesha murphy: Fabulous
Monica Morgan Neville: Beautiful
Candice Sanders: Hey Diva @Tatiaunna . Do you have a P.O Box? I wanna send you this Milky way hair to do a Quick weave. I bought it because it was $1!!!!! Its in the color Mint Green. The reason I'm asking is because i bought a pack for myself as well to probably make a wig/quickweave for myself using this hair... That is inexpensive and in a color. Please let me know
Ronikka Carr: Yes because if you don’t use the neck strips your hair will come off on the wig cap .
Dedelicious Bel Grimmel: Very nice..
Jennifer: Where are you located?!? I would love to have my hair done by you!!
SHEILA BREWER: HEY TATIAUNNA WHERE CAN I BUY THE KOREA BUNDALES SO BEAUTIFUL ❤️
랄라: 와우......금손이시다....우리나라에도 이런 금손인분 미용실 차리셨으면 좋겠어요...전 100퍼 갈텐데요.....찾기가 쉽지않네요.ㅜㅜ
love peace:
Meeting of the Minds Of South Florida: What are the brands for the te flat irons you use
Kellee Mcfadden: Congratulations to the winner
valav0406: Am I first tho!!!!!? Hey Tati!!!! I love your videos
brenda brooks: Gurl this style is the shit
Janice hudson: Okasy.. I" enjoyed watching t you're video its New to me, learn sumthin new Evert day, I it nice job you look beautiful
Deborahnell McClendon:
Vanessa: Can you show us hair removal???
Ronni j: Love your technique looks like this doesn't damage your natural hair...love it !!! Do you do clients hair ? If so where are you located????