Boho Box Braids Bob $35 Amazon Hair | Crochet Protective Styles For Natural Hair
- Posted on 31 August, 2021
- Bob Hairstyles
- By Anonymous
Hey beautiful! In today's hair tutorial, I show you how to do this boho box braids bob using crochet hair from Amazon. This hair was only $35 and I was able to cut the hair into a blunt cut bob so that the hair would be shoulder length! I also show you how to do this style WITHOUT cornrows. I show you in detail how I did the illusion crochet braiding pattern which allowed me to give the illusion of individual box braids. This is the perfect protective style for natural hair, especially during the Summer. This look was inspired by another Youtuber named Jai Marii! Let me know if you decide to try this style, thanks for watching!
Like & Subscribe to my channel for more! xoxo.
Hair:
14 inch Crochet Goddess Box Braids in the color 1B from the LMZIM Store on Amazon
https://www.amazon.com/dp/B08TMGDM4S?p...
Products/Tools Used:
Murray's Extreme Hold Edgewax
Shine n Jam
Rat Tail Comb
Rubber bands
Crochet Needle
Hair Shears
Let's Connect on IG: https://www.instagram.com/dahliamonet/...
Bible Verse of the day: "Rejoice always, pray without ceasing, give thanks in all circumstances; for this is the will of God in Christ Jesus for you.."-Thessalonians 5:16-18
Music:
https://soundcloud.com/julian_avila
https://soundcloud.com/lakeyinspired
#bohoboxbraids #bohoboxbraidsbob #amazonhair #crochetbraids #protectivestyles #cheaphairstyles #boxbraidstutorial
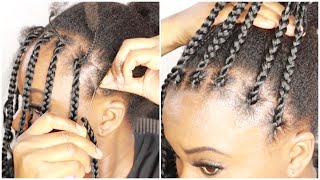
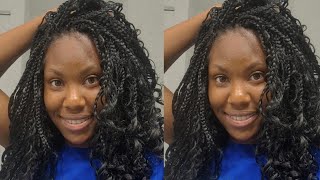
Hey guys, welcome back to my channel is dalia monet, i'm back with another hair tutorial, i'm going to be showing you guys how to achieve this beautiful boho box, braids bob. I purchased these crochet braids from amazon and in this video i'll, be showing you guys how to do the illusion. Crochet braid pattern in addition to how to install these braids and cut into a bob so keep watching. Okay, so we're starting off with some freshly blow dried hair, we're going to be using a mix of the marriage edge, wax extreme hoe and the shining jam to achieve this braiding pattern. So basically, what we're going to do is we're going to add the murray's edge wax to the perimeter of all of our hair, just to make sure that it has a good hold on it, and the purpose of this braiding pattern is to, like i said, give The illusion of individuals, even though it's all connected you can do cornrows if you want, but i just chose to do this one because i don't know how to grow rope and two, because i feel like it's pretty easy, so basically just parting, the hair. So you can make your first box and then make sure you add your shine and jam to the ends, and so now we're going to go ahead and add a rubber band to the first section of hair that we've parted out, make sure that's secure and then We'Re going to go ahead and part out our second box, because these two will be getting connected together, and so what you're going to do is start to twist each plaque, as you see me doing, and then you're going to connect them with them still twisted using Another rubber band and you don't need to pull too tight because you definitely don't want to have too much tension on your edges. It looks like i'm pulling tight, but it's not that tight and this is going to continue to do this until you run out of hair. As you see me doing so, just continue to part twist and connect part twist connect and then to end it. I'M going to just braid the rest of the hair and then i'm just going to connect it all in the back. So this is the final braiding pattern. My hair is super thick, so it's harder to see the parts in between, but it still did what it needed to do and if your hair is thinner than mine, you'll definitely be fine but yeah. This is what the fatal final, but not fatal. Gosh braiding powder looks like so. This is what the hair looks like. It has curly ends and then each braid has about two strands of curly hair throughout the braid as well, and it does pass a sniff test. So no corn chips smell okay. So what you're going to do is take your crochet needle and point it down towards your ear. This is very important for the braids to lay right and at the top of the braid, is going to be a tiny, little hole and you're going to stick that through the crochet needle close the latch pull upwards and then you're going to slide the braid onto The latch like back a little bit and then take the end of the braid and just form like a little loop with your fingers kind of so that you can wrap it around and you're going to put that through the latch close it and then pull it. All through the original loop - i know that was probably a lot, but i'm going to show you guys many more times and then be sure to be careful when pulling the loop up to the base of your braid, because it does have those curly pieces throughout the Braid and you don't want them to get snagged so just take your time, make sure you pull those through, and here i'm just showing you again the same process hook the loop onto the latch, pull it upwards, push the loop back on the crochet needle form. A little loop with the end of the braid so that it can hook onto the latch as well and then pull that through the loop and then just slowly. Shimmy. The loop down towards the base of your braid and you're. Just going to continue to add a braid in each little box, i kind of like to go right over where my rubber band is because it tends to cover it very nicely. And it's going to continue this process down each of the little plaits that i made until it's all full and i'm going to show you guys how i do the back specifically, because i do use a different, a few different methods just to make sure that it's Not too bulky so i'll be showing you guys that in a few seconds, okay, so for the first method, i'm kind of just going underneath the base of the plait - and i am trying to go somewhere at like a diagonal wow with the accent come from diagonal Direction and just doing as normal and then for the second method, i'm actually going through the plait itself, i'm not going completely underneath just so that the loop that's going to be made when we loop the crochet braid around. It'S not going to be too bulky. If that makes sense - and i kind of just decide which method i'm going to do based on the thickness of the braid, because clearly i didn't really care how big my braids were so they're a little bulky, but i still was able to cover them well and In this clip, i'm actually going parallel to my plait and then adding a braid there. So it's up to you, but these are just some options that you can do just so that it all gets covered well and it's nice and flat okay. So if you want a deep side, part slash bang like me, you're going to have to crochet the plaits that are near the part a certain way. So, instead of going towards the ear, i'm pointing the crochet needle up towards the plait and then i'm going to you know, pull down and proceed as normal because as you're going to see soon, if you were to do it the regular way with the needle, pointing Down is going to create a little like loop, slash knot as you can see right here, and we don't want that showing so we're going to want to have to be able to flip that over. So once you flip it over it's nice and seamless, and you don't have that little nasty knot and you're just going to continue that method for the plait that is closest to where your bang is going to fall. If that makes sense and for the um flat on the other side of the part, you would just crochet that as normal towards the ear, because it's going to fall naturally. But the issue is with the hair that we're going to be flipping over. We want to make sure that little knot isn't there, and here i'm just showing you guys that i didn't necessarily always go in one direction for each plaque. Like some of them, i had flipped over some. I had going straight down. That'S just going to help you get fuller coverage and not have the gaps between your plaits showing. This is how it looks before i cut it. Nice and full. The back has pretty good coverage, as you can see, and now i'm going to show you guys how i cut it into a bob. So first things first you're going to pull down the hair and start cutting like an angle and be careful when you are pulling the hair, because if you pull it too tight, you can end up cutting it shorter than you like, and i kind of did that In some areas, but i was able to finesse it but yeah. So it's going to start bringing up little pieces over your shoulder and slowly adding it in and seeing where you need to cut so yeah just keep cutting in an angle. And then, after you finish, getting all those cut into an angle, you're going to start to cut straight across. As you see me doing here, and that's just really going to give us that blunt cut, vibe ends up being really cute and it's going to continue this process until you get it to your desired length and guys it's pretty simple. I think this came out super cute and yeah bob is definitely the way to go all right guys. So i did end up using all of the hair. It was eight packs total so and each pack had like 16 braids in them, so yeah, but it's pretty lightweight honestly, especially after i cut it, i'm really liking it. It'S a nice cute bob. You know a nice protective style for the summer. Don'T have hair dripping on your back. You know you'll be skinny sweaty out there, so you know we should embarrass yourself, sis, so yeah get yourself a nice cute ball, a nice boho box phrase bob and yeah. If you can be like. Oh, who did your hair you'd, be like? Oh, i did period. I love you guys. Let me know how you like this doubt down below in the comments or if you have any questions, i got y'all. So yeah love you so much. If you enjoyed this video, you know join the game subscribe to my channel and give this video a big thumbs up. It really helps small youtubers, so you guys i'll see y'all next time love you bye! You
Comments
ChasNicole1: I love this! So pretty. I can't braid so this is perfect.
TYRA MONET: Loveee this look, wow!
AdrienneRoxanne: Omg this looks so pretty on you!
ItsCriss 435: Very Nice, you did a greatjob!! I especially love the bob cut. I did this look recently & it turned out great!...inspired by Jai Mari. Next time i will try the cut.
ALW: beautiful!!
J. Spot: how long did it last?
Nyajei Vandi: Phewwww a beauty!!