How To: Bob Box Braid Using Brazilian Wool. Beginner Friendly, Quick And Easy
- Posted on 17 July, 2019
- Bob Hairstyles
- By Anonymous
HOW TO: BOB BOX BRAID USING BRAZILIAN WOOL. Beginner friendly, quick and easy
hey guys.
in this video i am going to show you from start to finish, how you can also do bob box braids on your own hair by yourself in just a few hours.
MATERIALS.
Brazilian wool hair bundles, scissors, comb, lighter.
follow my social media for more:
instagram: it's_shamai https://www.instagram.com/its_shamai/
If you want to be seeing more tutorials like this one please like, subscribe and leave a comment.
Don't forget to share this video with all your friends. love yall..
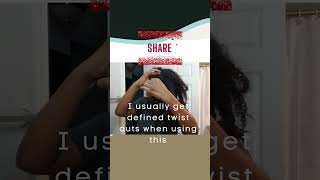
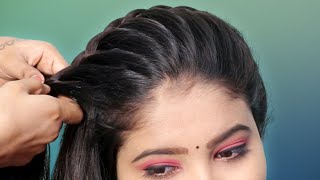
To my youtube channel, if you're new to this channel, please hit the subscribe button down below before you even begin watching. So today, I'm gon na show you guys how to achieve this beautiful Bob, but wait look all by yourself in just a few hours. You can look glamorous and have this beautiful hairstyle. So first off my hair's been pretty short. I caught this, I think about four months ago, so you can see it's quite short. Now. First of all, you wan na. Do you know cornrows on the sides. My hair was really really short on the side, part and great down side hairs, but if you want, you can still use the box braids starting from the side, or you can also do the colors on your side now. This is how they look like the Pandora's when they come through hair. This is one one bundle looks like you wan na, remove the rubber band tightening the map together and then using it. Now, you level, you want to measure what length you want. I was measuring from my fingers to my opposite. Shoulder. It all depends with what length you want. You get it into the longer or shorter, depending on how long you want them to be on your head now. After doing that, you wan na start unraveling the whole bundle, and so it's finished and that's how it looks like that. What you wan na do now you wan na you wan na, take your scissors and then you want to cut them into so you're gon na cut twice, and if you cut twice you're gon na separate them into two different species. And then you join those pieces together. So now you have your more than this one to bundle together. Now you wan na do this easier because you get to just count instead of just estimating how how much you want the hair, if you just count the strands and then for me, I was using twenty-one strands for each braid, so you can use more. Obviously, you can use less if you want thinner or thicker braid. It all depends on how thick you want your page to be. I was using 21 strands for each grade because I wanted to mind a little sticker now you want to separate them. You want to take out a third of the hair, a third of the whole piece, so my third, which is seven yeah, my mother's still created showers, circulating the seven and then want one because part, and they want smaller parts like that, and then you wan na Hook them together together, like that, so that you come up with a kind of for food cooking them like that. So now they all talk together. Okay, so now we basic 101 grading technique. You'Re gon na want to use your both your index finger, your middle finger and your thumbs in the whole grading process. That'S all you can. I use you're gon na take your index finger. You'Re gon na take your index finger and then you go under and over the other plate. That'S on the opposite, so you go under and over like that. If you take your index finger and then you go under and over and over one more time, and then you have your three small pods, we fight together. Now your hair and just both ways you want to separate them. You want to have a line first into a line first and then now at the back, you can see and you it's better to use bigger chunks of hair as you play just because you don't want your hair at the back to be too bulky. It gives your hair this whole weird shape to your whole head, so you wan na take bigger parts of hair at the back and then in the front you use different techniques. Still at the back, you wan na pick bigger chunks of hair like it see now. It'S really it's usually better if you're, if the hair, you pick like your next line, the trades kind of small in between the previous life. Well, they can cover up your cornrows below the hair and then they can cover up the bases because you're picking, big chunks, you want to cover the spaces between the place. Yeah it's hard with the 4c hair dryer child back now you got ta use that same technique to try to attach the extension on your hair, the under and over technique. You'Re gon na take your index finger and your thumb to kick a small part of hair, and then you go under and over as you go under over. You pick up smaller parts of hair as you go picking up hair as you go until you have your whole braid attached to that each of hair. Now, as you do this, you wan na be pulling on your own hair so that it's nice and tight bikes. Now I just kind of prayed like four to five goals or like right. After my own hair and and then I just kind of I sleep it over and then I start braiding the regular way, this is faster, it's faster than the old one. I don't like that. One use it more when you attach against the expansion to your own hair. Now this is all the hair lose I'm done with the back, I'm down the side. Now I just wanted to show you guys how I braised the product. Now I was adding those little rubber bands to my hair, as I was craving just because I didn't want us to unravel so you can - or you may not if you don't want to, but I was just I didn't want to have to go back and start Finishing the braid again before I think Dallas using the little two rubber bands, but you don't have to if you don't want to, as you can see, they already look like there. We have something coming out: huh now for the crunchy one I'll start separating into smaller pieces. Okay, you wan na start taking smaller parts of scale for the fun just because you want to cut in the front to be a little more tap the brains and the plants to be a little more packed than the ones at the back, so that those in Front can like cover up the spaces in the back, so it's it has a really nice shape, so even in front was still gon na use the over-and-under method to plate smaller piece of hair. So this is for those of us. We still don't get it. You do the over-and-under method to make it to braid your hair. You take a small part of hair, you go under and then over taking smaller pieces of hair as you go so that you can, the page is really attached to the hair and then, after doing a few rolls, you wan na flip it over and start trading Regularly now for the front part, I wasn't really pulling my hair with the tights, because I don't want to mess up my edges, my hairline. Now, if you really don't have, if you really have like strong hairline strong edges in the fall, your hair, you, you can pull it a little harder, a little tighter. I didn't want to peel my hair pink like just because, as you can see it's already like short and weak, so it's the edges, honey. You don't want to mess up the edges honey, so you can see at the end a add, a little rocket band to stop this bomb unraveling insecure. So I'm going to show you guys one more time you don't have to take a lot of hair or son. You need to take some all the pieces of hair in front so that so that in the front it's packed and you can cover up the gaps fold it back and from the sides and also cover up the controls. So this is how they look now. So now I want to show you guys how to burn this is the most important part you will need your lighter make sure your lighter is working yes and then now you wan na measure or your brave, then you wan na see exactly where you want to Cut your your grade and then you wan na stop burning exactly where you want to cut. You know cou uh, maybe a little a little father, but really you wan na you wan na start burning exactly where you wan na cut, feel great exactly where you want to afraid, and then you burn it a little bit and then you kind of seal it With your own fingers, but please be careful with the lighter. I cannot stress this enough. Please please please, if you're doing this at home, make sure you're really careful with the light that don't turn yourself and don't burn anything and then so you kind of squeeze them all together, like that, so that you know they kind of steel together and then you Get your scissors and you cut where you stand, and then you kind of burn it a little bit after that. Just to make sure that the alone and gravel you don't have to burn a lot after cutting a little just to be sure that it won't unravel. Just to make sure still be, and then the best thing is that you can actually like mold them into what you want them to be kind of like that yeah into into shape, and then after the first one. That was a kind of easier because you just measure with the first one or with the first one. So you know exactly where you want to cut. You can also use this lighter to kind of like even out those gray hairs away from just to kind of clean them out so me, and then he, along to all teachers, please be careful with the lighter and then after cutting you just kind of turn. It a little bit but make sure you don't burn it too much, because if you burn too much it will unravel and then you're gon na have to start over so burn just a little bit and then seal it off with your own fingers. Let'S make sure you don't burn yourself so at the fact I was using a hand. Now this is how they look. You can see afterwards. It looks really really really nice at the end. You can kind of mold them into taking the shape of the bob, and then they look really nice. That'S a good height for the hair. You too can achieve this beautiful bob box. Great look in just a few hours. This took me about like six hours. To finish the whole milk, but it was worth it so if you guys enjoyed this video, please give it a thumbs up like comment and subscribe, and I will see you in my next video bye for now. I love you all Vince Mullins me
Comments
Chioma Onuoha: I've watched a lot of videos on how to attach braids to hair but yours is the best and I actually did my daughter's hair, which is the first hair I've ever done and it came out beautiful. Thank you!
Nifemi Favour: Thanks for this video,it's so helpful❤
Tawanda Hayes: Best video on how to install the hair. I could never figure out how to hold the yarn/hair or how to grab hair from the scalp. Thanks to you I got it!!!
Rue Lillian: Bih we have the same lighter! . Amazing hair tutorial , and love the whole hairstyle and color choice
Rumbidzaishe Mubvumbi: Hie.how many bundles in total did you use
Queen John: Nice one
juliet onuoha: Nice and informative am using ur tutorials to do my mum's hair tomorrow. Please what is the name of the song at the intro of the video , been looking for it for a while ?
Marlene Lyles: Wonderful video and great details. Did the yarn stick to your clothes like weave does after u burn it?
JasperTheFilmie: Love your intro!
oluchi iloduba: Hello, please what's the name of this color, is it written on the pack? Also where did you get it and for how much per bundle? Please reply
Charity Stainless: Thanks
Tinah Mcwilliams: Go girl