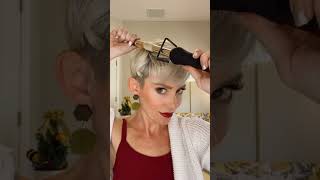
A Layered Bob - Short Layered Bob Hairstyles Over 70
- Posted on 08 December, 2022
- Bob Hairstyles
- By Anonymous
A Layered Bob - Short Layered Bob Hairstyles Over 70
In this video, we'll show you how to create a layered bob hairstyle using short layers. This hairstyle is versatile and can be worn straight or wavy, so it's perfect for any occasion!
If you're looking for a stylish and easy hairstyle to try, then check out our short layered bob hairstyle tutorial! This hairstyle is easy to style and will look great on anyhair type. With short layers and a little creativity, you're sure to achieve a layered bob hairstyle that you'll love!
________________________________________________
Thanks for watching Boys and Girls Hairstyles
Watch the latest videos: https://www.youtube.com/playlist?list=...
_________________________________________________
CONNECT WITH US:
Facebook: https://www.facebook.com/BoysAndGirlsH...
Pinterest: https://www.pinterest.com/BalancedLife...
Website: https://www.boysandgirlshairstyles.com...
_________________________________________________
Don't forget to check out our YouTube Channel:
https://www.youtube.com/user/GirlsHair... and click the link below to subscribe to our channel and get informed when we add new content:
Subscribe: http://www.youtube.com/user/GirlsHairs...
_________________________________________________
Join our email list : https://forms.aweber.com/form/67/36899...
_________________________________________________
Products:
Wet Brush Link: https://amzn.to/2BhoA8O
Deb Erickson – ICAN Mind And Body: https://icanmindandbody.com/zynnlife/
Weight Loss Protocol: https://www.zynnlife.com/radona
Hi I'm redana from boys and girls hairstyles today. I have Tana with me and she is a sweet friend. She'S been coming for a while her um Grand boys are awesome. They wrestle with for my husband so anyway we're we're good friends. Um. I want to show you her haircut. She is growing this out um. She wants us to kind of all be one length. So what we're going to do now is we're going to bring them back up we're going to come. Um more of an a-line try to get more of a look of an a-line, so we're going to bring this length up and then we'll clean, we'll clean. This up with a little trimmers but yeah we're going to bring that back up just so. It feels a little bit more stacked, okay and then make sure that the head is tilted that it's just um level this way, because if the head is down and you cut it's going to be shorter, when you lift the head so just make sure your head Is looking straight, okay now same thing over here we're bringing this up we're going to bring this down on an angle to the front length here. Okay again make sure the head is tilted, just not even tilted just straight okay and then just bring this just barely trim that okay and now we are going to take the little trimmers clean this up and then, of course, after we dry it and stuff. If there's you know things that we need to make shorter, whatever we can okay, so now this we're trying to grow. So you can see that there's a lot of length here. Okay, so it's going to look really full here, so she wants an a-line look. Why she's growing it out, so you want to take this corner off so you're gon na see, because that top layer so you're going to take that little corner off just to take the bulk away. So it's not so bulky at the bottom and it will catch up to this layer up here and also give it the look. You know of an a-line okay. So now I'm taking another section this way holding it back and of course you want to keep holding it back this way. So when you let go, this length still will fall. If you hold that out, it's going to be shorter, so if you hold it back then that way it will fall long and you won't take the length off of the site. So you can kind of start to see where that's coming in a little bit and that's what's going to make it look more like an a line, and this is going to be a slight A-line. Okay, it's not going to be. You know very stacked, um we're just trying to catch this top layer up but feel like there's a style as she's growing it. So that's why we're going with it more of an a-line look! So, okay, now we're going to hold that hair back and - and you can see, there's not as much hair. Obviously, when you hold this side back because um, you know it's going to fall a little bit longer, okay, now what we'll do is just trim the rest of this, because you obviously want to trim when you're growing your hair out. A lot of people think that you know when you're growing out hair, that oh I'm not going to go, get a cut because I'm growing it um, that's actually the worst thing you can do. It'Ll start breaking and things like that. If you just barely trim the ends, it will really keep it healthy and help it grow. Okay, so you can see the little ends off of this, not a lot but just trimming, and you should see Tana at the wrestles. I love her. She is the best grandma out there cheering her grandma grandson's on she's the best well, the whole team, but she loves her grand boys, yeah and speaking of it's their first duel tonight and they don't have a match. So we're really sad. We was talking about that earlier, darn, it that's right, two weeks, yeah exactly so we I guess we have to wait till Saturday we'll get to see him rest in Russell. That'S a good thing! Absolutely! Okay! So you can see I'm just trimming the rest of it and I'm going at a 90 degree angle, okay, something here and here. Okay, now we'll take the top and trim that yeah it's kind of cut into that a little sway. We'Re gon na hold out trim. These ends same thing, 90 degree around the head. Now, if you want it more stacked in the back, you guys just take your fingers and hold it closer to the nape of the neck um and up the back of the neck, and then, if we feel like we need to take more to have it. Look more aligned, then we can take more length, but where they're growing it out, you don't want to obviously take too much, but we want it shaped into more of an a-line. Why she's growing that top layer out, then you just don't feel like bushy at the bottom and it's kind of how it was getting huh yeah. Didn'T you feel like that yeah? I think it did yeah. That'S why I wanted a little shorter in the back. Yeah super smart, okay and then the bangs we're just going to come in through here just point cut into the bang area got a lot of dead ends there in the front. I know I'll always ask people okay, what do you have your flat iron turned at or do you hold your blow dryer Too Close yeah little things like that, make a huge difference. So I'm glad you brought that up, because maybe somebody out there is having you know: they're they're frying their hair and they don't know it. But that could be why so I'm real careful about that. That'S good! If it gets too hot, it kind of discolors the hair too, oh yes, it can definitely do that. In fact, some people do that and then they have this big orange yucky. It just burns the hair. Definitely definitely so you can see I'm just coming around her face this way just so it um just kind of frames, her face a little bit, okay, perfect and now I'm going to give her a little bit of texture um. Obviously I am not going through where her part is, but I am kind of going through this back a little bit and through the sides you want to go up about a half inch to an inch up um. I obviously don't want to texture through her ends, because we want it to look full, but we do want the you know the volume through this area. So that's why I did it up in instead of on her ends. You don't want to do that, especially when you want it to grow and look fuller. Okay. So now I'm gon na do a little bit of mousse rub that in a little bit through the veins and then um. Obviously, when we're done, we can go back through and see if she wants her being shorter, let's go shorter and go to town and take too much your clients will be mad. No okay. Now this is just a volume and lift spray. So that's going to make it look and feel thicker and then I'm just gon na dry down the back. You see, I can already see like drying, there's just a little bit. That needs to be cleaned up. That'S what's awesome is when you dry or you move the hair it it can move and then that way you just do those little peanuts and then you're good to go. Okay, you guys, so you can see that I just round brushed and brushed her hair and it's so cute. I'M really loving the color too. My dear! It'S awesome a little bit later. Okay, now I'm going to just take part, I'm just going to back comb a little bit up through here and when I back home um, I just kind of go in down and out like this, it's kind of a c shape a lot of people when they Back comb will go up and down, and it just takes the back coming out. Then I just like to spray underneath the back clean and then just put the hair back into place, and I love this cut, and I just I love it because it makes her hair look really full um. She has fine hair, the texture looks really fine, and so it makes it it makes it look a lot Fuller. Okay, now I'm gon na turn her to the mirror and see if she wants shorter, bangs. Okay - let's see yes, how does that feel feels good good super good, thank you, but I do think that what like little things? Okay, yep, that's what I'm thinking see. So you can always go shorter, obviously, on the bangs, so we're gon na come up through here. You can see that I'm just taking the shears kind of on an angle and not going straight across I'm cutting just kind of Point cutting, and so it's different lengths in the bangs that way you're not going to get. You know a straight straight bang on the front which, if you want to then obviously you're not going to point cut you're just going to cut straight. But if you do want a little bit of texture in different, you can come through here and just lighten. This will just lighten up the bangs, so it's not so heavy. So if you feel like you have a heavy bang, you just come through the ends like this and take a little bit off. Okay, oh yeah, much better huh yeah! Is that about the right way? I think so yeah yeah I've got it Alex right here, but it's cute because it gives up volume. I do like that. Okay and then I'm just gon na spray that I'm going to turn it around. So you guys can see how it's it's stacked. So it looks a little a-lined, but it's not way stacked okay, so it's just a subtle, a line um anyway. Okay, thank you! So much. You are amazing, um thanks for watching and supporting, and I hope you enjoyed the video and we'll chat next time see ya. Thank you.
Comments
Rose W: Oh wow! The cut looks great on her lovely color! You smashed it RaDona!
Jazzy Bee: Love this cut! ❤❤Great job!
Melissa Potthast: Thanks again for having us gals over 70 with thinning hair. You gave her a nice haircut with bounce and faux thickness. Just exacting what I need. And you teach us some many tips on hand to have healthy hair. Live you for caring so much about us out here in comment land!!!
T K: A beautiful look for her Radona! Such a pretty color as well!! Thank you for another great video!
Elle: I love the cut & color!! You are so much fun to watch...not only for your skill, but positive energy!
Turra Gorman: Cute cut!! That shirt you had on is so cute!!
Arlene Nielsen: Love it!
Donna Landolina: Beautiful hairstyle! Love to watch you and all of your fabulous creations! Thank you!
inna172134: Beautiful hair cut
Sharon La Tour: So cute on her!!! I like the color too!!
Kerry Booth: That is my hair right now! Super flattering
Corey Acre: Her hair looks so pretty
Jean Jacobs: Greetings RaDona! You make fine hair look so full!! Love and blessings ♥️
Sue Smith: I love how you make fine hair look so much fuller and healthier , I have finer hair than this lady and would love to have you cut it
Dana Renken: Beautiful color wowser! Love the cut on her to. Y’all have a good day. Stay safe praying for you.
Sandra Sealy: Beautiful job
Sheryl Dye: Great cut and color. Wish you lived closer to Michigan, then you could cut my hair.
cynthia evans: Love U’re hair cut plus the one U just finished. Are U close to NC