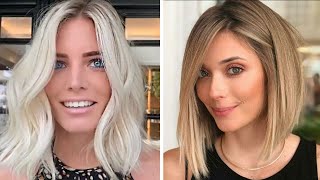
Layered Bob Haircut Step By Step | Lob(Long Bob) Haircut | Dry Cutting Technique
- Posted on 21 December, 2020
- Bob Hairstyles
- By Anonymous
Layered Bob haircut step by step tutorial
Lob(Long bob) Haircut | Dry cutting technique
How to cut a Layered Bob
*Giving is hold forever*
#LayeredBob #LobHaircut #LongBob
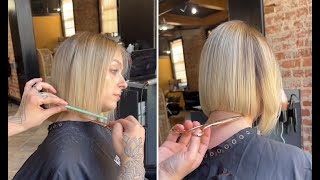
Good morning, good morning, guys uh, this is anthony edge from edge academy, uh changed location today, we're back home in our apartment. In our studio, the girls kicked me out of the salon today, someone's busy getting ready for the holidays. Salons are still open, touching wood that everything stays open over the holidays. Uh the girls are busy today. So he said, look you can do your videos, but you got ta go back home, so uh we're live on two devices again, i'm gon na be live on. Instagram and we're also live on facebook. Okay, so if you don't follow us and you don't know much about edge academy, you can check more of edge on our website at edge74.com. We have classes basically we're an educational, advanced kind of uh haircutting company out of san diego, and i run the education with my gorgeous wife. So we have a team of girls who work for us and then we do different educational classes. So we do one day two-day and three-day classes all right. Uh live out of our academy here in san diego and then, if you can't get to san diego in person, then we do some free education like this online and then also we've been doing some online courses where you know you pay for those okay. But today what we did yesterday, we came on uh same time yesterday and we did a long, uh, layered haircut right so seamless layers we did yesterday. So yesterday we came up with an idea of the weekend and said: let's do uh three days and three haircuts. So monday, tuesday, wednesday we're going to be live at 9, 30 pacific time, uh, california, time uh, which will run again tomorrow uh, and we did one yesterday seamless layers, which was basically this kind of this is the haircut from yesterday. So it's left long. It'S created a little bit of fresh framing through the front, and then it's really long layers. Internally, okay, we worked it on dry hair, so we did a bit of a dry cutting. We were kind of like you know where to be reaching out to all our friends and followers and said: would you like to see and a lot of people said? Look you know i'd like to see a dry haircut. You know. Sometimes we like to do a bit of dry cutting, so we did that yesterday and then requested um again. Another dry cut people are like you know what we really enjoyed seeing that yesterday it was a different approach and just cutting it on dry. So, as you can see, the mannequins dry all right. So what we're going to do we're going to do another dry haircut, but we're going to do like a lob all right, so a little bit longer than the bob a little bit of a like a lob kind of shape, uh introducing some layering. So for me i would call it a layered bob or if you prefer it a little bit longer, lay it lob all right and that's what we're going to be working on today. That'S the inspiration of the haircut today so keeping it just below the plastic of the of the mannequin's neck. So it's not going to be like a short bob or anything like that. It'S going to be a little bit more of a mid-length and that's what we wanted to design over the uh the three days. So we came up with this idea of three haircuts three days for free, so anyone can just come in and tune in and watch and uh. So we did a long one and then we thought we'll do a mid length and then tomorrow we'll chop it all off and do a short haircut all right. So again, there's something there for everybody. If you do long hair clients, you could go back and watch the video from yesterday. If you do more, but you've got quite a few mid lengths. You know people who are a little bit bored of like long, hair or short hair, and you want that middle length. Then you could follow this hair for today or if you're really focused on short hair, then you could literally watch tomorrow's haircut as well. Okay. So, let's crack on all right we're going to take you through it step by step, it's quite quick, simple technique and when it's simple and quick, then you're not afraid to use it behind the chair in the salon. Okay, so in a real life scenario, if you've colored this you've done like uh, you know highlights or placement of color and then you've come back from the back bar. You might have blow dried it. You might have got this all blow dried, nice and smooth and then using you're really prepping the hair first, so making sure that the hair has got like you know like a smoothing cream and a straightening product in there. Maybe an oil or a serum, something that's going to glide through okay leaving conditioners. You know things like that heat protection spray and then once you put all that in and blow dried, then you can literally then decide how much you want to cut off. If you don't do a lot of dry, cutting and you're like i don't really do this, then you would have this wet. Okay, guys, i'm not here to dictate i'm just here to share something fresh and over the last. You know six months: eight months we haven't done any dry cutting and for me, as an educator, i'm always getting like. What do i do next? What do i do next? So, in a way it's kind of refreshing when our audience said yeah, we really enjoyed yesterday's haircut and a dry haircut. So can you do another one? So i was like yeah, okay and get away with doing a dry haircut on this length of hair. Today, all right, so you basically uh if it was wet or it was dry. Okay, you would then literally work in a center parting on the forehead down to the nape, then literally working in a radial. I call this like a radial parting from the crown to the top just behind the ear. We want to make sure it's behind me: it's not on top of the ear, so it's just behind the ear. Okay uh a little part in there, and i think everyone can see that on a profile. A few people waving and saying good afternoon and good evening depends on where you are all right here. It is good morning it's good morning from san diego, all right, i'm at home, no one's here, tallulah, our little girl is at school gloria and the rest of the team are in the salon and i'm in the den basically doing a live video for you all. All right, so what we've done here now is literally split the hair into like kind of three boxes in a way you've got a center part in then you've got a radial and then we've just clipped out a side and a side. Okay. So there's two clips in the front and then the back is all natural for all falling down all right, so we're going to layer this first, so some of you might be like. I just want to cut it off into the lob. Okay, if you prefer to do that, you could literally do section by section and then comb that down to natural fall and decide what sort of length you want to take your perimeter. Well, i want to create, is a different approach. So what we're going to do? We'Re going to get the client to put a head down, so if this was in a real scenario, hello from belgium, hello, belgium, okay, if you put that client's head down so in a real-life scenario, she could read them be on an ipad. She could be on her phone, she could be um, you know falling asleep all right, so the trick is, is really just to put a head slightly forward, all right. So for the guys on instagram or facebook, you can see that nice little profile. How she's literally got her head coming down all right, so our head is slightly down okay and now we're going to introduce a layer. So i'm going to work a center section right through the middle. My elevation is 90 to over directed and what that means is basically i'm going to bring all the hair up to the ceiling. Okay with a head down, so my head is going to be down, but i'm bringing everything so i'm not doing it. 90 from the head, i'm bringing it off the head shape. So all right! So, what's going to happen, you're going to create a layer going from shorter to longer, but instead of creating the layer with your fingers, you're doing it with the head shape instead, all right! So you're going to go straight off from the head. Yeah, like you, say, up to the ceiling, okay, so straight up to the ceiling, and then you decide how short you want to take this all right, i'm working with the uh, the larger scissors again today. Yesterday i did the same working with the sevens. I prefer to work with a larger scissor uh when i'm doing some dry cutting, but that's again, personal preference and then we'll drop that down and then before you carry on. Let'S just check and see where that light is going to fall, so you can put your client's head up now up right and you can start to see where the crown is. That'S where your layer is and then let that fall down, that layer is now just sitting underneath the o bone. Okay and i've got to think that i can let it stick out a little bit there. So you can see where the layer is falling, yeah and then you've got to think that. Where am i going to take that length to i'm going to take that length to there all right so that layer for me personally from the top of the head to where the length is going to go to is about halfway? So i'm kind of happy with that, because that's very commercial and very someone friendly. If this girl turned around to me and said i want an edgy haircut, i want it a little bit like funkier then take another two inches off that layer. What will that do? Give a little more texture a little bit more volume, it'll look a little bit. It looks slightly disconnected in a way it won't be disconnected, but it would look like it. Okay. So again, what you see and what i see are always going to be different and that's what i love about our industry and we all you know, there's loads of us who are watching this. Now we all cut hair. We approach your hair cut in different ways and it's kind of nice that you can just see something to it fresh, so head slightly forward again. Okay, so the head is down and everything is on the base. Okay, everything's on the base and we're just literally point cutting through square. So the technique is a square layer with the head down. Okay, so my elevation yeah is 90 to over directed okay. So where am i over directed i'm over directing the perimeter? Okay? So my distribution is 90 to over direct the way i'm combing. The hair is also 90 to over direct, so i'm over directing so it's maintaining a nice square line all the way through there, okay and then i'm just going to continue working vertical sections. Okay, so vertical i'm not pulling into the middle, so i'm not pulling into the middle. If i was working on finer density of hair, then you know this is where you can start to customize and tailor make that haircut for your clients needs okay. So in this case, i'm not just literally on the base. Okay, so you can see there. I moved there. I made sure i've got a grey shirt today guys because sometimes you see educators when we wear a lot of black as a hairdresser and you're doing you know dark hair with a black shirt on. You won't be able to see what i'm putting. So. I think it's kind of nice, where you can start to see the actual shape, what we're doing there not a step away. You can just literally just point cut through there, okay and we'll just continue working to the hairline okay. So you just literally work into the hairline so, like i said before, the elevation distribution is 90 to over directed and we're point cutting okay to do a little bit of softness because we want a choppy bob okay. So the technique here we're just joining in and we're working on a layered bob all right and what we want to do here is just point cutting and when i'm point cutting, as you can see, i'm point cutting a little bit away from my fingers because you Can be the best hairdresser in the world, but we can still catch ourselves yeah, especially when you bought a brand new pair of scissors, and you know ah - and you just catch yourself all right. So these are just literally pulling everything up: okay and you're: maintaining a square line. That'S what we're looking for here, looking for a square line all the way through okay, and then we calm that down and what we're doing here is introducing a nice layer all the way through okay, what i love about this layer, you could even do this on Long hair, so if you've got a client who wants to maintain a length, you could do this layering pattern as well. I'M working on a mannequin, i know - and i can just spin the mannequin around and change my body position that way. Okay, so i just want to make sure i've got the right camera angles for you all all right and then exactly the same now my distribution yeah is 90., so over directing up and i'm just going to work the opposite side exactly the same: okay, so you're Over directing everything's coming to the ceiling, so the easiest way to explain this haircut is literally working vertical sections. You pull in everything from the crown up to the ceiling so right up to the ceiling now, okay, so get it right to the ceiling, and then you literally just point cut that through following the guideline from the middle okay, you follow that guideline. Keeping the client's head down. Okay, you don't need to put it right down the client's head, it's just going to be forward okay and then right on the base, like i said, and we wanted to do a dry cut. It'S amazing how everyone was like. I love the dry cut yesterday, uh, it's something that i do. We had a lot of good feedback yesterday from yesterday's demonstration. A lot of people are like yeah. I do a lot of color. I focus on color, i'm not really a hair cutter. Yesterday'S haircut was fantastic, it just made it so simple. Where i do my balayage, i do my ombre, i blow dry it and then my client says: can you just tidy it up a little bit? You know i don't really want a full haircut, but how can i make it look good and that's what yesterday's haircut was all about is focusing on. You know that kind of haircut for, like you've got colored hair clients, okay, so just literally paint cut through everything up to the ceiling. Okay, making sure that you don't get your fingers so like they say like that's right on top of the guideline now, so making sure that your finger is below the guide, and you can get that nice and choppy all the way through. Okay and you can drop that down and you'll start to see when i bring her head back up now, say like okay darling, bring your head back up all right! Just tighten that up, because we've got here now, all of a sudden, it's kind of nice even leaving it that long. So some of you might look at this now on a profile and go actually. I love that layer that looks really good on long hair, because, basically, what you've done you've just created like a lot of layers in a long haircut, and what does that look like nowadays, a shack? You know it's really popular where people are saying. Look, i want a layer, i lots and lots of layers looks very 70s inspired because what was really hot in their 70s was layering. You know, so you know more layers, great, more volume, more texture, all right. So some of you might look at that and go. I love that layer because, basically, what that does is shorter so longer so, if you're a crush checker now and you love to cross check what you could do, you could just literally just check this through and what you're looking for is shorter. All the way to longer you think wow. How good is that so, instead of angling, your fingers so, for example, doing this and then trying to angle your finger to get it perfect yeah, you just put the client's head down and do a square layer and you're like what. Why did no one ever show me that before all right, so really really simple all right, because then it just gives a nice seamless layer like we talked about yesterday and what seamless means it means you can't see a shelf in there. So if i spin this mannequin around, if i shake that out, you can't see the layer starting or finishing it just looks really seamless. So it's no shelf there's no weight line. It'S just a really commercial salon, friendly layer. Okay! So that's what i love about this kind of cheeky technique, all right, i'm always here just to share something new and fresh okay, and you know, if i stop learning i'm bored, then i know i'm going to give up being an educator. So i'm always trying new things out. Some things don't work. Some things do yeah when we're doing that collection and we're. I play on mannequins a lot of the time like this playing with different shapes, different ideas. If it works, then that's how we put it into the collection and every year we bring out a new collection of haircuts new shapes, new ideas, new approaches. Why? Because it inspires me, inspires my team. It inspires our followers and all our clients who come. We have people traveling from all over the world coming to our academy yeah. We have people all the time coming to our academies for all our classes and we have people who come like twice a year now you know twice a year they come like. You know. It'S part of the year, then they wait. Four months later they come back to the academy and they're always seeing something fresh they're, always seeing uh something a bit different. Okay! So that's what i love! You know it's never always the same at our school. Okay. So once we've done that you can see like we've got shorter, go into longer. Some of you might like. I just want to keep it long uh. You know. If you want to keep it long, you can do but, like we said before, we're going to do a lot all right so like a little bob, so i'm going to do now because it's layered and you've taken out all the weight internally yeah. All this doesn't reach look see. Let me reach you to here, so i can get away with cutting that perimeter in one go now, so i'm just going to get on my knee all right a little bit and i'm just going to comb that down. That'S the best angle: you can see this okay, i'm going to work it through my comb, all right and i'm just going to literally just point cut through through the comb, nice and choppy all right and i'm going to decide how much i want to take off That length, if you prefer, to work through your fingers, you're more than welcome to if you want to create, if you want to work a bit more of a stronger perimeter, you could work it all blunt again, a personal choice. What you see and what i see are always going to be slightly different. Okay, all right! So that's what i love about this, so it's literally just bringing up that length now. Okay, so we're not taking it really really short, like i said earlier, we're doing more like a grown out bob or a lob, you know something a little bit more modern. You just eliminate all that length now because the layer doesn't reach so just comb. It all down, so it's natural full, if you want to you, could have a cheeky chat for your fingers. You want to make sure you're 100 happy nice and shocky all the way through. If you, if you want it even looser, you want it more choppier yeah. What you could do, then you could go in and do some point cutting. So you could literally just divide that through and see there, and then you can just do some little bit of deep point cutting if you wanted to just to break that up. If you wanted just to break that up a little bit more than welcome to break out break that up and then when i move that around you can start to see that it's not as layered. Now, because i took the layers short enough that it's going to balance so look pick that layer layer up now drop that down where's that sitting about halfway and that's what i wanted. I wanted to keep the layers really commercial and really salon friendly, so the layer now is around about halfway from that length. So if this is not funky enough, the client said i wanted it a bit more funkier you just go in and take them all off. The layer, okay, so there we are just moving that around, but what's in that kind of lob perimeter and then you know obviously that shaggy little commercial layer all right. So, let's crack onto the front now. That'S all the background guys. It'S really really simple! A few waves out there and leash man in hell, you're watching with paul houston, hi paul hi mate, two of my friends from england from blackpool hi nice to see you guys definitely using this tip kelly yeah kelly. How are you kelly all the way in philadelphia? Just outside philly or outside new jersey that way, how are you kelly, i hope all is well. I hope you enjoying your ed sheers. I hope they hope you're using them a lot at this busy time of the year. Okay, so we're literally just combing everything down to uh, it's natural fall, we've decided on the actual length, so the length is finished. The layering pattern is finished. What you could do now? You could literally go back back into the layer and customize because we're working on a dry hair cut, so what you could do if this was wet hair. You would do this at the end of the haircut. Well we're working on more of a dry haircut today. So a little dry cutting. So literally you just comb that through now - and you can just literally go through and just do a little bit deep point - cutting all right, deep point cutting about two inches into the hair. Let'S just give it a little bit more of a shattered layered bob, but again what you see on what i see are going to be slightly different. Okay, just break it up slightly all right, so you might want to go in and slice this and break it up even more you're. More than welcome to you can do all right. I love what we've got going on there. I think that's very commercial. A lot of girls out there will go yeah. I'Ve got the haircut right so now we're going to go into the front okay, so in front of the uh the radial. So what we're going to do now so we'll take those clips out good thing about this haircut. You need two clips or one clip all right. How many times i've done a haircut and it's like okay, you need about eight clips to do the actual technique. So what we're gon na do now is i'm working a large last uh triangle, section: okay, i'm just gon na work, a large triangle, so it's literally going from the radial right going from the parting and it's going towards the recession area. I know we're working on a mannequin today or dolly yeah whatever. However, you want to call them all right and uh literally, i would go to the recession area and then we'll just literally just clip out this large triangle through the top so i'll just twist this out the way twist twist twist, and then we clip that out The way there okay and then everything else is just hanging down. So let's just show you what that looks like that little triangle so that, if i come, if i put a head down be able to see to the recession area is diagonally towards the radial parting. Okay and we just isolate the top out of the way right. So what we're going to do now we're going to create kind of the short to long layer again so, instead of having a head up like this and then following the shape, what you've just cut by doing this and getting the angle like that, making it difficult What we're going to do here is we're going to get her to put a head over to one side again, so we're going to get to put a head over. So it's all about getting your client to move the head and get them involved a little bit. So first at the back, the head was down and on the sides, the head's going to go slightly over to one side and slightly over to one side. This is going to be quick because you, as we all know a client, doesn't want to sit in the chair being uncomfortable, yeah and being a bit weird yeah by going like this having a haircut so in a way when you come on to do the sides, You just literally just get the client to move ahead and you do it and then it's done and then it's over to one side, and it's done you don't take the time with it. You know it's not a lot of hair anyway, when you think about it. You'Re going from the radial and you're just literally working to the front hairline, so there's not a lot of hair. There. Okay depends on the density of your client's hair as well. If it's kind of weak and fine, you could do that in one section. If it's fine hair, if it's thicker hair, you might need to take two or three sections all right, as we all know as hairdressers, you know some some densities of hair take a lot longer to do, and some people's hair takes forever to do because it's a Lot more hair, okay! So we're going to take the guideline from the behind the ear, so you have a guideline and you're basically bringing everything to the ceiling. Okay. So if i pull that back, so everyone can see the elevation so my distribution, my elevation, is 90 to over directed because what's going to happen now, i'm pulling back i'm coming off the base guys i wanted to leave it longer through the front, so i'm using The guideline, so if i drop that down you'll be able to see there's the guideline, that's behind the radial. This is a square layer, okay, so it's all to the ceiling, so it's lifted to the ceiling. Okay and then i'm coming off the base. So i'm over directing back and i'm just point cutting through i'm just point cleaning it all through okay and then i'll just drop all that hair down. Okay. Now what i'm gon na do now take another vertical section. I come off the base, so i'm over directing it back to me. So it's coming towards me, so i'm traveling, so everyone has different terminology, depends on where you've been trained and who's trained you so i'm over directing back and then i'm point cutting through i'm point. Cutting through and keeping it all nice and square okay and then my last section off the base, so it's traveling away from the client's face. It'S coming all the way back to behind the ear. Okay, so that stationary guideline, so stationary means it doesn't move. So everything comes back to behind the ear and you work it as a square layer, but with the head slightly tilted like this. Okay, all right, so let's go back through just check it. I love to cross check quickly. You know so, let's just quickly check quickly, check, make sure you're 100 happy with the technique: okay, working on a dry cutting technique, but if you prefer to cut this wet you're more than welcome to all right, we just got requested over the weekend to do a Couple of dry cuts, so yesterday we did our first long, one which was dry, cutting and then we've just done a middle end shape today like a little layered bob. Okay, all right! So that's our section done! You can even go in and do a little bit of customizing now, if you wanted to so maybe a little bit of deep point cut in just ever so slightly. I don't want to get carried away with that, because it's kind of finer through the front. Okay and then we drop that down, and then this is the time where you can pop the head up now, just like quickly up right, all right, you want to cross check it. You want to check to see what you've done so what you've just done! Let'S have a look okay, so let's pull it out and you will see straight away, it's shorter to longer, okay. So, instead of trying to do that angle, the head's done it for you all right. So that's all the layer. All the way through okay, looks beautiful and, like i said before, you could do this on longer hair. If you wanted to i've, just decided to do a little bit of a lob okay, so we're going to do now we're going to get it to pop your head over to one side okay slightly over and then you just work vertical section and we come off The base everything comes back so behind the ear and we point cut through square. Quite a few people waving. This is a live guys and if you didn't realize this is actually live. You'Re watching live from my apartment today, all right with our apartment, with our den the girls are really busy in the summer uh they kicked me out, they said: look, we can't you can't do 9 30 uh live demonstration, we've got clients, so i literally ran over To the academy this morning grabbed me, my naked my lights set up in our little den and uh. I'M live here so we'll just do it before we do three days and three haircuts all for free all right just to say thank you guys, for you know supporting us in this bloody crazy year, but uh. You know where all our education was postponed and cancelled. We did a few little events throughout lockdowns and uh. You know: we've been busy doing some free stuff like this, so it's kind of nice to give back to our industry. So that's what i really wanted to do. I wanted to support you all by giving you back some free education. Keep you motivated inspired. Okay, it's all about sharing the love okay, so just everything back all right! So, that's just to recap what we're doing we're just literally coming off the base, all back to behind your ear and then working square, so everything's going to the ceiling it's going up to the ceiling, so i think about the ceiling. Yeah you're not following the head, shape, you're coming to the ceiling you're, creating like a corner, okay and then uh, it's all off the base. So it's all coming back all right. Let'S just check a few little waves. There, hello guys a lot of people joining in okay, so once you've done that we can go back in now and customize a little bit so a little bit of decor cutting, so someone's just asked what scissors are we using? These are the sevens uh. These are our seven inch uh scissors from edge yeah. I like these for customizing personalizing scissor of a comb. I like to use a seven if i was doing this on wet hair and i wasn't doing a dry haircut. I wasn't doing a dry haircut today and this is all wet. Maybe i would use the 6.25 okay. So if you don't know, we do make scissors all right. We have scissors in our uh collection. These are the sevens, offset attachy, japanese steel and then we also have our 6.25. They are on the black friday sale. So if you are looking for a new shear, uh you're you've got a friend who's, a hairdresser and she's. Looking for a new, sheer or new scissor uh, you know we have a black friday sale going on and uh there's gon na be a hundred and fifty dollars off the shears, which is great. Also, we have our famous orange edge comb. Okay, uh beautiful, used backstage at all the fashion shows around the world. A lot of the top tops hairdressers around the world session stylists. Quite a few celebrities have even got them as well. So really, a hot item is our call. We have a deal on that. We never usually discount the comb ever because it's so popular, but we are doing a bundle where you buy five and you get them a lot cheaper. Okay. So if you want the assets code for uh for our website to the deal for the black friday sale, just let us know i'm gon na say you get a code. Okay and you can look at all the deals. We'Ve also got uh education discounted as well. Okay, so let's check the balance now, i think some of you've noticed when i'm picking up the hair like this, i was just literally just checking the balance. This is a nice thing for the client to see to check the balance all the way through uh. What you've done there it's shorter internally, so it's shorter here and it's longer at the bottom. Okay. So what we're going to do now, like you, might look at that and go. I actually love that length. You know this is a really nice layer to do on longer, hair. It is guys, try it on long hair plank with the head down and everything to the ceiling and then head over to one side up to the ceiling up to the ceiling. It'S nice and long hair, but we wanted to do something more of a lot today. So that's how we uh that's, how we literally go through so so we're going to do now, we're going to just connect in the perimeter. So i put the perimeter already at the back as you can see, it's already shorter there and we're just going to literally just cut that off all right. So if you wanted to work a line, do you want to work it square? It'S honestly up to you. So i'm just keeping a client head position up right, uh we're going to comb it down to its natural fall and i'll. Just literally just point cut that through the comb and keep that really nice and loose all right. So i'm just working through the comb and then just point cutting through so keeping it really commercial, really salon friendly, okay, so many clients, i'm thinking of now, who would have this haircut? Okay? And i think that's what's good about education when you're watching this now as a hairdressing, you might be thinking. Oh, i know somebody about this haircut. I can't wait to try this out in the salon this week. You know and that's what's good about our education. It'S not about haircuts where you like, no one's gon na love that that's really weird start the car. You know our education is all about salon friendly. You know this year's collection when we designed it moving. I don't have any of this in this year's collection. It'S posted all over our website at edge74.com. We invest a lot of money in our collection. You know it's cost a lot of money to shoot. Nine girls makeup, photography, fashion, clothes. You know all it costs a lot of money to do a collection. Some of you out there probably do naha or different awards, and you already know how expensive it is to do an award. Do pictures and uh. You know when we do this. This year's collection was all about. I wanted the client to fall in love with it. More than the hairdresser, so you know i showed uh girls, you were not headlesses and said, look, do you like this collection and they all loved it, and i think that's what i loved about it more than ever is a lot of clients were like. I love the collection, it's really nice really salon friendly okay, so there you have, it got a little lob going on there. You know if you wanted to take this shorter you're. More than welcome to you want to leave it longer again, it's up to you as well, all right, so nice little layered bob so far, guys all right. So, just to recap, if you're just joining in what we've done, is we popped a client's head down? Okay, we went behind the radio we put our head down and everything literally came off the off the head to square keeping a corner here. So it's all square layers traveling all the way through okay, so on the base all the way through there, and then we popped our head up and that would have created a layering pattern going from short to long. Then we did the sides and the sides literally. We pulled the head over to one side and then we lit again worked square and then the opposite side. We worked square okay and that's how we're finished through the uh underneath so now. What do we do with the top? Okay? So we're just literally going to connect the top in. So i'm going to clip the sides out of the way we'll get another clip. Okay and we'll just clip those sides out the way like that, but it will be connected through all right. So i am connecting it so there's going to be a slight disconnection on the sides, but the overall feeling is going to be connected right. So this is the large triangle. What we basically left out: okay, we're going to layer this. So i'm going to work on a profile, put it on the side and we're literally going to connect it through with the crown. So i'm going to go center section, and this is where you can get a little bit more individual all right. So if your client wears it on the left, hand, side or the right hand side, she wears a strong parting or her hair naturally falls into a parting instead of working. This first section in the middle i'd work it for the natural parting. So in this case, i'm working this through the center as you can see, but if you, if you've, got a client who's slightly off-center or she wears it over to one side, then you literally work your first section over to one side so that what i'm trying To say is you can work with an offset or a offset layer where it would be literally working from the natural parting? In this case, i like it where it's more versatile, so the client can wear it different ways. I'M a big believer of that. I love to have haircuts where it's uh, you know the client gets a lot of different, looks out of it and you can see the short piece from the crown. Okay, that's the short piece, i'm going to connect it into that short piece. That'S my guideline! Okay! So my guideline is the crown okay, so i lift that up and i elevate away from the face - and i use that short piece as my guide so just before. Hopefully, everyone can see that you can see the short piece there guys yeah and then literally i'm just going to pull away from the face. So what i'm trying to design decide here is literally leaving it longer through the front okay. So i'm coming away from the face. You see this hair on the face coming to the front hairline the front hairline is over directing so i'm over directing. So what that means it's going longer towards the face okay connected through and then what we're going to do. Now is give it a little bit more softness within that triangle. I'M going to come off the base and i'm going to invert everything into the middle okay. So i'm doing one side of the triangle: okay, so keeping that down. Okay, so i'm just literally working one side and i'm over directing coming off the base into the middle okay and it's working from shorter at the crown so longer at the front. Okay, so it's connected from the layer and it's going from shorter to longer. Okay, if your client said i want more layers, you know i want it a lot more layered yeah. Then you can work this square. You don't need to work it from short to long. You could work it all square if you wanted to create more of a layering pattern through the top now i'll scroll make it a bit easier for the camera angle and i'm still working within the triangle. Okay, so if you can see that's why i put the clip there all right so i'll, just make sure that i'm not kind of over directing any of this hair. So i'm just working within the triangle, a large triangle coming off the face there and, like i said before, if you wanted to do this wet, you can do, but we just literally did a whole haircut dry cup, okay and then i'm going to grab all that In one go now all this large triangle grab it all in one: go grab all that triangle and make sure it's absolutely perfect. All right, i'm just lifting that up and what you're looking for here guys is shorter to longer longer being at the front. So let's come away, so everyone can see there we go there, we have it, there's any little bits. Okay, so that's what we're looking for! It'S shorter, so longer perfect and then what i can do down. I can go back in and just take a little bit of weight out through that through there just a little bit deep point quitting like i said before, it's a shattered, layered bob all right, so we want it broken up a little bit. So it's all broken up hey now you can take clips out the sides i'm gon na come to the end of the haircut. How simple is that? What time are we on just around 10 o'clock here in california, we started at just on hot past nine. So we've been going what 30 minutes 35 minutes yeah step by step, a lot of cutting a lot of hair, a lot of explanation explaining what we're doing yeah but matching this in a salon situation: you're not doing a live demonstration, you're just cracking on with it. You could do this in 20 minutes this haircut, okay, this is a really simple commercial, everyday haircut, okay and then we literally just tidy up in a little bit. So it's gon na fall down from the front just inspired like a little lob. So we wanted to work on a layered, lob or layered bob, whatever you prefer to call it just checking that front now anything from the front if you've got a client who wants to have a fringe, she wants to have some more shape through this front area. You'Re, more than welcome to do that. Okay, you just move it around. Have a look at it, see what you like see, what you don't like: here's a mannequin all right - and you know i just feel that is so salon friendly, so commercial, it's not weird! Nothing! Weird going on just a layered bob all the way through and wear it different ways. That'S what i love about. It can wear it different ways. However, she wants to wear it and that's the haircut completed all right, really simple. There'S lots of ladies out there, who will probably say look. I just want to get rid of some of my length. I love my long hair. I don't want to go to a pixie. I don't want to go short well something like this. This is really nice. Yeah, really someone friendly very commercial. We did a haircut yesterday. So if you didn't see yesterday's haircut, we did a seamless layer. Yesterday it was a long haircut, dry, cutting again really really simple uh and then today we got requested again to do another dry haircut. So i said yeah: let's do another dry haircut, then all right, so it was all prepped from yesterday and this is again really salon friendly uh. It'S a little basically uh a lob layers all the way through. Some of you might never have seen that technique before, where you put the head down and create a square layer, put the head over to one side, create a square layer. It'S just a really simple technique of creating a layer going from shorter to longer. So, instead of like angling, your fingers and changing your body like this and going from long to shore, get the client to do the work for you by popping the head over to either side all right on behalf of everybody at edge. Thank you so so much for tuning in we've got guys black friday sale going on. So if you want the access code to look at discount on our shares, comes and education leave us a message and we'll send you the access code. You can have a look at some of the deals. What we're doing over the weekend uh, we have lots of education planned from start of january, all the way through to may all the dates are in now: we've got one day two day and three day education at our academy. If any of you want a brochure, we've got our new brochure out uh with all the prices, all the classes. Send us just leave us a message and we can send you a brochure with all our education and what we're doing next year, but on behalf of everyone at edge. Thank you so so much for watching. I hope you got inspired by this little uh layered lob. It'S a little late, bob or lob, whatever you want to prefer to call it uh, but have a fantastic day evening afternoon, wherever you are in the world, stay safe and we'll see you again tomorrow for a short haircut. So, basically, tomorrow we're going to chop all this off all right, 9 30 in california. Tomorrow we're going to take this to our little short little haircut, but thanks guys stay safe for now. Love you all bye-bye!

Comments
sherry sailors: Great teaching of this Lob. Loved you showing the checking the cut. So many stylist dont check cuts. I was taught that in school. So important for these cuts!! Thank you for your free time..
Veronica Ogle: Just watched this video and did a beautiful cut! Thanks for taking the time and for sharing!
strong woman: This is wonderful! Thank you sir!!!
Practical Pip: Super great technique! Thanks for sharing your knowledge on this cut. I love a lob hair cut!
strong woman: I appreciate you so very much for taking your precious time to help others have a wonderful day
Michele Ann: Love it!!
drkmgic: Gosh this channel has been so helpful in my hairdressing career. Also. Am I the only one who love cutting those corners off?
Nicco Happi Vlog: What cutting Shears are you using Sir? They seems to be Very Sharp !!! ✌️☺️
Diana Zamani: Great !!! Teachers are supposed to talk ( rude people ) this was so helpful & easy ! Thank you
Aziza Elghaly: Thank u great hair cut
Nayome Vazquez: Clean and beautiful job.
Rahel Getachew: Thanks so much , very grateful
Aprill Roberts: Great tutorial
Mário Oliveira: Bravo
Undauntingly Prudent: Really insightful
SULTAN AMINI: Love from Afghanustanvery nice
Karen Donoher-Rager: OMG just get to it
A Little Ray of Pitch Black: i was so interested in learning the cut but only made it like halfway through. Please take this as constructive comment, you talk too much and the your microphone isn't recording well. You are a wonderful teacher but it becomes grating after the first ten minutes. Wishing you and your channel the best!
Yo Ya: Looks crap, nothing like the cover picture. The way he speaks, so up himself.
3gloriafranco: Too much talking
susan gunn: Too much chattering. Get on with it.
Kiran Dutt: So much talking ...
D M.: Talk to Much !!!
L B: You talk too much
D M.: Habla mucho !!! No mames !!!