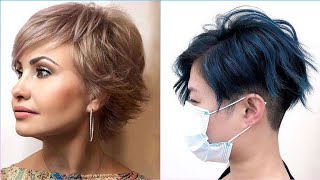
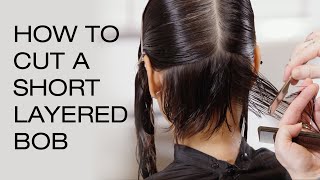
Perfect Layered Bob Haircut & Hairstyles For 2021
- Posted on 22 January, 2021
- Bob Hairstyles
- By Anonymous
Learn How to cut a Short layered bob Hair. Layered bobs look amazing on the right hair type but require more styling.
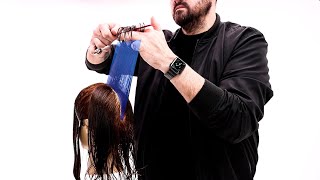
Good morning it's a beautiful day in brooklyn today the sun is out: we've got a busy day in brooklyn today with the team, so that should be fun lots of clients - and i will be back here on monday for the happy mondays as well so hit a Little thumbs up if you're going to be uh joining us on monday, for the happy mondays myself, carl and nick will be here, and we've got some really fun models for everybody, so it should be super fun. I know the last one i did it was such a a really good time and we had lots of ambassadors join us, and also some of our team came to join us. So that was really fun and we just shared some creativity and our inspiration. Just kick off the the year 2021 so see, i'm just adding a little bit more tension through the corners here and that'll. Just give that line that really precise finish. Okay, let's turn, can you see hey kyle right? Okay, just let me know if i'm gon na need to move. So as you work up the head, we get up to the top of the just to slightly above the occipital bone. We start to lift the head now and i'll show you from the profile. So sections are going to go like diagonal forward working towards your kind of length through the front and then i'll just comb, this up and away to keep these sections nice and clean and as as i say as we get to this point of the head, where The occipital is, we can lift the head slightly back and that's going to help keep that graduation of the line. Uh super clean and tidy. So your sectioning is like your it's like your road map for your haircut, so the it's really important to keep that super. Clean and then that'll kind of come through and show in your work as well. Okay, so just turn again slightly and then head up so just slight tension through just pushing onto the back of the head. Find your guide. Keep your sections! Fine enough! You can see your guide through there and just pressing onto the hair to follow that clean line. Okay, keep combing side to side, and the previous haircut was kind of already slightly layered through with a more razor look. So it's coming through with a scissor. It'S really nice to just clean that out a little bit this time, just to give a bit of a different look kind of more classic and blunt to finish, say: we've just had some really fun classes over the past few weeks. So last weekend we did the american wave class here with a cat who works in the brooklyn salon. Who'S. An amazing stylist here and nick also was teaching that class, and it was a big zoom party. It was great fun, wasn't it so we got some extra stylist now certified in the american wave and we have another class. If you're interested it was uh, it was. It was kind of like a six-hour class. Wasn'T it car yeah and we um. We got to do three raps, which was super fun yeah. We have another one coming up if you are interested in getting involved in those on the 28th of february, so you can go to erosio pro. Is it erosion, nyc and uh check that out? If you want to join i'll, be here again, it'll be super fun, okay, so working up to the top of the head. Now, through the back i mean slightly above the round of the head here, so this is probably going to be a little bit of a layered from the previous, so there might not be as much to cut here into the line, and so i'm just going to Drop that down to behind the air, and then we can work through into the sides in a second i'll, just spin milling around a little bit. So we're going to get some color done today on malina's hair also, which is exciting and we'll definitely share. Some finished. Look pictures with you and um yeah. You live in the brooklyn area, don't you molena and you've been with erosio before correct nice yeah we met only a few. A few weeks back, we had a fun event um in rojo soho. I got two models coming in on monday for happy mondays, which should be fun. Two different looks: maybe i'll do one. Maybe i'll do two and we can uh share the model love, so you can see a few different, uh stylists, okay. So i'm kind of happy with the way this is looking now i'll show you from the back just to get that nice clean line in through there. Like i say, the hairline was pretty low, so we kind of just cleaned that up and i'll i'll refine this uh the hairline here a little bit later, so we're going to go into the sides now. So i'm going to spin to this side. Is this good curl, okay, great and you can see as well where melina's chin is here, so we just want to bring that slightly forward and just clean that up a little bit in the front, still working on a triangular shape, where it's ever slightly longer towards The front, but just to frame the chin, i'm really thinking about suitability as well so use these features, use your clients, features and kind of um, assess it to accentuate or bring the best out in someone's features and face shape and framing, and that's the beauty of A haircut really - and i know we've all been uh struggling, probably a little bit with that in the salon, with the masks and stuff these days, so a nice little trick, i've been doing is, if i ever get a new client in who i haven't seen before. I usually just ask them now for like a little selfie and i'll say. Show me, show me what you look like and it kind of works. To be honest, not everybody um does it, but i think i feel, like it's a nice little a little tip to see the client, because we've got a lot going on these days. Okay, so i'm cutting through the finger here still just bringing everything down and slightly forward and just really cleaning up those edges, hey and then dropping this down now, where kind of all the length is through here, and you can just clean those little edges up that Fall over there so slight head slightly to the opposite side. When you cut in the sides - and i always say to my clients - to keep the chin slightly up the head's too far down, you can assess the lat the length at a uh, not the best angle. So it's good to keep the chin up slightly and i almost like, when this front piece comes into like something a little bit more kind of sparser and looser in the shape, say so dropping the last section down and we bring all that length up now front Here, marlena's got a beautiful face shape, so this will work really nicely and tell that she's really suit the triangular shapes and just bringing a little bit of texture into the back as well in a second. So i'm just going to repeat this on the opposite side. Again, diagonal forward sections, you kind of want the section to almost mirror the um, the external shape that you cut in it's a nice little tip to kind of keep consistency with the shapes and where the hairline is. You can come down and scoop out any of these little loose hairs. Have we got any questions so far? Carl? Oh great, i always kind of go off the client really and go off the ears because i feel like the reason you tap above the air is to kind of compensate for the length being, even so for molena i kind of assessed, and she you know the Ears sit quite flatly um, so you can almost just bring that down just slightly elevate over the top of the air and cut through the fingers. I don't really work on that rule that you have to tap above the air but um. It is something i would do say if it was a little bit protrude a little bit more on the sides. I would give myself a little bit of room for the hair to jump there. So yeah that's a great question, but it that rule doesn't sit for everybody with me. Basically, but um yeah. It is important to do it if you feel like you need to give that extra little bit of a jump above the air, for the room for the hair, to move a little bit more and as well. So you don't get that kind of gap that we see sometimes from not doing that, and then i just noticed the backs a little bit heavy behind the air. That'S probably due to the hair moves in different ways there, so you can reveal a little bit more weight. So if that is the case, i kind of comb again side to side just to move that hair around i'll. Put that tension in and then just bring that up slightly through the underneath. So if anyone out there who's watching, who is like who is this woman i'll give you a little bit of history, so i worked in manchester for sassoons for about 12 years. At the start of my career and nick nick is my uncle, so he came here obviously many moons ago and the opportunity came up for me to come and work for him. So i came to new york in april of 2019 and i've been working for a rojo this whole time, and so i've been hairdressing now for around 13, nearly 14 years. I think wow time flies when you're having fun. Am i a veteran yet okay? So final section through the side there and then i always like to just have a look from the front as well camera two okay, great thank you carl, do a little balance check, keeping some width through the back as well when you are cutting your line. Just remember that is like your heaviest form of uh technique, so you can add different ways to remove weight or build weight. Basically, so i kind of want to add a little bit of slimness through the back. I'M going to show you from profile. You can see. We'Ve kept the length through here, which is super cute, really frames the chin really nicely, but it's a little bit heavy here. So i'm just going to slim this out a little bit and we can open up some texture through the back there and i'll do that with some layering. So i'm going to come back through the vertical section from the crown to the nape again and combing. All the hair away from the sides and just bringing this directly out and then see what we've got here so we'll take these edges off, and this is just going to make this back area just a little bit slimmer and i'm not elevating too far around the Head because i don't want to create a rounder shape, i still want to keep that direction. That swings heavier in the front, so i don't want to make this shape too round. So taking a little bit from the previous section and then a second section is just going to go back to previous with the over direction and that's just going to flatten the shape out through the back, but also retain length and weight through the front again. Keep the hair moving she's got some kind of wavy texture in there, so keep that hair moving, really assess your expanded form as you uh, as you work throughout the haircut. So my section through the back now i'll just show you so i started in the center and maybe the top might be nice and then just pulling this all directly back yeah. So we've got kind of two quads through the back here. I'M pulling this all back to previous with my other direction and then working to behind the air actually might just leave the sides completely out. And let's just see until we run out of hair from here yeah. So, just directly straight out to the back and not pivoting around the head again, you'll get something quite round with that. If you want to just kind of flatten the back out, i go back to previous and you cross check. It should look a little bit like this, so same on this back side and then we'll keep the sides out and we'll do a little bit of um product and styling. So i just use my thumb as well with my scissors. Keep nice tension and bottom blade kind of balances on top of my forefinger, and i'm just literally using my thumb to work that blade to get a really nice clean cut so final section through the back and with my product selection. Today, i'm kind of thinking about something where we can add some texture protect the hair, create a nice sleek, smooth shiny finish, because who doesn't love that and i'm shaking the hair out again. So this is just balancing the weight now from the back to the front because, like i say, we already had that kind of soft finish through these pieces here. So i just wanted to lighten the back up. Okay, let's get some products, i'm going to add a little bit of um wave mist. So this is a rojo sea salt spray. This is actually something i probably use in the salon to as like a cutting aid for some people, because it basically is going to add some kind of grip to the hair. So it's going to add that beachy feeling of like hold and texture and make it not so soft, because melina's hair is pretty um fine to medium, i would say, but it can definitely take a little bit of a little bit of that extra um. Grit grip is good, it's beautiful texture! Actually, you can really see. Even if you just diffuse the hair it'd be beautiful. You can really see that nice strong wave in there. Do you ever let it air dry yeah, it's so pretty. Okay, so that's the wave nest and then the second product i'm going to use for you today is the d4 serum. So this is a serum, a rojo serum in the salon, and it basically is going to give you less static, more smoothness shiny finish, and i love it because it makes the hair beautiful to blow dry really easy to work with so really massage. That into your hand, if you ever use this really massage it into the hands, and then i kind of like to just give a little scrunch of the edges and get right into those roots, as well with the excess products that you've got on your hands and We'Ll start the blow dry, okay, so using my new gamma erosion blow dryer, which i love, this dryer is sent from the gods. It'S a super lightweight, really affordable. I feel like and will last you a long time, i'm actually just gon na air dry. Just get some air into those roots and just move the hair around a little bit. I think it's important. We always dry the roots. First, i'm going to do a little wrap dry just to smooth it out. It doesn't need lots of tension. I don't think it just needs a little bit more roughing of the roots and just give it a little bit of direction with the brush. So a little bit of tension through the ends beautiful. It'S got really nice hair to dry and work with. So this is the erojo gamma air dryer blow dryer, and you can find this on erojopro.com. I think it retails at about 200, which for a hairdresser is really uh affordable. I feel like to get a blow dryer that lasts you so long. You know it's lighter than an iphone. I mean that's amazing, okay, so i'm pushing the hair side to side side to side. The airflow is coming down the roots down the cuticle, so it really helps smooth it out and then once the roots start to sit really nicely i'll, come back through tension on the ends and i'm like separating the hair with my brush, i'm not actually using any Clips i'm just kind of pushing the hair forward to section it away. Okay, i'm coming into the other side. Now i'm gon na push this chair down a little bit, so i hope everyone's doing well who's watching out there. I hope um this year you have a really good successful year in your salons or your schools or wherever you're at, and we can pick things back up and have some fun doing hair this year and bring in all that hair again cross to the other side. Just to smooth these roots out before i uh pinch and dry super nice blow drying technique for all your bob, all your bob clients out there just so. You can really assess and check your work once it's dry and a nice technique to do with the razor. Also, just depending on what kind of look you want to give you want to have something a little more edgy and texturized today, i'm just giving you a little bit of something on the classic side, but also looks really modern and cute. So i kind of tension, dry the ends and then i'll always hold the hair on the brush for a second and then let go and that just lets the hair cool down. It'S nice to go from hot, to cold, to kind of mold it and and also helps your blow-dry um last longer as well and there's some nice little tips. You can give to your clients when you're blow-drying, which i'm sure they'll all love. I think that's a good way to promote your products and your your tools as well in the salon, because people need to know how to use them and it's nice to give them a strong routine to have with the hair as well. So just a little air finish now super happy with the way this is looking. I think i'll just do some uh finishing touches and we'll do some styling finishing the styling with some products and i'll get you in camera. Two camera one camera two number one camera! Two, so comb everything back. Oh thank you! So much peter, oh hi, charlie kelly, works with us now um. I believe it's once a month. She comes from chicago and comes to hang with the rojo team, which is super cool and we did happy mondays together and it was a whole lot of fun yeah. So anyone who's joined a little bit late uh. Today we have a happy mondays coming up this monday and it's going to be here at rojo, brooklyn and i'll be hearing some of the other guys from the team nick and carl. So please tune in and say hello all right, so just combing the hair. Now, just assessing your shape, take a step back through a session shape, don't look too close and use your mirrors as well. I mean it's nice. I'Ve got these cameras to check my work for me, but uh in the salon. It'S really nice to uh. I always get the when i teach i'll get them to use the mirror and turn the client around and really really assess. Um all their work through the mirrors gives them the visual eye as well. Okay, so just comb in the hair side to side move it around and then moving the head as well to the opposite side and then just really coming through. Let'S just see if we can get this shot here and just cleaning up any little bits of uh. Graduation cleaning that line up and then moving the head over to the opposite side. So, looking for any of those little bumpies little bumps, i like to call them and you can also bring the line into the base of the comb and tap it to the back. A comment tap to the back like this and you can clean it up. That way also make sure you got a steady hand, okay and then i'm just going to come through and do the same through the other side here, and i just want to say a massive thank you for everyone who tuned in today, i'm not finished just yet, But i'm going to wrap up soon, thanks for having me and um yeah, just some finishing touches now, i'm gon na do a little bit of point cutting through the back as well. Okay, she's looking cute right, guys all right a little bit of point putting through the back. So just take your sections same way. You cut the technique first, originally i'm just pulling everything directly out, so you cut in line and then you can assess the density first and see where it's heavy and then i just point quite on a vertical. If i want to just soften the edges and that'll, just really enhance that uh beautiful texture, you've kind of put in the back and also where you've done the weight, removal, it'll just kind of soften all that through and help it to move a little bit more. As well, okay, so one final check across the pattern just lift everything directly up to the back and i think we're looking pretty good camera two nice that wore this white shirt today, cute okay, so some finished styling finish: styling product tips for you melinda. How do you feel you look beautiful so just blessed with a little bit of cool air, pull the hair down and i'm going to take this cape off for you all and then i'll just get some. I think i'm going to do a little bit of the dry condition: a dry shampoo, so the refinish okay, so we've just cooled the hair down and just use a little bit of this. This is our dry shampoo, so it needs a good shake and it's just going to add a little bit of texture and um, give the hair a bit more hold as well, and i love this because it really doesn't leave any white residue in the hair. Like your old school dry shampoos, do it actually feels really nice on the scalp and it smells good and it smells good, and this is like a hero product, i feel, like everybody loves it, so just expanding that shape. We cut through the back and keeping this a little bit stronger and piecier in the front and then again just assess through the mirror, give a little shake through

Comments
Kay Littrell: Love this cut!
sheri Abruscato: ARE YOU HOLDING THE HAIR AT A 70 DEGREE EVELATION IN THE BACK?
Kimberly Garrett: I am enjoying technique and again I see a different way to get same effect I have the most fine hair I am so needing a cut and stystyl,could you give me some pointers on a. Great topical solution and give me a good suggestion on a cut creating fullness and volume. Gratefully appreciate your input Sincerely Can you have layered inverted bon? Thanks again