Haircuts For Women - Bob Haircut With Razor Demo
- Posted on 25 March, 2013
- Bob Hairstyles
- By Anonymous
Haircuts for Women - Bob Haircut with Razor Demo
Subscribe: http://goo.gl/aWSkjE
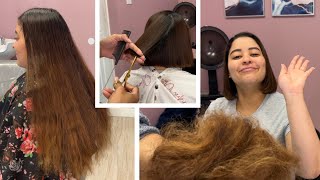
In this video, I demonstrate how to achieve a graduated bob haircut for a woman with a razor. This is more of an advanced haircut, however I explain the best I could how to understand it and be more confident with razor cutting. Razor cutting is all about finesse and this haircut I demonstrate how to achieve that. I hope you enjoy it and I look forward to bringing you more haircutting videos. This video is great for short hairstyles, haircuts for women, women's haircuts, bob haircuts, razor haircutting and many other 2013 hairstyles and haircuts.
Follow me:
http://www.twitter.com@TheSalonGuy
http://www.facebook.com/thesalonguy
Hey guys Steven here and thanks so much for watching my hair tutorial videos, I'm here with a new one. As you can see here, this mannequins got some pretty long hair, but I'm going to show you guys how to cut a bob with a razor which is pretty advanced. What I'm going to show you guys how to make it quick and simple. So, let's get started so, as you can see here, I established my first section at the very bottom, which is going to be pretty fine of a section. Everyone'S hair line varies obviously with the mannequin hair. It'S not realistic, but I want to start off with with establishing your guideline, which is going to be the length in the back. So many of you know if you're cutting guidelines, you don't want to use really much tension. You can use just your comb place where you want it, so we want it right here and we're going to come in press the scissors right against the neck and just cut establishing your first section right here, probably to go up about maybe one or two more Sections and then we're going to go with the razor and that's we're going to start building the the graduation. So here's where things get a little interesting as far as where you want to start building your graduation. If you want to build up a good amount, a good, solid foundation as far as starting in weight line, then you want to cut it horizontally. Anytime. You cut vertically you're going to remove weight, so what I'm going to do is actually and the way to describe this horizontally. I was saying the horizon, which is straight across and vertically, is up and down so horizontally, you're building weight and vertically you're moving weight. What I want to do is actually take my first section and I want to build a little bit of a a small weight line and that's what's going to give us that nice built up almost stacked, look and what you can do is you can take your Guide, which is underneath um from the from the base line that you cut alright now, when you're coming with a razor you want, you can see the guideline straight, underneath there and you're going to come in and just make little moving strokes like that with your fingertips. Pretty pretty simple and what you want to do is when you're in the middle look for your guide and when you get towards the corners here, you want to make sure that you're not overextending out too far this way, because you want to maintain some length you're. Also you're going to get holes, so you want to keep everything within this format into here. You don't want to go too far out. You want to keep as much of that length and weight in the corners as you can. So there is my guideline and what I'm going to do now is then start to cut everything vertically, so I don't want to stack it too much and create too much a heavy weight line. I want to have a nice soft of shape. So now, I'm gon na start cutting everything in vertical sections. Alright, so now I'm holding it vertically as before is holding horizontally. So what that means is that I'm going to start to build a more softer flowing type shape in through here, which I think lays pretty nicely. So what I'm going to do is I'm going to continue throughout this bottom section here and I am kind of over directing just a bit towards the corners here again, because I don't want to create any sort of holes. So I am doing a slight bit of or direction and, as you can see when you, when you cut the hair, just basically comes right off very very easily, so you're not really scraping it too much but again, you're using that motion with your fingertip, which is Pushing from here, and that is going to create a softer, more fluid type shape again into the corners here now. What I'm going to do is I'm gon na continue to work up the head shape and in through back here is we're going to start to see the nice graduation, but in a very soft without any sort of weight lines? Now, as you go up the head towards the occipital bone here, you can take thicker sections. You definitely go not to too thick, but not too thin either because now you're starting to because also this is finer hair. You can do that depending on the on the density, and the amount of the hair depends on the section that you take the thickness of it. But I'm also using the fine teeth of the comb as well, which I feel creates more of a more accurate definition and and results when you're in your cutting. As you can see, I just completed the top the last section here before I go into the sides. Um but as you can see, it's got a very nice shape as far as the the layering here and the stacking very, very soft, very smooth, and then, when we blow-dry that you'll see how it just all kind of melts into each other. So this is a great um, a great look and a great technique as far as getting a nice, nice, modern bob. So now we're going to work into the sides and actually almost done alright. So here we are at the sides, which is actually pretty easy. You want to continue to over direct and the more you over direct the more it's going to allow for this length to come in through the front here. If you hold this out this way, you run the risk of cutting too much income here and creating some sort of holes. So if you over direct pretty much straight back following from your guide, which is you can see clearly under here - we're going to continue that and work our way up and as you can see, this is what we've created, not bad right. That'S just from over directing and making sure that you don't uh, you keep the razor at a steady, spotty overdrive everything I'm gon na do the same thing on the other side and then I'm going to show you guys how to blow dry and then finish it All up now, when I upload dry, this I'm going to use a two products. One is the a Louie while junior styling treatment oil, which is going to give a nice smooth, silky finish to the hair and also quick slip by Paul Mitchell, which is a styling cream. It'S one eye: favorite products: I'm gon na marry these two together, so he's about three four pumps of the quick flip and then about two pumps of the wild wild ginger mix. Them cocktail them together and then apply it all the way throughout the hair and I'm using my favorite blow-dryer, the Paul Mitchell ProTools Express ion dry, which I love this dryer. And then we use a Pro Tools round brush and then we're going to go in and dry cut it all right. So I'm just putting the finishing touches and blow dry as you can see, but is this the front of the back? I don't know. Oh it's. The front haha well, this is just a first blow-dry here and another. I previously cut this mannequin before um, so the front was, I think I guess I had some layers in here for the front, which is why it's kind of coming across this way um. But I just want to show you some of the different angles and what I've done here. Actually this is the back as you can see it's beautifully stacked here, and it's got some really good movement into it. You really get a lot of volume and just look at that. It just flows in through this is the layering, it all blends and nicely it's nice and smooth no heavy steps of any sort, and because we left the weighting through here, we managed to keep this thickness in ternary magic, keep the integrity. So what I want to do now is some dry cutting and just kind of finish this whole haircut off, and I really give it some more texture into the sides here. So again, I like them to come in with the razor in here and I'm just going to use the white teeth of the comb. And what I like to do is just kind of comb everything forward and then just slightly go in and blend the front and the back over the sides and the back into the front and just very lightly scrape the top layer. And again, this is a great technique when you, when you're scraping, if you can really lay the the razor flat - and you can go like this and there's no hair coming off. But when you get good with a razor, it's all about the touch and the finesse. The more you tilt it in then we're going to take off, but if you go like this, obviously you're not going to get anything. So when you find a fine line between where you can lay this off, it's more of a feel um thing. So here, as you see the shorter layers, then it's going to kind of slightly work, be back into the front and I'm over directing everything forward and that's just going to kind of create a nicer shape and you just kind of scrape it everything and have fun With it you know, and just be you know a little aggressive and you know you want to definitely have a more advanced aggressive approach this, but you don't want it again, take too much hair off because then you're going to be in trouble, so just bring everything Forward over direct, it lay the razor on and lightly just scrape off, as you can see, not too much hair is coming off, but just enough to make a little bit of a difference and then again you turn them the client around. In this case, the mannequin and again, everything is over directing coming from the back and then working the sides into the front. So you going from the back to the sides into the front, and this will create some nice movement, some nice texture and volume throughout the top and as well as as the back and just kind of piece everything together now, depending on you know, if you want To go in, and you know, dry cut everything with scissors. It'S up to you. I hear the same thing here in the back. You can put the clients head down, you can come in through here and again you can start to. You know. Do the same thing. You can even go razor over comb where you go in and you want to bring it in a little bit closer than fit here. Take off some of the weight you can do that. I call this razoring razor over comb. We'Re literally just scraping the top layer off, and it removes some of the excess weight, which is a really really cool technique which I like to do pretty often. Actually, it's a great way to remove weight but not really damage the integrity of the shape that you spent so long on. I'M going to spray a little hot off the press on the whole head, I'm going to go in with the smoothing iron and then we'll be finished. Chuck bot may express ion style by Paul Mitchell. Again. Has the silicone strips on it and I'm just going to come in and go over with the smoothing iron here, I'm going to show you the finished result here. As you can see, it's got beautiful shape to it and because we over directed, we left the corners and we over directed back. We are able to keep the integrity here when we brought everything back. So, as you can see it's, it's got a beautiful flow to it really really nice. The razor gives it a very nice soft shape into here. You can have a lot of fun with this in the back. We really get a lot of volume and texture into there and it really is a nice beautiful flow to it. So this mannequin I had previously cut once before, but that's why it's creating this little kind of a softer piece here in the front. But you know overall, I think you get the the idea. Well hope you enjoyed that tutorial on how to cut a bob with a razor definitely have to be aggressive, but also careful. At the same time, the razor can be your best friend. You don't want to overuse it too much, but, as you can see you get a nice softer shape, you don't have to worry about as much harsh lines. You can have a little more fun and be more creative with it. So thank you again for watching. I appreciate all your support with my videos and I will see you again soon with another hair tutorial. Take care.

Comments
JMS 888: This is my favourite style I love, love, love it. I love to use the razor as it gives great results. Chantal looks amazing now!! I'm almost tempted to go back to having this style again. I think it's a much loved versatile look that just keeps returning xxx :-)
Dianna Coulter: Thank you for this video! That is beautiful & I love your razor over comb technique.
greg fernandez: After watching you and the instruction which seems effortlessly done, I am inspired to watch more of your videos. You are an anomaly to the industry. Hope more learn from you.
Desi Gonzales: I just love you, you make everything simple! Amazing new techniques. I'm always looking for new ways to do haircuts! Fellow Hairstylist
Nanasha Mihaylova: Спасибо! замечательный урок!
Julia Walsh: I learned a lot watching this video. It was very instructional and showed excellent usage of razor in softly layering hair.
Jamie Wamie: amazing and really well talked through thanks
Samantha Rinaldi: I love all your videos, they really help me learn! I'm a new stylist fresh out of school :)
Patricia Renner: I have been a Cosmetologist for 18 years. I am so thankful for "TheSalonGuy", he has shown me some new techniques. TY
Janey Saenz: Love it. I would like to have my hair cut by you. I am not a professional hair stylist but enjoy your videos
No more War!: thanks so much for sharing,i am nearly qualified cert 3 at a private hair n beauty school but they don't teach everything so this has helped me so much cheers :)
Sana Rizwan: fabulous work stephen ...good job I must say!!keep it coming man
Robin Hanff: Thank you I never learned razor cutting in school but trying to learn from youtube and that did help
Mandy Ann: Absolutely gorgeous!!!
Vera Allen: Nice hair cut! I watch it for several times. I love to see it especially the back part.
Janeiry Nunez: wow! your super talented! I really want to get into razor cutting. Thats a sick bob
ct2 snipez: Hi did you take vertical or diagonal sections on the side thank you great job
Ché Moni: Awesome vid! Thanks so much!
Dina Ismono: Morning, Bob. Thank You so much. I learn a lot from you. God Bless all of Us. Greetings from Gouda, The Netherlands.
vivinnienguyen: you are amazing ! thank you alot !!
TheSalonGuy: Thank you SOO much!!!
Shauntae Blalock: Great teacher!!!
Susan Belive: Hermoso!!
Deborah D: Love it
Rosy Madrigal: Hello.thank you for help us with you tutorials.can you do this with scissors. l will love if you do farra faucett style,elizabeth taylor. you are so awesome.
TheSalonGuy: Thank you so much!!!
Lucy Trần: Amazing and I love this
Tina C.: This makes cutting an angled bob a lot less intimidating.
Jenna Schultz: This is awesome, can you do a tutorial of Kelly Ripas bob with shears?
TheSalonGuy: Thank you!!!
Major in Music! Thai student in Canada.: Excellent!
Virginya Adam: absolutely beatiful
Ana Yuderka: I love You Bob your re the best,eres el mejor!
No more War!: I wish it wasn't fast forwarded though so I could see the back grad part a bit better but still awesome vid.wheres ya salon mate?do you teach cutting classes etc?
Ghostiiie kun: I kindve wish that youd make a video on when and when not to use a razor on a client. I don't want to do something that will look good on them that first month and then gets all fuzzy.
canada maple leaf: amazing thanks
Kimberley Hutchison: Great video!!
Holly Blum: I love this hair cut and Would love to get a hair cut exactly like this, so where are you located? coming to Boston area at all:))?
LynetteMercedes: this is really beatiful
Mari —: Would you call this a low graduation bob?
2LazyLeslie: I thought you can't cut dry hair with a razor? It's a worst thing you can do to hair. Am I wrong?
T HOWELL: Very nice
TheSalonGuy: Thanks Jack!!!
rennickelizabe: Hi I wear my hair in a bob but I am not very good with my hair styling wise would a graduated Bob be better for me
TheSalonGuy: @Edgar Zepeda thanks so much Edgar!
Ken Buchanan: I like the way cut bob look so nice
Adrian Gauna: Thanks
sam bennett: Nice lines!
Paris Marks: Wow your great I wish you wear my hair drasser
TheSalonGuy: Thanksssss
TheSalonGuy: Cameo Beauty Catalog and many I had left over from being an educator.
Lesley briscoe: Steven can I have a mannequin plz girl one
Danielle Tubbs: Thats hot!
Adrian Gauna: Where do u get ure manequin heads