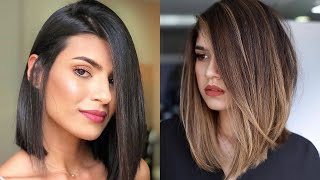
Textured Bob - Thick Hair
- Posted on 13 March, 2020
- Bob Hairstyles
- By Anonymous
In this tutorial, Ruth shares how to create a textured bob on wavy thick hair. A traditional approach would create too much volume on the sides. Using this approach you can collapse the weight and still have layers without sacrificing the shape. This look utilizes her natural wavy texture.
I'M redken master artist, Ruth roach, and I want to share with you how to create this look. So let me show you this sectioning. What we've done is we've created a horseshoe section on the top and then separated at the occipital area. So we've got the knee. The middle section and the top so I'm gon na start in the center and I'm gon na take a section that is no wider than my second knuckle, and what we're gon na do is start to surface cut this so going in and I'm just gon na Start to turn the blade in until we start to remove some of that hair. So what we want to do is get this area here just sitting in closer and the rest of the hair is gon na fall over the top. I'M just gon na lightly. Take away these layers and that's just gon na cause that to fall in nice and close in the nape next section is no bigger than my second knuckle, and I'm gon na go in about two inches from the hairline and just start to softly. Take that away. I come into this the section just behind the ear I'm gon na over direct it back and I'm gon na go in and keep my blade at a little bit of an angle. This way now, once I've taken the weight out of it, what I'm gon na do is go ahead and put my perimeter in, and I'm just gon na use the toe of the blade and work my way across then we're just gon na connect our perimeter. In again, using the toe of the blade and working our way over to the area behind the ear, so I'm using one United, which is a twenty five benefit spray and what I I'm using. It is cuz it detangles and it's a great cutting lotion. So it smooths down the cuticle and gives us some control of the hair. I'M gon na go in now and cut my perimeter with the razor and I'm gon na go just a little bit longer. Then the perimeter we just cut and the reason for that is this hair - is gon na move. So I just slid past my guide and I'm gon na work just slightly longer on the side. We want to be careful, it would not have too much tension. So what I'm doing is I'm going to comb it through, let it drop and then close my fingers on the guide so that we have a softer amount of tension on that section. So now I'm doing the same thing. On the other side, now I'm gon na strengthen the hairline and make it a little bit cleaner. So this is where we want to take Wade out and cut our layers at the same time, so this area is gon na, be like the Spanx of the haircut. This is the star of the haircut, the part that hangs over the surface and what we're gon na do underneath is gon na pull the shape in so I'm gon na start with a vertical section center back, so I'm going in and weaving through. Turning away from me and just razoring some of that weight out, and so what we're doing is we're making this hair think that it's finer than it is I'm gon na work up from my guide long strokes. So we get lots of texture on the ends. So you can see how that's collapsing in so, even though our layers are a little shorter in here, those aren't going to show that's just to get it to get smaller and still have a lot of movement to it, because if we left all of this more One length it would be so big on the sides when we're done and that's something that's happened to her in the past, so this is going to take care of that problem. The lengths that I'm cutting the the woven part to is you don't want to go any shorter than where the hair gives or where it bends here, because once you go shorter than that, you can tend to have it stand out or stick out through the section. This last section around your face: you can see that it's pretty soft, so just the section behind it and you can see how I've come behind this section come forward a little bit of that comes away, and then what I'm going to do is bring it all Down and connect it to the bottom, so, on this side, I'm gon na be working with my fingers pointed down my thumb forward and I'm gon na start by putting the blade in at the bottom of the hair on the other side. I was this way and I started by putting the blade on the top of the section and working my way down razoring out, but both sides - I'm gon na start from the bottom up to connect to the guy's. What I'm gon na do is start in the back of the horseshoe. Then I'm gon na take a horizontal section right across the back and we're gon na drop that right over what we did underneath now. What I'm gon na do with this section is I'm gon na comb. It all the way down. I'M gon na use the white teeth of my comb. I'M gon na release it so that some of that tension goes away and then I'm just going to point cut it to match my perimeter. So now we're going to start to build the longer looking bob. Where is underneath we were bringing it in now. We'Ve got our longer length sitting over wide teeth of the comb figures in position, but let the hair go and then close. Your fingers, I'm gon na, take another thin slice from the horseshoe and I'm going to drop it down to the bottom. This is going to become our guide for the top layering technique, so the last section that I cut I'm just bringing this up and what I'm gon na do is take some weight out of it, so we're gon na comb it straight up. I'M gon na go in and just lightly remove weight and push it out of my hand, remove some weight, push it out of my hand and so on. So when you drop that down, it's gon na start to open that up and a lot of times, people's hair is straighter on the top than it is underneath, and this is a great way to bring out the movement in the hair. But it is straighter to match the texture of. What'S underneath, I'm stepping around to the front and I'm gon na slide past my guide. Now my guide is very textured. You can see the different links in there. What I want to do is take one piece at a time and then cut my length to match the general guide, so I'm going towards the longer pieces of the guide, as opposed to the shorter pieces of the guide. So what I'm going to do is just continue with horizontal sections across the top. I can see my guide through the section there. It is I'm gon na go and take my right hand, piece work, my way up and then close on the guide going in and then close in close in and close. So you can see how we're getting a line here where we're closing the shears across what we're getting this texture cut out of the hair at the same time. So it's a time-saving technique which is great in the salon, because we're always trying to find more time somehow and we're getting our texture in our shape cut simultaneously. Now, where have gotten into the layers that are either the same length or shorter than the guide. This is where we just want to start taking away weight, so I'm not cutting the length, I'm just cutting the texture and letting it fall out of my fingers, texture and then it falls. So I haven't closed the blades on the length. If we get to a piece like here where we've got a piece, that's part of our part of the length that needs to come off when we get to that piece, we're just going to close the blades boom. You can see where we've got layers that are longer than the guide right there, but for the first part of it, I'm just gon na take away weight and the reason that we're standing in front of the section, as opposed to in the back of her head Is we don't want to keep cutting the hair? We just cut shorter than the guide shorter than the guide, we're gon na end up with short layers back here, so you want to come around to the front side, so you're cutting the new section each time, not the previous section each time. So you can see here where our layers get much longer, they blend in the back and then all of a sudden they get longer here. So I'm just gon na bring this down and I'm just going to point cut to match the bottom. So now it's just a matter of me working with her hair and starting to look at the the amount of density that there is here and there. So on this side, I'm gon na go ahead and start to take more weight out and I'm gon na be a little bit more aggressive, because we've created that perimeter with our first few sections. Underneath in that midsection, we've got all the density we need at the bottom, so by lifting this out and starting to take some of that weight out. It'S gon na get smaller down here, which is what is usually the problem for her. Is it gets too big like this right, so we're just gon na keep going in and taking some weight out where it needs it? Just inside of the section I'm gon na do here is start to take sections across the front, so we're dropping that down. I'M gon na go in I'm gon na do a few things. I'M gon na go and just lighten this up. First and I'm using the shears cuz. I want to put a little bit of a stronger end on the hair on the surface of her hair. So this is gon na go in, take weight out, and then what I'm going to do here is over direct it over to one side and just take that corner off and then what I'm going to do here is just go through that that top section where It needs it and take a little more weight out now. I'M just gon na use a diffuser and just dry it I don't want to over scrunch it it's looking so nice, the amount of wave it has now. I just want to get it dry, so here's Elise finished can't feel anything here and she's just got a really nice sort of classic, but modern Bob with texture. We'Ve taken a lot of weight out, so it stays closer to her head and we just let that natural texture come through I'm red, Kim master artist, Ruth Roche. Thank you for watching.


Comments
Silvia Flores: That was amazing!!! I have big hair and nobody can cut or style it! This helps me make my decisions on my cuts!
Joanne Baik: Amazing haircut!!!
olivia taylor: thank you.... you are amazing!
Aanisha Dey: All wavy hair people needs that . Waves styled according to natural wave
Yvonne: love iiiiiit!!
Silvia Flores: Following!!!! ❤️
Brenda O: Why are there hairdressers that cut like this
Andy Star: Amazing Joob baby