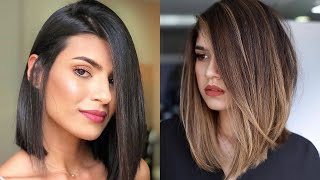
How To Cut Beautiful Layers On A Classic Bob
- Posted on 14 May, 2020
- Bob Hairstyles
- By Anonymous
Give the classic bob a new hair flip! Sam Villa shares how adding layers to the bob creates new movement and a fresh look. Explore how to use these dry cutting techniques to add layers without losing the strong bob shape.
If you enjoyed these tips, be sure to check out more tips for cutting a Bob at our blog. Click the link below.
https://www.samvilla.com/blog/challen...
Want more education? Make sure to subscribe: http://bit.ly/2mCNIib
Click that bell on the screen to make sure notifications are on!
To learn more about all of our styling tools, discover upcoming events, or to book one of our artists for events or in-salon education visit us:
Get Social with us!
Instagram - https://bit.ly/2Bq94bt
Facebook - https://bit.ly/2PKuAAi
Pinterest - https://bit.ly/2DytLDo
Linkedin - https://bit.ly/2PGdfZo
Twitter - https://bit.ly/2BnqG7Q
To learn more about the Sam Villa Streamline Series Shear, click the link below.
https://www.samvilla.com/shop/streamli...
To learn more about the Sam Villa Dry Sectioning Clips, click the link below.
https://www.samvilla.com/shop/accesso...
To learn more about the Sam Villa Signature Series Combs, click the link below.
https://www.samvilla.com/shop/combs/si...
Hi, my friends, Sam via here, welcome to the artist studio today. I want to talk about a real, simple salon scenario in regards to a bob and layering out a bob without losing too strong bob shape. You'Ve seen a lot of layers right now, so you're having clients come in with those strong bob saying give me some layering. Here'S a great way to introduce them to it. What we want to do is we want to separate that transition from vertical to horizontal, so I'm going to separate that horseshoe on the top, which is the top and the crown area by simply placing the comb vertical. You can see that that's going to transition to a horizontal line, so we're going to come through and we're gon na start our horseshoe at that particular position. Now you have an opportunity to adjust this horseshoe in terms of how high or how low we take that based upon density so base it upon density. How high or how low you're going to take that, because we're dry, cutting gon na suggest you give that a very softer twist and now go against and pin against a twist and using a dry cutting clip the dry. Cutting clips have elastic on them so that you're, not gon na get the lines continue to work. Your horseshoe shape around now I'm working towards the around that bat crown area, keeping that pretty even and balanced as I work from one side to the other because I'm dry cutting. I feel that I want a dry cut, because I will be able to see the visual cutting edge, so I find that these strong shapes like this. It'S an advantage to you to dry cut because we can visually see the edge immediately in terms of how hard it falls or how soft. So I want you to remember something: dry. Cutting is a visual exercise for us, the hairdresser, in terms of being able to see that visual edge, we're going to use the bottom length of this section as our starting point in terms of how to create the layer in terms of the length. So it's not just a matter of a vertical long section and determining where you want to start it. Remember let the head shape, determine for you where that layering point could start. So, let's come through. Let'S take this back area here and that's where we're going to start to work with the back area in this crown area. So what I'm gon na do because I'm cutting dry I'm going to isolate underneath. So I don't pick up any of this hair as I'm cutting by isolating underneath. This is a blended haircut. It allows me, though, to reap pick up again the section I've just cut in case. I want to pick it up again. It controls this down here. Alright, so we've got that all isolated underneath now you can just release that top, because you're gon na see how I'm gon na work with this back area and the side area. So now we're gon na start. Give you a profile view we're starting in the back area of the head. Look I'll just give my hand across that I've got my sectioning, so I separate front to back there. I am there. This is going to give me that crown area on the top. Now this is the area that we're about to cut this top crown area, I'm going to give you a back view of it so that you can see it. So this is the area we're cutting this crown area, we're going to use this length as our guide and we're going to cut to the shape of the head and then, as we go, we're going to pivot. So we're going to begin here and you're going to start to see me pivot, the sections around so by time I get to that vertical line. Sign area, side area, I'm gon na - be parallel with it, so I'm going to start in the center pivot pivot pivot. The angle we're gon na cut it we're gon na cut to the shape of the head, so we want to cut to the shape of the head. We'Re gon na begin vertically in the center I'm going to work with a traveling guide. I'M going to give you a three-quarter view, so you can see how I'm elevating it and the angle that I'm cutting. We start in that center vertical section here. Is that short point right? There disregard the detachment I see inside now, I'm gon na come through and I'm just gon na softly point cut that just notch it once I've notched that now come through that. I want you to deep point cut that, by placing your thumb inside your index finger and now just make a fist just so you can soften that edge that we've created now. If we cut this line blunt first and then try to come in and point cut, you're spinning to mount double the amount of time just softening that edge so notch it first, okay, next section now the next section we're going to take is we're going to come Through we're gon na pivot from that, so we're going to pivot pivot pivot, so I'm going to pivot from that top center point and now watch how I'm going to cut right where that hair is that, so I'm not gon na over direct to that center back. I'M now going to comb on this side, but my last combing angle is on this side and watch I'll, take the spine of the comb, and I will align that up with where that section is and then pull up to the shape of the head. From that section and continue to point cut now disregard the detachment that's inside. Let'S say this is a client said I enjoyed having my hair cut detached, but I'd like to see it a little bit more blended, yeah. Now here is my first section. Second, section third section, so I'm moving to that third section. Give you a little bit more of a profile view on that look. I just skim my hand across that that clip let's go to our third. Let'S give you a view of the angles that I'm cutting. I'M not a one sided comer, that's over directing back watch how clean on this side see the section of my line, comb to it. Spire the comb sits over it following the guide. Notch now come back through and soften the nachi by just Fanning and point cutting point. Cutting has become a real, classical technique. It'S just a great way to soften the edge. You could do this with razor shear. This is being done with a streamline 6.25 for those of you that are looking for a scissor. That'S really comfortable on your hand, highly recommend the streamline 6.25 watch. My combing angle always set me up so that I'm not a one-sided comer and over directing now, I'm gon na continue to work the same method on the opposite side and now you'll start to see how I'm just starting to layer that Bob out, but I'm not Gon na get a hard line now, let's go the opposite side being aware of how I'm combing the hair, so we know we started vertical now we're gon na start to pivot, so we pivot. Now, let's talk about give you a back view of this now one-sided comb, our little condom now over combing this to me so now, watch I'm gon na take the spine of the comb and how I'm going to place it in, but the spine sits around that Line that encourages me to come straight up. Go to that short piece. Disregard the detachment inside a notch, now come back through notice. How I work my left hand deeper inside that section, and I find, if I lay the hair down with gravity, look how it just moves the fan, and I don't move this year, we've discovered if we move the sheer because of my body position. I tend to go more on a diagonal as I go around now: you're, releasing lengths so keep the sheer parallel or a vertical straight up and then bring the hair vertical straight up to the shear okay release. That section continue to work right around and pivot. So I was there now I pivot to here so now, you're probably wondering Sam. Is there any over direction? Well, let's take a look. This is where that hair lists and I'm cutting see where it lives. Now, if I just keep combing on this side or this side, you're swinging too much so let's be aware of our combing, that's Sam via, we believe the tool that makes the creates the problems. Is the comb look how the spine sits over that line? Now we comb up there's my short piece. My guide come in. Look, I just lay it down comfortably for me to not CH once I'm not now come back in and I'm about an inch and a half inside now. Watch me move and see how I'm leaving the halo of length but releasing the weight inside look how much weight you see there and you can see the softness that we get okay. Now, let's take a look where we're at my last section: here's that side area where I separated front to back alright, look how I'm combing over combing. Look I'm combing over combing your where, where do I want that boom? There'S that spine right over that section! Look on elevating: let's talk about the angle, we're cutting and now look at the angle, I'm cutting it matches the shape of that head. So it's the same angle that you cut and there remember we use the transition of the head. The bottom point of this line the one length to use as our guide to create the shape of the head. Now, let's go through and let's notch this section so once again lay it down so that you could just use gravity to set you up in terms of the the length that you're creating now we're ready to go into this side area. Now, let's talk about the side area remember this is more not as dense as the back area, because the hairline is higher. So in this front area remember to create to layer this out, but to maintain the visual of a one link Bob we need to over breakfast back so now we're going to stay square on these sections and we're simply going to move back to a stationary guide. So when I get to the front area, I'm moving back so now watch where I'm going to put the spine. I place it over that side area where I was boom up to that section coming through notch notice, the angle of this year, when we notch it's at a diagonal at a diagonal when we notch that releases length yet notice when we want to soften the edge And not release length, look how parallel perpendicular in the more we're going to take off length. Okay, I'm going to continue working and over directing each section to a stationary guide. We'Ve completed our left side and you could just start to see how we have the illusion of a distance from it. Looking one lane. But if we start to move it, you can just start to see how you've layered that out, but there's no hard line in terms of that so understanding the shape of the head and where to start your larry's. If had I started layer down lower, I would have lost the roundness of this bob into that back area and lost the weight in that back area. Let'S come to the opposite side. Now, look at this sense of more volume we're starting to get with the Bob. Just by simply coming in and Larry okay, so let's go to that side area! Okay! This is where we're cutting we're cutting all of this hair that you see here this. We are not picking up well using the bottom of this as our guide and we are working with the shape of the head in terms of the angle that we're cutting from that point, we are now over directing back vertical sections. I know the side area where that's at and I stay right there looking for my god notch into the guide and now stay right with your over direction, fan and lay it down with gravity we're going to continue to work this to a stationary guide in the Side area we've completed our layering all the way through, and I want you to look at the shape how it looks relatively the same. You know yet what's happening, it's just basically getting the sense of fresh movement now. The last thing I want you to do is just come through the top and just square off the top, see anything that you might want to square off, just start to come in and square that off and once again, dry cut is a visual exercise that allows You to see the visual edge of benefit for you, the hairdresser, let's take a look at it and you could see the graduation all right. So once again, how did we do this? We went in through we separated that top horse chute to the top, and we did that all the way around once we did that we used the bottom edge of that horseshoe as our guide and we started at centre-back elevating to the shape of the head. The angle we cut was to the shape of the head and we moved right from where the hair lives, so your combing is very important. You don't want to over direct this so much the point of reference where we changed. Our over direction was in the front side area where we made stationary and everything from that point forward was over directed back, so we maintain a max amount of weight and length in that front area. So once again, I want to thank you so much for watching artists studio and know that we appreciate you. We want to continue to support you behind the chair, thanks for watching


Comments
L Blincoe: I see so many comments here saying it already, but I have to say it again, you are a wonderful teacher! Incredibly detailed and thorough, yet simply stated and to the point, plenty of repetition without feeling repetitive, it's so easy to follow and understand what you're demonstrating. That gift is not to be underestimated! Thank you for sharing it with us!
elenaadorno76: I absolutely love your video’s! Your explanations are great & easy to follow & it makes sense. You’r a fantastic Teacher!
Tara Duddy: I love the comb trick, laying the spine of the comb over the parting and combing straight up, that way you aren't overdirecting. I agree that the inconsistencies are caused by the comb as well. Thanks for the great video!
Celeste B: Fantastic video showing me the technicals of a true layered bob. My salon overbooks and then when I ask for more layering it is done in 3 minutes. Now I can do my own to my taste. I cut my own hair during the pandemic lockdown and did a good job. After watching this video I am now confident enough to cut my own hair and put in the feathering/layering myself. Thank you so much for this video. You are truly appreciated because are a true stylist and excellent teacher. ❤ from Montreal, Canada
diane quinn: Absolutely beautiful, another clear , great explanation of dry cutting , use of comb and technique. Many thanks.
Tina Holden: Beautiful work! Love the volume and movement
Karen Zeiwey: Such a great teacher, very detailed. Thank you
Jewel: Absolutely the most beautiful haircut! What a classic. That style will never age. Love it! Thank you!!!!
Lady Lilith: This was so simple to understand!! Thank you for making this video!!
Bakkiyalakshmi Balakrishnan: I've been watching your videos and you are explaining each technique and nuances excellent. Should this "cutting layers technique be applied only for classic Bob or can be followed for all short hair long hair layering pl? Thank you. -BuzzyBee
Auburn Yoga Studio: Hello Sam, I went to Cosmo school with you ... I run across your products at beauty supply and now ran across this vid. So impressive and I congratulate you for all you've achieved. You are super talented, and were always ala Mr. Precision cutter I well remember. Your teaching in this video is precise and thorough. Kudos. Be well, Gwenn Jones.
Fluffy Pink: I just want to say thank you. I restyle old wigs into newer styles. Specifically Irish dance wigs. I am currently working on a wig for a cancer patient. I needed to learn how to cut layers. I watched your video until I memorized it. Then I watched it some more! Thank you. Thank you. Thank you! I My layers are stunning. Thank you from my heart.
LaDeane Fenton: Tried this today! Vuela! Worked great Thank you so much
Somer Styles: Fantastic video Sam. Really effective
Tea Lemon: Thanks for explaining and demonstrating such wonderful technique
housejunky777: Beautiful cut! Can you do this technique on an a line Bob grow out sitting at the shoulders ( hence to preserve length and continue growing)?
myra banh: Love it!!! Thank you, Sam Villa
Kitty Machine: Really helpful, thanks!
Flower SafeHeart: "Support you from behind-the-chair." Aw, that's clever. Skilled teacher and great attention to detail. Suggestion: before and after photos (or video clips) at end and in the thumbnail would be powerful!
Kay Littrell: Thanks for all you do Sam. God bless you.
Marylou White: im always grateful to Sam Villa , so patient with us ,merci beaucoup
Christopher Daniels: When Sam Villa talks it just makes so much sense lol
Roya Moshiri: Great thank you so much
Roro Roro: I love the technique and layers
Isä Flores: I feel like I'm back in cosmetology school watching this and I love that
Jill F: I am unclear what you used for the first guide. Is it the length of the bottom part?
Elena Taylor: I've payed $60 for layered bob and my hair looks so horrible even after recut the next day.
mahmut YAVUZ: Tnk u so much for sharing video.... all heart’s ❤️ for u Sam uncle
Parlor in Brooklyn: I am curious about when you say "ignore the disconnection" is that because of the clipped out reserved hair or is it from a previous unrelated cut?
Queen Mum: It's hard to see the shapes of the layering because of the dark hair coloring and shots not always up close.
Lorie Pyper: Thanks again Sam!!!
Janis Mccaghren: What about the line at the nape?
mahmut YAVUZ: your a legend ⭐️⭐️⭐️⭐️⭐️⭐️⭐️
Andrews2490: Were the guides cut into the hair before you started layering? Oh, never mind i see you used the bottom edge of the horse shoe as the guide.
Michele Dana: Beautiful
Antonio: You are the best !!!
Xochitl Benhumea: Hola Sam saludos desde México
Ana F: I've asked this to my hairdresser today and she wasn't able to do it. It's pissing me off. I wish I could do this to myself
Amal Al: Thank you
John Roekoe: Even the hair is isolated these days.
Sameer Sam: Very good sir ge
catalina Meza: thank you Sam
Sheila Mullen: Thanks Sam
Pedro Sanchez: Very good
Deb C: No way to cut in back of head yourself.
burpie: Thank you!
최영지: 감사합니다
Mary P Rodriguez: Sam, I wish you Lived in Mcallen Texas.
mahmut YAVUZ: when is the next live broadcast.. answer me pls
Angela Martyn: ,