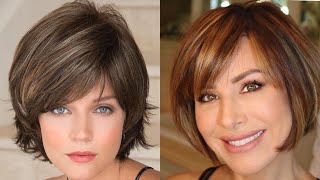
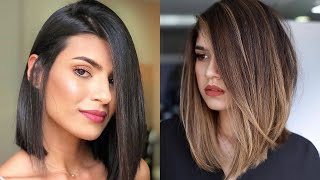
Shaggy Bob Haircut Tutorial For Women | Easy Hairstyles Tips
- Posted on 29 July, 2020
- Bob Hairstyles
- By Anonymous
Shaggy bobs can be tried in long, medium and short hair if you wish to give a modern quirk to conventional bob.
Hello, ironco world, we'll wait a few minutes. While people are tuning in how's everybody doing. Can you hear me? Okay, the one person tuned in two people tuned in how's everybody doing, let's see good. Let'S see, i don't see comments. Let'S see, can everybody hear me? Okay, we're just getting started. Let people tune in oh good, good, good, okay, cool! I haven't done a facebook uh. I do a lot of instagram. I don't do a lot of facebook, so i'm not sure how it all looks and everything thank you for adriana for adriana for helping me hey glad to be here. I think we'll get started hope everyone is doing well through this interesting time. There'S been a lot of good stuff, that's come out of this. I hope that everyone is staying positive and trying to connect. That'S been. The big thing for me is just spending the time connecting with people and trying to plan for the future as well as kind of looking back and trying to focus on some of the things that i maybe got away from when, when we were all in the Salon so today we'll do some cutting stuff. It should be fun i'll, try to keep it pretty straight forward, something you can use in the salon, something that's going to take a little bit of some of the fear factor stuff about, maybe where pieces are hitting and the way you want to frame someone, and So i it's rare that i've worked on mannequins before this time, so in thinking of that you're wide open right with the person you're looking to frame them in the best possible way and with the mannequin we have every option which is so different. So that's why i'm going to walk through kind of this blueprint of kind of some of my basic go-to's, but just thinking of a way that we can shift things around, that we can simplify and so we'll get started with that. I'M just gon na take a drink of water, real quick, say hello to our beautiful model erica. So what i did you see i'm going to get up close what i did with her today. Earlier today. I just wet her out of the box conditioner with uh atlantis, put some motorcycle gel to scalp, and i put our rock or sorry mannequin through mids to ends and just let her air dry, because i that's that's kind of something that i prefer to do with. Clients is set in a you know the shape before i start cutting at all, or you know as i'm cutting, and we don't have that full option today. So i think this will be a good start. So what i decided to do was we're going to do kind of a drapier bang, but i'm going to set some guidelines in for us so that hold on one sec, some guidelines in front so that we know we're hitting the spots that we want to see. So there's she's she's right there uh, but i just kind of let that stuff fall in and then we'll talk about where we want. You know we're gon na have the length hit, but then what like? What and what sections we can take to best serve uh? How much strength we want to keep in the corner, so we'll kind of the focus of the cut is not going to be so much the actual um like the perimeter. I mean we'll walk through that and and some quick way, quick fashions to kind of make sure we're hitting where we want to in the front. But the real focus is going to be the stuff around the face and then the subtleties in the crown, and so with my typical bang section, i'm thinking about well number one. Where do where do i want it? Where do i want to hit, and so we're going to work with a little bit of exaggerated shape today? But what i'd like to to do is have these ones kind of swoop up and hit a cheekbone or just just below, as it kind of swoops up and then we'll cut that center section a little bit shorter into here. And you know people ask about sectioning, but so much of it is what i'll base everything off of initially. Is that classic? Where does the comb? Where does the cone come off the head and then recession to recession with a mannequin head? It'S going to be very generic, because that recession is super super balanced, but with a individual it it really becomes. That'S my set baseline and then i'm going to adjust according to density according to where the recession is hitting, and so a lot of what i'll talk about as we move through is just with the person. What are you looking to frame and then also uh like adjusting because of an individual but again it'll be so much generic today, because of our our model? Has a you know, a perfectly balanced hairline, so what we'll do is it gets set up there? I'M just gon na mister, a little bit with water and, like i said i already had prepped her with uh motorcycle, gel and mannequin paste and so she's kind of had that nice movement in there and let her air dry. So i have that big section that i took and kind of classic sectioning but again alter this to your individual good. To see you too douglas, i'm gon na look and see cool thanks everyone for hanging out, but any questions i'm i'm trying to be close up. So i can answer questions too. If you have anything, shoot them at me and i'll try to break every so often to talk to to see what y'all have in any questions, and so i'm just breaking that apart. So i can see where what i'm working with and again same thing, it's not like a set amount. It'S just so i can see what i'm doing, i'm going to miss just a little bit more okay, okay and so again, to simplify this. I'M not going to cut the angle in first i'm going to i'm going to focus on again. Where do i want these corners to rest, and the whole purpose of this first cut is making sure i hit my corners, and so i'm not going to over direct. I'M going to pull everything i guess as the head as the head rounds down i'm over directing a little bit, but i want to work within this plane of the head right here and will elevate ever so slightly. So i'm thinking with this section right now, i'm going to stay in that line there, i'm going to think about again like where do i want this piece to be i'm going to elevate up okay and so that the whole point of this, like i said this First section is that i'm getting this where i want it to be i'll comb that through just check, make sure i'm not over directing too far. But again, i want this bit every piece to be that a little bit check in there. Okay check my corners okay, so my balance is good, see any questions, hello, okay, so that's the only reason i cut that whole thing is just then now what we're going to do is going to go shorter here with the person i try to look at. What'S naturally splitting and it might be offset it might be in the center wherever wherever that spot is that's. What i'll talk to a client about or model about i'd, rather give something that's going to push in the natural way and and going to work that whatever spot that's opening up, so they don't have to do much at home to it. So i'm gon na, so that seems natural with her and you can what i normally do with this is kind of just. You can go a little bit shorter with this center section than you think, because it's really gon na pivot down quick quickly and push out, and so i really like when there's just a little bit setting up in there and so again we'll do this and then Instead of just cutting a blunt line, let's see, let me find that again so i'll pick that up and i'll rest here at the eyebrow we'll start there just to see where a bunch like wants to push up and then, instead of i'm not going to cut A blunt line i'm going to cut more of an arrowhead shape. So so, then, i'm not trying to blend out that hard line and i'll see where that pushes and i'd rather see that a little bit sit up a little bit more because her hair is almost dry right now. So it's close to what it's going to be doing so again. This is kind of generic that we're setting the way that we're setting this up, but it leaves us room to react to what the hair is actually doing so again, very low tension and i'm going to go steeper with that arrowhead. I think that's going to give me what i want so again it now. It'S simple: we'll connect the dots, so we've set this up the center area. We'Ve set up this corner, and so this is leaving room for us to be able to replicate fairly easy again. We'Re not going to stop here. This is a good starting point. It allows us to set a basin and it will allow us to observe and then react once it's dry so elevate a little bit more find my center piece there. I'M going to try to have all that hair facing this way, but again trying to cut, because we've taken the time to set this up, i'm really trying to make sure i cut all the way to that guy right there same thing over here this it becomes Pretty simple right: so, let's find our guide there's our guide again. We want to make sure our hair is doing that more i'll. Stop once i get to the point where i'm stretching it re-comb but again, so that just gave me a little bit. It gives us a way to know like. Oh i'm, i'm the same here as i am here, and i know my corners are balanced, double check. You see like a little bit of a density thing here might be there there we go so i'm seeing i like it. I like a heavy fringe because you get a little bit more control on the surface and what it's going to do, and i, like you know i like the strength of that, but we want to. I think the balance is finding the softness of the perimeter of the fringe, with the weight of the top of it, and at least for me, that's uh, that's that's the balance i like in it and that's the key to all. This is figuring out what you like what your clients like interacting that balance between you and that's that's to me, is where uh the art happens and and to me where the fun is had so we're going to just what now i'm going to stay almost parallel And i'm going to walk through with this again like this with the mannequin head, it's different, because the hair is kind of so uniform if the hair to me, if i'm a person if the hair is really curving, this, i try to come from the back side Of the curl and and walk through that way, rather than chasing the curl, so some of these variables, just with the mannequin head, it's different, because everything is so uniform so before just since it's so dry and again, this would be a variable, too, is how dry Is the person's hair before i start doing this stuff, but because we left it, you know, got it mostly dryer, just kind of working through some of it. I can work at it right as it's reacting so again, generic having structure and then balancing that out with with this part, is kind of. I think what makes the haircut my clients and what makes the haircuts mine and and just looking. So i think the thing that i'm looking for in this is his visual balance is there things that are jumping up unevenly uh and visual balance to me is is created a lot through um. You know through density. Like is my uh like right now, i don't know if you can see that in the camera or not because of the distance, but that's pretty airy - and i like that. I got that to about right here, so i'm just gon na loosen some of this up. Try to balance that out. It'S interesting cutting on a mannequin head too, because you could be like so in there, but any questions so far. No all right! So now i've set myself up uh, i'm just gon na walk through these i'll. Do this in two sections, just kind of mirroring this line right here and uh, just in the balance to that is to me it's just so you can see what you're doing not don't take too much where you can't see what you're doing don't take too little Either that you can't react to what some of the density is doing and uh, so we're just going to follow that through we're just going to elevate, maybe ever so slightly more i'll split at the center, and now that my hard work is over through that. First section it's just kind of following the pattern again that trying to keep that hair, even as the head rounds down i'm trying to keep that hair coming forward. Like that and again that's looking good, i'm just know i'm going to have to react to some of the weight of that stuff. All right same thing, elevate up, okay, before i move on i'm okay with some of this now uh, not i don't feel like. I have to cut it on the surface, so i'm just going to elevate up a little bit. My section see if you could see me gon na come and i can be more aggressive with this section so and kind of mimicking what a razor similar to a razor. I think someone's bunching over here, but some of that will be taken care of once we uh switch over to some of the layering patterns so again just drop letting drop out. What i previously did what i feel good about. If there's anything i want to add, then then i'll just pick that up okay same thing, cool, i see any questions. What kind of shears do i use? I'M excited i've only gotten to use my friend chris jones sent me a pair of ark scissors, which i've only gotten to use three times, but i really like them. I think they have a couple different spans, but i think this is the paragon two and i think it's a it's a six inch so with this, this now is, can be pretty quick, i'm going to elevate even a little bit more and i may end up Even slightly layering into that section, we'll just see if, if we feel like that weight is too much but again i really i love the balance of this the weight the weight of this allows this to rest easier for me and then the is finding that balance Of texture or if we want to layer it subtly so we'll just do like a very subtle subtle, subtle, uh, texture and then we'll observe and decide. If we want to do more, i think for now. I feel good about that. I don't really. I don't want to layer that in, and i think i think, that's going to give us the lift off that we want so quickly. Let'S see how we're doing time. Oh we're doing pretty good okay about 20 minutes in everyone, doing, okay, how she looking she's! Looking pretty so with the side, what we're gon na do is set the bobbin and i'm just gon na split erica at the back of the ear i'll show you there. She is, i'm just going to clip this back out of the way. Now the surest way to me to hit a bob where you want it to hit in the front is cut it in the front first, and so what my sectioning is going to be. What i like to do is scoop out all of the hairline, because if you cut, if you just cut traditionally this line, and then you you keep, you know you keep moving up the head. If you're not doing any face framing layers, you're going to it's going to get a little bit longer, so what i like to do is just scoop out that bit right there, knowing right when i cut i'm going to establish where i want to and again this Is going to be something that will be more useful, long term because we're going to end up doing a little bit of layering around the face? So it's not going to be quite as it's not as necessary with what we're doing right now. So i'm just going to make sure i can see through what i'm doing and pick a point and i'm i'm just picking a point with what would be over the shoulders because we're going to end up layering some of this stuff through so kind of traditionally put The cone, through wider teeth to loosen it up a little bit, i'm going to square it off, excuse my my mannequin head skills. I haven't cut one in a long time, but we'll do that and then again just as long as i'm seeing, i can see what i'm doing. I feel comfortable with a slightly bigger section. So if it's, where i'm not seeing you can see, the density of that mannequin's, head hair or the mannequin's hair is, is pretty sparse until you get up around there anyway. So so pretty quick swipe and then again the back we'll just connect the back through we'll work on this other side. Have you all been? Have you all been doing a lot of mannequin cuts? Do people typically do mannequin cuts? I'M curious uh like how much people which there's a time and a place for it. I think it's a great practice tool. I just haven't done it that much in the last few years there she is check my balance before i move on right. That'S always the scariest part with the bomb or can be even still to this day. You know getting to the front and checking that balance, there's always a breath of fresh air. Let out like let out a breath a deep, deep breath. I did it so again. Don'T this is don't judge me on my my technique here. This is more secondary to the things that we're we're learning or that i want to address today, but this is definitely a way that i'll approach a bob, sometimes just for fun to switch it up. You know we're trained to do things a certain way and it can feel so mechanical, so sometimes it's nice to just switch it up. So again, i'm gon na do with the back i'll do more. Let'S see, let me get this so i'll. Do more diagonal forward like a traditional line, but i will make sure i scoop just like the front i'm going to scoop in i'm going to scoop in this too. So i'm going diagonal forward. But with that first section i want to make sure that i have that connect connect the dot point. So i have my center blended through i'll, go traditional diagonal forward and then mirror the hairline back in enough that i can see what i'm doing, but not too much that it's going to throw things off. Okay, i checked my. I checked my balance in front now. I'M just checking my balance right here, which i'm good and so i'll find my center, which is right there again just no tension, i'm looking to create strength, that's kind of something i enjoy that honestly. I like creating strength. Unless someone has a ton of hair right. I'M looking to kind of see how much i can give it before i can. I start taking stuff away, especially like, in this type of instance, right. That makes sense. Oh, my god, not bad right, not bad got some little stragglers that you probably can't see on the camera, because it's a mannequin head, i'm just kind of getting there's little long ones that are popping out cool. Now that we got that i'm switching back to diagonal forward but just like, like i said, the sections that i can see, but not not too small, not too big just right. So again, it's more about getting that that getting that line in there. So but it's just as a front, i mean we're approaching this exactly the same as we did the fringe, where we've set that guide in we set the line in now we're just kind of connecting the dots one. Last section and again it gets easier with each one right, so i can definitely see what i'm doing just kind of loosely. I'M not worried about. You know the traditional bob stuff of wearing like where that hairline is moving around because we're going to end up addressing a little bit of layering in there too. So it's just more about getting stuff out of the way do cool, so we've established our length which again, like i said, it's a little bit more secondary with this shape, but just double check my balance, okay, cool! So now the things i want to think about are what am i looking to frame on this mannequin or you know, on this person i should say, and thinking about how these these bits right in here are going to function with that like how? How much of this corner do i want to to maintain and keep it more bob like, or do i want to push that bag back and make it more shaggy, or do i want a little section right here that can you know once this is tucked it's Going to frame parts of her and so we're going to work on those different things, but to me the basis if you want to keep it, you know we're going to work on a little subsection that will be kind of fun and then i, i kind of Think about again where that corner is going to rest and how much of it do i want to maintain, and so those reference points can be low recession. You know if you really wanted to keep most of most of that corner you're going to go as far as far forward as you can and then we'll start moving back base of the ear. It'S just picking those points and then shifting things back uh to make your keep keep more of this, and so what we'll start with is i like a like we'll do a little subsection so we'll pivot, right off of where, where that that fringe ends so like At high recession and we'll go just to the base of the ear, and so we'll break out just a little section here and clip that away and then again we can simplify this. We can, we can decide, we can decide. Where do we want? Where do we want the longest piece of that to hit, and so again it can be really simple. So i want this to hit right at the jaw, so i'm just gon na without with very low tension. I'Ll put my finger right at the at the jaw and just take that out that way as that jumps, i know that i have this piece already right, where i want it to be, giving it a little room to spring up, and so what we'll do here Is we can connect right with that, but what i've decided is i like sometimes when there's that jump uh so that fringe can sit over here and then and you can see it - it rests down here. But what we're going to do is we're going to go a little bit shorter with that, so it kind of hugs, the head and more and this stuff can kind of like wing out over over top of it. So what we'll do is we'll get this out here, let's see in and what i'm going to do is i'm going to i'm going to mirror my fingers to that parting, see if that's good, yeah and and then my point of reference will be more creases crease. The eye there or it could be even as high, i think, we'll start a crease at the eye. I think if we go that high with the mannequin head is going to puff out, but i'm going to mirror that section, i'm just going to lay my hands in here and spread my fingers out find where i've created my guide all the way down here. I'M just going to connect again connect the dot, so i'm visualizing this corner of the eye and again same as the fringe, it's kind of a generic start, but it gives us. That'S i i've just had this. You know teaching or just being consistent in your work. At some point, i had to decide uh what is my baseline and and to me, that's my baseline, but because of the way the hair is going to move around, i'm going to react to what it's doing now and i miss some right there oops and so What i'll do is i'll just push it in different ways and see what the hair wants to do. Overall, i like what that shape is doing. I'M just looking for inconsistencies of like where it's gon na bunch or you know, is it. Is it all catching in one spot instead of moving more freely and then same thing with the fringe? I'M gon na come back in and really try to freehand that out loosely can y'all see that. Let me see there's a better way. Can you yeah okay, but i love little things like that where um, when someone tucks it gives just it gives a different element and - and it adds more versatility, i'm using the phone as my mirror - and i really love that too - that we can do but yeah Here'S some of my miss guys. You can see them and again i can see now that we've taken that away that that corner is a little heavier than not a lot. I'M just gon na dust that and soften that. But i love that like when you can get that stuff to melt like that. There'S a front view so switch over to this side. Just repeat what we did any questions so far, no thanks! Everyone for hanging out appreciate, it, see, see all right so again, we'll get a little bit of this out of the way best we can, but just like the other side, we we're going to create our baseline. We know where we want to go, and so i'm going to give us i'm going to place my same as i did on the other side, i'm just going to pull that straight down. Rest, my fingers, just at the jaw see there we are so again. I want to make sure my guide is balanced, so i know i'm connecting the dots to the same places, kind of give it that generic connection, but we're going to alter it as as fit for the individual. So again, my fingers are mirroring this. I'M going to keep my hands stationary elevation ever so slightly, but there's our corner and we're cutting right. We'Re aiming right for that. Crease of the eye i missed a little bit there. Mannequin heads are weird to cut on if you're, not it's not weird, i shouldn't say weird, it's just so different than humans, but good practice. I miss human heads right there, i'm just letting that stuff fall where it wants to. As you can see, it's kind of it's starting to bunch. Let'S see, maybe you can't see, as you can see it just started. I like that, that line that we're getting but we're just kind of looking to take that off any little little bubbles or inconsistencies and then same thing we're going to look to air that out. This side seems to be laying a little bit denser than the other. So i'm just kind of that motion slowly, just walking it out cautious that one's a little that side's a little bit nicer than the other side. It seems like and again same thing. I i think i left a little bit too much weight right there, but i couldn't see it because all that hair was over the top and i'm constantly looking constantly looking at. Is there where's where's weight building up? Where do i need to adjust just trying to take moments to to allow yourself to step back from uh the details that we can get so so close up in? So i think she's looking pretty, i like that so far and again we're going to go back to now thinking about where we want that second section to be so, we stop and say we stop right there. I i would honestly feel good about that, like classic bob uh really strong, but has those soft bits i would probably walk through and texture if this is where we're gon na stay. But we want to do a little bit more and i think overall, we want to keep this the shape of the bob. So we have the little like those little bits to to give us some softness underneath i'm going to adjust this real, quick uh. So we have those little little bits to help us under there and i still want to keep the strength of the bob that we've created, and so i think we're just going to do a mini like a small section. So we'll pick point of reference uh to me: it's just making sure it's balanced, so i think we're gon na pick from the split of where we sectioned our classic. You know uh bang section we'll pivot off of that and go right to the base of the ear. Let me see that might be too big, but we'll see i want to see yeah. That'S what we'll do so section that out clean that up - and i don't know if i'm gon na blend it all the way through what what i'm looking for is. How do i wanna frame her and again, which is interesting on the mannequin head right to think about? How do i want to frame a mannequin head, but i don't want to go overboard with like having these layers all fully interconnected, and so what we're going to do is, i think, we're going to just pick a jawline, but we're going to do just walk through The same motions that we just did with that subsection with with the small mini section here, and so, even though i've changed my section parting for uh, you know kind of coming off that bang to splitting at the base of the ear i kind of like i, Like that that that angle kind of mirroring the hairline so we're going to stretch that out, following the shape of the hairline and elevate slightly and again, i'm we've have our corner and then we're connecting to just that or just below jawline. To give us a little room to bounce i'll elevate that up mirroring the hairline here, so just real subtle see the same thing on this side. So again, my fingers are gon na mirror that and then i'm going to, basically just i'm connecting the dots so my hand state are staying stationary there we are, but my point of reference is point a to point b right there. So i try not to steer it with my fingers. I try to see beyond my fingers and just connect connect those dots because you start getting too steep with that. I think it your hands will have a tendency to lie to you. So what i'm going to do here is stay stationary and know that i'm going to right there, let's check our balance. Our balance is good now i'll, just kind of see if there shouldn't be very much that stretches over that. But if there's a little bit i'll connect that will stay really far forward and be really loose with that, i'm not i'm not concerned it's just more about as it swings and again hands staying parallel, but there's not really much hair on this side. It could see. Sorry chasing the head again feel good about that check. My balance on the sides here, so it's constantly kind of cutting looking cutting looking yeah feel good about that and then just to to go into the last part with the internal layers. Just checking my time. We'Re doing pretty good about 45 minutes in hope. Everyone is enjoying yourselves uh. Is there any questions? No sweet? Okay. So now with again it's we're kind of deciding same as what we did right here. How much of this corner do we want to maintain same thing with the bob i mean if we wanted to have a bobbish feel, then what are we going to do in terms of the layering? Where do where do we want to lift weight up, but how much of the you know the actual bottom structure we want to mess with, and so for me, if i'm going to approach that i would either be doing like we want to keep that line. Pretty strong, i would either do some sort of very, very low graduation, with some layering in the crown that pivots up or just work into the crown a bit so that you can get that lift off and to me i really like more of the visual. I keep saying visual balance, but i, like the that balance, if you can lift a little bit of weight off the back with a bob and still keep you know, keep that strength of it and and then you have like the way that that looks to me Is is usually more pleasant than just um someone that's going to go home and get a bob and not style the style, the bob uh, but to me this if they go home, there's less to mess with. If you keep the graduation low enough and you you know, get that balance of a very low graduation and then some crown layers in the crown it you still have the weight weight kind of like we talked about in the fringe. You have that weight that that gives the hairline enough to control it, that you don't they shouldn't have to do too much to it, but then you get the airiness with the layers and everything. So i'm glad to be here thanks for having me so with the layers uh in the crown. What i'm going to do is i'll i'll show you my site, like it's very simple, and it's very detailed in terms of this, like i said the same way around the face like where you're going to pick that pivot point. So i could go straight over back split of the ear and and just do that traditional. But what you can do is i'm going to layer kind of square starting square and then we're going to gain some length towards the front. So we keep a little bit more weight around the face, but you can really push this section further and further back the more exaggerated that you want that to be so. What we'll do we'll push it back? A little bit, uh and i'll. Show you what i'm doing before we start cutting all right. I think the key to anything i'm talking about, though, is just think about it, of course, of just as techniques make them your own push them move them around. Can you hear me now? Can you hear me now or no you hear me now? No, can you hear me now all right i'll keep moving so with okay, good i'll i'll be louder, i'm sorry uh! So, with the section like i said, here's the section i chose to take and you'll see when i'm pivoting up: okay, good sorry about that everybody um, but with the section i chose to take, everything is going to be elevated up here, but i just wanted to Show you this, like this section really could be pushed for this is about as far back as i would push it, maybe just a little bit um and then you could, but you really can push that forward too, to kind of create the guide where it's going To pivot forward so make these haircuts your own. So let's see what's the best, the best angle, i think i'll be right here. Okay, good everyone can hear, but i'm just going to mirror that section and i'm just i basically will cut a square guide. You know, i'm being really conscious to i'll show it this way too, i'm going to over direct everything up and we're just going to knock this corner off we're not going to take a ton ton of hair away here. I think this will be a better view, but the more that we cut this stuff, the more it's going to affect the density of our ends. So i'm just being conscious and you're not going to see a ton of hair falling off, but it will make a difference. So you can see we'll comb up and i'm conscious of where, like how much density i want to drop out and so sorry, this head. All right, let's see a good, so i can see i'm getting it where that hair, where i want it to stay up like that, so i'll, let that rest drop out and then just so i can make sure i'm cutting that square. I wanted to let that stuff drop out and then i'll continue to cut square, so see how that stuff all is coming up, and when i run out, i run out. I just let it let it drop out so lift up same thing here. I can only get it square to about right there and then let that drop out i'll switch to the side here and then, depending on how steep of an angle i'm going to do is again. That was just sorry mannequin, let's see, let's see, let's see there, we go okay, all right, so there we have our guide right here. That kind of runs the bandwidth of that i'm going to comb this stuff up and see see what i've got below. I feel i feel good about it. There are times where i'll want to bevel this a little bit i'll, lift this stuff up and i might want to just knock a little off. But what i'm looking for is to make sure it's not super flat and then go that way. I want. I want there to be fluidity in that, and so i'm just going to grab a few sections just to double check, which i feel good about. So now. What i'll do is i'll? Take a mohawk section, see where we're at with time cool. This is just a quick little thing, but i think it makes a nice difference so i'll take a mohawk little little mohawk section off the point of the fringe. Let'S see so here's my section i'll show you not the prettiest one, let's see i'll clean that up cool, and so now i'm looking at okay, here's here's our perimeter length in the front and here's our guide back here and so i'm going to connect the dots And so the variable with this is, do you want to connect? Do you want to fully connect all the way to this piece, and that's not always so if you had someone with fine hair and you really want more strength around the front, what you'll do is let that drop out. Let it drop out and say, like okay, do i feel good about the density of that and then whatever is behind that that's where you're gon na connect you're gon na connect to this piece rather than this piece. So i think again with the mannequin head, the density is pretty strong, so i'm going to connect close to right behind where that piece is and so we'll just kind of slide. But again i keep repeating we're connecting the dots, we're connecting the dots and so we'll elevate up and i'll kind of just kind of slowly open and close, connecting check that, because i think some fell out as we're working. I want to make sure i i once i decide where my two spots are, that i'm connecting, i don't want any hiccups in between. So anything unnecessary that to me is unnecessary hair in between that's going to cause the shape to to not function as well, and so we have this center guide and now we'll just split that guide and we'll take a guide running right next to it. So moving guide, so there's our there's our back uh our initial guide right here and there's our our piece up there. Okay, we'll do and as i we worked as down this round of the head, everything will be over directed to as we get right here. So the guide pivots for one two sections and then on the third section, we're going to uh we're going to stay stationary, but you should be running out of hair too, as you get further towards the sides. So again, if someone had super fine hair or you just wanted to maintain more density, just you could either keep going all the way up the side of the head, or you could pick a point where you're like i really like the amount of density down here. So i'm going to leave that out and then that's where i'm going to connect in so she is a bit sloppy. The mannequin! Yes, the mannequin head, i'm glad you're liking it. Thank you but yeah. So at this section it's it's it's nothing! It'S just dust! So we'll walk through again secondary. I will i'm going to pivot one section off this side and kind of slice up. There'S my initial guide cutting up here all right, just check in check in there's a little bit right up here. So now again kind of structures put in and for uh. You know a lot of my clients, i'm encouraging them to wear it natural. So this is like, like i said, you see, you still get the weight of the bob, but it slices that out and loosens that out and now the last thing i'll do is kind of walk through the shape, just just with some subtle diagonal forwards. Just looking for where things are denser and looking to soften that, so you could see the density change from here to here. I'M not gon na i'm not destroying it, but i'm not. You know with the right person in the chair: i'm not afraid, i'm not afraid to destroy it. I i want the structure there, so i can follow it and so it's going to function, but some haircuts, it's okay to get to that point and just break it out. So i'm not i'm not doing that today, but uh you have permission to. But again you can see as i'm combing this. You see the density change here, but you see it's thicker there so similar to again similar to the razor i'm working, creating like deep triangles what i would say, inversions and then just from back to front kind of slicing and and connect trying to honestly connect the Dots as i've been doing is i'm just picking a point of reference and then i'm trying to blend that all the way out to in this little, because i'm basically i'm visually liking. Sections like this, throughout, as i'm holding that hair up and i'm picking a point and i'm looking to blend all the way to that point that last corner there. So you could see it if you've watched through this whole thing with with us. That'S a lot of what i'm doing is picking points, blending points, picking spots and and then blending through, but we're almost we're getting there, but just airing that out a little bit and you can see the difference from that side to that side. And i didn't do a lot of texturizing right but see like that. Airiness of that's doing. I love that little tuckable spot we're just kind of getting in the last few minutes of everything here. If anyone has any questions, uh shout them out and if i'm not, if i'm, if i not answering as i'm cutting i'll take the time to answer at the end, thanks everyone for tuning in just a recap too. As far as products dampened, her used uh, the atlantis conditioner combed, her out put motorcycle gel at the scalp kind of maybe the first couple inches mannequin through mid mids to end combed, her let her air dry for the most part and then i'm just redamping with A little bit of water and then i probably will quickly uh just do a little rockaway in the crown and basically like a little horseshoe shape up here. So i feel good about that overall checker later we're going to focus on this little horseshoe bit right here. Uh, which i don't know, if any of you all do this, but this is i mean you: could you could layer this really quickly a few times and it dries so fast? But what i'm going to do is i'm going to work off the part on the underside here here and just being intentional. I might pick up the fringe a little bit at this upper peak of the fringe. So some of my pictures, i really like to bring that out on someone and what i'll do is just pick up that top triangle, maybe even the second section and then quickly, uh diffuse, which we won't get into diffusing, but but because, but it dries so fast And you could do that to you: could do that diffuse it do that diffuse it usually about three times. If someone has lighter hair, you could do it about three times. If someone has darker hair usually about two times, because it starts getting really chalky, then and again, this might not be something that you would want to do on your guest, but it definitely you can. I mean some guests. I do have guests that really like it, but for shoots and different things on models. Uh really press the stuff right like it's hard, if you guys, i don't know if anyone takes models or not, there's there's her final look erica uh and but if you take time to do models change your mindset, you can it's so easy to like be like You know because we're uh, we have such habits with our clients of being like this is how much product i use. This is uh how i do this blowout, but with if you take the time to do models. Man just push the prop push like i'm, not saying that whatever product you use uh, but i use rnco, of course, but put put the push the product harder in the hair layer, the product more than you would on a client, because, if you're pressing things yeah Same thing, with cutting on a haircut or a color, if you're pressing things that are challenging you on your models, you can always gauge that back for clients and it's hard you're. Not you don't want to put too much product in a client's hair, because then you know they're paying you and you. You all know this, but but push push things harder on the on the uh on the models. Let'S see i'm going to answer the questions too. Uh, this was a dry cut. I kind of i let it air dry throughout the day putting the product in and then i uh just missed it and then just put for the most part. It was dry, though yeah, partly because it's like i'm cutting on a mannequin and cutting for time, so it's kind of would be very based on the individual at the salon. I would probably be cutting it wet too dry and then thank you chris. I i appreciate that i tried to stay it's for years. I'Ve i thought i needed to be. You know i would look at the people that i look up to and and thought i would uh. You know i should be like them, but i think in reality just be yourself in teaching, and i think people will respond to that. Thank you, uh yeah, whether i chose the prep products because i use them. I put products in on my clients right when they sit down from being washed, because i do like the wet to dry thing. I like to cut the fringe first and comb it in place and let it all start to dry so that the client can see. I could do this without having to put a lot of effort into it. I do use a lot of mannequin, uh and uh and motorcycle gel. I use motorcycle. I mean i feel like i can do get a lot of uh different looks with those two products, depending on how far up the hair shaft the mannequin goes. How far down the the motorcycle goes - and it just gives me the i think some people might be afraid of man or the motorcycle gel, because it's a gel, but it has so much memory and i'm such a big fan fan of it. Let'S see uh, yes, it is this that is disconnected so with this. We left that disconnected, and i look like i said, because we did this this section on the crown here. There'S this weight release so when this stuff is tucked back to it, just allows that hair to do you know tuck in and set in, and you get this nice silhouette and then you get this little softness around the face that can be kind of more of A peekaboo type thing: uh yeah, just to recap the cut everything square. We cut that first square, so we knew our corners were there. Then we cut a little mini section in the center blended from point a to point b, moved on to the little little undercut section there or no sorry we cut the bot we cut. I can't remember: we either way we cut the bob very simplistically from front to back, and then we came and did this little subsection one of the two ways i can't remember and then uh we did just a very small face, framing section pivoting off, where the Fringe uh stops right here and the base of the ear, and that went from jaw line to our length. So we kept more strength through the crown small square section right here: pivoting really steeply up to these corners here to maintain the density of the bob feel and super soft and versatile yeah. I really love shapes like this and i guess that's. It is any more. Thank you thanks everyone for tuning uh tuning in oh thanks, chris uh. If you i think this will be posted on ironco, and if you have any questions or anything, you can go to my instagram, which is brian hickman one. I have uh interviews and like just talking with people monday tuesdays thursday friday, usually around 3 p.m. Central, and i have also have a online education platform, which is the the link for that is in my bio and there's a free month of it. If you use the code, which, again all that's in my bio, so appreciate everyone hope everyone has a good day and is doing well through all this try to stay positive, try to focus on your future. Look back and think you know things that you might want to change as we move forward with this. I i feel, like i'm gon na there's things that i would definitely change for people's money and people getting sick, but i definitely do feel like i'm gon na walk out of this a better person, and i hope that y'all do too. Thank you. Have a good night


Comments
Brenda Sullivan: This is the best tutorial I have seen!!luv this channel
Adelina Ward: Yes! I like it my new favorite haircut ❤️
Jeannine Jones: Would it be rude to show this to my stylist, to make sure I get this. I love it
Charlotte Copeland: I would like to have this in shorter version and would that work.
Luis Oliva: Subtítulos español gracias
Jane Dowell: Love this cut…
Cherie Mattice: What scissors did you use?
M&T.V: Nice
cățea aia: jus did this thanks
Doris Rentrope: Nice
Jane Dowell: Love this cut…
T: 240p quality? How is that even possible in 2021?
Dawn Rummage: Doing great
Naomi Warner: Just now watching, thank you, but can't hear you very good??
kathy O'Brien: Havent had a haircut for over 2years
Cheryl Whitmore: Doing great
cano cano: he's adorable
Charlotte Copeland: No, I agree with good practice.
tania haywood: Come mai si vede male il video? Non riesco a vederlo bene. Che peccato
Rita Master: Can you name the products again. Brand name
Charlotte Copeland: Yes, I hear you great.
Cherie Mattice: What does "elevate" mean?
Andrea oldfield: The camera would benefit us the audience better level with the head. I like to see from that level than above
Abby Vasquez: Who is this guy? He never introduced himself. IG?
Elizabeth Lopez: this video was so freaking long for a haircut that doesn’t even look like a shag cut
cano cano: wider shot is better
kathy O'Brien: Hello there from Australia
Tammy Warren: Good morning...
L M: I can hear you
Vanessa Woodcock: Yep
Charlotte Copeland: Yes.
Denise Rangel: Hello