Short Layered Bob Haircuts With Side Swept Bangs Full Tutorial
- Posted on 08 October, 2020
- Bob Hairstyles
- By Anonymous
Short Layered Bob Haircuts with Side Swept Bangs Full Tutorial
How to cut a graduated bob with a Swept Bangs
Bob cutting techniques, haircut tips
*Giving is hold forever*
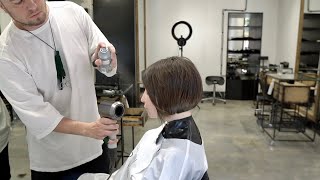
Hey guys, michael pizzellini's, i'm here from slate hair education. We have the lovely georgia heroes rocking it behind the camera, diana with hello. Today, i'm just going to. Let us do a really cool haircut for you guys it's going to come shorter in the back, and it's going to cascade a little bit longer in the front. What we're going to do is we're going to do some last round layers in the top. It'S going to open up the front, so it's going to have these sweat, bangs or sweat freeze, depending on what you like to call it with this really cool graphic line coming forward. So it's a bit of play on shapes one shape coming forward, another one. Coming back so i hope you guys, like it sorry, i'm just going to spin the background, so we're focusing first on creating our line in the back, so we're looking to create a nice triangular line, so something that goes longer towards the front and ends up shorter Towards the back, and so we're doing this by creating a lovely curved line now the way i'm doing this is an interesting thing where i'm starting from the side and i'm starting to work my way towards the middle. So, by doing this, i'm actually using my elbow as a pivot and i'm working my way around. If you imagine that you had to draw a curve or an arched line, you wouldn't start in the middle when you're, drawing it and then go down and do the other way. You would just draw from one side all the way to the other. So, whenever you're trying to create one of these nice curved lines, it's really good idea to start from one corner and work your way to the other, because i'm right handed, i start from this side and work my way across. If i was left-handed, i would start the other way. So big love to the hair brain community is always for having us. This will be our 30th hair brain live. So it's over two years or over two and a half years, we've been doing hair brain lives. Now so this is our 30th hair brain live. Please give us lots of love. Give us a shout out. Let us know where you're treating him from. We always love to hear where you guys are watching from what time it is. What'S the weather like how you're doing mike, can you tell us please what haircut are you doing again now yeah? So if you want to talk about it technically, what we're doing is we're doing a triangle line with round layers, so the line the outline technique is going to be something that goes shorter in the back. It ends up longer towards the front, and this is the beautiful diamond and we're going to do something that comes shorter in the back and ends up the longer in the front into a line and once we've finished the line technique we're going to be doing some Nice round layers, so something that goes shorter in the front and comes towards longer in the back, and this is going to create this swept bangs or sweat fringe look. So the front is just going to open up nicely and then the line is going to come forward, so one's going to push forward and the fringe is going to push back and that change is going to be a lovely little creative thing. It'S going to look really cool, so let me know if that makes sense guys. Let me know where you're tuning in from we'd love to hear it. What are they got? Our first comments for the color nice yeah, loving the color, so we have to give credits where credits are due. This column was done by a really amazing eleni matthew, she's, an amazing colorist at mojo, her studio, she's done this amazing copper. I wish i could tell you how she did it, but i have no idea so it's going to remain so. What i'm doing is i'm taking these really nice curved sections, so you can see the section is very much mirroring what i'm creating at the bottom. So whatever i've created at the bottom, i'm looking to recreate it at the top. The way i do this is, i actually start from the center and i use my comb as a pivot, so i hold my cone in the middle and then what i do is i curve my section down and what happens is by doing that motion where it Stays in the middle and it curves down, we end up with this lovely little arched line, and this lovely little arch section that mirrors the line that we're creating. So thanks so much guys for tuning in. Let us know where you're treating him from. Let us know what time it is where you are in the world. We always love to hear what you're up to so, what do they have from hungary? It'S 8 p.m from vancouver. So what we're doing is we're starting again, this line from the corner and we're working our way towards the other side. So, by working from the corner, it's allowing us to create this really cool curved shape that we see coming through now and the reason we're doing this is we want something goes longer in the front and ends up shorter in the back. So that's why we're starting? It from longer in the corner we're working our way up and we're working our way across to the other side. This is a really cool way to start doing a triangle line, so i could leave it and just have a triangle line like this or a triangle. One length or i can keep going like - i am and create some interesting layering in it as well. Obviously this is going to be a nice one, because it's going to be a variation, so we're going to have a nice round layer with a nice triangle line on this. It'S going to be really cool again, it's very repetitive, but repetition is what makes these things work, we're just continuing working up towards the ears, so we're taking these sections that come higher in the top in the middle and end up lower towards the ear. The reason is because we want to mirror what we're cutting with the section, so the section comes from high and ends low and the cutting angle comes from high in the middle and ends up low. So we just want to have something that mirrors. What we're doing this way? It'S almost like we're, sketching our haircut before we're committing to doing it with our scissors. I always find once the scissors go in it's kind of like you're, already cutting hair before you even get to think about what you're doing so by taking more time with the sectioning. It kind of allows you to think about what you're creating before you work. Your way in with the scissors as well try and keep the hair nice and even and damp, it's always going to help. You have more control. So control is a key thing, always when you're working and the water is what's going to allow you to have that. Next level of control, what i'm doing is i'm using my fingers to give myself a little bit more tension. So what i'm doing is i'm coming down and i'm popping my fingers on just to give me a little bit more hold while i work so have alex saying hi shout out from norway love your sectioning and you've got also from pavel great sections. Thank you. Thank you, norway, fantastic guys thanks so much for tuning in guys really appreciate it love the comments, as always like we said this, is our favorite hair brand live, so we feel like season's pros now we're not in our 20s anymore. We'Ve got to our fetish. Finally, we're getting there, we have people tuning from pakistan from la sid, new york, ireland, big, shout out athens, everyone from around the world, ohio, ireland, so i would say the sectioning is the key, always clean sections clean mind. That'S what i like to say: the cleaner! You work the easier it is to create something, especially when you talk about trying to do something: that's quite precise, so any precision haircuts have to come with a level of cleanliness to them. Otherwise, it's very difficult to be precise in your work and obviously this is why we always say whatever we're doing. We try and do it with a level of precision and a level of accuracy. This doesn't mean that we will have to do something clean. We can also do something: that's quite messy and chubby, but if we wanted to have structure, we have to work in a methodical way and that methodical way is clean, even if we're point cutting or even if we're cutting a straight line cool. So what i'm doing again is i'm just continuing these nice sections which come from the top and come down nice and clean but mirror what i'm cutting what's going to happen is from the next section, i'm going to show you my little secret to how i do This so for those of you that are just tuning in on michael pizza, ladies, we have georgia who let us behind the camera, rocking it out doing the video for us big love to him for giving up his time and filming us. We also have our beautiful model, diana, so she's, letting us cut all the hair off today. Not all of it don't worry. I promise we're going to spend around the indiana just so everyone can see what we're doing so. We'Re doing a nice triangle line, saying it's going shorter in the back ends up towards longer in the front and we're just working through the back. Now we're going to the point where we're behind the ears still, but the next section will be the big one where we start to incorporate the front into this as well. So our sections mirror what we're cutting in our line and we're starting from the corner and we're working our way across. So that's the secret to creating these curved triangle lines is we start in the corner and we start working our way up as well. So we have coming from linda love these videos. They help me keep my skills updated and i learned lots are great for our students too asset cap support from uk 635. Oh thanks so much, it really means a lot like. I said we've done 30 of these videos now over a two year period. You know everyone always gives the nicest comments, and we really you know can't thank everyone enough for all of them, just to know that anyone has learned something from. It means a lot to us, and so we really appreciate the support guys. So don't forget if you are enjoying the video don't forget to like and share leave us a comment. Give us a thumbs up if you enjoyed the video and uh the love guys beautiful. So we've finished doing our line in the back and what we're going to do is we're going to start to incorporate the front now as well. So this is where things change slightly with the technique of what we're doing so, it's looking really nice. It'S got a nice shape to it, it's starting to form well together, and what we'll do is we'll start to show you how we work towards the front. So, funnily enough, this hair is a little bit gritty as well. It has got bleach in it, so it's just just a little bit hard to get through, but the color is phenomenal. So what we're going to do now is we're going to start again working with these sections that we have working from higher to lower. But now what we're going to do is we're going to start to incorporate the front on this as well, so i combed it first in the direction i want to take my section and that's very important, it's very important to comb the hair first in the direction You wish to take your section, because, if you don't you're, never going to get that free flow of moving across you're always going to have to stop and move the hair out your way. So what i recommend is always always comb the hair in the direction you're going to take the section. What i also do is i comb the hair again in the direction i'm going to take the section before i comb it, and i clip it away this way. Their hair is ready for me when i'm going to do my next section, so we do the same on the other side. We'Ll take the clip out and what i'll do is i'll have a guideline from the back. That'S the same, and then i want to have a reference point for the front, so i come from the front i'll give a little idea in my mind, where i want to take my section to i'll comb, the hair onto my finger, where i'm looking to take My section i will connect from the back and i'll work my way forward and then what i'll do is i'll, just comb the hair down, and then i start to look from the front and i'll make sure i've got a good section. Okay, good! So again, i'm just combing the hair forwards, because that's how i'm going to take my section next and what i do is i'll just turn the hair over again and just keep it out of my way all right. So what i want to do now is i'm going to actually do something that i think is very important. Now i'm going to keep the hair wet, obviously, but i'm also going to start to subdivide the back from the front, so i'm going to actually take the hair that sits in front of the ear and i'm just going to get rid of it. I'M just going to get rid of it, so i don't have to think about having to cut it right now because to be fair, i don't really have a guideline from the front. I have a guideline from the back, so i'm going to work with the hair, where i have my guideline from first same on the other side, nice bit of water. Sorry about that all the way through and then what we'll do is again we'll just subdivide the hair from the front and the back, and this way what we do is we have a very clean and clear guideline, so it would be very hard for me to Tell you what length to cut the front now without actually having to cut the back first, so i can see my guideline. So what we do is we first comb the hair very well, so we get the hair ready for us before the scissors is going. So the hair gets combed very nice very even and i prepare the hair for me before my scissors go in now i can do the same thing i was doing before where i put my fingers on, or i can actually just now cut into the cone. If i want to as well, because i have a very clear guideline and the head's now upright and i'm working with the natural fall of the head so still working from one corner towards the other and each time i have a very clear guideline and i simply Follow the guideline as i work so once i've done that i can actually see where my line is going much more clear now, because i've cut the back in so once we've cut the back in, we can see where the line is going, and this gives us A really nice guideline to work from when we incorporate the front so now we comb the hair down from the front nice and even a little bit more water just to make sure we have even tension in the hair. Everybody loved your section today, everybody's commenting about the section i cannot see all of them. Thank you so much guys. So what we're doing is we're following the angle that we have from the back. So we see the line that we have in the back and we're just looking to follow it forwards towards the front. So we're just combing the hair down. I'M just going to clean that again and we see the angle that we have from the back and we're just mirroring it towards the front, taking fine sections, fine teeth of the cone and moving it forwards. And so what we've got now is: we've got a line which starts to become much more clear and defined, which works from shorter in the back and works towards longer in the front. Now, let's do the other side. So again we have this beautiful guideline which we have because we've done the back first and now we're going to start to work that towards the front on the other side. Okay, so we let the hair fall down again on this side, so you can see the benefit of doing the back. First is that we have a much more defined a much more clear guideline to work from when we're going to do the front now. So let again turn a little to the right, of course, thanks george, so we climb again down, we see where our line is from and we just continue it further down. So it's just a continuation of what we've already created, if you just want to tilt for me slightly, that's great, and what i want to do is i'm going to take a little bit more of that angle. Up we're just going to clean the graduation underneath so working still with some kind of small sectioning, because i'm not cutting all of it at once. So i'm using my very little scissors to cut little piece by piece as i work my little toenail clippers as they like to call them. So these are four and a half inch in case you're wondering nice little small scissors. The reason why is i feel, like i get more accuracy, you know it's kind of like if you went to your doctor and he brought out a seven inch butcher's knife you'd probably run a mile. I would too so what we're going to do is we're going to continue this section, so you can see that what i told you we comb the hair in the direction we're going to take our sections. We can see the angle that we have underneath and we're going to work flat and we're going to comb it around. You can see because we comb the hair so well, there's nothing to stop me taking one clean section, as i work my way through. So i think the secret to clean sectioning is combing the hair in the right direction. Okay, so what i'll do is we have more people tuning from san francisco netherlands? Today we have a lot of people from uk. What'S up uk representing, i like it from manchester hampshire, i said that correctly, don't worry, we're gon na guys. What do you guys think give us a thumbs up? If you think george is doing well on the camera, guys give him a shout out, show him some love he's always uploaded filming us for you guys. So i think he deserves a nice little shout out as well cool. So we've taken the section which you can see it's like a horseshoe, but it goes down actually - and this is just the same thing that we have at the bottom. The triangle line goes from long to short, and then it ends up long again. On the other side, so we're just mirroring that so for those of you that are just tuning in i'm michael patrick's, this is the beautiful diana, hey everyone and we have georgia here - is behind the camera, we're doing a triangle line for you guys now and then We'Re gon na do some round layering afterwards, and so what i've done is i've finished doing the first section from in front of the ears. So for a little recap, we started from the back. We started from the corner behind the ear and we worked our way across from the corner all the way to the other side. So we worked from the corner to the other side and then when we incorporated the front, we had the back already finished and we brought the front and we connected it. Now we have a guideline throughout the whole of the haircut. So, in terms of from the front and the back, we have a very clear guideline, so what i can do now is, i can actually start from the front and work my way towards the back. So just looking for my guideline, underneath we can start from the front and work our way towards the back. I'M only cutting little bits as i go. Okay, i'm not trying to cut a lot. So almost you can see. I'Ve got some measuring bits. It'S just the tiniest bit as i work, so i can get accuracy also because we're trying to create a curved line. If you try and cut too much off with your straight pair of scissors, you can imagine you're not going to really get a nice curved line. So the less you cut the more chance you have of creating something that's got a little bit of curvature to it as well. Okay, i hope that makes sense guys if it does give us a thumbs up, give us a shout out. Please don't forget to like and share guys we super duper appreciate it so much. You know. We'Ve we said: we've done. 30 hair brain lives. Now this is our 30th one. We have the first 12 of them on our website, so we upload every week an old or a new old video that we've done so it's one of our hairbrained lives. We upload to our website each week for you to watch. We'Ve got 12 up there, but we upload a new one every week, for you, we've also got loads of slate lives, we've done and we're going to upload those for you guys as well. So if you like what you're seeing you can go to our website slatehair.com and you can check out some of the other ones, we've done for you as well cool i've got a question yeah. Sorry, i can't work out how you hold your scissors. Your thumb is tucked in, can you show us how you hold them please? So what i do is what i try and do is i try and work my way with my thumb less in so i have my lovely little scissors and what i do is i'll put my finger in, but it doesn't go that deep in it stays on The first knuckle: what i'll then do is i'll put my other finger on the top of it, so my other finger goes to the top of it and what i'll do is i'll put my thumb, but not all the way in so it doesn't go inside like This it just stays over the top, so i have my finger in my thumb over the top and my finger goes over the top. That way, my doesn't go all the way in, and so this way i can cut a very flat cutting angle. So if we look by doing this, i can cut. If i had my hand all the way in you can see how i'm always going to be hitting the hair or hitting the neck as i work so to lower my wrist. What i do is, i take my thumb out so, instead of being in, i take my thumb out and i rest it over the top, and that way it's much easier for me to cut. I hope that makes sense guys. I hope that helps out. It'S a really fun technique and it also makes your life much easier when you're trying to cut lines into hair, that's easier on the wrist, i think yeah. If you cut a lot of gear, then you you never know you might get tunnel or something. So what we'll do is we just continue this section, so we're we're at our second to last section i would say for this line technique and then we're going to go for the really exciting bit we're going to start doing some layering in this as well. So, for now it's just a classic triangle line technique. The way we teach it at slate. So if you guys wonder what slade is we're a london based hair education company, we have an academy in central london. It'S about a five minute, walk from oxford circus. It'S in between oxford, circus, piccadilly and tottenham court road stations - you know anyone who's from england, london, please give us a shout out, come and see us in our london academy, we're hosting our next class um in about two weekends time in the london academy. I think there's a few spaces left. You can go on our website and check out the courses that we have coming up in our london academy as well as well as all the live videos we've done from the past, so there's some great free education on there. Some free live videos and you can see all the courses we have coming up and all about slaving who we are. So if you go give us a little zoom in george, you just go to slatehair.com, so it's slayedhair.com and you can get some free live education on there and you can learn all about slate, our london academy and what upcoming courses we have as well. Cool like after covet 19, we are so gon na visit. You guys in london, and you have to wait now. You know what guys that's why we've done all three online education. So a lot of companies right now are charging for education online and we're just giving it away for free. So if you go on our website, like i said, we've got some videos up there, but we're doing a new uploaded video for free each week. So we're not charging you guys, so you can go and watch as much as you like as many times as you, like always free of charge from us, and you know, obviously, once the world goes back to normal we'd love to see you guys in london, too. Have a comment about nice old school yasaka shears the index finger is always used to keep the line straight. Paddy yeah old school bless. You bless you it's not dennis. Is it from uh dennis de touristy? There we go dennis old school sister and how are you doing dennis so you knew who was from the same comment of course dennis's old school sassoon through and through. He is a real old-school, sassoon guy. He used to be at sassoon how you doing dennis good to hear from you, man and yeah. These your suckers are a dream. Come true man, i love them so much so we can start to see this line technique coming through really nicely. You know the shape is really starting to come through every time we cut. We can see that angle, how it just goes shorter in the back and just cascades and gets towards longer in the front, and what we're doing is we're just following our guide as we go, and so we're just maintaining the angle every time to bring it down Into that lovely triangle line, so what we'll do is we're almost at the end of our line technique. What i'll do is i'll stay on this side, because, what's happened is if you come here george, you can see that actually, this hair falls very much more on the side than to the back. So what i'm going to be doing is i'm just going to be subdividing this into two sections, i'm going to do one side and then i'm going to do the other side so instead of running around the chair. Well, actually, i've been spinning down her around to be fair, but instead of doing that, what i'll be doing is i'll be maintaining myself on one side while i finish this side and then i'll move on to the other side, so i'm actually looking at the growth Patterns and i'm looking at where the hair falls, and so once i've seen where the hair falls i'll start to connect it in in that place. So this bit's really fun because we just got a really nice strong guide, we're just combing the hair down to natural fool and we're just following it round getting gradually longer as we get towards the front. So this is the last section on this side. I'Ll. Do the same on the other side and then we'll move on to the next side, so guys, if you have any questions about this haircut or any haircut, you feel free to ask if you want to know my favorite color feel free to ask if you want To know how princess diana is doing here feel free to ask we're very open to all questions. We love any questions, technical ones or not. It could be about this haircut if you do have any haircut that you're thinking of as well, okay beautiful, so we can see that this angle is just getting longer and longer and longer as we go forward now. The truth is, some of this length is going to go because when we do our nice round layers, we're going to start to see that it goes a tiny bit shorter in the front as it opens up. But that's what we knew it was going to happen and that's what we want to happen so i'll do the same on the second side. So for those who are just changing we're just finishing off our triangle line and then we're going to go towards our round layers afterwards, which is going to give us that swept bangs, feel or swept fringes. We have a question from dennis michael: do you feel you would lose some control with longer shears yeah? Definitely definitely so. I always find the smaller the scissors, the more of the accuracy, and you know you can kind of imagine if you hold the current. Let'S say my shears are this long? If i move my finger just a little bit upward a little bit down all of a sudden, we have like a centimeter an inch difference at the bottom. So the longer it is the more difference there will be when you move your scissors, so if you hold it more close and you move up and down there's much less difference. So with these small scissors, i can have much more control of what angle i'm creating. I hope that makes sense, but definitely also they're, just easier to get into all those finicky small places. You know the places that are quite hard to get to like around here around the shoulders or around the back of the neck. But nice question: dennis i'm sure you you would give the same answer as me, beautiful so just coming to the end of our triangle line technique and we've got our last section here before we move on to our layers. So again always keeping nice consistency with water. Nice bit of spray on it that way we have even tension and even elevation, so the hair sits nice and flat. We always make sure we comb the hair really nice. Before we start. We always prepare the hair for us. So before my shears or my scissors grow in what i'm doing is i'm laying the foundations for them. So now that i know that it's a nice clean base to work from and i'm just tapping the hair as well, so that i'm getting a nice even tension on it. As i work did you color your model here? No, i'm not a colorist, but a very, very talented colorist did eleni she's done a really amazing job. She wanted me to say hashtag em, so you know hashtag em right there, little lenny, marquito, so she's done an amazing color, really really cool i'll, try and get the formula and when we post the pictures on our own facebook, page slave hair education, we'll give you Guys some formulas on how she did it as well. So if you guys are following us on social media, we do loads of cool things. Loads of volleys videos, loads of events, loads of classes in our london academy, so feel free to follow us on slave hair. Education on instagram and facebook and keep up to date with all the things slate cool, so we've just finished our line. What we're going to do is we're going to go around to our lettering, so i'm michael pizzeridis from slater education. This is the beautiful diana. We have the lovely georgia heroes behind the camera and what we're going to do is we're going to start going into our layering now. This layering is going to be interesting because it goes completely against what we've done. We'Ve done this lovely triangle line, so it comes longer in the front and it goes shorter towards the back and the layering is going to be the opposite of that. The layering is going to go shorter in the front and longer in the back, and this is going to create something that sweeps open in the front and comes with this nice long bob in the front. So it's that sweat bangs with this kind of like long bulb in the front, so i'm taking a center section, i'm going to curl the hair out of my way, so it's just really taking a nice shape. So i want to have something that goes all the way from the front to the back in the center section and i'm going to start to create my layering. So what i want to do is i'm going to turn down to the side. I'M going to take a small section from the front, but what i really want to do here is: i want to keep an eye on where i'm going. So as i cut the front, i have to think about where i'm going to end up now. I actually don't want to layer the back really, so i'm going to take away the back for a second and i'm going to pick this up and i'm going to show you guys. So i'm thinking i really don't want to layer beyond this point. So this is already going to be the bit that i want to stop that so now i have to think when i cut the front, where am i going to end up at the back? So the easiest way to do this is put your cone onto the roots. Put your finger underneath the cone pull it up with tension when you get to the length you think is right, stop take a section as a guide pick it up and look at where you're going, and if you see that your fingers are going to match the Point where you want to connect it to you can start cutting. So this gives me full accuracy. So when i'm cutting here, i know exactly where i'm going to end up afterwards. There'S no guessing games here. So it's done with the precision that i know when i cut the front. I know that i'm going to end up where i want to be in the back and so i'll do this, whether i'm cutting from the front to the back or the back to the front i like to have accuracy, and i like to understand not just what I'M cutting but where i'm going okay, so we keep going up and each time we pull the hair up, we do the same thing. We lift the hair up. We check that we're following the guideline to connect in the back and we move on to the next section. So i keep doing this until i have a guideline in my fingers. So again i'm seeing good we're working we're going to connect to the right plank here. So i'm really happy, and that goes and then moving on to the next section. So now i can actually take my guideline and the bit i'm cutting in my fingers and so now i can see that i'm connecting to where i wanted to in the back, and so that has created my round layer in the middle. What i'm going to do now is i'm going to start to take these vertical sections across the head, and i want this to connect to the middle. So as i take these vertical sections, i'm looking to connect them to the middle again. So what i'd like to do now is bring the hair towards the center, and so i'm looking to comb the hair towards the middle lovely, little bleached hair here and we're pulling the hair towards the middle and we lift the hair up. We would like to see that we are in the middle, so we're not over directing anywhere else but to the center that we've cut before. So we take a small section and we do the same thing. So what we want to do is we want to pull to the middle. We want to connect it in i'll. Show you guys from the side we're going to pull the hair towards the middle and we're going to connect it in, and this is what's going to give us that amazing, sweat feeling that feeling that the hair is just sweeping over towards the front. So working in small panels over directing the hair towards the needle and doing the same thing until there's no hair left. So i'm going to assume that there's not really going to be anything to cut on the neck sections coming down. But i'll take a little bit. Just to see and double check, and if i pull this up now towards the middle - and i see that there's no hair to cut, then i know that i've reached the point where there's no more hair to incorporate because we've over directed the hair to the middle. So that's just from this side yeah! So that's it! So the one side is done, and now we have a round layer which connects to one length in the back. That has a rounded layer in the front which will just open up the front, and what we'll do is we'll do the same thing on the other side. So we take a section which is just off the center parting on the one side and we'll start to do the same thing on the second side. So, as i turn the chair around, what we're looking to do is take a small section and then we're going to connect. What'S the reason for only layering the front, all right. Well, the point is actually what i want to do is i want to create something. That'S quite swept and open so there's something that opens up towards the face, but i don't want to lose the weight and the definition from the back. So i still want to see the back comes quite strong and that's why i'm not layering it so much so it depends what you're, after, if you decide that you'd like to have something which is soft and laid all the way through, it's very nice, you can Do it as well? If, however, you decide that you want to stop your layering at the back, so leaving the back of one length and allowing the softness in the front, then this is a great technique to use. You know. I'Ve got a lot of videos that we've done where we've shown how we kind of layer the backing using pivoting sections and things like that. But i think also just because of the fineness of this hair. It might be nice to show something. That'S more soft in the front and a bit more stronger in the back, but there's no right or wrong. You know it just depends what you and your client feel like doing that day. Isn'T it, but the thing i like is: if you have this kind of precision, you can really choose those nuances. You know you can decide whether you're going to layer the back a centimeter, a millimeter, not at all, because you've really done your check and you've seen in your fingers that you're not gon na layer it, but you are gon na. So it comes back to that whole accuracy, thing that i was speaking about before about choosing for yourself. So the simple answer is: i wanted to see something softer in the front and i wanted to see something that comes strong in the back. That'S it from dennis. Do you check vertically after you finish, layering yeah yeah, you can. I mean it's quite hard to get through this one with the bleach, so i might actually cross-check it when it's dry, if i'm needing to um, i don't think there's a problem in cross-checking when it's dry, especially since all the hair is being over directed towards the Middle and where can i get those cool capes? So if you go on www.feel for hair feel for hair, it's this amazing uk company and they make these amazing gowns and you can get them in whatever color and logo you want to give and they ship all around the world so feel for hair. I should start taking commission from them or something i've given them, so many clients so feel for hair. If you're watching, remember me cool so i'll, give you a little bit of a recap. So what we've done is we've created this softness in the front which sweeps a little bit off the face, while still having this really strong triangle line coming in from the bottom. So we have this really nice triangle line from shoulder in the back ends up longer. In the front, and then we've created these soft pieces in the front which, when i finish you're, going to see we're just going to sweep off the face. So it's going to have that juxtaposition between the strongness in the front and then the strongness in the line in the front cool. Why don't we get drying? What i'm going to do is i'm going to grab a little bit of product and i'll be back all right, so i've got a bit of my magic potion here. It'S my magic potion lotion and what i'm going to do is i'm just adding a bit of cream and oil into the hair, something which is going to help smooth the bleach. That'S underneath this and then we're going to give it a nice little smoothie rough dry. So if you guys have any questions now's a great time, if you are enjoying this, please give us a like and a thumbs up. We super duper appreciate it all right, so we're gon na start to give it a nice rough dry. So i'm going to do a wrap technique, so i'm just going to use a large powder brush at first and then i'll probably switch to a little vest if it's too hard to scream okay come back. What'S the paddle press that we are using, this is a tg just a tg paddle brush. So it's just giving me a nice flat, paddle brush just the generic ones you find anywhere and what's the name of the company with the capes fill the hair here feel off here. Okay, can you tell us how you got into characterizing education, uh yeah? However? Definitely hairdressing was completely by chance. Um. My mother told me to try hairdressing and i said no and she convinced me and that's really how situation my mother recommended it to me and i tried and i really liked it. The reason i got into education was. I was, i was doing a lot of session work, a lot of like fashion work and things like that. It wasn't very fulfilling for me. So i went back into the and i started to just try and be in the salon again, and i i wasn't that good at cutting. When i went back to the salon, i met the most amazing man who helped me: learn how to cut there and told me how to teach keith was an old, sincere guy, so he was an existing guy from the 80s and then he guided me to be A teacher and to join the church and after working at sushi for a few years, he said to me: why don't you start an education company and that's how we started slaves, so the guy i'm talking about is my business partner gregory, who taught me how to Cut hair guided me to become a t-shirt, got me to work at the scene and and then we started sleep together and it's been an amazing uh. Many years, i've known him now and he's my biggest mentor and my greatest partner and so uh. That'S kind of how i got into the educational side of it, and so it's been a it's been a thing of giving you know like what he did. He gave me an education and now it's kind of our duty to give it back and that's where we are bring your hip closer. Thank you. Thank you. Do you miss the session work yesterday? Oh so yeah, i i still get the best kids on it. You know when i was doing session work. I was traveling a lot and i was doing a lot of furnishings and i'm still doing that. So i just get to do it with the bit that i love the most and that's teaching session is very self, which i find whether his teaching is very rewarding. So i've got another question: if the person has a side part, how will you the layering technique? Change, i can show you, i can show you, so i would do exactly the same thing that i've done now, but i would personalize it slightly different at the end. So, apart from that, it would stay exactly the same, and we can see this lovely little triangular line coming in now, so we can see how it goes from something shorter in the back. It works its way towards longer in the front. Let me just pump up this chair if it goes any higher, so we can see how we have a really nice clean line that comes from something that goes shorter in the back and ends up towards longer than the front, while still maintains this softness within the Hair that opens up and what i'll do is i'll, just change the position of the parting now as well for you before i cross check okay. So, let's change so we can say that we're going to apply to be here for a nice side, parting, okay, and what i want to do now is. I just want to open up this fringe area a little bit more, not fringe, but this swept bands. I keep forgetting my english american english, so what i'm going to do is i'm going to take a section which comes from the party and comes towards the eye? So if we turn it around like this, we're going to get our section which opens up the front of the face, so it comes from the parting and curves towards the corner of the eye. Now, what we're going to do is we're going to lift this piece up and we're going to grab in our fingers the front. So in the front of our fingers, we have just the front of the head. It'S very important that in the front of our fingers, we only have the front we do this by grabbing the hair, with the teeth facing towards the face, and we grab only the front and the front of our fingers. We curve it over and you see how it goes longer and what you can do is you can soften it either through pointing or through blunt cutting. Personally, i like a bit of blood cutting, and by doing this, what we're doing is we're just shortening the front. Even more - and it just emphasizes that little swish or that sweat swept balance, and so what happens is short. Hair always pushes the long hair, and so by doing this, we're encouraging that front to be pushed even more off the face so coming over to the other side, there's a corner remove the corner and we just end up with something: that's even more swooshed. I don't know if that's the technical term swoosh, but i like it either way. We'Ve still got a one length in the back, so we're still going to recognize one length in the back and we've got something which cascades and ends up opening the front. But it's got that nice triangle line towards the front as well beautiful. So what i'm going to do is i'm going to grab a little bit of spray as well just so we can clean it up. What i'm doing is i'm just moving the hair around just so i can start to remove some of the graduation that we find underneath got to be a bit careful here. Don'T want to take too much off, but just want to remove a very small amount of hair from one side to the other. Obviously the more you push the hair forward, the head forward, the more graduation you're going to find. So you don't want to go crazy here. You just want to take off the bare minimum in order to refine it, just encouraging the hair to come off the face: okay, beautiful thanks george. So what i'm going to do is i'm going to grab a lovely little bit of spray for you, so i can style this for one moment and then we'll be back to show you guys. The final look i mean with this kind of hair. You don't really need to actually layer it, the back it kind of has that feeling of texture anyway and that height in that movement that we like it looks quite strong beautiful. So we can see that we've got something. That'S quite strong skill towards the front as it drops down, so we've got that strength in the line towards the front. Someone agrees with me and then we've got the softness coming off the face as well beautiful. So i really like that softness cool. So i think you guys deserve a little bit of a recap before i say goodnight um. If someone can just bring your facebook, please facebook, beautiful so princess diana, please stand up for me and what we're going to do is we're going to just dust that off amazing. So what i'll do for you guys is i'll. Give you a lovely little recap and then i'll, let you guys enjoy the end result in all of its splendor, so guys. Thank you. So much for tuning in it's been amazing. As always, it's our 30th hair brain live two and a half years we've been doing it. Thank you so much to everyone, who's treated uh, my beautiful model diana was with us today. Last little cool haircut, i'm just going to explain how we did it. We started demonstrating, we started from the corner and we worked our way across creating this nice triangular feeling. So it's something that ends up longer in the corners and shorter in the middle as well. So we started from one side working our way across once we had finished the back up to the ears. What we did was we started to incorporate the front which created this amazing triangle line feeling, so it went from shoulder in the back towards the front. So once we had the back, we incorporated the front what we did after that was. We worked our sections from the front and we came all the way around to the other side until we had finished our line technique afterwards. What we did was we worked our way in the front. We took a center section and we picked the hair up and we found the back, because what we didn't want to do was the back is actually one length, and so we didn't want to cut the back in. We found where the back connects from from the front and we're cutting around there, so we picked up the hair from the back. We checked that we weren't cutting it off from our angle from the front and we just connected the front short layer towards the back. We brought everything towards the middle on both sides. What we then did was we found the natural tiling. We pulled the hair over and we just cut the front a little bit shorter. So this front here has a tendency to push off the face and open up cool. I think that's it nice and simple. I hope you guys enjoyed it as much as i did thanks so much for tuning in. If you made it this far, you obviously did don't forget to give us a thumbs up. Don'T forgive us to give us a like and a share, please we really appreciate it. As always, it's been great seeing you guys and i'm gon na, let diana take off her mask when i get out of the way and you guys can see the end result thanks so much guys whoa. Thank you. So much guys. It'S been amazing and always lots of love from the slater education team. We'Ll see you next month for our next hair brain live good night from us. Bye,


Comments
magna vieira sales: Vc é top, parabéns vídeo bem detalhado
joan mohammed: I'm in love with this hair cut
Angela Fernandez: Muchas Gracias
Norma Jortack: Loving very much your technique. Wish to be near you, and have you to work on my hair cut. From Florida with love.
ProudDeaf Mom: Impressive.
Angela Fernandez:
Hakan Gonzaga:
Rachel Herbig: Hello Alabama, USA 10:30 p.m.